
In order to create your own font in Procreate, you must first create your font using a third-party website and then format it using a third-party app to save it to your device. Once these two steps are done you can import it directly into your Procreate app.
I’m Carolyn and I’ve been using Procreate for over three years to run my digital illustration business. As many of the projects I work on with my clients are graphic design and branding based, I know all about how to add and manipulate different fonts in the Procreate app.
Creating your own font in Procreate consists of three different components and is quite a long process. However, it is simple enough and with my easy-to-follow step-by-step guidelines, you should be able to create your very own personalized font in less than 20 minutes.
Note: Screenshots are taken from Procreate on iPadOS 15.5.
Table of Contents
Key Takeaways
- In order to create your own font in Procreate, you must download the iFont app and create a free account on the Calligraphr website before you get started.
- Creating your own font should take less than 20 minutes and you can repeat the process as many times as you like.
How to Make Your Own Font Using Calligraphr and Procreate
In order to create your own font in Procreate, you will need to access a font design program first to design each letter individually. Then you will need a font program in order to change it from a JPEG file to a functioning, font file that can be imported into the text menu of the app.
The website that I use for creating and designing my own fonts is Calligraphr. It’s free to make an account and it provides you with clear guidelines each step of the way so you don’t get overwhelmed in the process. You need to create an account on Calligraphr before we get started.
Note: You can use your own preferred font management app to complete the second part of the tutorial. I like to use the iFont app as I find it really user-friendly and it’s free to download.
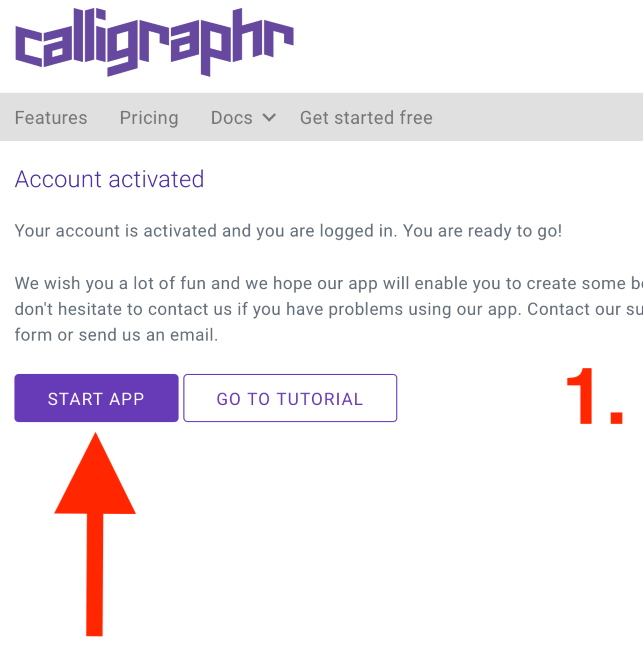
Step 1: After you have logged into your own free account on the Calligraphr website, tap on the purple Start App button.
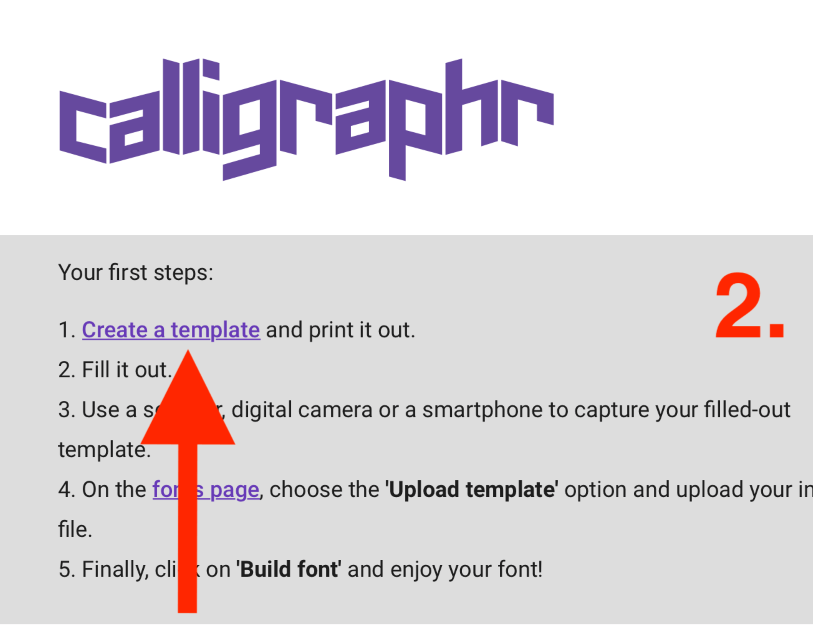
Step 2: On the next page, under Step 1, tap on the Create a template link. You can ignore the directions to print and scan the template as we will be doing it a little bit differently than what they suggest.
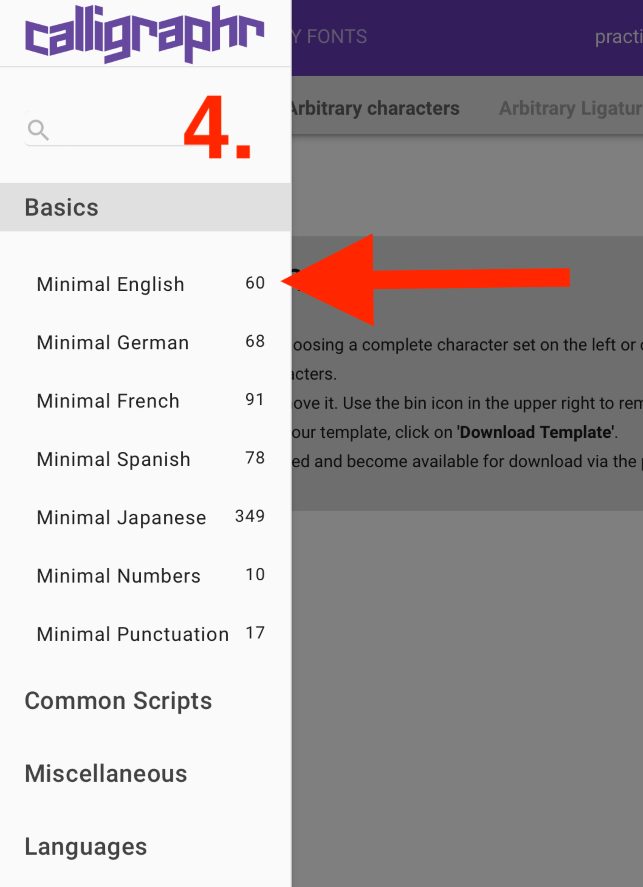
Step 3: In the top left-hand corner, tap on Templates.

Step 4: In the drop-down menu, select the language of the alphabet you would like to use for your font. I chose Minimal English.
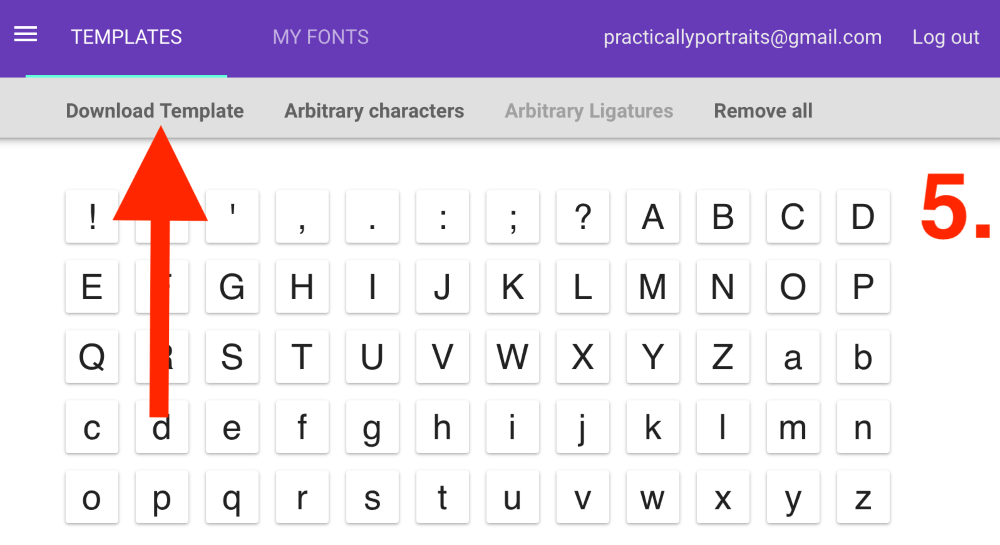
Step 5: An alphabet will appear, you can choose to move or remove any characters you don’t need. Once you have made any changes, tap on Download Template in the top left-hand corner of the web page.
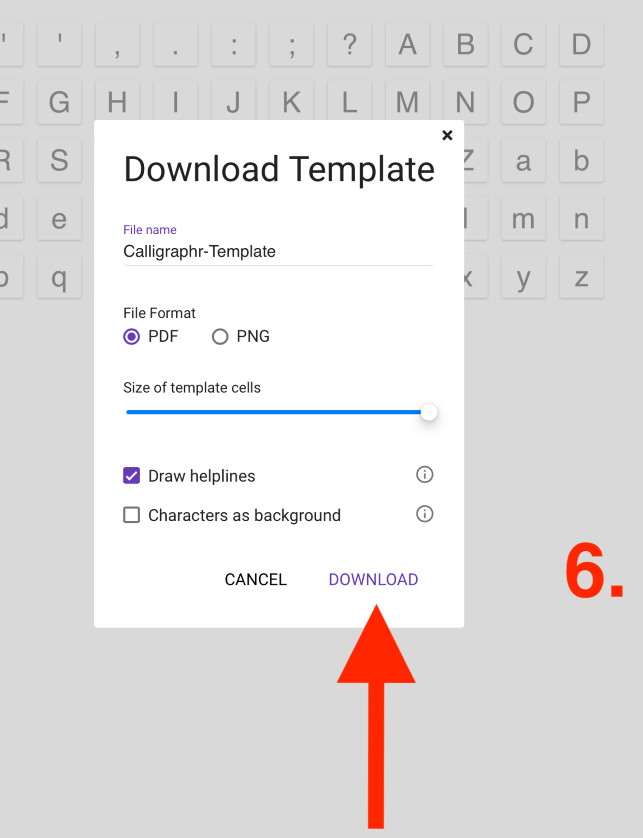
Step 6: In the pop-up window, select the PDF option and ensure you select the Draw Helplines option, this will provide you with a drawing grid when creating your font. Once you have done this, tap on the Download button in the bottom right.
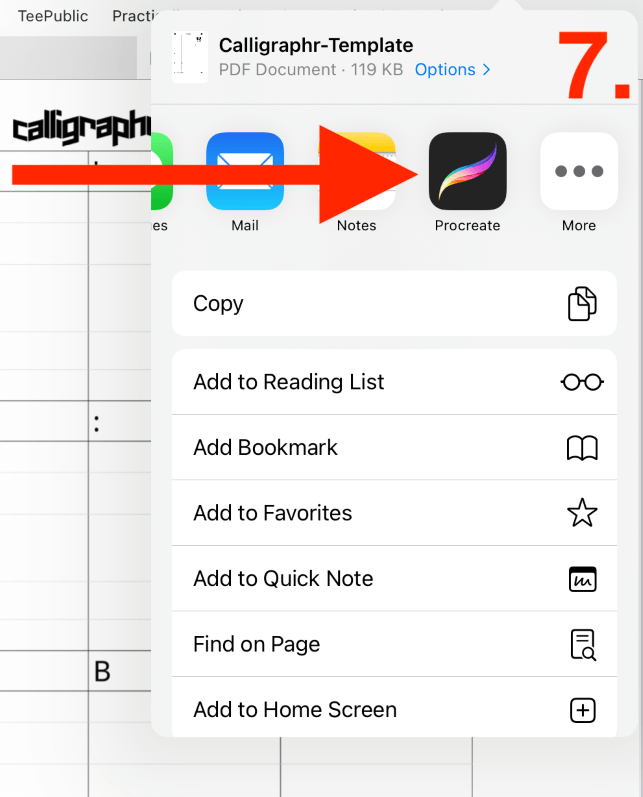
Step 7: When your template populates in a new tab, select Share and tap on the Procreate icon. This will automatically import your template as individual layers into a new canvas in your gallery.
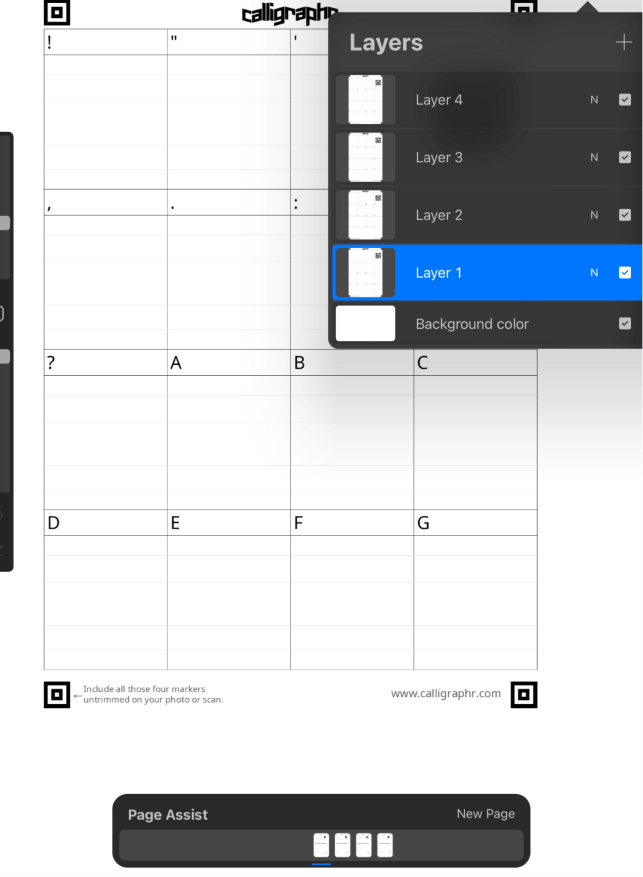
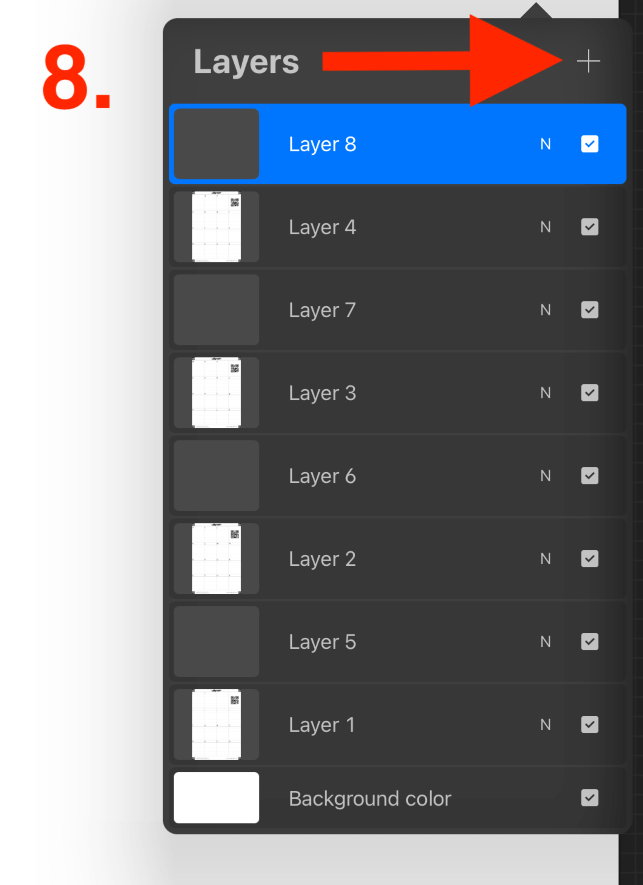
Step 8: Add a new layer on top of each of your templates by tapping the + symbol in the top right-hand corner of the Layers Menu.
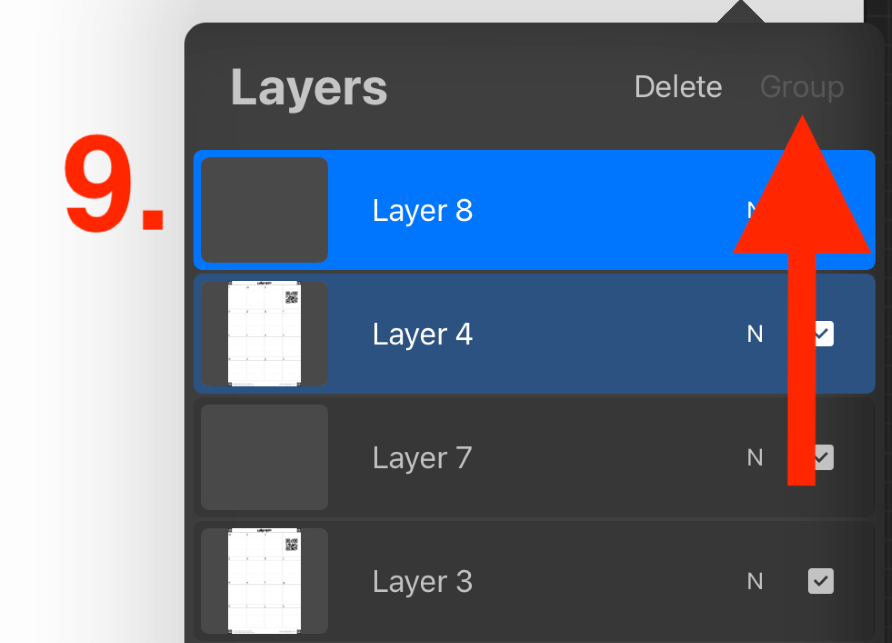
Step 9: Now you need to group each template layer and its corresponding blank layer together. You can do this by highlighting the two layers by swiping left on each one until it is highlighted in blue. Then tap on Group at the top of the menu.
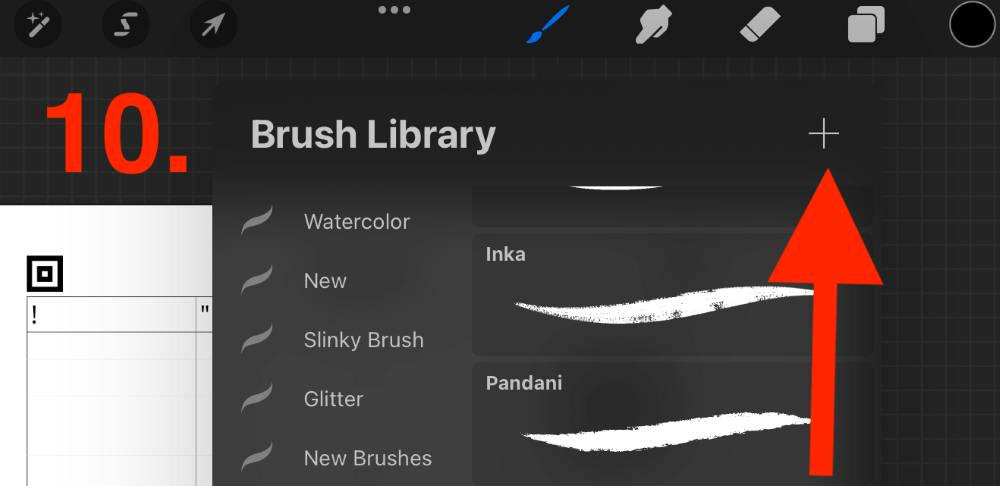
Step 10: Select the brush you want to use for your font by tapping on the paintbrush icon and scrolling through the drop-down menu. This will directly affect the appearance of your font. I chose the Monoline brush because it is simple and clear with no opacity.
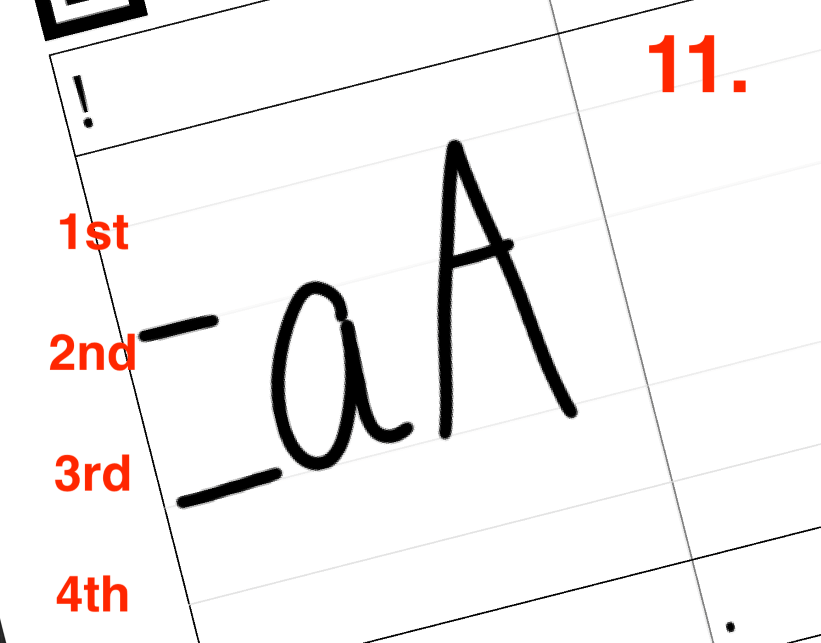
Step 11: Write your letters within the guidelines in Procreate. You will see four, faint lines in each box. These act as a guide for your characters. For uppercase letters, stick in between the 1st and 3rd lines. For lowercase characters, you can stick between the 2nd and 3rd lines.
Step 12: Go through each template layer and write in each character exactly as you want it to appear. I chose to create a font based on my handwriting but you can choose any style you want.

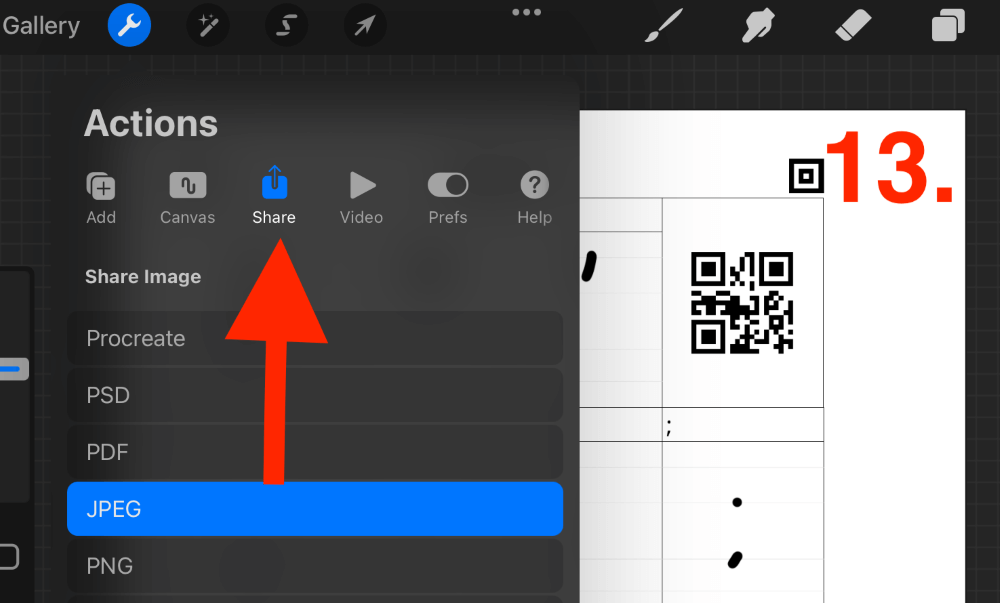
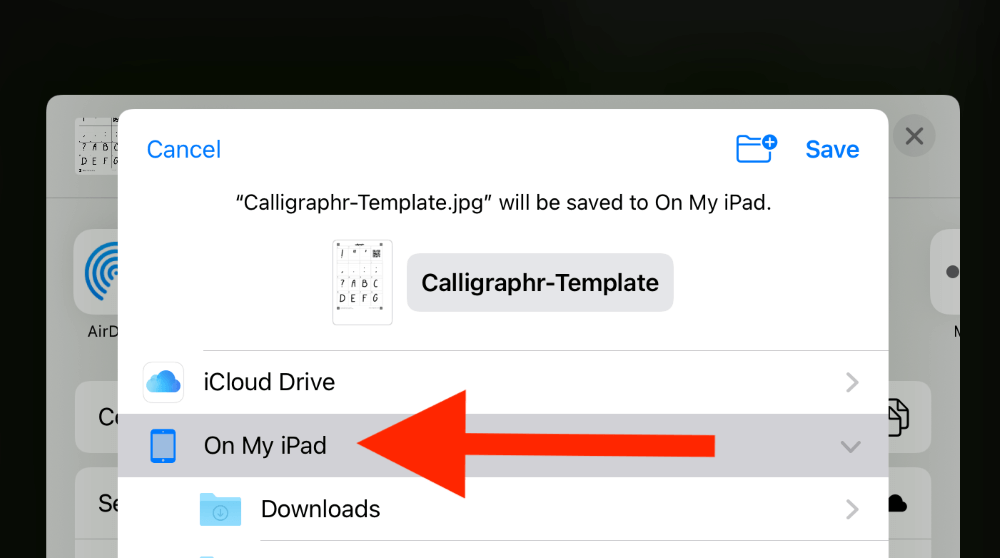
Step 13: Once you have filled in all of your template layers, you will need to export each group individually. Do this by tapping on the Actions tool and selecting Share and choosing the JPEG file type. Then save each JPEG file to your device.
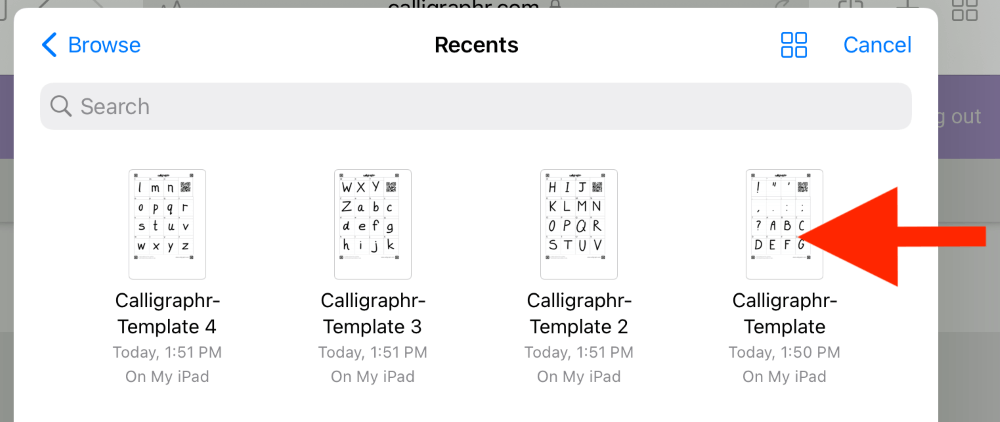
Step 14: Now you need to go back to the Calligraphr website. Tap on Upload Template and select every single file that you exported from Procreate.
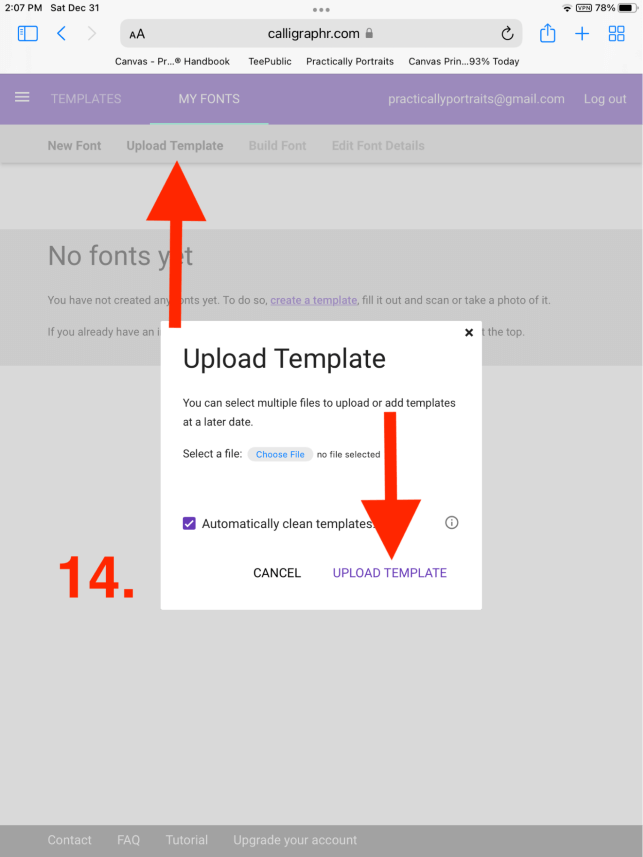
Step 15: Once each file has been added, select Upload Template. This will take a few minutes to complete.

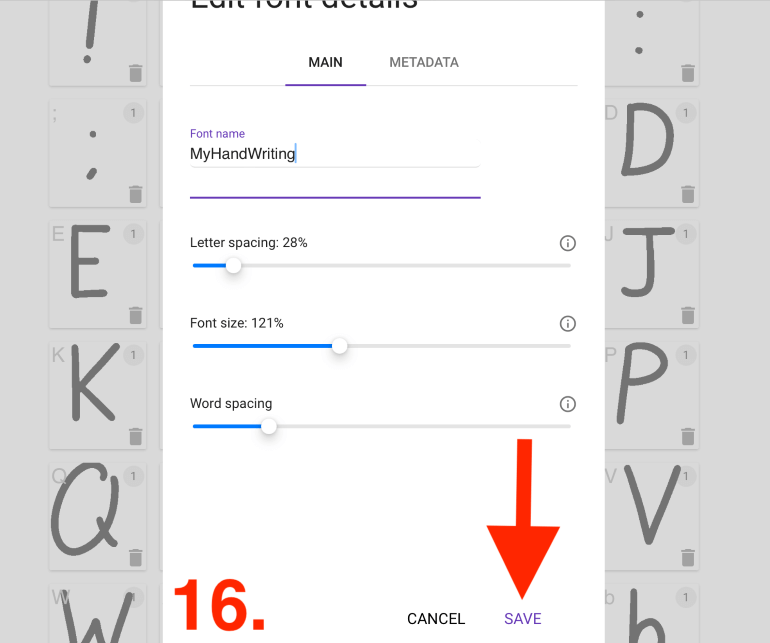
Step 16: Your full selection of characters will appear. Here you will have the opportunity to remove or fix any characters you may not be happy with. Once you’re happy with the characters, you can edit the details of your font.
Here you can rename your font and change the details. I recommend reducing the Spacing to anywhere between 25%-30%. I increase the font size to around 120% and you can leave the Word Spacing as is. Once you are done, tap on Save.
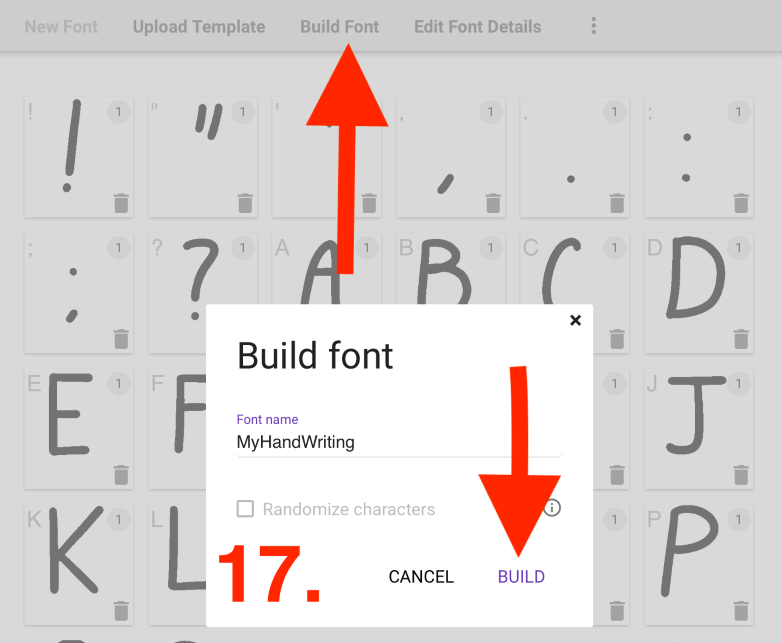
Step 17: Don’t worry, we’re almost there. Now you are going to tap on the Build Font tab and confirm your font title.
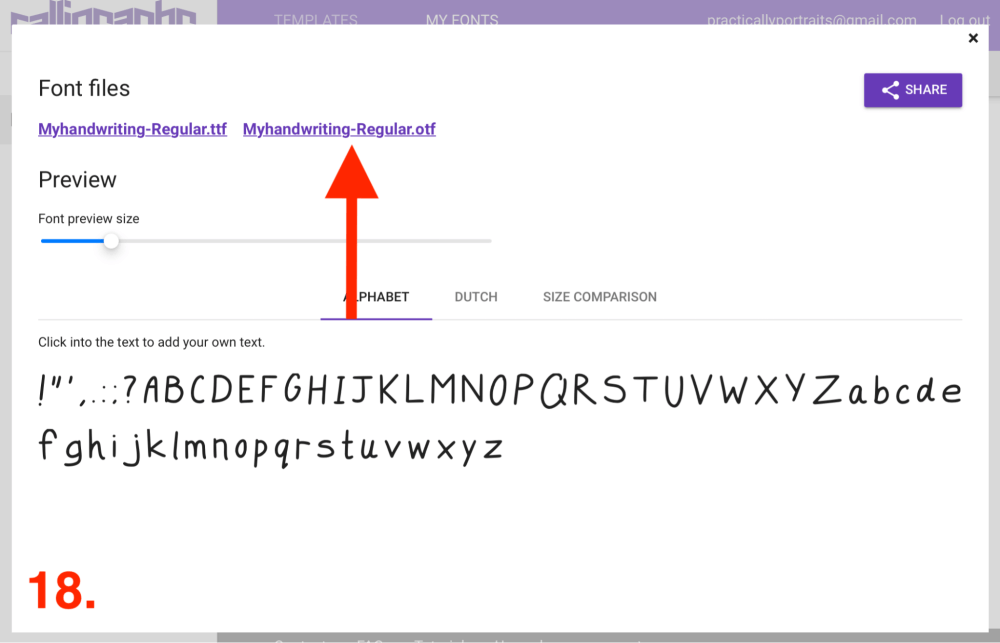
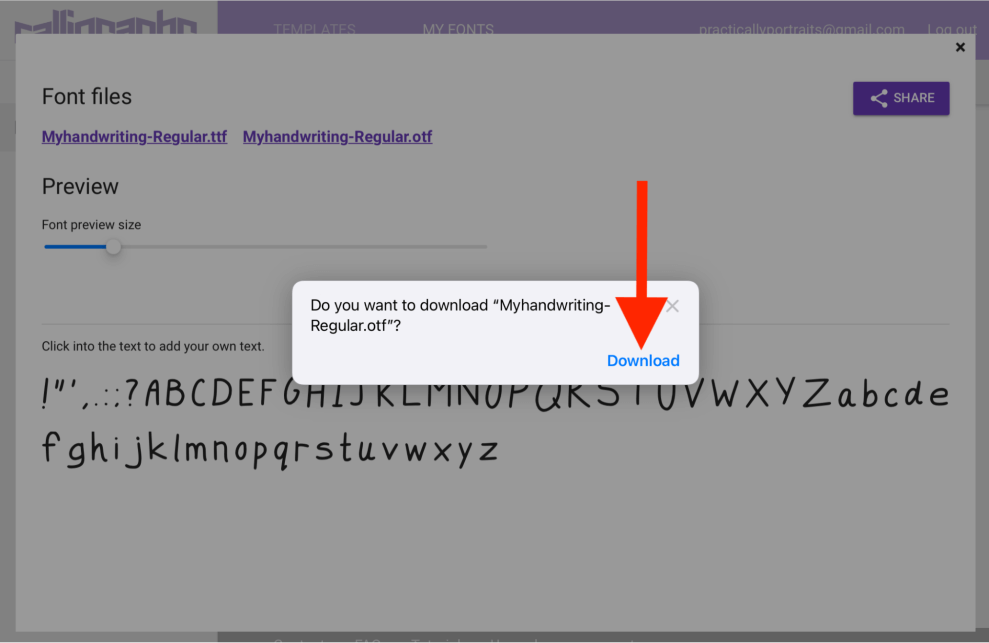
Step 18: Your alphabet will now appear and you can double check it looks right. Once you’re ready to download it to your device, tap on the file type that ends in .otf, and when the pop-up window appears, confirm the download.
Congratulations! You successfully completed the first component of creating your own font. Now it’s time to open your iFont app.
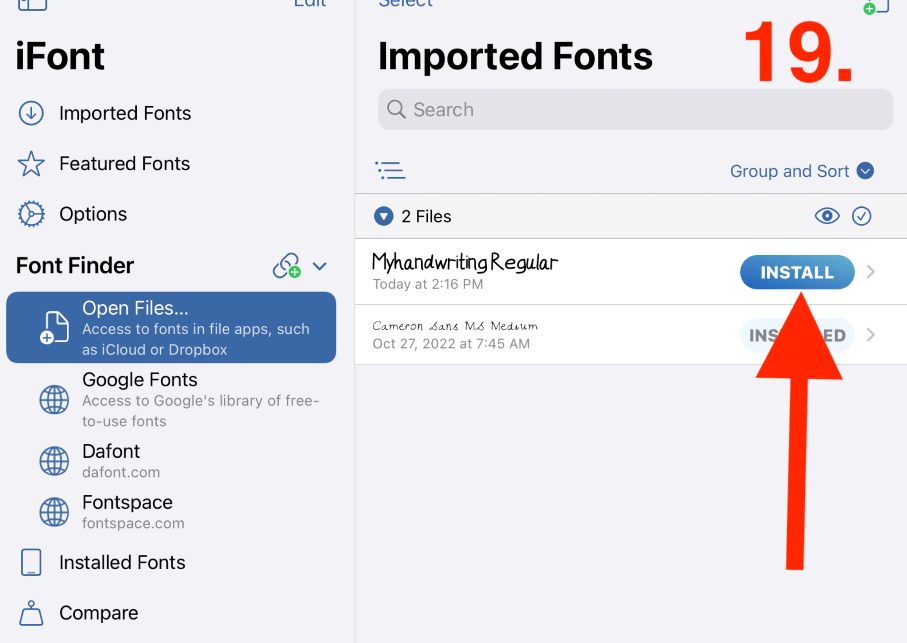
Step 19: On the iFont home page, tap on Open Files under the Font Finder tab. Your new font should appear on the right. Once you find it, tap on Upload.
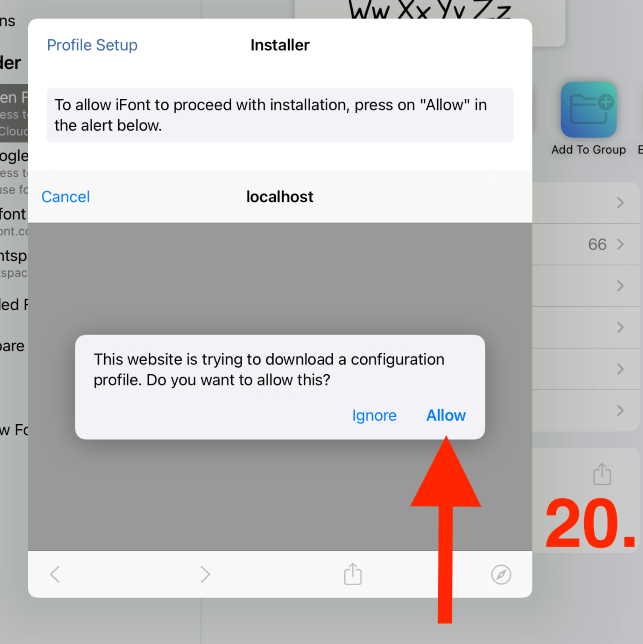
Step 20: You need to select Allow in order for the app to have access to your device.
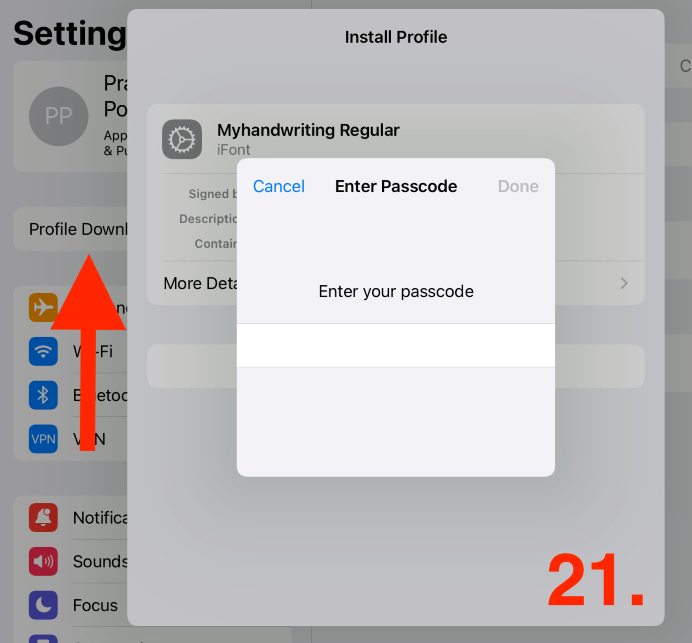
Step 21: Open the Settings on your device unless it automatically opens from the iFont app. Tap on Profile Download and follow the prompts. Once you have completed all the prompts, your new font file will appear under VPN & Device Management.
You’re almost there!
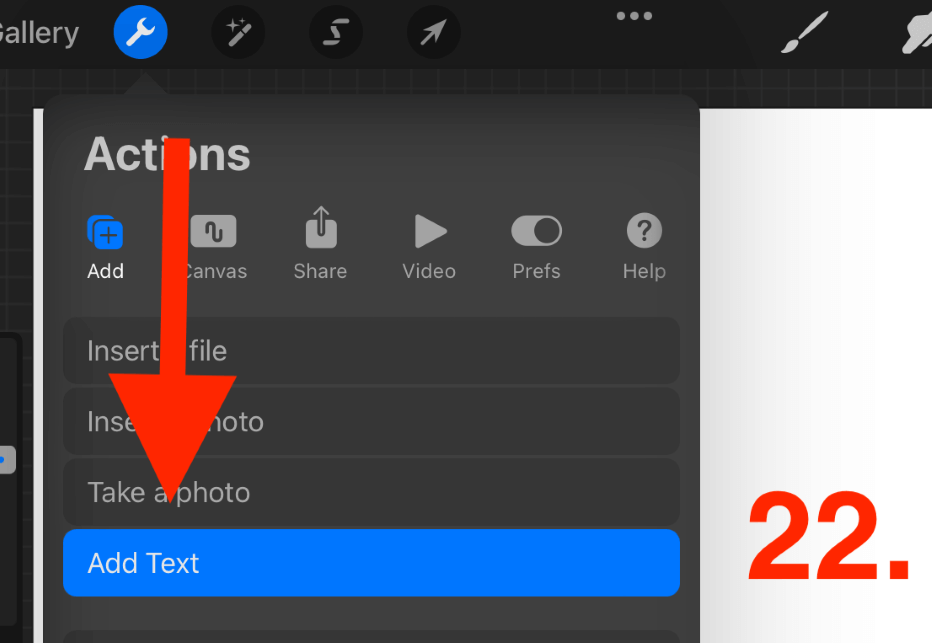
Step 22: As you configured this font with your device, I have some great news. It is now automatically loaded into your Procreate app font menu. Now all you need to do is add text by opening the Actions tool by tapping on the wrench icon.
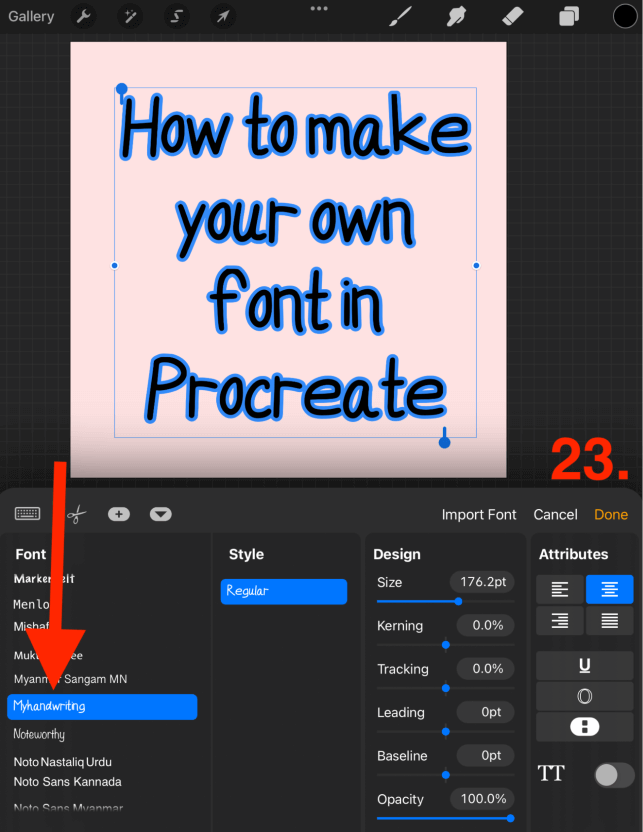
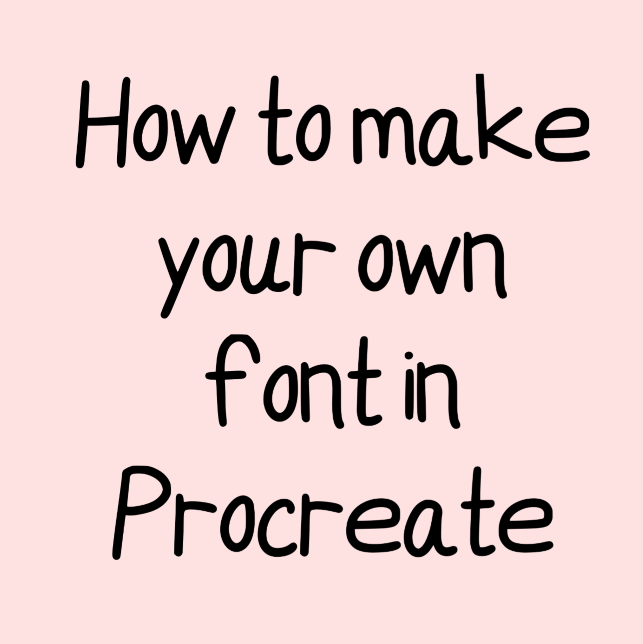
Step 23: Type your message and highlight it. In the bottom window, tap on the Aa icon. In the font menu, scroll down and select the title of your new font, and voila! Your text will now appear in your new font style.
FAQs
Below is a selection of your frequently asked questions that I have briefly answered for you about creating your own font in Procreate:
How to turn your handwriting into a font in Procreate?
You can follow my awesome step-by-step guide above to create your own font. While at the design stage, all you have to do is write each character as naturally as you would normally instead of purposely writing in a specific style.
How to make your own font on iPad?
All you need to make your own font on your iPad is the Procreate app, the iFont app, and access to the internet so you can use the Calligraphr website.
Where to find free handwriting font for Procreate?
If you don’t feel like creating your own handwriting font for free, you can find free brushes online to down onto Procreate. Alternatively, there is a preload Procreate font called chalkduster that you can use that resembles handwriting.
Final Thoughts
By the time you have made it down to this paragraph, you are probably exhausted from completing all the steps or thinking to yourself, this person is crazy if they think I’m going to do all that to make my own font. But trust me, it will take you less than 20 minutes to complete.
And like many other Procreate skills and techniques, once you learn how to do it once, you’re ready to go. You will now be able to create as many unique and personalized fonts as you want and you might even be able to make some extra cash by selling them to other artists.
Do you make your own fonts in Procreate? Show me some of your own fonts in the comments section below.