Pixel art brings together nostalgia, a unique visual style, and creative expression with limited resolution and color. It’s a style that requires a specific technique, but with Clip Studio Paint, you have a powerful tool to create pixel art and explore your creativity.
Hi! I’m Zoe, a freelance illustrator, and Clip Studio Paint is my favorite tool for all my artistic projects. Even though it’s not designed specifically for pixel art, I love using it for all art forms, including pixel art.
In this guide, I’m excited to show you how you can expand your use of Clip Studio Paint and easily create pixel art without any extra software! I’ll cover everything from setting up your canvas to outlining, coloring, and even exporting your pixel art at any size without losing definition.
Let’s get to it!
Table of Contents
Key Takeaways
- When creating pixel art, you can size your canvas to match the desired number of pixels, without the need to scale up the canvas beforehand like in regular artwork.
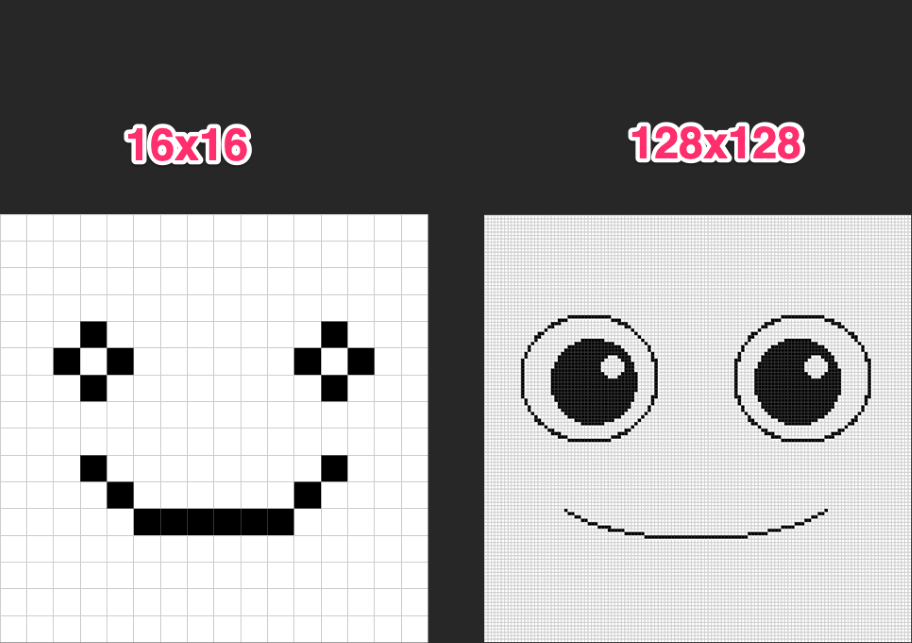
- Common pixel art sizes include 16×16, 32×32, 64×64, 128×128, and 256×256 pixels.
- Clean up your linework by removing stray pixels for clear and understandable pixel art.
- Focus on capturing the essence of your subject rather than overwhelming it with excessive details.
- Scaling should be the last step in your pixel art process to maintain consistent pixel ratios.
Note: All screenshots from this tutorial are taken from the CSP Mac version.
Continue reading to discover the step-by-step process of creating pixel art like a pro.
Creating New Canvas in Clip Studio Paint
The key to making pixel art in Clip Studio Paint is setting up your workspace correctly. Follow these steps to get started with pixel art:
Step 1: Open Clip Studio Paint and go to File > New to create a new canvas.
Step 2: Make sure the unit is set to pixels and enter the size of your artwork.
It’s important to enter the exact number of pixels you want on your canvas, even if it seems small. Don’t worry, we’ll learn how to increase the resolution later on.
For this example, I’ll use a 64 x 64px canvas, which means there will be 64 pixels on each side for me to work with.
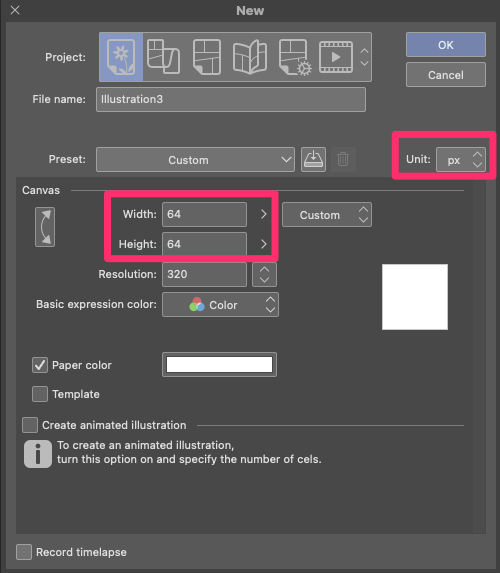
Remember, the lower the value, the bigger your pixels will be. If you want more intricate pixel art, you can increase the number of pixels under Width and Height.
Once you’re ready, click OK.
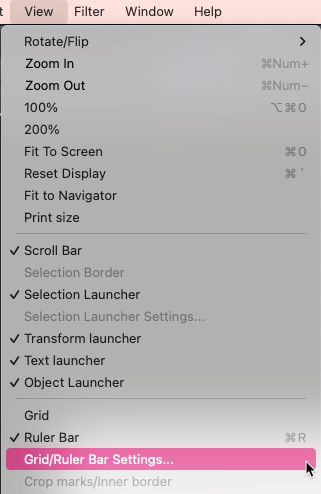
Step 3: Another important setting to adjust is the grid. Go to View > Grid/Ruler Bar settings.
Step 4: Under Grid Settings, change the gap to 1 pixel and set the number of subdivisions to 1.
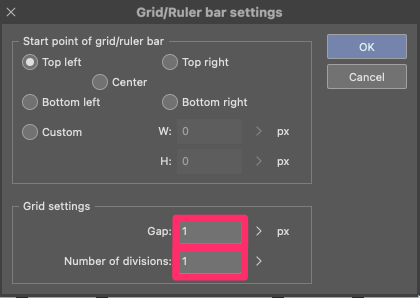
Regardless of the size of your pixel art, these are always the values you should use.
Step 5: From the menu, select View > Grid.
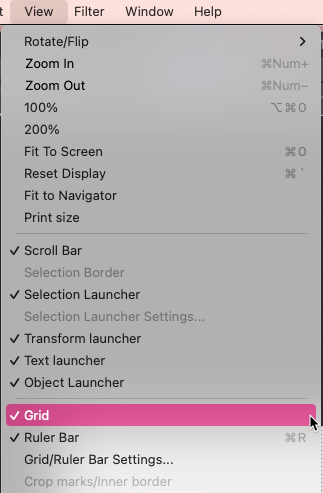
Now you’ll see a grid overlaying your canvas, perfectly defining the number of pixels you have for your drawing.

With the perfect template for your pixel art, it’s time to start drawing!
Drawing Your Pixel Outline in Clip Studio Paint
Now let’s learn how to draw your outline and cover a few basic rules that pixel artists follow:
Step 1: Create a new layer.
Step 2: Select the Pen tool and choose the second tab, Marker.
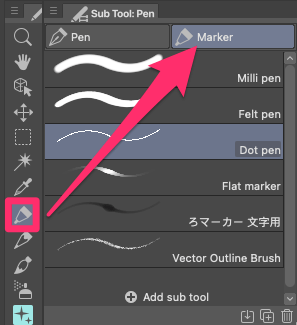
Step 3: Pick the Dot Pen. This pen will be your go-to tool for pixel art because it doesn’t have anti-aliasing and draws in pixels.
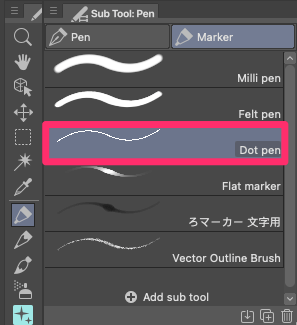
If you’re not familiar with anti-aliasing, it’s a process in drawing software that smooths edges by creating semi-transparent pixels around your strokes. While anti-aliasing is great for regular art, it can make pixel art look messy.
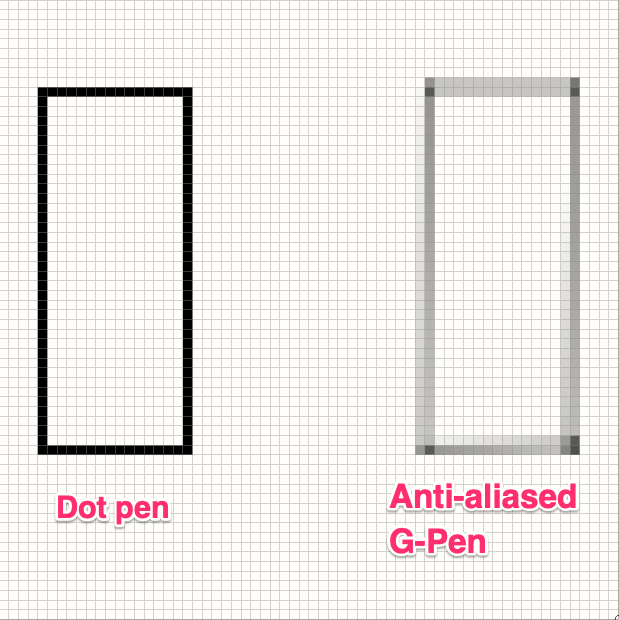
Step 4: Start drawing your outline freely. You can use various tools like the symmetry ruler tool to help you with this process.
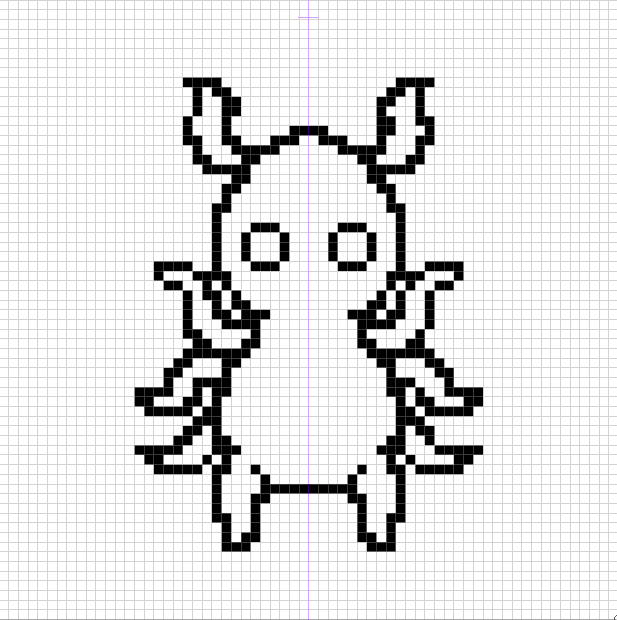
Step 5: Once your outline is drawn, you will need to clean it up.
Note: Here’s a handy shortcut to erase anything in Clip Studio Paint: press the C key on your keyboard. This will switch between your main color and transparency, which is particularly useful for pixel art where you don’t want an anti-aliased eraser.
Our goal is to get rid of any stray pixels or groups that disrupt the smoothness of your lines. These are known as “jaggies.”
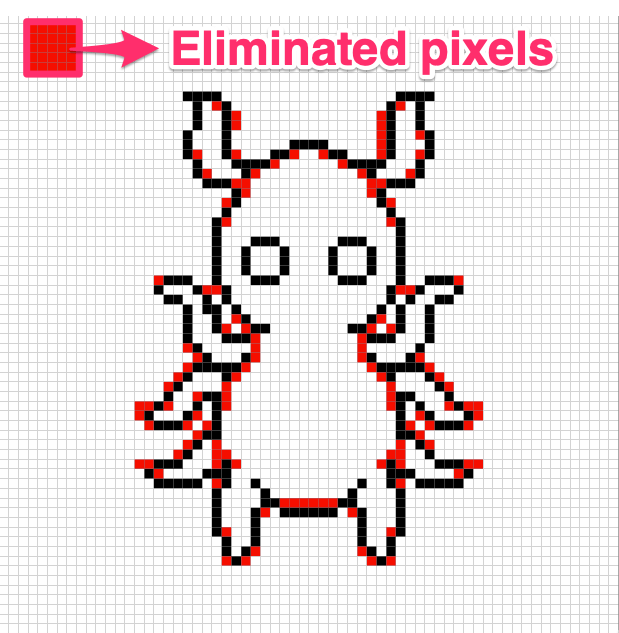
- Jaggies happen when line segments are uneven, causing awkward transitions. To maintain smooth curves, try to use a consistent length of pixels and avoid creating pixel clusters.
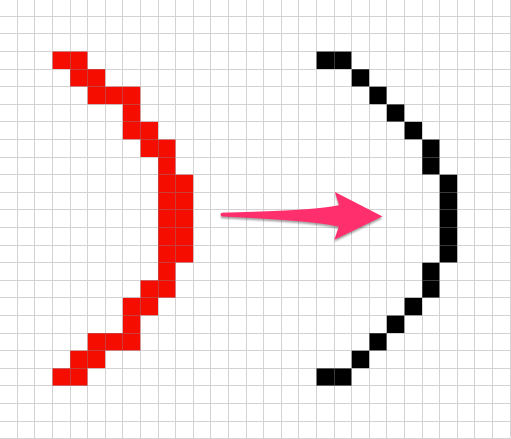
- While you can’t completely eliminate jaggies (after all, pixel art is meant to have a jagged appearance), it’s best to minimize them.
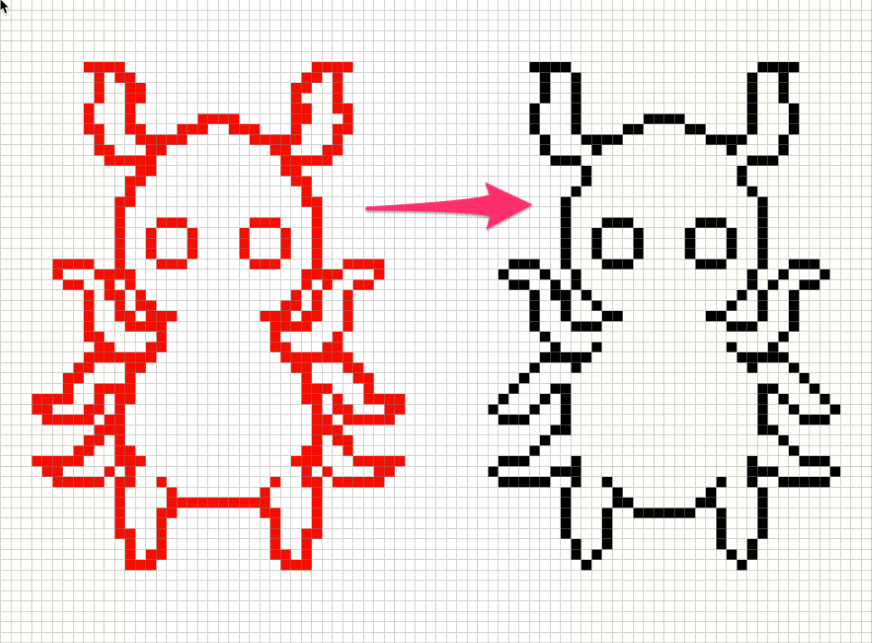
- Also, pay attention to the corners. Often, you’ll want to remove the pixel at the corner, leaving only the two pixels that connect at the angle.
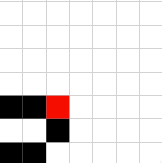
Great job! You’ve completed the most technical part of pixel art—outlining. We’re almost there!
Coloring your Pixel Art in Clip Studio Paint
Creating a balanced palette is key for pixel art. Include colors that go well together, different saturation levels, and a mix of light and dark tones. Keep it simple to make a strong visual impact with minimal information.
Assembling a palette can be challenging within the limitations of pixel art. That’s why Gradient Maps are a perfect fit (and you won’t have to worry about the artifacts they introduce in anti-aliased lines, like with regular drawings).
With Gradient Maps, you can achieve more dynamic and intricate shading compared to simply darkening colors, which can appear dull. Follow these steps to color your pixel art using this technique:
Step 1: Use your trusty Dot pen to create the base fill of your artwork.
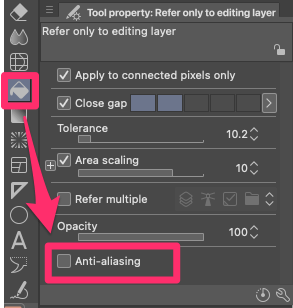
Alternatively, you can use the Bucket Tool. Uncheck the Anti-aliasing box from the tool’s Property Palette.
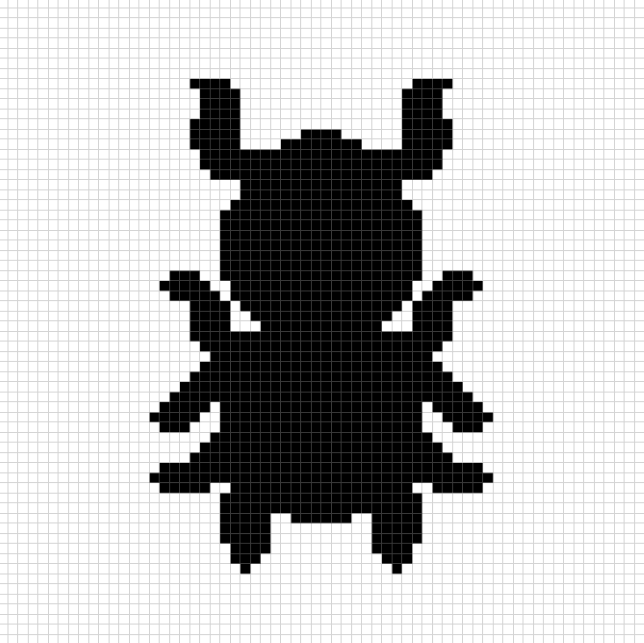
Start by filling it with black, as we’ll be using Gradient Maps to add colors later.
Step 2: Select your black fill layer and go to the Layer Property palette. Click on the Layer Color icon and change the default blue color to a shade of gray.
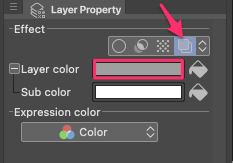
This step provides flexibility in changing colors later, so don’t worry too much about the exact shade.
Step 3: Now that your base fill layer is ready, create additional layers above to add details, highlights, and shadows.
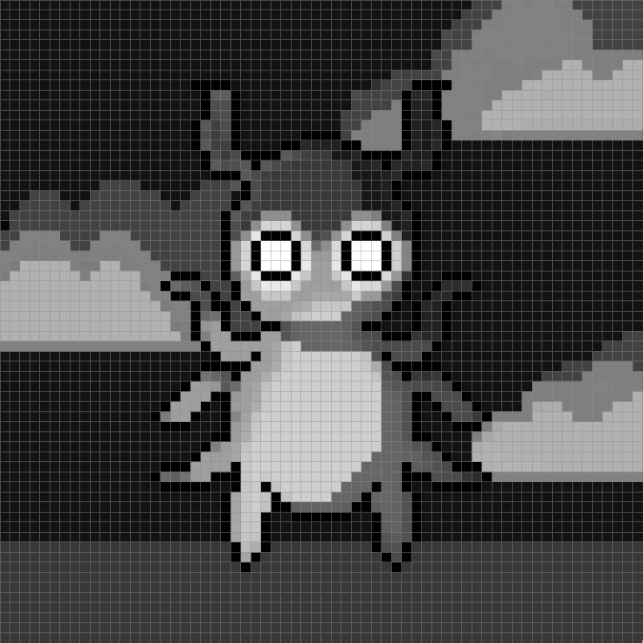
Pixel art relies on limited pixels to convey form and depth. So make use of darker shades for shadows and lighter shades for highlights to give your art more dimension.
Feel free to adjust the opacity and blending modes to achieve the desired effects.
Step 4: To apply the Gradient Map, right-click on your Layers Panel, select New > Gradient Map, and go through various color scheme options. You can select from pre-set collections or create your very own gradient.
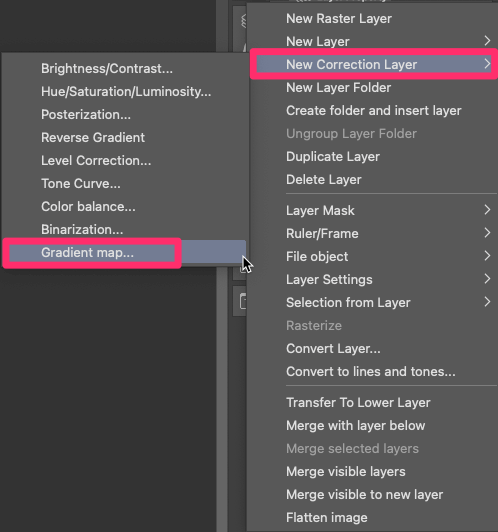
Gradient Maps are a great tool for pixel art because they work perfectly with their limited color range. By keeping your palette concise, you’ll bring charm and cohesiveness to your artwork.
When selecting a gradient map, think about the mood you want to create and the colors that can help convey it.

Once you’ve settled on a palette, let the Gradient Maps do most of the work for you when it comes to shading and smooth color transitions. They effortlessly give your art interesting color variations within your limited palette.

When you’re satisfied with your selection, simply click OK to apply the Gradient Map to your pixel art.
Voila! Your pixel art will now be filled with vibrant hues and lively color transitions.
Increasing the Resolution of Your Pixel Art
If you were to export your artwork now, it would be a tiny image. However, you can easily adjust the resolution and reformat your pixel art to high definition without losing quality. Here’s how:
Step 1: Go to Edit > Change Image Resolution.
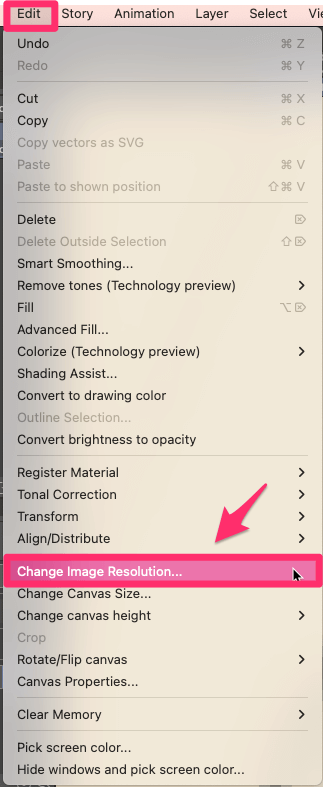
Step 2: Enter the desired size for your canvas. Feel free to go with a higher resolution (it won’t affect the quality of your pixel art).
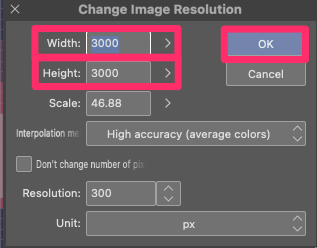
Click OK.
Step 3: Your pixel art will now be blown up to a larger canvas. Go to File > Export (Single Layer) and select PNG or the format that suits your needs.
Step 4: Name your artwork, confirm the settings, and click OK. Now you have a full high-resolution pixel art illustration!
Step 5: After you’ve exported your artwork, it’s a smart move to revert the resolution changes and go back to the original size. Simply press Ctrl + Z (Windows) or Command + Z (Mac).
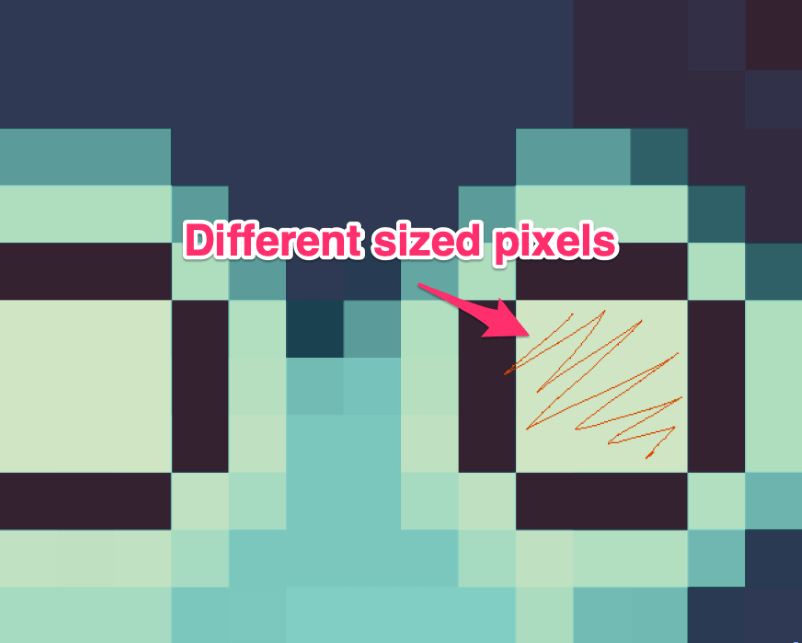
Remember, it’s best to save scaling as the final step in your process. Avoid scaling up and then continuing to draw with your one-pixel dot pen, as this can lead to inconsistent pixel ratios that don’t look great.
Well done! You’ve successfully learned how to create pixel art in Clip Studio Paint. Enjoy your newfound skills and keep creating amazing pixel art!

Final Thoughts
Pixel art has become popular again due to its charming and nostalgic aesthetic, reminiscent of classic video games. By mastering the art of pixel art in Clip Studio Paint, you can add a unique touch to your projects and stand out creatively.
It’s a valuable skill that can be handy in so many creative fields, including video games, animations, and graphic design.
With Clip Studio Paint, you have a versatile tool at your disposal to create pixel art and explore your creativity in new and exciting ways. Keep creating and have fun with your pixel art projects!
I hope this tutorial has been helpful in your pixel art journey. If you have any feedback or questions, I’d love to hear from you.
