
Gradient Maps let you explore color schemes and add atmosphere to your artwork. Fully color your art or use them as effects to enhance existing illustrations.
I’m Zoe, an illustrator with years of experience in Clip Studio Paint. Since I discovered Gradient Maps, my color choices have become so much more interesting, and now I want to pass that skill on to you.
In this article, you’ll learn the basics of how Gradient Maps work, how to add custom Gradient Maps to create your own collection how to color your artwork using Gradient Maps, and explore using Gradient Maps as overlay effects to add different moods to your art.
Let’s get to it!
Table of Contents
Key Takeaways
- Download Gradient Sets from Clip Studio Assets to explore inspiring options for your artwork.
- Take your time to adapt the Gradient Map to your drawing by exploring the options in the Gradient Map dialog window, as it may not look perfect right away.
- Gradient maps are non-destructive, making them a flexible and safe tool for coloring your artwork.
Here is the ultimate guide on Gradient Maps and how to use them.
Note: All screenshots from this tutorial are taken from the CSP Mac version.
Understanding Gradient Maps in Clip Studio Paint
Gradient Maps work by mapping the brightness levels in your artwork to a gradient of colors. This allows you to achieve beautiful color transitions and create unique visual styles without having to manually select and apply hues.
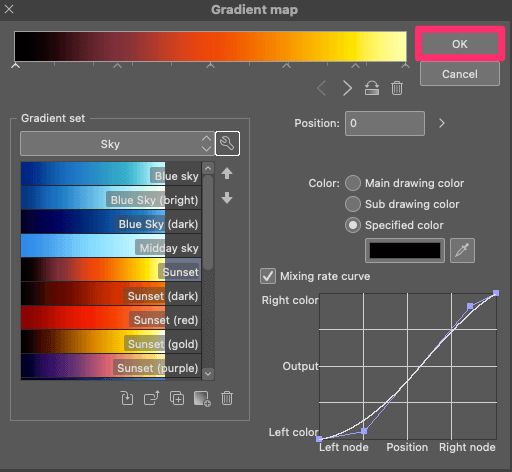
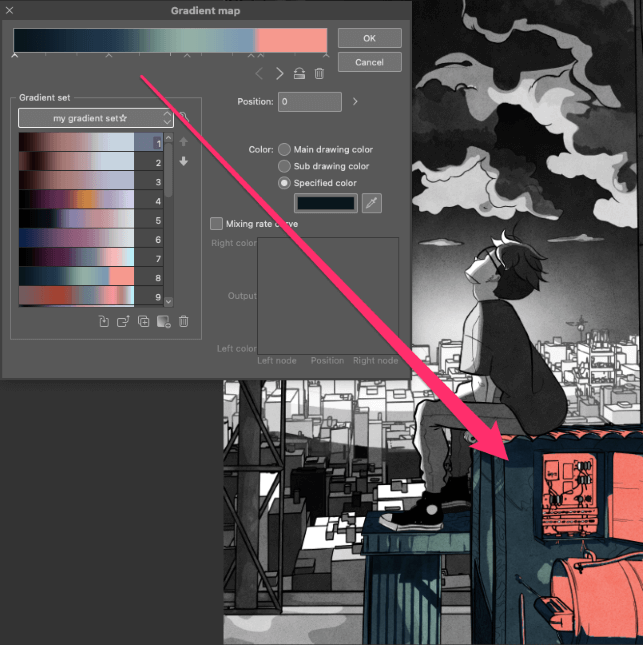
Let’s explore the elements in the Gradient Map dialog window:
Color Bar: The color bar offers a preview of the gradient with nodes representing different colors. You can drag, switch, or delete these nodes to customize your gradient.

The node at the beginning of the color bar controls the darkest color, while the node at the end affects the lightest color in your artwork.

Color Options: For each node, you have three color choices: the main drawing color, sub drawing color, or a specified color, which allows you to pick any hue.
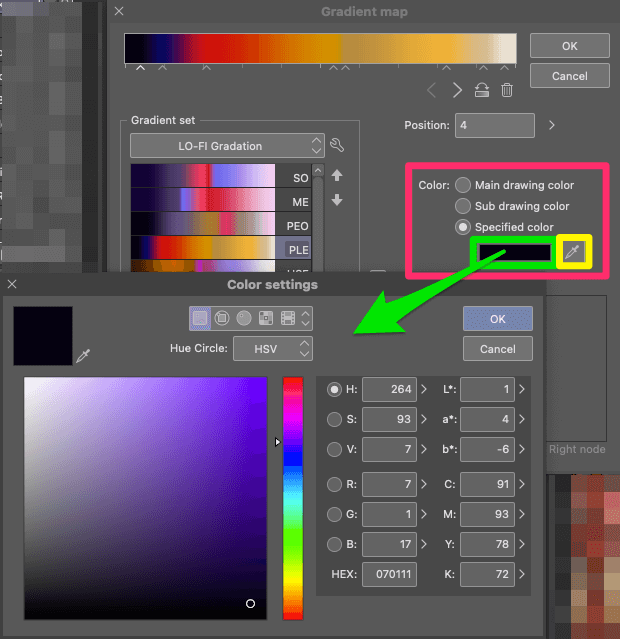
To choose a color, click on the swatch, which opens the Color Settings dialog box. You can also use the Eyedropper tool to pick a color from your screen.
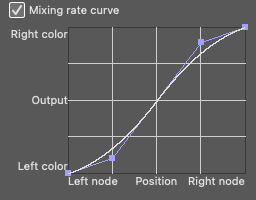
Mixing Rate Curve: While you may not need to use it often, changing the mixing rate curve can create interesting effects, like a pop art style with no color transition.
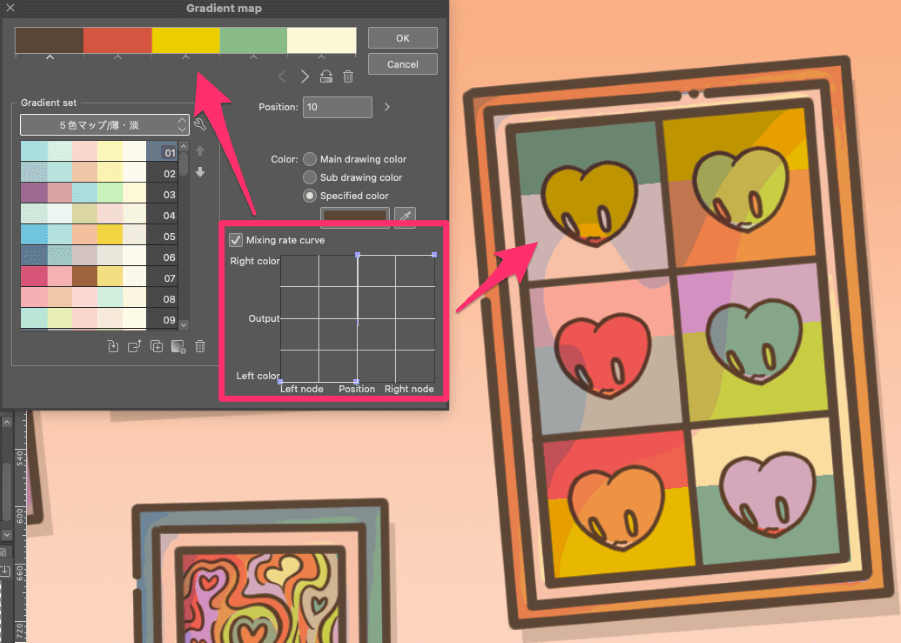
With this curve, you control how colors blend between two nodes. The horizontal line represents the node’s position, and the vertical line controls the color blending with the node on the right. By moving the curve, you can adjust how smoothly or intensely the colors transition from one node to the next.
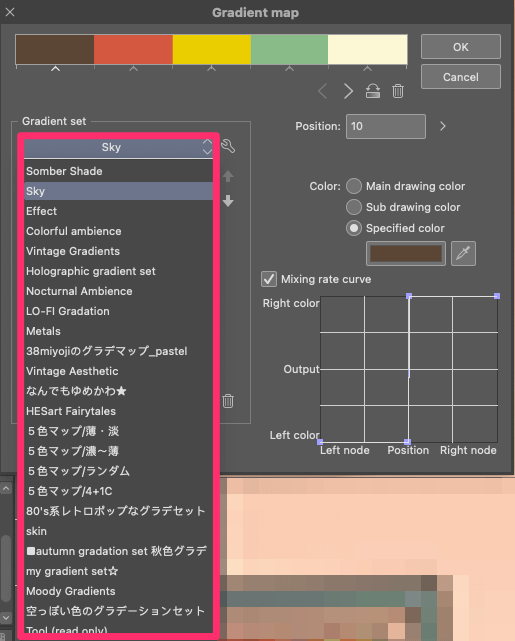
Gradient Set: This displays a list of gradients available in the selected gradient set. You can choose from a variety of presets or create your own custom gradients.
It may seem like a lot to take in, but applying Gradient Maps is actually quite intuitive. As you adjust the nodes and see the live preview, you’ll quickly grasp how it affects your drawing.
How to Add Gradients to Your Gradient Sets in CSP
By default, CSP doesn’t offer many pre-installed gradient options. Over time, you can expand your library so you have many options to choose from when coloring your work.
Creating Custom Gradients:
First, let’s learn how to create your own gradients. I’ll guide you through the process and share a quick tip on extracting colors from other art pieces, which can be a great source of inspiration.
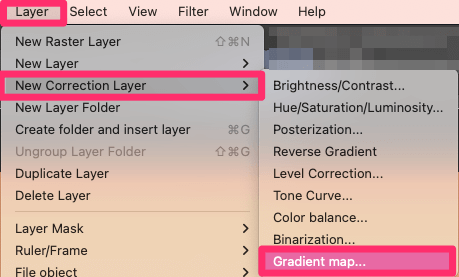
Step 1: Go to Layer > New Correction Layer > Gradient Map.
Step 2: Customize the colors by changing the node’s color under Specified Color. You can add more colors by clicking anywhere along the bar.
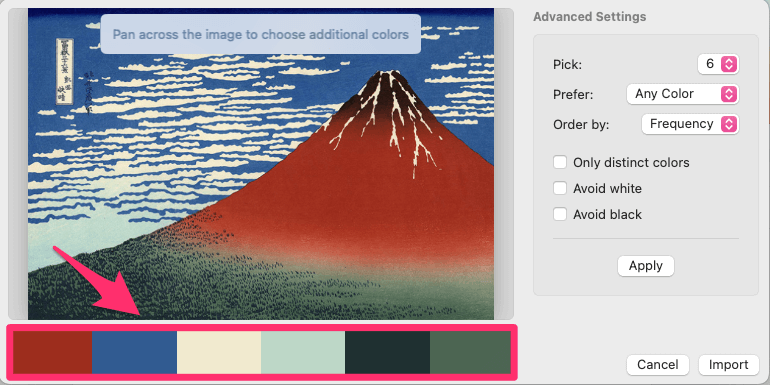
Step 3: To extract colors from artwork, you can simply paste it onto your canvas and use the eyedropper tool to pick the colors.
Alternatively, you can use a palette extractor tool like Pastel (Mac, iOS) or a browser based tool. Take a screenshot of the palette, paste it on your canvas, and use the eyedropper tool to copy the colors.
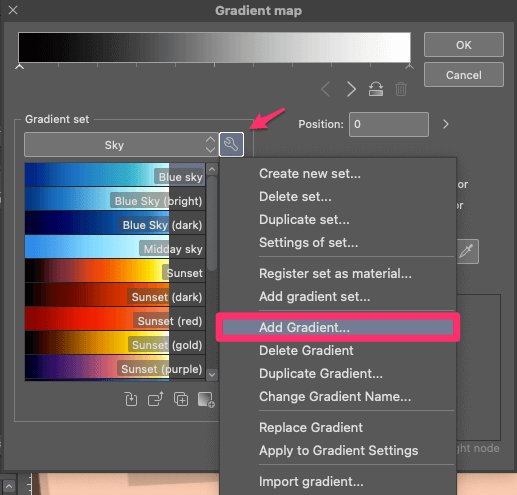
Step 3: Once you’re satisfied with your gradient, click the wrench icon and select Create New Set. This ensures your custom gradient is separate from the default ones in CSP. Give it a name and click OK.
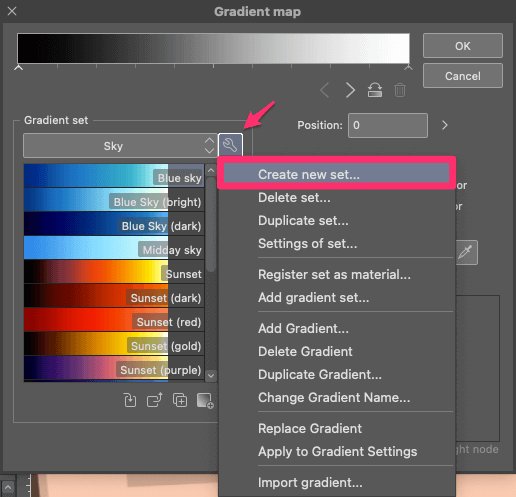
Step 4: With your new Gradient Set created, click the wrench icon again and choose Add Gradient. Enter and confirm the gradient’s name.
Step 5: Close the Gradient Map Dialog window by clicking OK. Canceling will discard your custom gradient, so be sure to click OK to save your changes.
Importing and Installing from Clip Studio Assets:
The CSP community shares plenty of useful gradient sets. They cover everything from creating a mood to achieving realistic skin tones or metallic effects. Here’s how you can find and add them to your program:
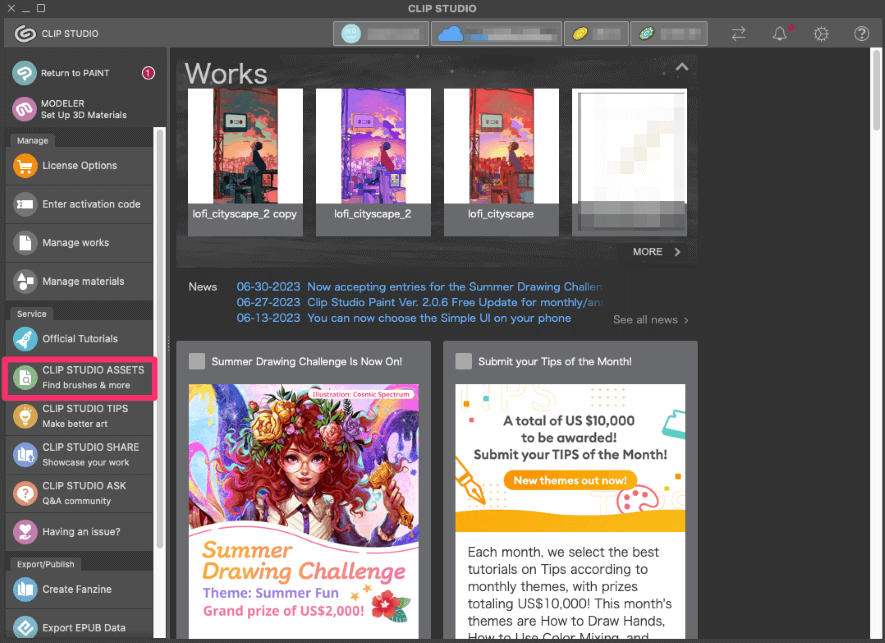
Step 1: Open the Clip Studio App (the main window from where you usually access CSP) and click on Clip Studio Assets.
Make sure you’re signed in to your account to download assets.
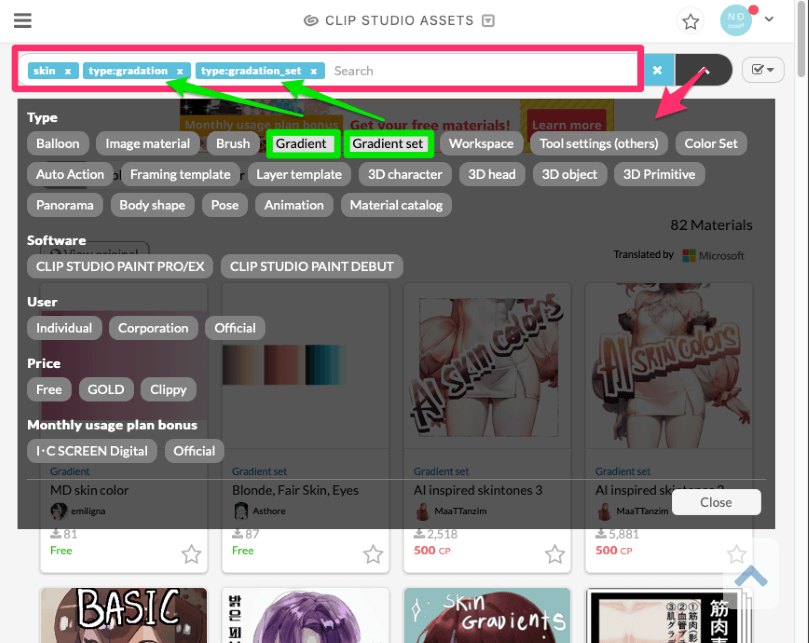
Step 2: In the Assets platform, use the search bar to find Gradient Maps that catch your eye. You can filter by selecting Gradient and Gradient Sets under the Details menu.
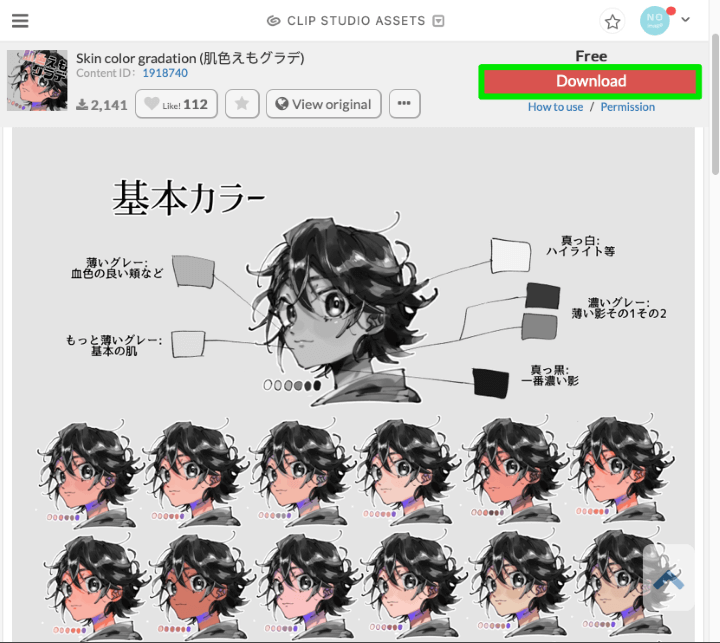
Step 3: Once you find something you like, click on its thumbnail to open the material’s details page. Then click the Download button.
Step 4: Return to CSP, and go to Layer > New Correction Layer > Gradient Map.
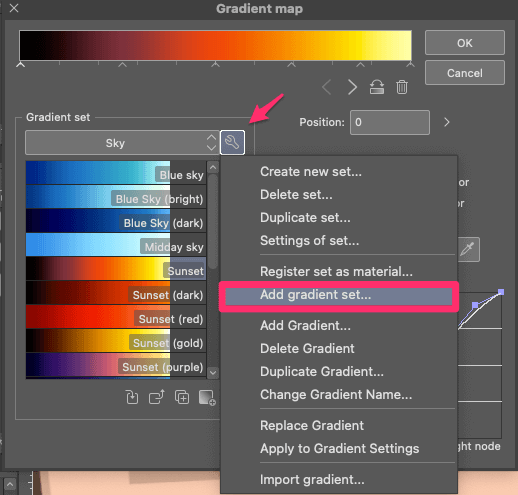
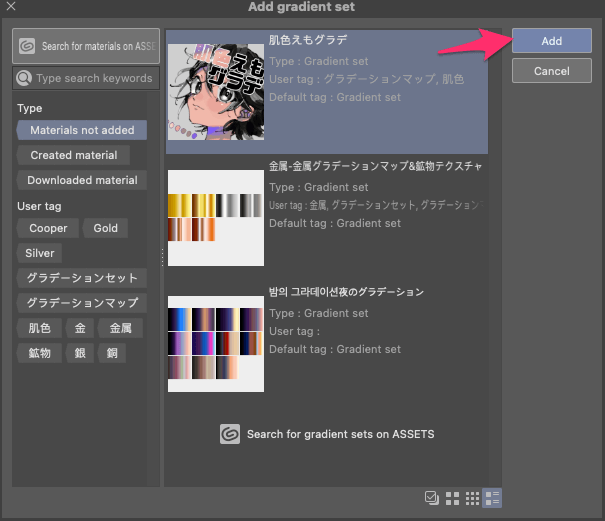
Step 5: In the Gradient Map dialog window, click the wrench icon and select Add Gradient Set.
Step 6: You’ll see all your downloaded gradients and gradient sets. Choose the one you want and click Add.
Now that you’ve started building your own library of Gradient Maps, let’s jump in and explore how to use them in your artwork!
Using Gradient Maps to Color Grayscale Artwork
Starting your drawing in shades of gray can help focus on composition and linework. Then when it’s time to add colors, Gradient Maps will help you find eye-catching color combinations.

Note: If your artwork is already colored, you can still use this technique, but making adjustments may be trickier. Gradient Maps rely on brightness levels, so even if two colors appear different, they might have similar brightness values, leading to less precise results.
How to Use the Gradient Maps to Color in Clip Studio Paint
While Gradient Maps offer a quick way to add color, using a single Gradient Map for your whole drawing may feel limiting.
Step 1: Organize your artwork. To overcome this, you can prepare your artwork in the following ways:
- Organize different parts of your artwork into folders, applying Gradient Maps to sections rather than the whole drawing.
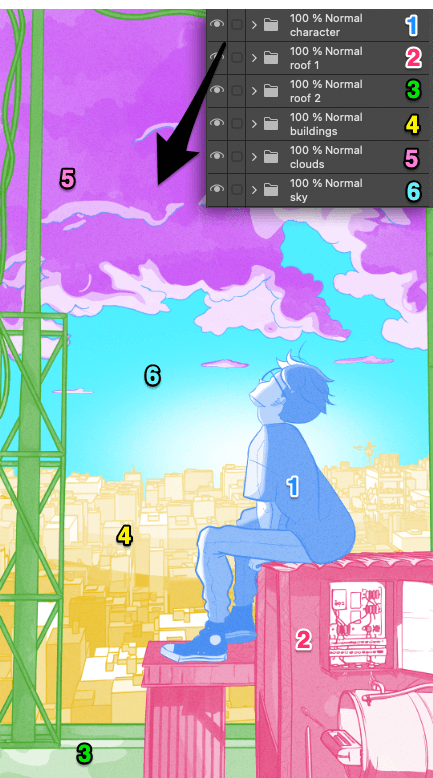
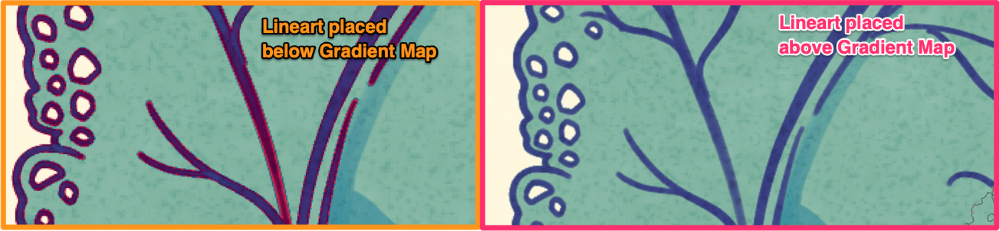
- Keep lineart separate from fill layers. Later, you will be able to place your lineart above the Gradient Map and color lines afterward if needed. This minimizes imperfections caused by Gradient Maps, especially on smooth, anti-aliased lines.
Step 2: Once your artwork is organized, go to the Layer Menu and choose New Correction Layer > Gradient Map.
Step 3: In the dialog box that appears, choose a Gradient Map.
This is where your custom or downloaded Gradient Maps come in handy. Having a variety of options allows you to explore different looks!
You can make adjustments by dragging the nodes or making changes to the colors. You’ll see the changes in real-time on the preview, so you can fine-tune the colors until you’re satisfied.
Step 4: Click OK, and your artwork is now colored! You can always edit the Gradient Map by double-clicking on it in the Layers panel, even after you’ve applied the colors.
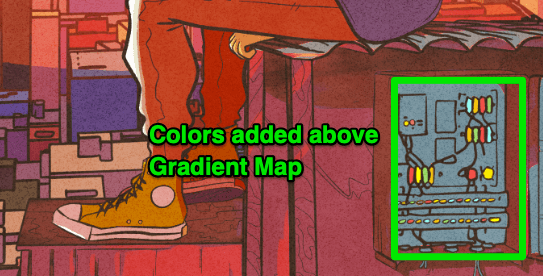
Step 5: While Gradient Maps do a lot of the work, relying solely on Gradient Maps can make things appear a bit repetitive. To add more variety, create new layers and apply additional colors on top of your Gradient Map.
Now you know how to color grayscale art! If you’ve ever felt hesitant about trying new colors, Gradient Maps can help you become more confident in your color choices. They show you exciting possibilities that you may not have thought of before.
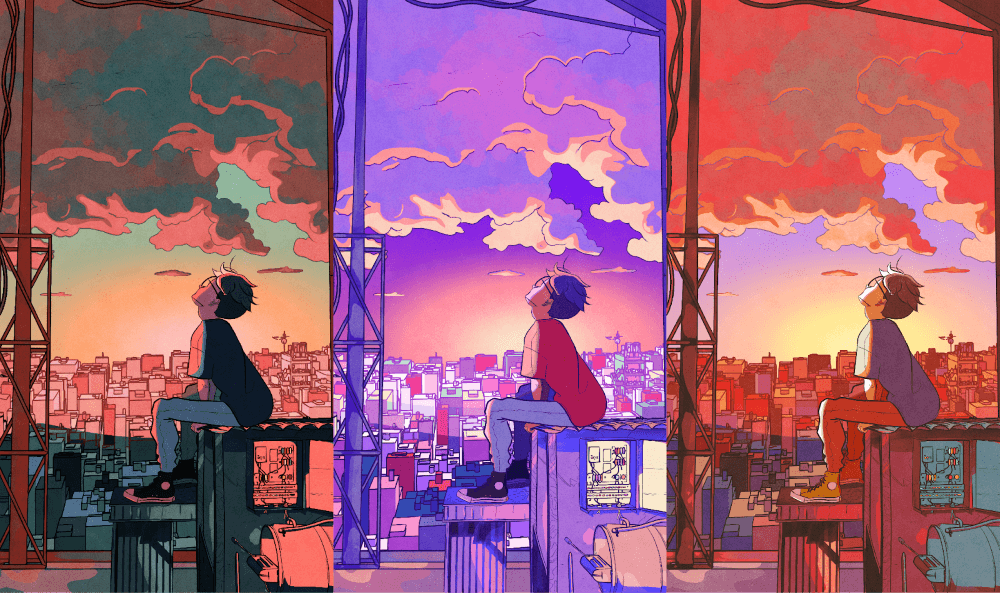
Adding Gradient Maps as Effects to Your Colored Art
Gradient Maps can also be used as overlay effects to enhance artwork you’ve already colored. This technique allows you to quickly explore different color schemes and moods while preserving the underlying colors. Here’s how:
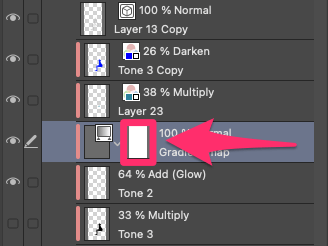
Step 1: Go to Layer > New Correction Layer > Gradient Map.
Step 2: Select a Gradient Map and click OK. Don’t make adjustments yet; it’s helpful to see the changes after changing the blending mode.
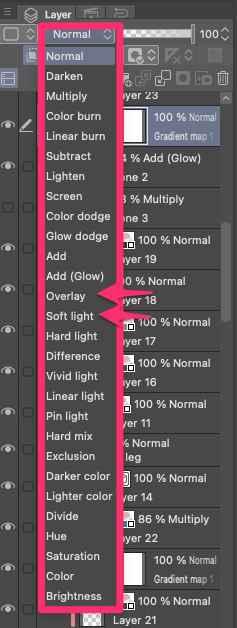
Step 3: Select the Gradient Map layer and try different blending modes like Overlay or Soft Light. Adjusting the opacity can also make the effect less intense.
Step 4: Double-click on the Gradient Map to adjust colors or choose a new one. Now that the blending mode has been applied, you can see how the changes affect the feel and mood of your drawing. Click OK when satisfied.
Step 5: If you want to keep the original colors in certain areas, click on the layer mask next to the Gradient Map layer. You can erase or cut selections so that the Gradient Map isn’t applied to the parts you remove.
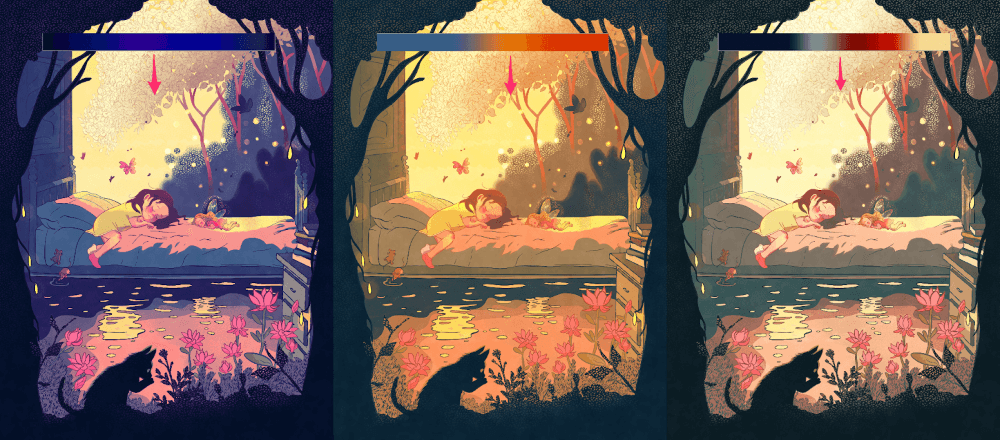
There you have it! As you can see below, different Gradient Map overlays subtly change the atmosphere of a drawing.
Final Thoughts
Gradient maps are a fantastic tool that will transform the way you approach to color in your artwork. By learning how to adjust and apply Gradient Maps, as well as knowing how to create your own collection of inspiring gradients, you can elevate your artwork and bring it to life.
If you have any questions or want to share your experiences using Gradient Maps, feel free to leave a comment below!