
Open your Brush Library and tap on the + symbol in the top right corner. Tap on Rendering and select Intense Blending. Then tap on Wet Mix and adjust Charge to 50%, reduce the Pull to 0% and increase the Blur to 99%. Tap on Done to save the brush.
I’m Carolyn and my digital illustration business relies heavily on my knowledge of the Procreate app. I’ve been using the app for over three years to create digital artwork, logos, and brandings for a multitude of clients so I have had no choice but to be an expert in it.
Creating your own brushes in Procreate is not easy, but if you are willing to put the time in, the pros can seriously outweigh the cons. Procreate comes with a small selection of blending brushes but it might not be what you need. Today, I’ll show you how to make your own.
Note: Screenshots are taken from Procreate on iPadOS 15.5
Table of Contents
Key Takeaways
- The main two settings to adjust when creating a blending brush are Rendering and Wet Mix.
- You can create and save as many brushes as you like in your Brush Library.
- You can duplicate a pre-existing brush and adjust its settings if you don’t want to start from scratch.
How to Make a Blending Brush in Procreate – 4 Steps
You should have a general idea of what kind of brush you are looking to create before you get started. It may take some time to find the perfect balance of properties before you are happy with the result. Here’s how:
Step 1: In your canvas, open your Brush Library by tapping on the Smudge tool (finger icon) in the top right corner. Select any of the brushes in the drop-down and then tap on the + symbol in the top right-hand corner.
Step 2: This will open your Brush Studio. Scroll down and select the Rendering menu. Here you can change the Rendering Mode to Intense Blending.
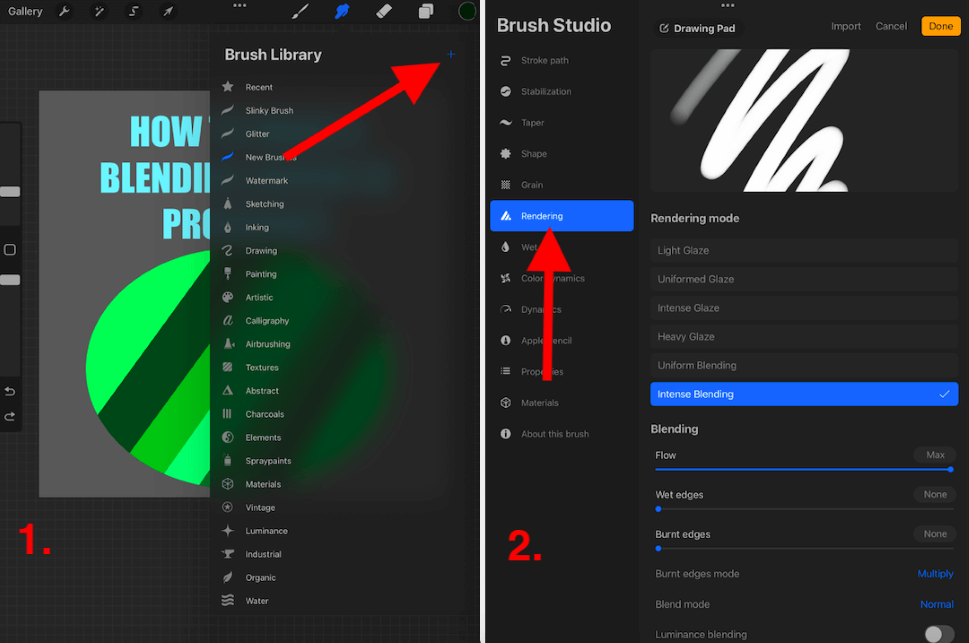
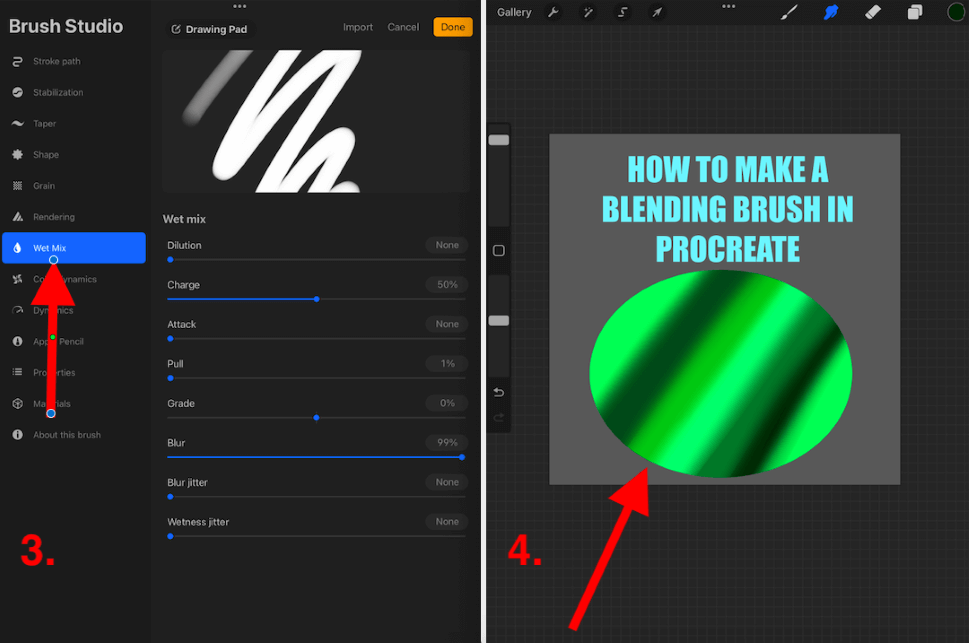
Step 3: Then scroll down and select the Wet Mix menu. You should adjust the Charge to around 50%. Then reduce the Pull to 0% and increase the Blur to 99%. When you are happy with the brush, tap Done to save it.
Step 4: Ensure your new brush is selected and choose an area to blend on your canvas. This way you can test your brush to see which settings you still need to adjust further.
Brush Studio Options
When creating a new brush in the Procreate app, you have a lot of settings and adjustment options that enable you to have full control over every technical aspect of your new brush. However, if you’re not familiar with them, these options can be quite daunting.
Below I have highlighted the main settings you will need to manipulate when creating a blended brush in particular. I have briefly explained them so you can start to understand what they mean and how they affect your brush.
Rendering
The Rendering Mode will allow you to adjust how heavily your brush interacts with the paint on the canvas. This ranges from Light to Heavy Glaze and all the way to Intense Blending. Which one you choose is dependent on what effect you are looking to create with your new brush.
The Blending setting allows you to adjust Flow, Wet Edges, and Burnt Edges. This changes how the edges of your brush stroke react on the canvas whether you want to soften the edges or make them darker. You can adjust the intensity by sliding to different percentages.
Wet Mix
In your Wet Mix setting, you have the ability to adjust the intensity levels of how your brush colors react to each other and to the canvas. Below I have briefly described what each one does:
Dilution
Imagine adding water to the color of your brush. Increasing the dilution of your brush will increase its opacity and make it more transparent and vice versa.
Charge
This is essentially how much paint you are adding onto your brush before you apply it to the canvas.
Attack
This will affect how much of your paint will stick to the canvas once you draw something using your brush.
Pull
Adjusting the pull will affect how your brush moves the paint around the canvas. This setting can be super trippy so definitely experiment with this one before making any big changes.
Grade
The Grade will affect the texture of your brush. You can set it at 0% or go all the way from -100% to +100%.
Blur
This will affect how strong of a blur your brush will have when applying it to paint on the canvas.
Blur Jitter
This can essentially randomize the amount of blur in each of your canvas. This creates a more messy result rather than a smooth result when increased.
Wetness Jitter
Think of adding more water to your paint while you’re applying it. This will change how real your brushstroke may look on your canvas.
Pro Tip: Start creating your brush by duplicating the Soft Brush in the Airbrush palette in the Procreate Brush Library and editing it from there. This is a good starting point and you can make any changes without losing the original brush.
FAQs
Below I have briefly answered a selection of your questions regarding this topic:
Are Procreate blending brush free?
The great news is, Procreate comes with a selection of great brushes you can use to blend your artwork. My favorite brushes for blending are the Airbrushing palette which you can find preloaded in your Procreate Brush Library.
What is the best brush for blending in Procreate?
My favorite brush for blending in Procreate is usually, depending on the subject at hand, the Soft Brush tool and I set the opacity to pretty low. This way I can blend small sections at a time without losing any control on my canvas.
Is there a blending tool in Procreate?
You can follow the steps above to create your own blending brush or simply use the Smudge tool. This can be found beside your paintbrush icon and will allow you to blend with any brush in the Procreate Brush Library.
How to make a blur brush in Procreate?
You can follow the steps shown above to create your own blur brush in Procreate. Spend some time adjusting the Rendering and Wet Mix settings on your brush to create a great blurring option.
Conclusion
The ability to create your own blending brush on Procreate is definitely one of the app’s greatest features of all time. However, it comes with so many awesome blending brushes already that you might not even need to create your own one. But at least now you know how!
Be sure to dedicate a good bit of your time to trying out all the different settings in your Brush Studio as even changing just 1% can have a huge impact on your brush and how it reacts with the canvas.
Have you created your own blending brush on Procreate? Leave your feedback in the comments below.