
To liquify on Procreate, choose the layer you want to manipulate. Then tap on the Adjustments tool (magic wand icon) and a drop-down menu will appear. Select the Liquify tool. Adjust your settings preferences and apply pressure to your canvas.
I’m Carolyn and I’ve been using this unique tool to create fluid movement in my digital artwork for over three years. Running a digital illustration business means that I receive a variety of different requests and desires regularly so this tool is a great one to have.
The Liquify tool can create some really cool and vivid imagery but it does require some time to explore and navigate its unique capabilities. Today I will start you off on the right foot and share with you how to use it.
Table of Contents
How to Use the Liquify Tool on Procreate
The Liquify tool comes already included in your Procreate app and it’s available in the Adjustments tab. Here’s how:
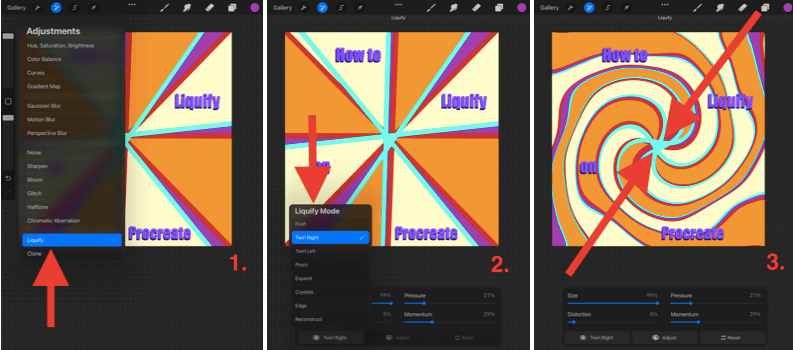
Step 1: Choose the layer you want to manipulate. In the top left-hand corner of your canvas, tap on the Adjustments tool (magic wand icon). This will be in between the Actions and the Select tools. A drop-down menu will appear. Near the bottom, select Liquify.
Step 2: A window will appear at the bottom of your canvas. Adjust your settings and choose which Mode you would like to use. For my example, I chose the Twirl Right option.
If you’re not familiar with the Mode options, I’ll explain them in the section below.
Step 3: Using your pen or stylus, apply pressure to your canvas in the center of the area you wish to liquify. I suggest trying different levels of pressure on different parts of your canvas so you get an idea of what this tool can do.
Liquify Modes
In Step 2, when the window appears, tap on the bottom left-hand box and this will show you a drop-down list of the available Liquify Modes. Here’s a brief breakdown of what each of them offers:
Push
Allows you to manually move the layer in the direction of your stroke.
Twirl
Holding pressure down on your canvas will twist your layer in a circular direction. You have the option to twirl your layer left or right.
Pinch
Applying pressure will pull your layer inwards, almost as if the canvas is moving away from you. This is a great tool for adding a sensation of distance to linear artwork.
Expand
This does the opposite of pinch. It pulls the layer towards you almost like an expanding balloon.
Crystals
This makes the pixels almost have a fuzzy appearance. As if your layer was made of glass, and you threw it on a concrete floor and it smashed.
Edge
This effect has more of a linear outcome. It kind of feels like you’re slanting your layer and it has a totally different effect on abstract images and lettering.
Reconstruct
This is pretty aptly named. This basically reverses the liquify tool. This is extremely useful if you have over-liquified a part of your canvas but don’t want to undo the entire thing.
Liquify Settings
In Step 2, when the window appears, you will see four Dynamics. You can adjust the percentage of the intensity of each of them. I recommend experimenting with these until you find the balance that works for you. Here is what each of them does:
Size
This will change the brush size. Meaning that the percentage you choose is the percentage of the area of the layer in which it will liquify.
Distortion
This is not available on all modes. The higher percentage you choose, the more intense your chosen Liquify Mode will become.
Pressure
This one is particularly trippy when combined with the Twirl tool. This essentially speeds up the effect of the liquify tool depending on the level of pressure you use with your finger or stylus.
Momentum
This determines how much your liquify tool will continue liquifying your layer after you have stopped applying pressure with your finger or stylus. For example: If you choose 0%, the tool will stop immediately after lifting your finger/stylus. If you choose 100%, it will continue to liquify your layer for 1-3 seconds after.
3 Quick Ways to Undo Liquify Tool in Procreate
This is an excellent question due to the sheer magnitude of the Liquify tool’s ability to completely distort your image. Some of the modes are out of the user’s control so it is good to know exactly how to undo them if you have made a mistake or gone too far. Here are 3 ways:
Using the main undo tool will also undo the steps you took in the liquifying process. You can either tap the screen once using two fingers or tap the back arrow icon on the left-hand side.
2. The Reconstruct Tool
When you’re in the Liquify mode toolbar, you can select the Reconstruct mode and it will reverse the liquify effects on the area that you select. This is perfect if you only want to undo what you’ve done a little bit, not undo the entire effect.
In your Liquify tool window, there is the Reset button in the bottom right-hand corner. Tap on this directly after your Liquify action and it will restore the layer back to its original state.
Liquify Tool Examples
If you really want to make the most of this tool, I highly recommend deep diving into the digital art world online and exploring some examples of artists who have used this tool before. The results will amaze you.
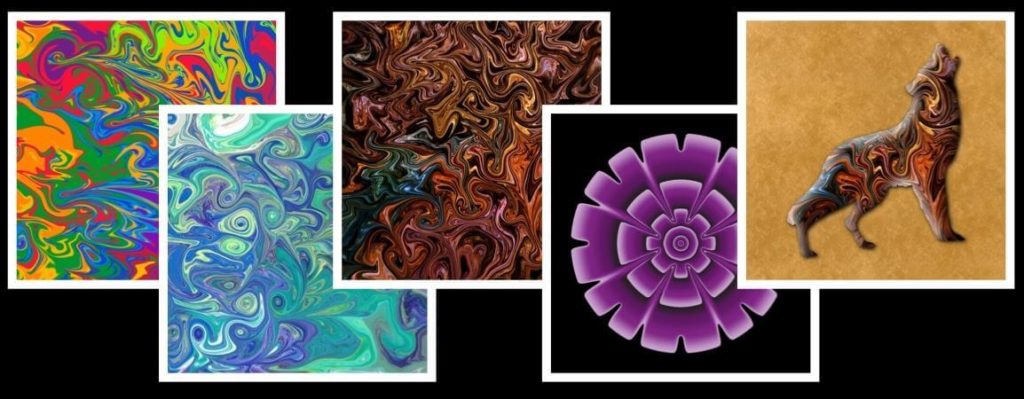
The image below is from skillshare.com and it shows five examples of how this technique can create some visually striking patterns and compositions.
FAQs
Below, I have briefly answered some of your questions regarding the Liquify tool on Procreate:
How to liquify words on Procreate?
You can use the same Liquify tool step by step listed above to manipulate your lettering on Procreate. Just ensure you have selected your text layer before applying the technique. I have briefly explained how to do this in my other article How To Curve Text in Procreate.
How to swirl on Procreate Pocket?
Procreate Pocket does indeed have the Liquify tool, it just looks a little different. After you select the Adjustments tool, in the bottom right-hand corner of the app you can select the Retouch button and then tap on the Liquify option.
What to do when Procreate Liquify is not working?
This is not a common glitch with either of the Procreate apps. I suggest restarting your Procreate app and your device and then ensuring that your iOS and app have been updated with the newest system update.
Final Thoughts
As you can see from all of the information above, the options are truly endless when it comes to the Liquify tool on Procreate. You could spend hours exploring this tool and still have not tried every combination it has to offer.
Whether you’ve never used this tool before or you’ve given up on it, I recommend doing some research online to discover its true potential. Within minutes of experimenting with this technique, my excitement levels reached A Whole New World level.
Has the Liquify tool benefited your work? Please feel free to share your work or feedback below so we can all experience some of the unique results of this underrated function.