
I’ve been utilizing the curve text tool in Procreate for over three years to create posters, book covers, and Instagram branding for small businesses. This unique feature of the app offers a graphic design technique that users like myself find incredibly useful and user-friendly.
The Procreate Transform tool can really up your game in the design world as you will never have to outsource your digital artwork when it comes to adding and manipulating your message. Alternatively, you can also use the Liquify tool to curve text in Procreate.
Today, I’m going to show you how to use the Transform tool and Liquify tool to curve text in Procreate along with some useful text editing tips.
Note: Screenshots from this tutorial are taken of Procreate on my iPadOS 15.5.
Table of Contents
Key Takeaways
- Curving text in Procreate can be used for posters, ads, book covers, and any graphic design message that requires lettering.
- The process is not automatic and you must create the curve using your own fingers and/or stylus.
- There are two different ways to curve your text in Procreate.
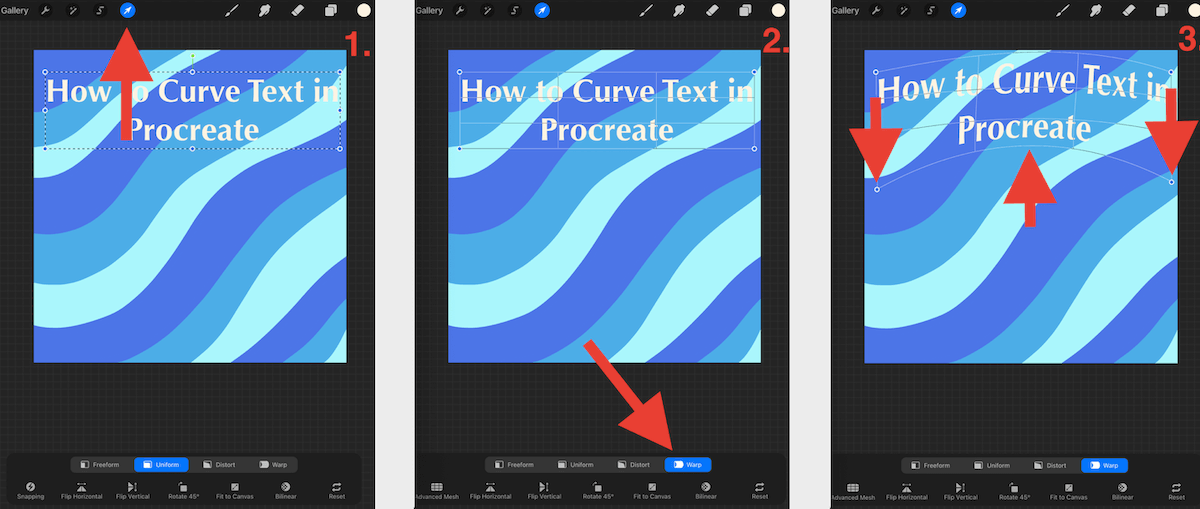
Method 1: Curve Text in Procreate Using the Transform Tool
This is a very hands-on tool that gives you full control of the curve and shape of your text. Unlike some other design apps, you actually create the curve yourself, and here is how:
Step 1: Ensure your text layer is selected. Then tap on the Transform tool (arrow icon), and a small box will appear at the bottom of your canvas.
Step 2: Select the Warp option. This is the last of the four options and looks like a white rectangle with a small blue crescent inside of it.
Step 3: To curve your text, you can drag the bottom two corners downwards and then push the middle of the text box up. This may take some time to get used to until you find the perfect curve.
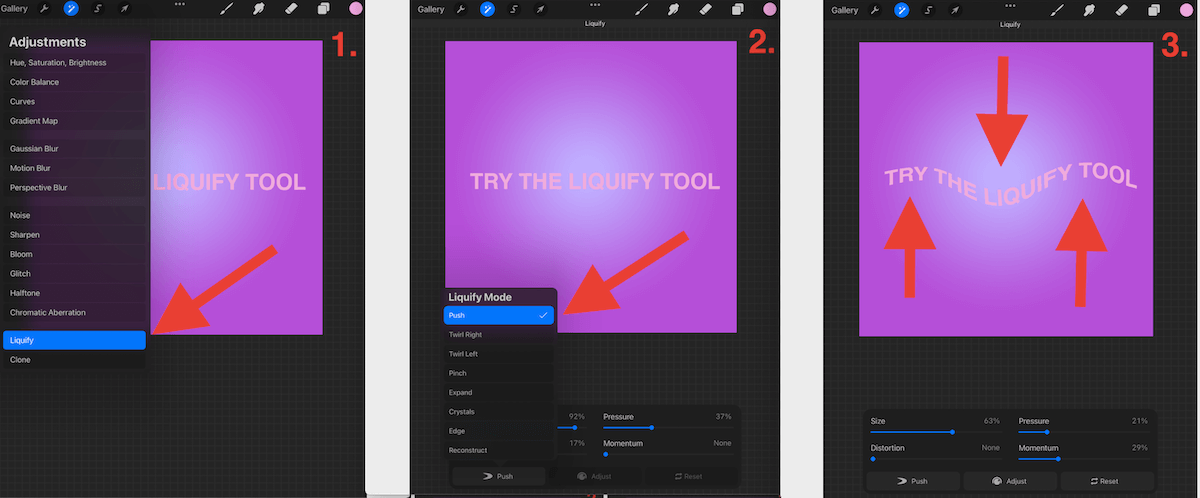
Method 2: Curve Text in Procreate Using the Liquify Tool
This method for curving your text relinquishes a bit of the control, but adjusting your settings on the Liquify toolbar can help you find the balance you’re looking for. Here’s how:
Step 1: Ensure your text layer is selected. Then tap on the Adjustments tool (magic wand icon), and a long list will appear to your left, Scroll down and select the Liquify option.
Step 2: In the bottom left of the toolbox, you can adjust which Liquify Mode you wish to use. Select the Push option. You can adjust the settings here for pressure, size, distortion, and momentum.
Step 3: To curve your text, use your finger or stylus to gently swipe up or down, under and over your lettering at different points. You’re using the pressure of your stylus to control the intensity of the curve.
Hints & Tips
Here are some useful tips that can help you work better with text in Procreate.
Tip #1: Always use a guide
Because curving text in Procreate is such a manual process, it is crucial to always use a guide. This will ensure that your text is aligned, symmetrical, and professional looking. The human eye is amazing but it’s not always accurate.
Here are the steps.
Step 1: Create the shape you want to curve your text to by using the shape tool, you can create a circle, for example.
Step 2: Align and curve your text within or aligned to your shape.
Step 3: Once you’re happy with your lettering, you can delete your shape layer, and voila, the perfect curve has been created.
Tip #2: Activate the drawing guide
By activating the Drawing Guide toggle under the Canvas section of your Actions toolbar, a grid will appear on your canvas. I rely heavily on this tool for precise symmetry and to ensure my designs and lettering are centered correctly.
You can also manually adjust the size of your grid using the Edit Drawing Guide setting under your blue toggle.
Tip #3: Always duplicate your layer before manipulating it
This is a habit that I have ingrained in my mind and I suggest you do the same. This is a safe way to back up your text layer in case you have to scrap the changes you’ve made and start all over again. I guarantee you, this will save you valuable time in the long run!
FAQs
Here are some other questions you might have about curving your text in Procreate.
How to curve text in Procreate Pocket?
Follow the same steps as listed above. The Procreate curve tools use the exact same method for its iPad app as it does for its iPhone app.
How to curve a drawing in Procreate?
You can use the same two methods outlined above in order to create curves in any layer or artwork. This means you can use both the Transform tool and the Liquify tool to create curves, distortions, and movement within any of your layers.
How to create a curved path in Procreate?
If you want to create a curved path for your text on Procreate without distorting the text shape, you can also manually do this on the app.
You start with creating the shape you want to curve the text to by using your Shape tool, this will act as your guide. Then using your select tool, you individually select and rotate the letters until they are in line with your shape guide.
I found this YouTube video very helpful and it covers a lot of the smaller details you might need to know in order to do this correctly:
How to angle text in Procreate?
Another option for manipulating the shape of your text is to angle it instead of curve it. This can be done easily by following the same steps above for the Transform tool except instead of selecting the Warp option, select the Distort option and drag your corners out.
Final Thoughts
I must admit that for me, this feature was one of the more difficult ones to master. My years of adding WordArt to Microsoft Paint did not prepare me for this hands-on ability to create my own curves and movement on the Procreate app.
But once you have mastered it, this tool is an absolute game changer and opens up a world of possibilities for its users and the graphic design industry.
Whether you’re a professional graphic designer or a new user experimenting with Procreate, this feature really does open up endless opportunities without having to outsource your work to a lettering specialist.
Has the curve text function changed the game for you? Feel free to leave your comments below and share any hints or tips of your own that you may have up your sleeve so we can all learn from each other.