
Have you ever wondered how to duplicate a photo in Lightroom? Though the technique is simple, the answer isn’t readily apparent.
Hey there! I’m Cara and I’ll be honest. In my work as a professional photographer, I have almost never had the need to actually duplicate a photo in Lightroom. That is, create a whole second version of my image.
However, creating virtual copies and snapshots is very helpful for creating different versions of the same image or comparing edits.
Clear as mud? Let me explain!
Table of Contents
Why Would You Duplicate a Photo in Lightroom?
The main reasons that people duplicate photos during the editing process are to compare different edits or to create different versions of the same image. In the past, (i.e. ahem, Photoshop) this was done by creating a duplicate of the image.
However, this method is ungainly and fills up your hard drive quickly. When you copy an image file that is 20 MB, now you have 40 MB worth of information to store. You can imagine how this can snowball. This is not an effective way to process large quantities of images.
A big reason for Lightroom’s creation was as a way to more efficiently process lots of images. Thus, you can duplicate photos in Lightroom without actually duplicating the image file.
What?
Yep, let’s look at how this works.
Note: the screenshots below are taken from the Windows version of Lightroom Classic. If you are using the Mac version, they will look slightly different.
Create a Virtual Image Copy in Lightroom
The first method of duplicating an image in Lightroom is by creating a virtual copy.
Remember that Lightroom is a non-destructive editor. This means that when you change values in your editing tools, you aren’t actually making changes to the original image file.
Instead, Lightroom creates a sidecar XMP file that is attached to your original image file. This sidecar file contains the editing instructions that will be used to create the JPEG image when you export it from Lightroom.
When you create a virtual copy, you simply create a second sidecar file that is also attached to the original image file. When you export your image, Lightroom applies the editing instructions in the appropriate sidecar file to create the final JPEG image.
This way, you can create different versions of the same image without copying the entire RAW file. Pretty nifty, right?
Let’s look at how to create and work with virtual copies.
How to Create a Virtual Copy
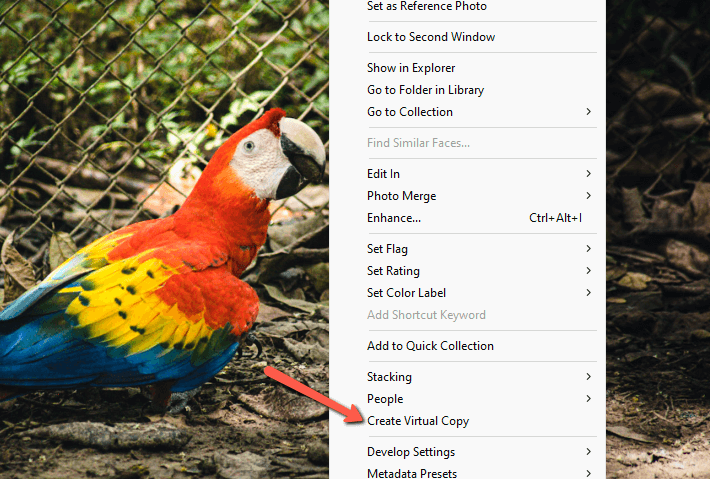
Right-click on the image you want to duplicate. You can do this in the filmstrip or in the workspace and it works in both the Library and Develop modules. Choose Create Virtual Copy.
Alternatively, you can press Ctrl + ‘ or Command + ‘ on the keyboard.
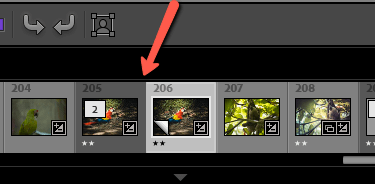
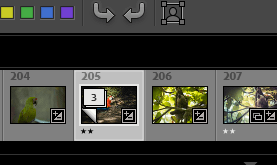
A second copy of the image will appear in the filmstrip at the bottom of your workspace. A number will appear on top of the original image to indicate there are copies. The virtual copies will appear with a little earmark to indicate they are copies.

You can create multiple virtual copies. Now you can apply different edits to each of the copies. Then when you export, Lightroom will apply the corresponding editing instructions to create the JPEG file.
To clean up your workspace, you can file all the copies behind the original image. Just click on the number on the original image and the copies will collapse behind it.
Create a Snapshot in Lightroom
There’s another method of creating a copy in Lightroom that is useful for placing bookmarks along your editing journey.
For example, say you wanted to compare two edits of an image. Up to a certain point, the edits are the same. Perhaps the white balance, exposure, and other basic adjustments are all the same. But you want to try split toning in one version but you’ll use the tone curve in another.
Instead of having to do all the basic edits twice, you can create a snapshot at the point where the edits diverge. Let’s look at this in action.
With some edits applied to your image, press the Plus sign next to Snapshots in the panel to the left of your workspace.
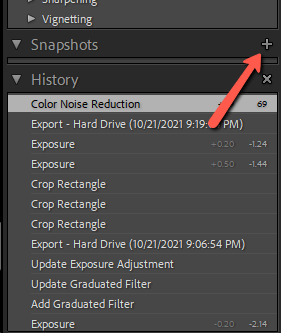
Name your snapshot in the box that appears. By default, it will pop up with the date and time but you can name it whatever you want. Click Create.
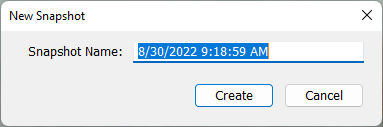
A copy will appear in the Snapshots panel. You can go on and make additional edits and create new snapshots. When you click on a saved snapshot in the snapshots panel, you’ll go back to whatever edits were active when the snapshot was created.
If you forget to make your snapshot at the exact moment, don’t worry. You can take a snapshot at any point in the history panel. Simply right-click on the point where you want to take the snapshot and choose Create Snapshot.
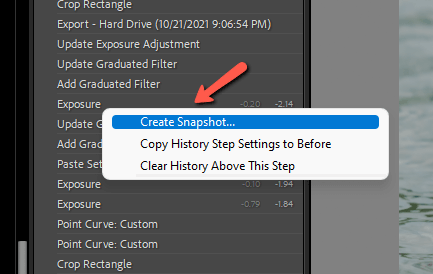
Notice you can also Copy History Step Settings to Before. This means that you can set a new point as your “before” image when comparing before and after images with the \ shortcut.
Duplicate an Image on Your Hard Drive
Virtual copies and snapshots are both convenient ways to work with different versions of the same image without having to create a whole new copy. If you actually want a new RAW version of your image, you’ll have to duplicate it outside of Lightroom.
Navigate to your image on your hard drive and make a copy. You’ll have to import this copy into Lightroom as well.
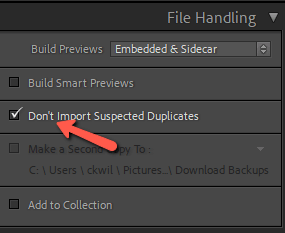
However, by default Lightroom tries to avoid importing suspected duplicates. To turn off this feature, uncheck the Don’t Import Suspected Duplicates box under File Handling on the right side of the import screen.
And that’s about it! Lightroom has simple ways that you can copy and compare edits without unnecessarily filling up your hard drive. This is just one more reason why this program is amazing.
Curious to learn more about the capabilities of Lightroom? Check out how to fix overexposed photos in Lightroom here.