Every time you visit a website, fill out a form or click a link, your web browser remembers what you did (and if you’re using Chrome, you can even download a file that contains your complete history across all devices).
For some people, this is great! It means you can easily reference pages you visited in the past, or save time when completing online questionnaires. But for others, it’s much less ideal. The stored history can lead to privacy concerns, compromised information, embarrassment, ruined surprises, stolen identities, and much more.

Knowing how to clear your history on any web browser is essential, especially if you use a shared Mac computer. Luckily, this is an easy task (no need to install any Mac cleaner apps), and the process is relatively similar on Safari, Chrome, and Firefox.
Using a PC? Also Read: How to Clear Browsing History on Windows
Table of Contents
How to Clear History on Safari Mac

There are two different ways to clear Safari history. You can either delete by entry, or by time frame.
Method 1
Step 1: Open Safari. In the menu bar along the top of your screen, choose HISTORY > CLEAR HISTORY.
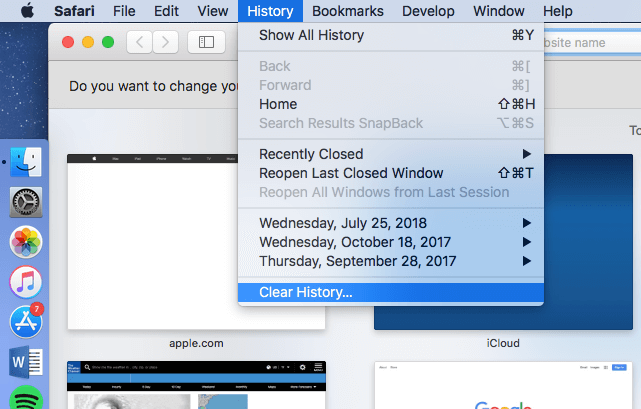
Step 2: In the pop-up window, choose how much of your history you would like to delete. Your options are:
- The Last Hour
- Today
- Today and Yesterday
- All History

Step 3: Success! Your browser history has been removed and your cache has been cleared.
Method 2
Step 1: Open Safari. In the menu bar along the top of your screen, choose HISTORY > SHOW ALL HISTORY.
Step 2: Your history will appear in list form. Click on an entry to highlight it, or use the Command key to select multiple entries.
Step 3: Press the Delete key on your keyboard. All selected entries will be removed.
How to Clear History on Google Chrome Mac

Google Chrome also features more than one way to remove your web browser history and data, depending on what your goal is.
Method 1
Step 1: Choose HISTORY > SHOW FULL HISTORY HISTORY from the drop-down menu (or press Command + Y).
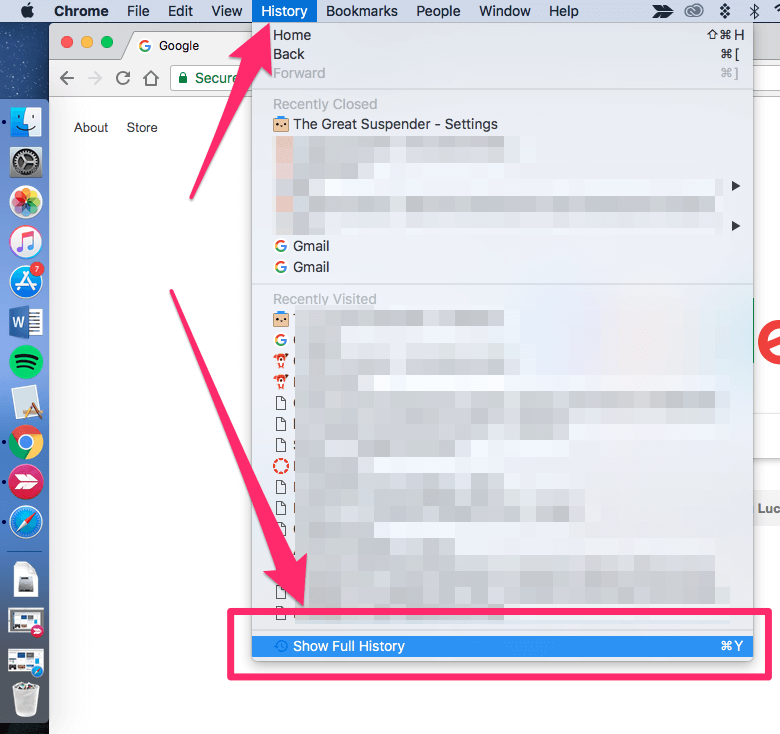
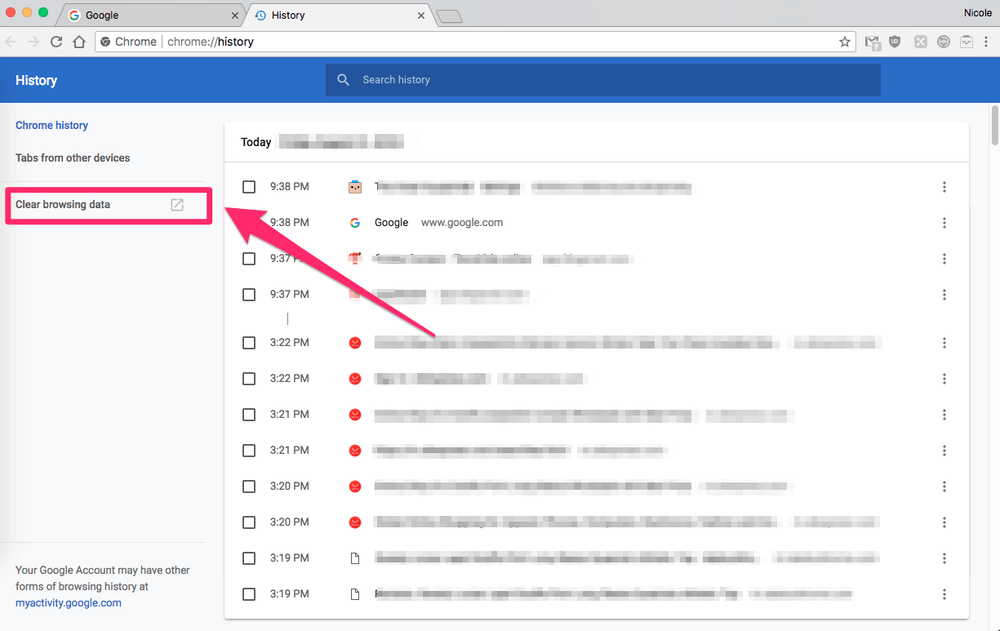
Step 2: On the left sidebar, choose “Clear Browsing Data”.
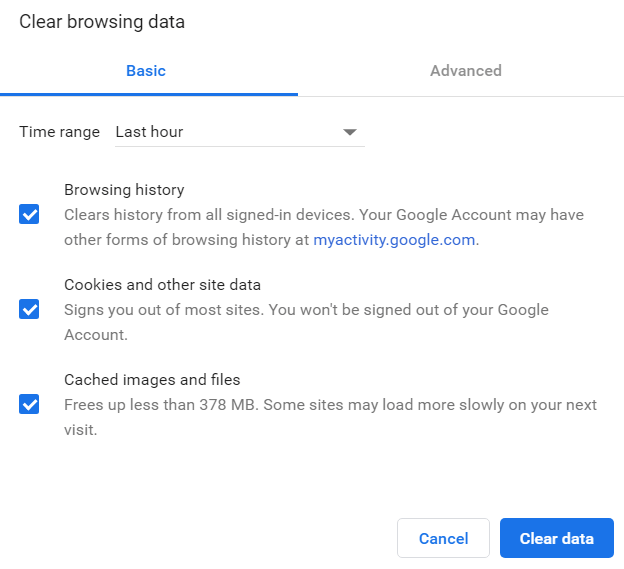
Step 3: In the pop-up window, choose the time frame of data to delete and what type of data you want to delete. You can remove just your history log, and you can remove cookies and any images or files.
Success! Your data has been cleared.
Method 2
Step 1: Choose HISTORY > SHOW FULL HISTORY from the drop-down menu (or press Command + Y)

Step 2: You will be presented with a list of visited web pages. Check the boxes of the entries that you wish to delete.
Step 3: When you have selected all the entries you want to delete, press “Delete”, which is located in the blue bar along the top of your screen.
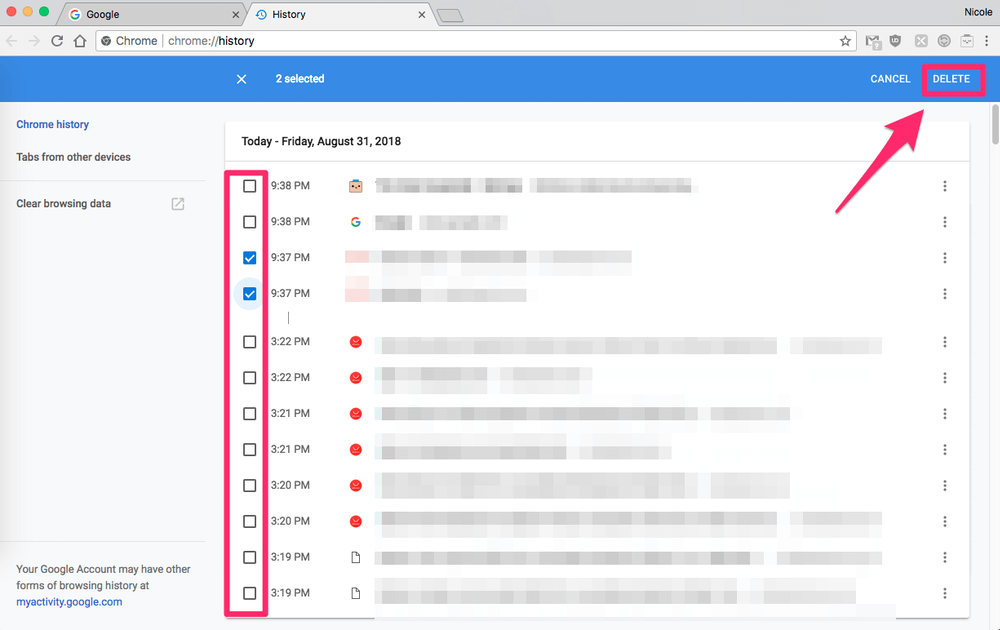
Success! Your selected entries have been removed. If you want to remove any cookies though, you’ll need to use the other method listed here instead.
How to Clear History on Mozilla Firefox Mac

For Firefox users, deleting your history is quick and easy.
Method 1
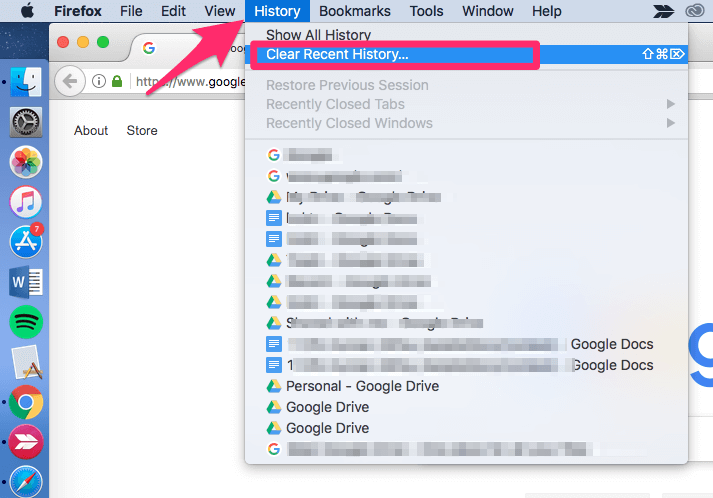
Step 1: Open Firefox. In the menu bar along the top of your screen, choose HISTORY > CLEAR RECENT HISTORY.
Step 2: Choose a time range to clear, as well as what type of items you would like to clear.
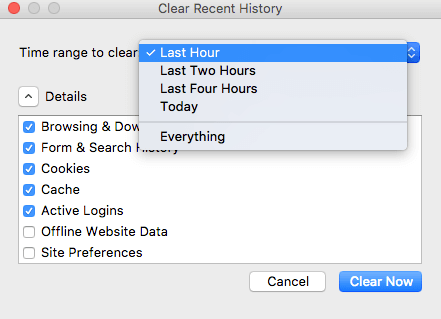
Success! All history/data for the selected range has been removed.
Method 2
Step 1: Open Firefox, and choose HISTORY > SHOW ALL HISTORY in the menu bar along the top of the screen.

Step 2: Select the entries you would like to remove, or use command + select to select multiple entries.
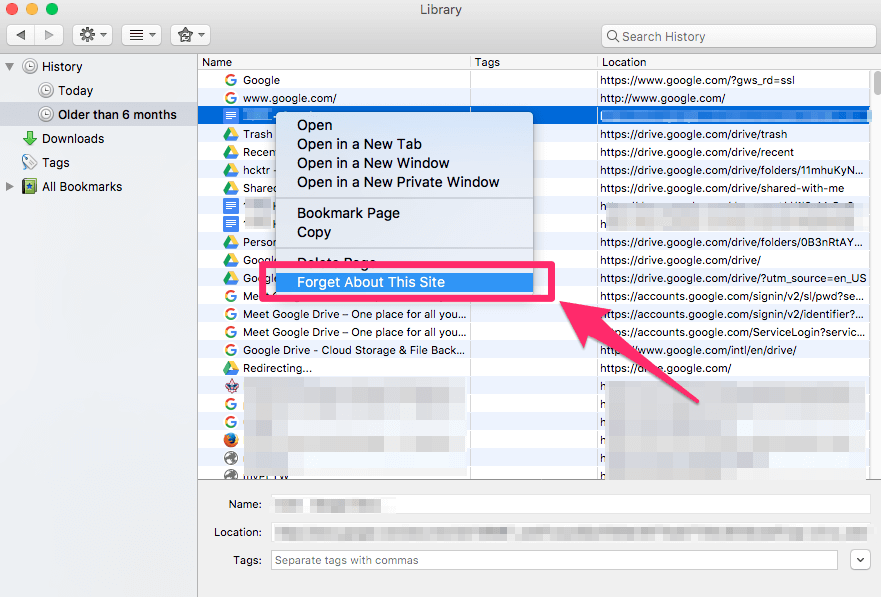
Step 3: Right-click, then choose “forget about this site”, or press the delete key.
Additional Tips
If you find yourself frequently clearing your web browser history, you may want to use Private Browsing or Incognito mode instead. When you use private/incognito browsing, your web browser will not record any history or cache any information about what you do.
Private browsing always opens a new, separate window and anything that happens in that window goes completely unrecorded.
So for example, if you wanted to get a gift for your wife but share a computer, private browsing mode will allow you to do all the things you would normally use the internet for, but once you close the window it wouldn’t show up in your history.
Private browsing is also useful if you are looking at airline tickets since it prevents websites from realizing you’ve visited multiple times and unfairly adjusting ticket prices (a common tactic when browsing normally).
Private browsing also has some downsides though. You won’t be able to autofill any passwords you’ve saved, and you can’t use your history to find pages that you were visiting. However, it does offer more privacy than browsing the standard way.
Here’s how to activate private browsing mode in the most common web browsers:
Safari
To activate private browsing, look along the top of the screen and choose FILE > NEW PRIVATE WINDOW.

If you always want to browse in Private mode, you can change your Safari preferences so that all windows in Safari are set to Private. To do this, go to SAFARI in the menu bar, then go to PREFERENCES > GENERAL > SAFARI OPENS WITH and choose “New Private Window”.
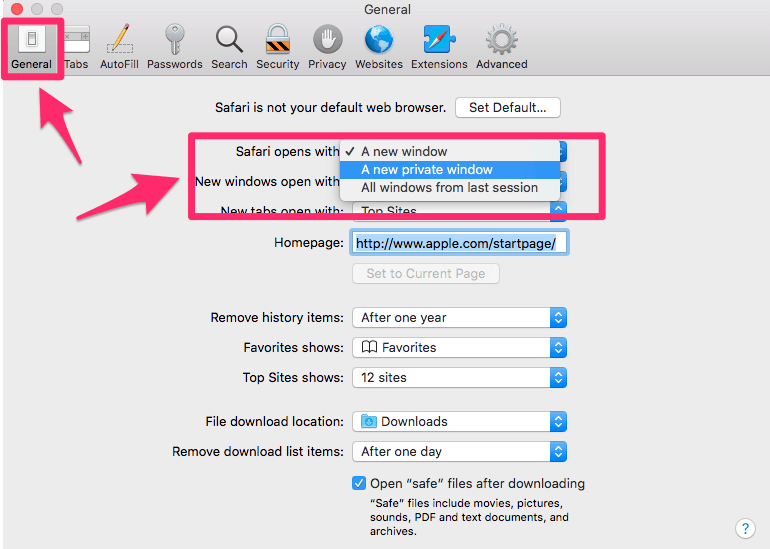
Remember that anything you download in Private mode remains on your computer, so even if you constantly browse in Private mode, you’ll need to clear your downloads for complete security.
Chrome
In the menu bar along the top of your screen, choose FILE > NEW INCOGNITO WINDOW. You can also click the three-dot emblem in the top right of the browser window, then choose “New Incognito Window” from the drop-down menu.

Firefox
If you’re using Firefox, not only will it not store any information, but the browser will actively prevent websites from tracking you automatically. This feature is available in other browsers, but normally must be manually enabled.
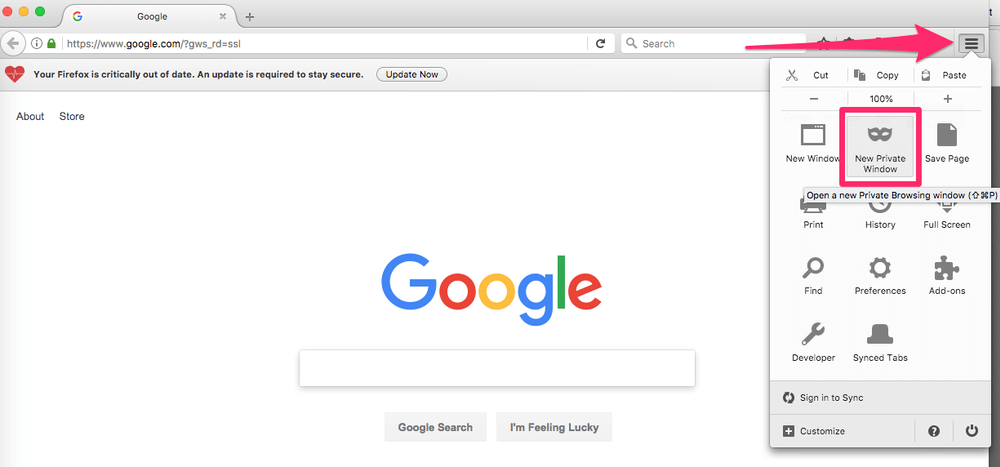
To activate Private mode, select the 3-lined icon in the top right and choose “New Private Window”. You can also go to FILE > NEW PRIVATE WINDOW. Private windows have a purple mask icon.
What is Web Browsing History?
No matter when you last accessed the internet, your web browser keeps track of every site you visit, links you clicked on, and the pages you viewed. This is your web browser history. It holds data about your browsing habits, saved password and form information (also known as “cookies“), and cached files.
This means it’s filled with what can often be very personal information. It’s used for a lot of different things, such as making your favorite web pages load more quickly, auto-filling your information when you’re completing a form, or reminding you where you left off last time you were online. However, all this stored data can have its downsides.
Why Remove or Keep Browser History?
There are multiple reasons why you might want to remove your web browsing history. The most common is for privacy. By removing your browser history, you can protect yourself from invasive eyes on a public or shared computer.
No one will know what sites you visited or searches you made. Additionally, it will remove sensitive data, such as credit card numbers entered on an online shopping site, and prevent others from using this information themselves.
Another reason to remove your history is to help your browser run more efficiently. Every web browser has a “cache” of information that under normal use helps it run faster. In the case of browser history, this can be your form information, frequently visited sites, or downloaded files.
However, if the cache isn’t cleaned out regularly, the browser becomes inefficient. Instead of quickly auto-filling the site you want to visit in the address bar, it may instead present dozens of similar options that you have also visited. Clearing your history will help clean this up and make your browser run more efficiently.
In some cases, it may be more beneficial to keep your web browser history. For example, if you are in the middle of a large research project, you may want to save your history so that you can keep track of sources. If your web browser history is useful to you, then refrain from clearing it until you are sure you don’t need it anymore. Once it is cleared, you can’t get it back.
Final Words
Your browser history can reveal a lot about you — from what gifts you are getting your family for Christmas, to your travel plans, to your credit card information. Storing this information on your Mac can be useful, but you’ll likely want to periodically remove it.
The methods we’ve listed here should help you clear your history anytime you like, or adjust your habits for future use. If you have any questions or tips, feel free to leave us a comment below!

My browsing data won’t delete on google for some reason and I don’t know why it won’t delete. Plz help.