
While Canva does not have a specific superscript button on the platform, you can create and add superscripts to your work by creating two different text boxes. Type the superscript information into the second box, make it smaller, and rearrange the placement to match it above the “normal” sized text box.
Welcome to our latest blog post about the joys and wonders of using Canva for all of your design needs. My name is Kerry, and I am an artist and designer who really loves finding all of the techniques and tools that are available to users on the website. Especially for beginners, these tricks for mastering techniques will certainly be helpful and save you time in the future!
In this post, I’ll explain what a superscript is and how you can add them to your Canva designs. Basically, this technique is all about manipulating text boxes and then grouping them together, so it is not hard to learn at all!
Are you ready to get into it and learn how to create superscripts within your Canva projects? Awesome. Here we go!
Table of Contents
Key Takeaways
- Currently, Canva does not have a button to automatically generate superscripts within your project.
- You will only be able to add superscripts to text boxes and not within any images.
- In order to create a superscript, you will need to generate two separate text boxes and after typing into each, change the size of the second one to become smaller. You can move this smaller box on top of the original to create the superscript effect.
- To make it easier to continue editing and designing on your canvas, once you have created your text with a superscript, Group together those individual text boxes so you can move them in one swift action and they will stay locked together.
What is a Superscript and Why Create Use It in Your Projects
You may be wondering what a superscript is exactly, and why someone would want to incorporate it into their design projects. Well, a superscript is just text that appears slightly above the regular text.
(This may spark a memory from a math class where you saw exponents hovering above numbers in different equations.)
While superscripts are not used in every project, they are helpful when designing presentations, infographics, or media that include data, scientific or mathematical equations, or formulas.
In regards to designing on the platform, at this time, Canva does not have a specific button that will automatically turn your text into a superscript.
However, there is still an easy process to get this effect in your text. Also, it is important to note that superscripts will not be able to be added to any images, only within text boxes.
How to Create and Add Superscripts to Your Work in Canva
As I stated earlier, while Canva does not have a button to automatically generate superscripts into your text (I wish that they did!), it really is not difficult to create your own. All you need to know how to do is create text boxes and resize them to give the illusion of a premade superscript!
Follow these steps to learn how to add subscripts to your text on Canva:
Step 1: Your first step will be to log into Canva using whatever credentials you normally use to sign into the platform. Once you are in and on the home screen, choose the size and style project that you want to work on, whether it be a preexisting canvas or a completely new one.
Step 2: On your canvas, navigate to the left side of the screen to where the main toolbox is located. Look for the tab that is labeled Text and click on it. Then you will be brought to the text tool, which will be your main hub for this type of technique.

Step 3: Here you can choose the font, size, and style of the text that you want to include. It is best to choose one of the basic size options (Heading, Subheading, or Body text) that are found within the text gallery.
Step 4: Either double-click on your choice or drag and drop it onto the canvas to create your first text box. You will want to have two different text boxes on your canvas to make the subscript, so make sure that you do this twice!
Step 5: Click inside the text box to type in your phrase or whatever text you want to include in the main one. This will be your “regular” size text box.
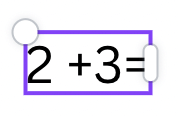
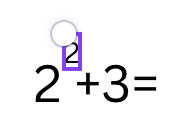
Step 6: To create the subscript, do the same thing in the second text box, only this time typing in the text that you want to be smaller and stand out as a subscript.

Once you are finished typing, you can resize the second text box by clicking on it and dragging the corners to make it smaller.
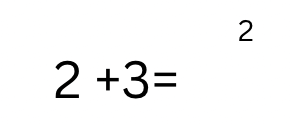
Step 7: Now you can drag the smaller subscript text box to where you want it to be above the first original text box.
In order to keep these two elements together while you continue to edit your project, you will want to group them to become one element when you are satisfied with their alignment.
Step 8: To do this, highlight both text boxes at the same time by clicking and dragging your mouse over the two boxes. (You can also click on one while holding the shift button down on your keyboard and subsequently click on the other.)
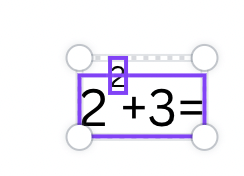
An additional toolbar will appear at the top of the canvas with the option to “Group” these elements. Click on that button and you will be able to move these two text boxes as one element from now on!
If you want to ungroup the element, click on them again and then on the Ungroup button that replaced the original Group option.
There you have it! Not too tricky, huh?
Final Thoughts
Whether you are creating a simple GIF that consists of just an image moving, or if you take on the extra steps to add in multiple elements and text, creating GIFs is a fun skill to learn and can give you an extra edge to your design portfolio.
Have you ever created a project on Canva where you used superscripts within your text boxes? Have you found that this is the easiest technique for doing so? We would love to hear your thoughts surrounding this topic, so please share them in the comment section down below!