
Running out of space on your MacBook Air can bring your work or play to a grinding halt. You can’t save additional files, download games or apps, or get much use out of your Mac at all if you don’t have enough space. So, how do you add more storage to your MacBook Air?
I’ve been tasked with this question countless times during my time as an Apple repair tech, and there are always easy ways to get around it. You often don’t need to spend much money or deal with a complicated technical process either.
In this post, I’ll explain how to add more storage to a MacBook Air. Let’s get to it.
Table of Contents
Key Takeaways
- iCloud Storage is a cloud-based option to add storage to your Macbook Air. iCloud is linked to your Apple ID and will therefore be a very easy way to transfer the files as needed and have them available when needed.
- External Storage is a very versatile physical option to add storage to your MacBook Air. Plugging in a USB flash drive or external hard drive is an easy and convenient way to back up your files and get additional storage space.
- SD Cards are an easy physical option to add and keep that additional storage on your MacBook Air. SD cards, while they can be removed, are a good way to consistently keep additional physical storage on your device.
- Sometimes the best way to get more storage is by freeing up space on your MacBook’s internal drive. You can do this manually by sorting through your files, or you can use a third-party app like CleanMyMac X.
Different Ways to Add More Storage to MacBook Air
Getting the notification that you are out of storage on your MacBook Air is not only frustrating because the notification doesn’t go away until you take care of it, but also because it prevents you from saving any additional projects.
There are a few ways that you are able to add more storage to your MacBook Air so that you don’t have to lose any data. Let’s start with the easiest way.
Option #1: Use iCloud Storage
The first option is to purchase iCloud storage. This will allow you to expand your memory on your MacBook Air by saving your projects, photos, and anything else on iCloud.
iCloud can be helpful to store information that you do not physically need on your computer, but would not like to delete or lose.
This way, it will be accessible whenever you need it, but not take up space on your physical hard drive.
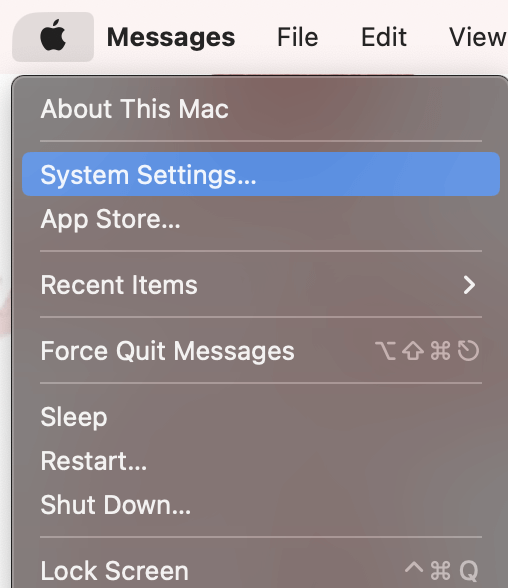
To turn on iCloud Storage, go to System Settings.
Click on your Name (Apple ID) and click iCloud.
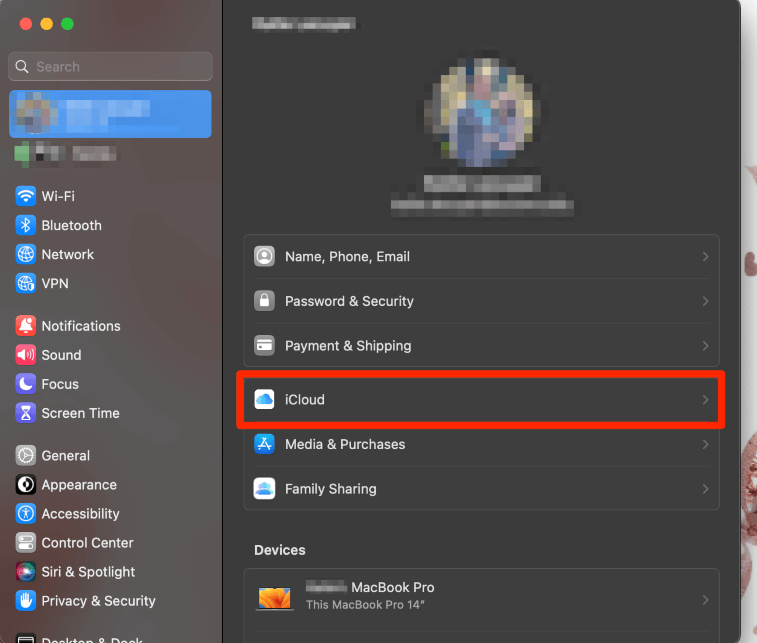
From here, there will be an option to turn on and use iCloud and/or pay to update the amount of storage you have. Choose the appropriate amount of storage for you.
Option #2: Use an External Storage Drive
Another option to add more storage to your MacBook Air is to use external drives. There are a very large number of options for external storage drives, so you will need to understand what you are looking for.
There are two main options for external storage drives. HDDs or Hard Disk Drives are great for storing very large amounts of data. SSD or Solid State Drives use flash memory to store data.
One form of solid-state memory is more commonly known as a USB Flash Drive (but there are other versions of SSD storage as well).
While HDD storage drives are more cost-effective and slightly easier to recover in the event of data loss, SSD is more efficient (both speed and power) and often more compact.
Note that while both of these options can be left in your computer for constant additional storage, they are designed to be removed from the computer after use. If you would like a consistent storage device, these may not be the best option.
Related: Best External SSD Drives for Mac
Option #3: Use SD Cards
SD Cards are another viable option for adding storage to your MacBook Air. Most new MacBook Airs do not have an integrated SD slot. Instead, you will likely need a USB to SD Card converter.
SD Cards are flash memory that can be installed directly in your MacBook Air (if you have the port or through the converter) and can be left in the computer as an additional drive.
They are also able to be taken out and stored if that is your desired usage. Like other flash memory and HDD memory, SD cards can store your photos, videos, and files.
Option #4: Clear Out Space on Your MacBook Air
Removing old files, unwanted applications, and system junk will free up valuable storage space on your MacBook Air. If you don’t want to use cloud storage or external devices, this is often the best option for you.
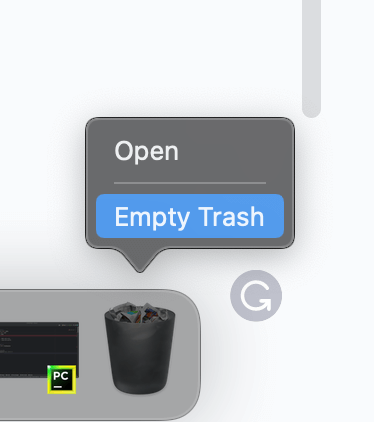
Start by looking through your Downloads folder and removing files you don’t need anymore. Make sure you empty the Trash frequently, as this can take up a significant amount of storage space. To do this, option-click or right-click on the Trash icon in your dock, and select Empty Trash.
Another way to free up space on your MacBook is by using a third-party application to sort through system files, applications, and junk data. CleanMyMac X is often one of the best tools for this job.
While not entirely free to use, it’s worth it if you have tons of system junk and applications that you don’t want to remove manually. Download and install the application to get started.
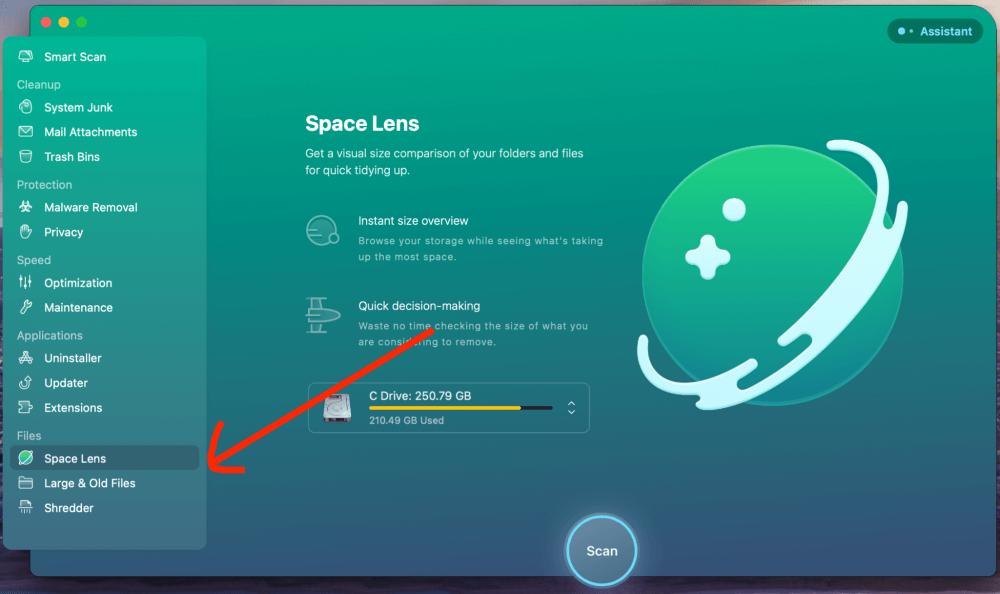
On the first launch, you’ll have the option to run a scan to detect any malware and issues on your system. If you want to go a little deeper, you can select from multiple options in the left sidebar.
Space Lens and File Shredder are perfect if you want to get an idea of what is taking up space on your Mac. You can run these utilities and quickly regain valuable storage.
Final Thoughts
There are many memory options out there that are compatible with MacBook Air. The key is finding the right storage method for your needs. We discussed several options, including using iCloud, an external hard drive or USB device, or even an SD memory card.
One of the most effective ways to add storage is by clearing up space on your existing drive. You can do this manually or with a third-party app like CleanMyMac X.
What additional memory option did you choose? Why? Let us know in the comments!