
Video Previews can be used in video editing for a variety of purposes, from previewing complex sequences or shots, to expediting the editing process and ensuring smooth playback and even to rapidly increasing final export times.
While their specific usage and codec specifics may vary from NLE to NLE, their value largely remains the same across all systems. And if you can master their usage effectively, you make your work far easier and quicker, and stand apart from the sea of novice editors.
In this article, you’ll learn how to make the best use of video previews in Adobe Premiere Pro, and ultimately learn a few tricks that will have you cutting and finishing like a professional in no time at all.
Table of Contents
We’re going to assume that you already have a project started, and an active sequence open in your timeline. If not, you can do so now so that you can better follow along, or if not, then you can follow along with our article and refer back to it later when you are seeking to modify your sequence settings.
Now, there are two ways in which you can easily call up the “Sequence Settings” window.
The first is to navigate to any sequence in your project that you wish to inspect or modify and simply right click on it. From there you should see a window pop up like this:
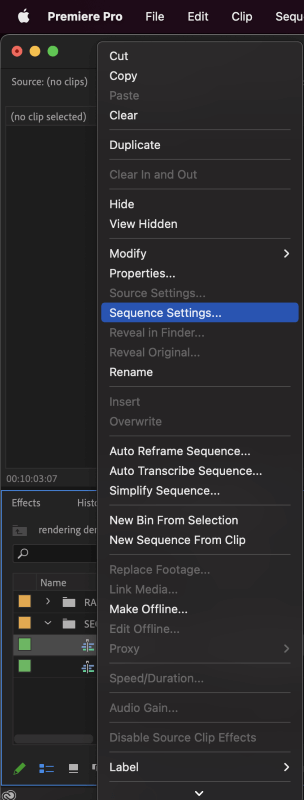
This above method is helpful when you have a lot of sequences, and you do not have the sequence in question active in your timeline window.
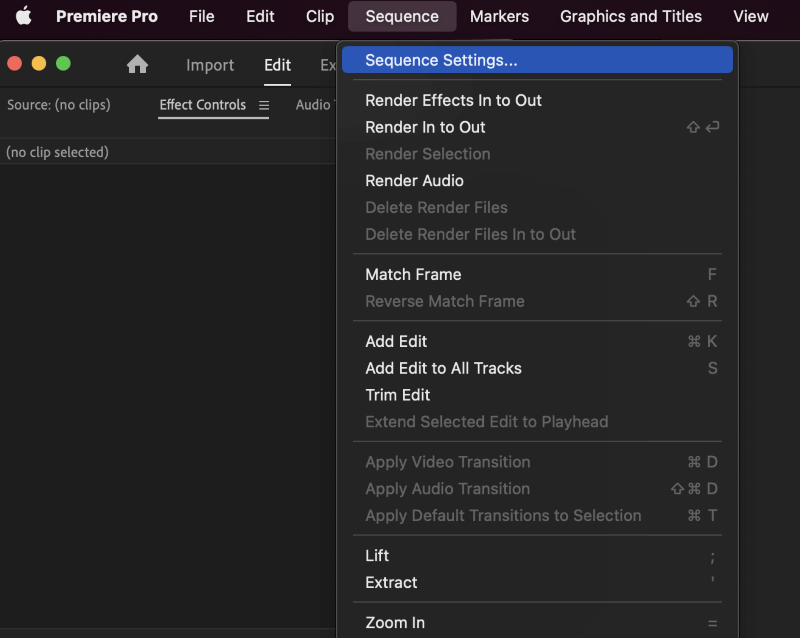
The second method is just as easy as the first but will only be helpful if the sequence is your main active edit sequence in your timeline window (otherwise you will be modifying properties for another sequence, yikes!).
To do so, simply navigate to the top of the program window and locate the Sequence dropdown menu. You should see Sequence Settings at the very top of the menu like this:
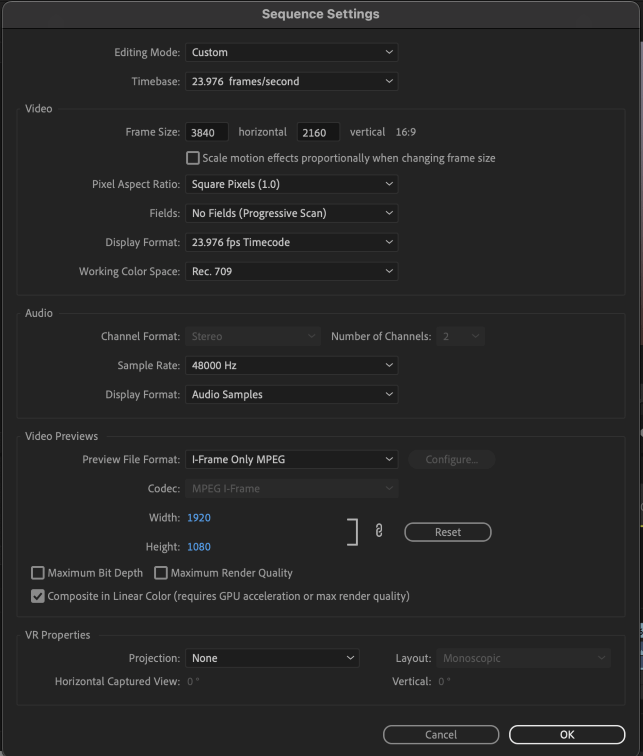
Regardless of which method you choose, either should get you to the same core sequence settings window. It should look like this (though keep in mind your sequence will likely appear different, for illustrative purposes here is a common 4K sequence):
Optimizing Your Video Preview Format
You needn’t worry about many of the other options seen here, with the exception of those items found within the Video Previews section.
You’ll note that here the sequence is set to I-Frame Only MPEG and sports a 1920×1080 resolution by default as stated above. Chances are your sequence settings will mirror this option unless you’ve already modified them previously.
Note too that you really don’t need to enable the checkboxes for “Maximum Bit Depth” nor “Maximum Render Quality” here.
There are isolated instances where I have found the “Maximum Render Quality” option helpful (in particular when doing any post-sharpening or post-blurring effects) but you likely won’t be needing them, and they can substantially slow your rendering speeds, as well as playback too. So it’s best to leave them unchecked as shown above.
Before we dive into tweaking and optimizing the file format for your video previews and the resolution, let’s first touch on why you may wish to leave these settings at their default.
In general, you could likely leave these settings all the way through the rough assembly of your edit and rely on their lower resolution and lower quality in order to expedite the editorial process, and simply use them as a low-quality draft preview prior to your final output.
Indeed, some editors don’t tweak these settings or find no need to, or simply prefer not to switch them back and forth.
One reason for this is that when you change your render preview settings, you will discard any prior render previews. This may not be a deal breaker if you are working on a short nine-second spot but could be a major setback and time loss if you are working on a feature-length project and have all of your reels already rendered.
While I would argue that you should really be reviewing any edit at a far higher quality than the draft-worthy I-Frame Only MPEG option, there may be use cases where you cannot afford to increase the quality of your render previews.
If this is so, then by all means, use what works best for you and your project. The settings and recommendations that are forthcoming may require a more powerful rig than you have at your disposal. That’s ok, if that’s the case, whatever works for you is what matters most.
And so, let’s assume that you have a sequence similar to the above, a 4K edit project (3840×2160) and you’re unhappy with the quality that the I-Frame option (1920×1080) is presenting you with.
Chances are that if this is the case, you’re no doubt seeing a host of artifacting and overall subpar video when you render your sequence and go to preview it, especially if you’re previewing it on a proper 4K display and not just reliant on your Program Monitor (which really doesn’t suffice for critical viewing).
If this scenario sounds familiar, fret not because there are many ways to find an ideal preview format that can help you, whether you’re seeking to do a final QC pass before printing your Final Deliverables, or you’re wishing to see an approximation of how a certain section is looking at near master quality.
The first thing to do is to click the dropdown menu for “Preview File Format” here:
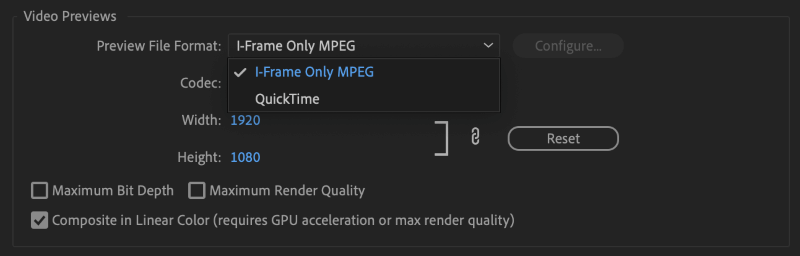
Here on Mac I only have the two available options, and your mileage may vary on a Windows PC. However, you should still see “Quicktime” as an available option to select here even on PC. In either case, click “Quicktime” and your previously lower resolution attributes should auto scale to match your sequence resolution, and the “Codec” dropdown window, which was grayed out, should now be modifiable and show like this:
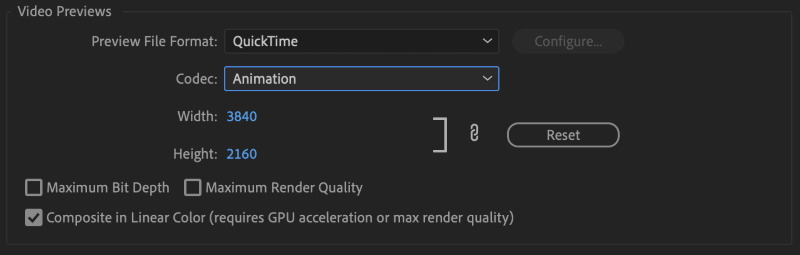
Optimizing Your Video Preview Codec
While some may click “ok”, and be done with it, it’s important to note that opting for 4K Animation Quicktime previews will be not only super massive in data size, they may not actually net you much speed gains in real-time playback either, but instead, prove far choppier overall.
This is due to the fact that the animation codec is about as lossless and heavy (data-wise) as can be. Great for animators and AE artists passing final prints to you for incorporation into your edit assembly, but not so much for previewing your edit revisions.
Leaving the resolution alone, for now, let’s drill down into the newly available “Codec” dropdown menu and see what is available to use there instead of “Animation”:

‘Well, now what do I do?’, you say? The answer isn’t exactly cut and dry, but I can certainly help narrow your options. Firstly, you can all but ignore the bottom three “Uncompressed” options, for many of the reasons stated above with regard to the “Animation” codec.
This is of course assuming that your goal is to still achieve the best quality video previews, while still maintaining real-time playback. Even if you’re seeking a master quality playback preview setting though, uncompressed formats are generally overkill, and will just eat up more hard drive space than necessary.
It is far more beneficial to your available drive space, as well as the overall stress on your CPU/GPU/RAM if you try and strike a balance, between the ideal resolution and ideal lossy compressed codec from one of the other seven remaining ProRes and DNxHR/DNxHD variants at the top of the menu shown above.
Thankfully today even the PC versions of Premiere Pro should have these formats available, though there was a long period of time where these codecs were Mac exclusive. Dark days indeed, but now thankfully the embargo has lifted and ProRes is available on all versions of Premiere Pro regardless of your OS.
And while there could likely be an entire volume written evaluating the technical advantages, merits, and shortcomings of all the ProRes variants shown above, for the purpose of brevity and simplicity, let’s focus solely on the available “422” variants.
The reason for this is that we are seeking to get the best quality preview, while keeping file size for these previews relatively low, and ultimately have a much higher quality playback in our edit, with far higher fidelity than the I-Frame Only MPEG format can ever hope to achieve.
And while I could enumerate all of the pros and cons of the 422 variants listed above, I will instead give a very brief summation of their hierarchy so as to illustrate which is of higher quality than next like so: ProRes 422 HQ > ProRes 422 > ProRes 422 LT > ProRes 422 Proxy.
If you are seeking the very best, you can opt for the HQ variant, click “Ok” and get to rendering your video previews of your sequence and see how it performs.
However, chances are that even the HQ variant will quickly balloon in data weight for your previews, so you may find better data savings and better playback speeds via the standard ProRes 422.
For what it’s worth, this is my go-to option for virtually all of my edits, and many professional editors go this route as well. If you try these first two options and you’re still not getting real-time full frame rate playback, then you may want to try the LT and Proxy variants.
If none of these are ideal, then you can certainly try the DNxHR/DNxHD codec and see if your performance and playback gains are any better.
Hopefully, at least one of these options will work for you, however, if none of them do, don’t worry, you don’t need to go back to I-Frame Only MPEG. Simply choose the codec that offers you the best playback and quality, and let’s head to the “Width” and “Height” parameters for your video previews.
Optimizing Your Video Preview Resolution
While it may be ideal to get 1:1 pixels for your render previews (relative to your source media/sequence) that may not be achievable on your edit rig, and that’s ok. Simply lower the resolution parameters here to whatever resolution nets the best playback results in your render previews.
To be sure, this whole process will require a fair bit of trial and error, as well as waiting for your video previews to render, but once you find a happy medium and an ideal preview setting for your project and edit rig, you can almost certainly apply these settings broadly to any project or edit that comes your way.
So, rest assured that all of the time spent tinkering and tweaking here will be well worth it and ultimately pay you dividends for many years to come.
It should be stated here that if you are unable to get real-time playback with the default I-Frame Only MPEG option at standard HD resolution (1920×1080) none of the above options or codecs will help you get better playback.
If this is the case, you will likely need to upgrade your equipment in order to use these higher-quality codecs and resolutions for render previews.
How to Use Video Previews for Your Final Export
This method can be incredibly useful and is akin to traveling at light speed (especially if you’re exporting a long-form edit and have pre-rendered everything in advance), but it’s important to take note of the cons as well as the pros.
There are a few key considerations to keep in mind when preparing to do this advanced export workflow.
- You will need to have rendered all of your previews in a lossless or nearly lossless format for the quality to be ideal upon final export. This should be self-explanatory. In other words, you can’t expect your I-Frame Only MPEG video previews to magically up-res to 4k (even if you can force the export to do so), nor should you expect the quality to magically increase if your source media is of lesser/lower quality than your target format/codec for your final export.
- Assuming you have the first item cleared (which may be a dealbreaker for some) you must know that you will really only see speed gains if you are outputting and rendering in a similar/symmetrical video format. In other words, you won’t see much by way of speed gains if you are cross converting from ProRes Quicktimes to H.264 (or vice versa), though you can still certainly use your pre-rendered files to output to H.264 all the same – just don’t expect a massive speed boost.
- Lastly, assuming you have observed the two prior conditions, and you’re printing a final export with symmetrical file formats, you should be able to achieve exceptionally fast export speeds. This is helpful if you are taking your 8K sequence and folding it down to 6K or 4K for example, or even HD resolution within the same format/codec space.
An ideal illustrative example of this usage would be that you’ve rendered all of the 8K ProRes 422 HQ previews of your final 8K sequence assembly and you’re ready to output a set of intermediate final exports to an array of various resolutions in ProRes 422 HQ.
In following this method you will greatly reduce the time that your NLE is needing to compress/transcode your sequence since you’ve already done the bulk of the heavy lifting ahead of time in rendering your master quality video previews.
The method isn’t altogether perfect, as there can still be some errors that occur in the final output, so a close QC viewing is always encouraged even when using pre-rendered video previews.
When done correctly though, and if all of the conditions are met above, you can save a great deal of time in the final deliverable stage of your editing process, especially when dealing with long-form edits in particular.
Here it can quite literally save hours of export time, though the savings are not quite as monumental when dealing with much shorter edits.
Take some time to experiment on your own with the above methods and workflows and see what works best for you.
Final Thoughts
As you can see, Video Previews can be used in so many different ways throughout your editorial process.
And while you don’t necessarily have to use them at all – providing your edit system is up to the task of juggling camera raws and massive modifications – they present a very useful tool to expedite and critically judge your edit effectively, whereas the stock format/codec of I-Frame Only MPEG does not.
Learning how to use Video Previews effectively throughout your edit process can help you to maximize your creative efforts as well as – most importantly – your time.
Some turn their nose up at using video previews, but they do so only out of sheer snobbery. Professionals use them all the time, and you should too if you want to make the most of your edits and ensure you are seeing the very best preview of your edit prior to your final export.
As always, please let us know your thoughts and feedback in the comments section below. What are some of your favorite video preview settings? Do you like to use video previews when exporting your final print?