
To unnest footage in Adobe Premiere Pro, just Right-click on the nested sequence. Select reveal the project, deselect the blue button below the timecode, and drag the nested files from the project panel over the nested sequence. This will reveal the nested clips.
Nesting footage in premiere pro means grouping together clips into one sequence. This helps the clip maintain its qualities and positions. Also, preserve their effects.
Nesting in premiere pro made it easy to merge short footage or sequences into a master sequence, making it easier to apply one premiere pro effect on all the clips. With these, without nesting, you will need to apply the effect on all the clips one after the other.
In this article, I will show you how to nest more than two clips in Adobe Premiere Pro, reveal the importance of nesting, how to unnest a nested sequence and an application of nested sequence using more than one effect on warp-stabilized footage.
Table of Contents
How to Nest More Than Two Clips in Adobe Premiere Pro
If your projects are open, you should have a sequence with a series of clips open too. If not, please do, and let’s fire on!
Select the clips you intend to nest. On the selected clips, right-click and choose nest from the list of options displayed in the drop box.
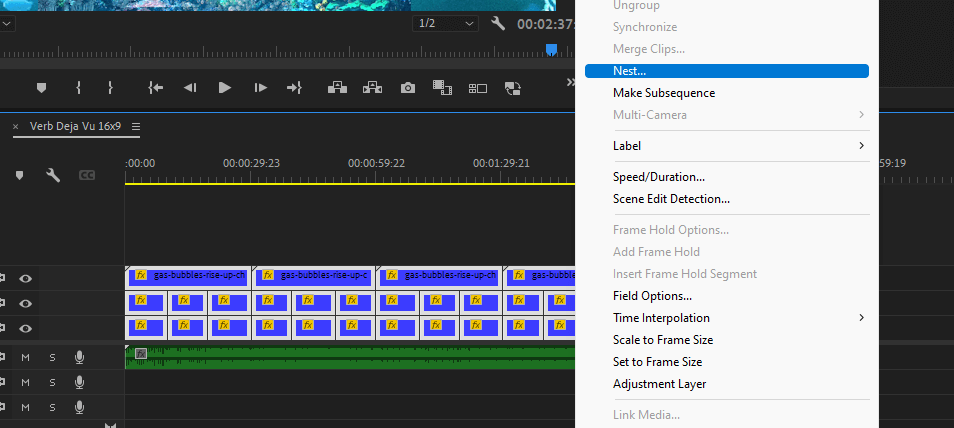
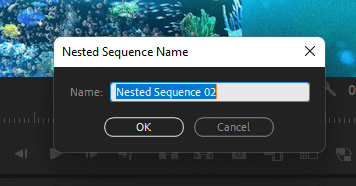
A dialogue box will pop, allowing you to name the about-to-be-created nested sequence. Click ‘OK,’ then it will create the nested sequence in your timeline, and you will see it in yellow color, well based on your Premiere Pro Preference.
Importance of Nesting in Premiere Pro
So you have successfully nested your clips– great! One application of nested sequence is you can speed ramp the whole sequence– sweet, right? Yes.
To do this, click on the Nested Sequence, right-click and select choose Speed/Duration, which you can set to your desired ratio, like 50%, then choose OK.
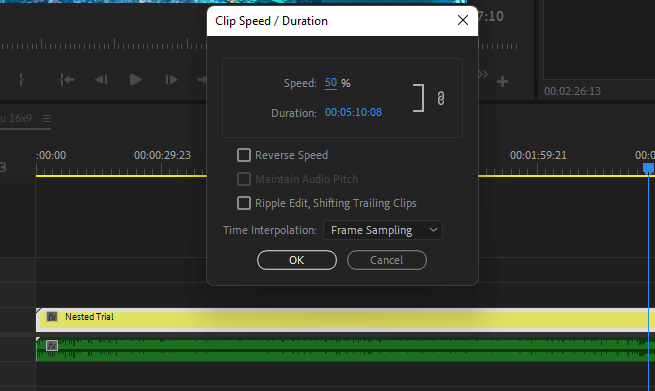
The significant feature of nesting is that this effect applies to all the clips in the nested footage at a go and will save you the time of repeating the effect on each footage.
Also, if you are willing to keep your project to a particular duration, you don’t have to turn to a mathematician to know the best time to keep each footage to achieve your desired duration.
In fact, this nested sequence is non-destructive because it does not affect the original quality of the footage.
It also allows you to edit the nested sequence being a single clip rather than applying effects inside it. If you are like me, you will love using this nested sequence because it will make you stay organized and keep your timeline tidy.
How to Unnest a Nested Sequence in Adobe Premiere Pro
One thing about a creative project is that it takes an innovative mindset. Therefore, while editing, there may be a need to unnest, and this function is not available directly the way we nest the clips.
If it happens to be immediate, you can press Ctrl+ Z, although this will undo all the effects applied to the clips inside the nested sequence.
Select the nested sequence from your timeline and double-click. This will open up the nested sequence containing only the nested clips.
Then select all the nested clips and drag them down into the main sequence; you can also copy and paste them into the track above the nested area. When pasting them, ensure your cursor is on the right timecode you want. Also, make sure you paste them into the correct video layer.
How to Nest Warp Stabilizer to Allow Other Effects
Warp stabilizer is one of the strong video effects in Premiere Pro. So, applying it might be tricky because the settings needed for the first clip cannot be the same settings for a reasonably similar clip, so you need to be able to analyze the footage one after the other.
So, you’ve applied the Warp Stabilizer effect to your footage. To apply other effects like speed ramping and all, you need to nest the footage. Follow the method I discussed above to nest it.
Also, Warp Stabilizer requires clip dimensions to work its magic. If you’ve got a 4K clip on a 1080 timeline (or vice versa), it won’t work.
To fix this, you’ll need to nest your sequence, so right-click the clip(s) on which you want to apply Warp Stabilizer and select “Nest.”
Conclusion
It can be demanding for new or intermediate users to unnest their nested footage, but it’s simple to achieve. Just follow the process above.
Open up the nested sequence, copy the clips, and paste them into the actual timecode– it is simple and straightforward.
Now that you’ve learned how to unnest your nested sequence, I want to believe you can now do that on your own effectively.
Are you finding it tough to unnest your nested sequence still? Don’t be troubled; just drop your question in the comment box, and I will respond promptly.