
To get a good final export or complete power over your project, one of the essential things you need to do as a video editor is to split clips in a sequence. And it’s easy to do in Adobe Premiere Pro.
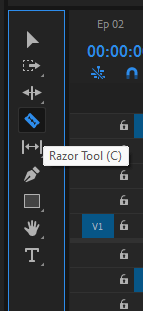
Select the razor tool (KEY C) from the tools box, select the point on your clip that you want to split, Click that area where your razor tool is, then select the move tool (KEY V) from the toolbox as well to move the clips cut around as you like.
In this article, I will discuss several ways to cut clips in a sequence and expose you to the reasons behind the cutting of the clips.
Based on my experience with some YouTube video content creators, video editing should be straightforward. Importing the video in your timeline, doing a few things, and exporting it should be all you need to do.
I must tell you video editing goes beyond that. Video editing often involves a lot of cuts and re-cutting of the raw video clips in the timeline. So, it involves more splitting and rearrangement of clips in the sequence timeline.
Table of Contents
Splitting or Separating Clips with Razor Tool
Splitting a clip in Premiere Pro means working gradually on video clips to create multiple clips. Footage that comes out directly from the camera will never be exactly what you planned as a creator because, during shooting, there will be some irrelevant moments that you will need to remove.
The Razor tool, which you can enable with the KEY C on your keyboard, is the most consistent tool that you will be using in Premiere Pro. Now, let’s cut some clips using this fantastic tool. After you finish importing the clips you want to edit. Select the razor tool.
At this point, click anywhere on a clip in your sequence, which will cut the clip. Then you can do anything with the clips.
Using Current-Time Indicator for Splitting
The time indicator is the most efficient way to split your clip as it will be the exact point you want to cut it. Drag the Time Indicator to the part of the clip you would like to split. Be sure that the video you are about to split is highlighted on the left side of the timeline.
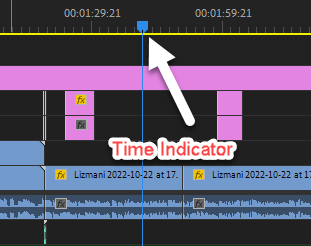
Then Press Ctrl Key + K on the keyboard to split the clip. With this method, if the audio track is highlighted too, the splitting will affect it.
Keyboard Shortcut to Split Video Clips in Premiere Pro
Select the clip you want to split. Then, press KEY C on your Keyboard, enabling the Razor tool. Drag your mouse to your cutting point and click to cut.
After which, you will press KEY V to select the Move tool so you can move your clips around as you want.
After all splitting methods, You now have two clips or more from the same footage, separated by a cut(s). With this, you can manipulate the clips independently as you wish. Keep on reading for some more in-depth tips on how to trim and cut your clips more efficiently.
How to Split Multiple Clips At Once
If you have multiple clips overlapping in tracks and you want a quick way to cut them all at once at the exact timecode so you can save yourself the stress of cutting them one after the other, select the razor tool, Press and hold the SHIFT KEY,
Then drag your razor around to the actual cutting timecode, and click to cut. See how beautiful that works. I’m sure you will love it.
How to Delete a Cut or Splitted Clip
Deleting a clip should be one of the simplest things in Premiere Pro. The way to delete part of your clip is to split them into two – the wanted and the unwanted part. Then, select the unwanted portion and hit DELETE.
How to Combine Two or More Clips
Let’s say you didn’t get things right at the beginning of your long shoot and later got it right towards the end. Then, you would need to cut out the useless part and put together the best part together. How do you do that? This is where cutting and combining clips come in.

In Premiere Pro, you can combine two clips by adding them to the same sequence. To do this, simply drag one clip on top of the other in the Timeline panel. The top clip will be placed over the bottom clip, and you can then adjust their positions relative to each other as needed. You can also change the order of the clips by dragging them around in the Timeline panel.
How to Separate Audio From A Video Clip
To separate audio from video on the Premier Pro timeline, select the clip you want to separate. Then, right-click on the selection and choose Unlink from the menu that appears.
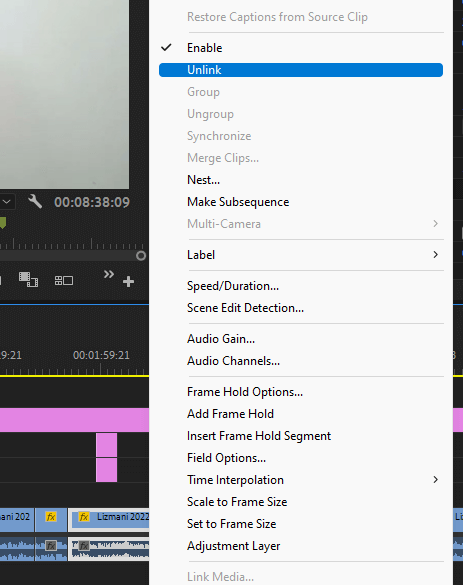
This will unlink the audio and video tracks, allowing you to move them independently of each other.
Conclusion
Splitting a clip within Premiere Pro is an effortless task that definitely can change your video style or add a special effect to the Premiere Pro software. For example, you can split a clip into two parts to add a different transition between the two sections.
Alternatively, you can split a clip into multiple parts to create an interesting montage effect. Whatever your reason for splitting a clip, it’s easy to do within Premiere Pro. Select the Razor tool KEY C, cut your clips and select KEY V to move your clips around.
Got any questions for me, kindly drop them in the comment section, and I will respond promptly.