
To speed up a clip in Premiere Pro, select the clip you want in your sequence timeline, press Ctrl + R, then set your speed percentage above 100%, which is the normal speed rate, to about 200% from the speed/duration effect panel.
There are a few reasons we might speed up our clip in Adobe Premiere Pro. One reason is that we might want to create a sense of urgency or excitement in our video. Another reason is to condense a lot of information into a short amount of time.
In this article, I will take you step-by-step through how to speed up a video clip. I will also explain the rate stretch tool and the speed ramp and show you ways to speed up to achieve the time-lapse effect.
Table of Contents
How to Speed Up a Clip in Premiere Pro
To speed up the whole or a certain part of the video clip, select the video clip you want, right-click on the clip, and select Speed/Duration from the dropdown menu.
Set your speed/ duration to about 200%, or drag it towards the right-hand side to increase the percentage.
Shortcut to Speed Up a Clip in Premiere Pro
After selecting the clip you want to speed up, press Ctrl + R set your speed/duration percentage above 100%, and your video clip will speed up.
Speed Ramp in Adobe Premiere Pro
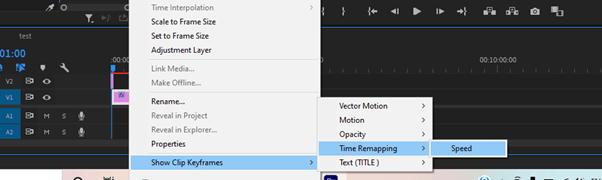
To create a speed ramp in Adobe Premiere Pro, select the clip you want to apply the effect and right-click on it. A drop-down menu will show; follow the arrow to the end of that drop-down menu. Go to Show Clip Keyframes > Time Remapping > Speed.
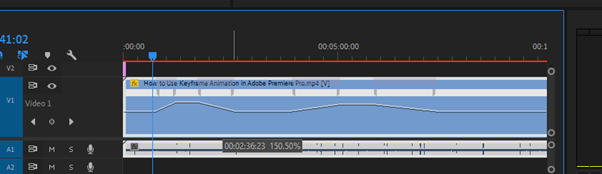
After you select speed, a thick white bar will appear on your clip. After that, enlarge the video track in the timeline to be able to work on the white thinner line in the middle. Use this thin white line to control and modify the speed of the video clip.

Drag it down with the move tool, which will slow down the footage, and drag it up to speed it up. If you check closely, you will notice the Speed percentage. Thus, to have a smooth transition, press Ctrl + a single click to create a keyframe and move the keyframe to a side. Doing so will create a physical ramp going from one speed to another.
You can keep up polishing the speed ramp by moving the keyframes to adjust the duration of the transition and by trying different speeds to achieve the effect you want.
Rate Stretch Tool in Premiere Pro Explained
The rate stretch tool is another method to either slow or speed up a clip in Premiere Pro. Press the key R to select the rate stretch tool or you select the rate stretch tool from the tools bar.
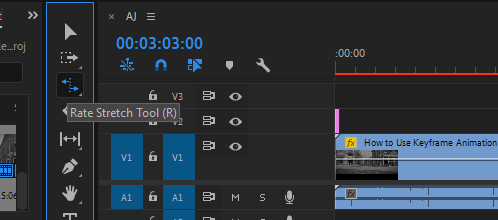
Navigate to the end of the clip and push it back towards the front of the clip to speed it up. To make it smooth, right-click on the clip and select time interpolation. Click on optical clips to generate new frames.
What is Time-Lapse Effect in Premiere Pro
The time-lapse effect in Premiere Pro is achieved by speeding up the recording of images. This is often done by increasing the frame rate, which results in a smoother and more fluid video. When played back at normal speed, the action appears to be accelerated.
One way to achieve a time-lapse effect is to speed up the rate at which the film is played back. You can do this by increasing the frame rate. Increasing the frame rate will result in a smoother, more realistic playback.
To do this in Premiere Pro, Add a video clip to your timeline, search your effect panel for time fx, and drag posterize time effect on your clip. Now, right-click to select the speed/duration to 2000% and select okay.

Conclusion
Speeding up a clip in Adobe Premiere Pro is a relatively simple process that you can complete in just a few steps.
By following the steps outlined in this article, you can easily create a faster version of your video. With a bit of practice, you’ll be able to make even more creative and unique videos.
If you find it tough to understand anything from the article, don’t be troubled; just drop your question in the comment box below.