
You should be saving all of your work both on your device AND in a secondary location like iCloud. To save and backup files on your device, open your Procreate gallery and select the files you want to save. Select Share, choose the file type and click Save to Files.
I’m Carolyn and I’ve been using Procreate to run my digital illustration business for the last three years. This means that daily, I am confronted with the fear of losing all of my precious work. This is one of the most important habits to develop before it’s too late.
There are a variety of different ways in which you can save and back up your Procreate work. It doesn’t matter how you do it, just do it! Below I will outline a couple of straightforward ways that I ensure my work is safe and sound from the threat of total destruction.
Table of Contents
How to Save Your Procreate Work
This will be slightly different from the method I discussed in my article How to Export Procreate Files as today we will be focusing on two types of your work, finished work and work that is still in progress.
Saving finished work in procreate
You will want to choose a file type that you can use IF the worst happens and you lose your original file.
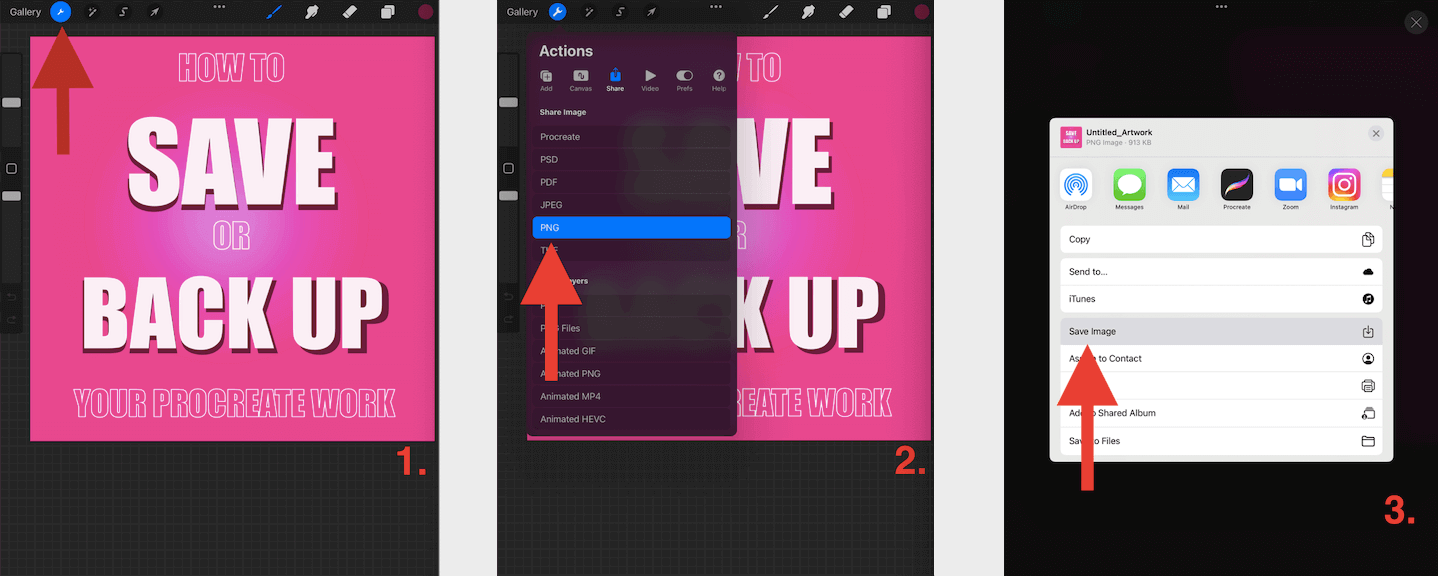
Step 1: Choose the finished project you wish to save. Click on the Actions tool (wrench icon). Select the third option which says Share (white box with an upwards arrow). A drop-down menu will appear.
Step 2: Once you have chosen which file type you need, select it from the list. In my example, I chose PNG as it is a high-quality file and can always be condensed in the future if needed.
Step 3: Once the app has generated your file, an Apple screen will appear. Here you will be able to choose where you wish to send your file. Select Save Image and the .PNG file will now be saved in your Photos app.
Saving the work in progress
You will want to save this as a .procreate file. This means your project will be saved as a full Procreate project including original quality, layers, and time-lapse recording. This means if you go to open up the project again, you will be able to pick up where you left off and continue working on it.
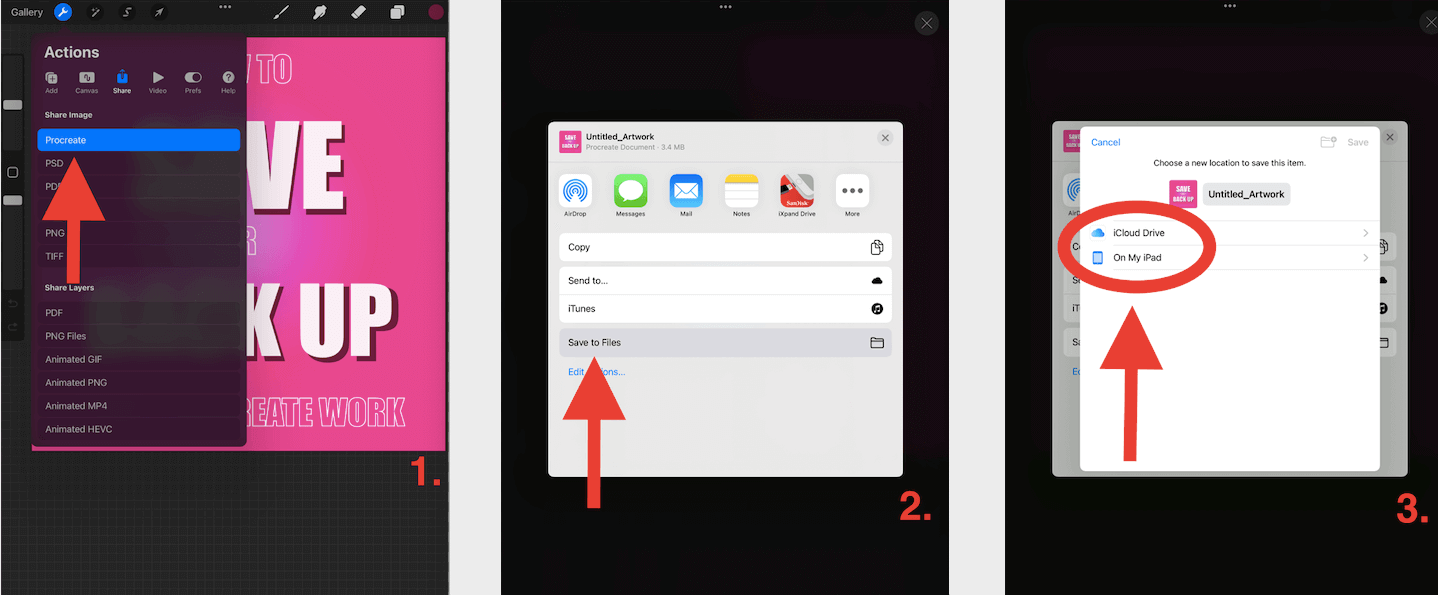
Step 1: Choose the finished project you wish to save. Click on the Actions tool (wrench icon). Select the third option which says Share (white box with an upwards arrow). A drop-down menu will appear and select Procreate.
Step 2: Once the app has generated your file, an Apple screen will appear. Select Save to Files.
Step 3: You can now choose to save this file to your iCloud Drive or On My iPad, I highly recommend doing both.
Options to Back Up Your Procreate Work
The more places you can back up your work, the better. Personally, I back up all of my work on my device, in my iCloud, and also on my external hard drive. Here’s a quick breakdown of how to do it:
1. On your device
Follow the steps above to save your file in whatever format you choose. You can save your finished work in your Photos and save your unfinished work as .procreate files in your Files app.
2. On your iCloud
Follow the steps above for Saving Work That is Still in Progress. When you get to Step 3, select iCloud Drive. You will now be prompted to choose a folder. I created one labeled Procreate Backup – In Progress. This makes it clear for me to find when I’m frantically searching my iCloud after my iPad has crashed…
3. On your external hard drive
If you value your peace of mind, I recommend investing in an external hard drive to back up all of your work. At the moment, I’m using my iXpand Drive. I simply input my drive into my iPad and drag the files from Procreate to my external hard drive icon.
Saving or Sharing Multiple Projects At The Same Time
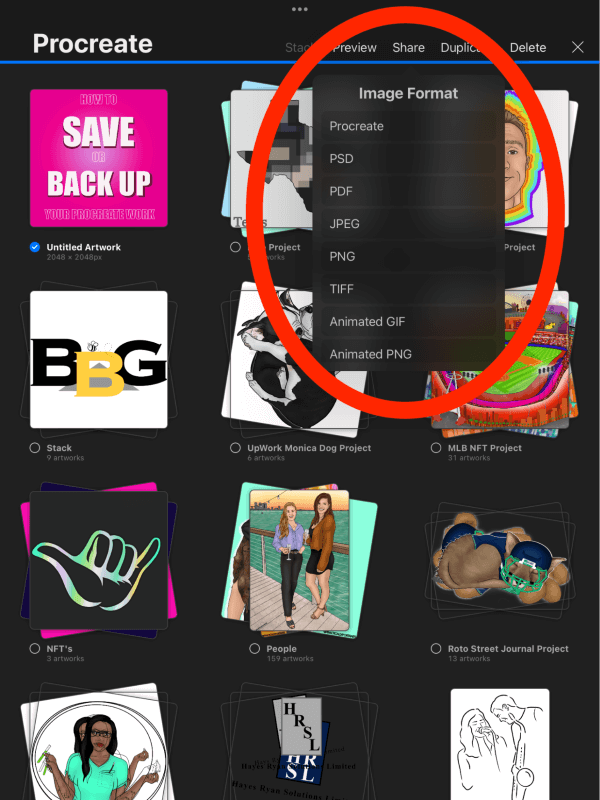
There is a quick way to convert multiple projects into your chosen file type and save them. Simply open your Procreate Gallery and select the projects you want to save. A drop-down menu will appear and you’ll have the opportunity to choose which file type you want. Then all you have to do is save them to your files, camera roll, or external hard drive.
FAQs
Below I have briefly answered some of your questions related to this topic:
Where does Procreate save files?
The answer to this question is exactly why it is so essential to manually save and back up your own work.
Procreate does NOT automatically save files on your device as some other apps do. The app automatically saves each project to the app Gallery periodically but it does not save the files anywhere else.
How to back up Procreate files with layers?
You must manually save your project with layers. Then transfer that saved file to your iCloud or external hard drive.
Does Procreate save automatically?
Procreate has an awesome auto-save setting. This means that every time you lift your finger or stylus off of the screen on an open project, it triggers the app to save your changes. This keeps all of your projects up to date automatically.
However, these changes are only saved within the Procreate app. This means that Procreate does NOT automatically save your projects to your device outside of the app.
Final Thoughts
Technology is a lot like love. It’s incredible but it can also break your heart, so be careful giving it all you have. The auto-save function on the Procreate app is not just convenient but essential. However, all apps have glitches and you never know when they’re going to happen.
This is why it is so important to get into the habit of saving and backing up your own work in multiple different locations. You will thank yourself for putting in the extra two minutes when you recover hundreds of projects that you spent hours of your life working on.
Have your own backup hack? Share them below in the comments. The more we know, the better we can prepare for that worst-case scenario.