
Exporting files on Procreate is easy. Simply click on the Actions tool (wrench icon) and then select Share. This will show you a drop-down list of all the available file formats. Select the format you want. An options box will appear and you can choose where you want your file exported to.
I’m Carolyn and I’ve been working with clients from my digital illustration business for over three years. I’ve had to create digital projects in every file type and size you can imagine. Whether you’re printing t-shirt designs or creating a company logo, Procreate provides a variety of file types you can use.
Procreate makes this process seamless and easy. It also allows you to export your designs not only in the most common JPEG, but PDF, PNG, TIFF, and PSD files. This provides the user with the flexibility to produce work in the best-suited format and today, I’m going to show you how.
Table of Contents
4 Steps to Export Files in Procreate
In just a matter of moments, you can have your project saved to your device in whatever format you need. Here is the step by step on how to do it:
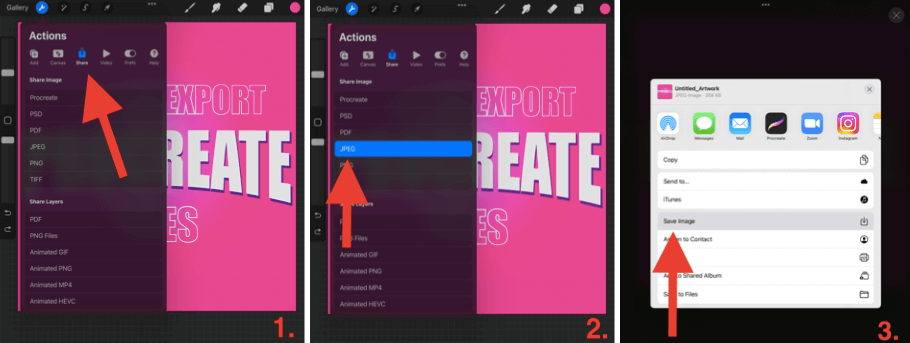
Step 1: Ensure your work is completely finished. Click on the Actions tool (wrench icon). Select the third option which says Share (white box with an upwards arrow). A drop-down menu will appear.
Step 2: Once you have chosen which file type you need, select it from the list. In my example, I chose JPEG.
Step 3: Once the app has generated your file, an Apple screen will appear. Here you will be able to choose where you wish to send your file. Select Save Image and JPEG will now be saved in your Photos app.
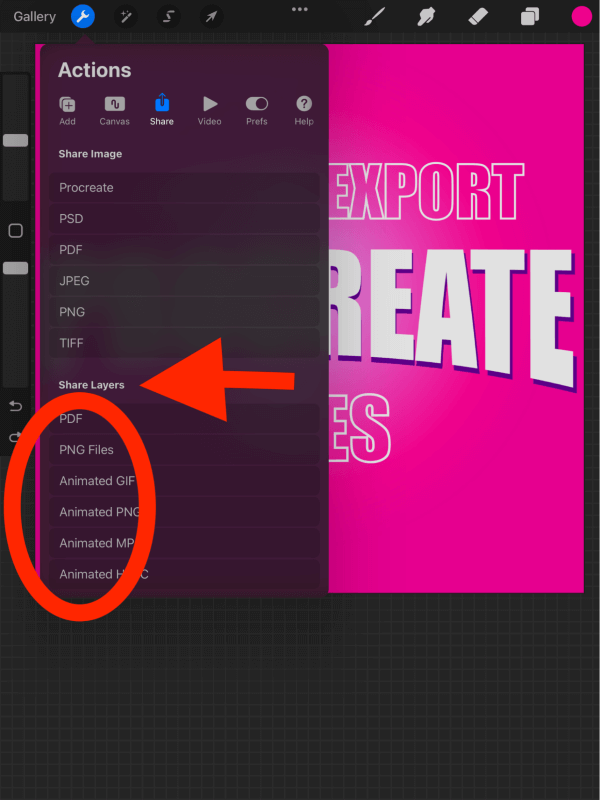
How to Export Procreate Files with Layers
Follow my step-by-step above. In Step 2, at the bottom of the drop-down menu, you can choose which format you want all of your individual layers saved as. Here is what will happen to your layers:
- PDF– Each layer will be saved as an individual page of your PDF document
- PNG – Each layer will be saved in a folder as an individual .PNG file
- Animated – This will save your file as a looping project, each layer acting as a loop. You can choose to save it as GIF, PNG, MP4, or HEVC format
Procreate Export File Types: Which Should You Choose & Why
Procreate offers many options of file types so it can understandably be hard to choose which one is the best for you. Well, it all depends on where you’re sending your file and what it is being used for. Here is a breakdown of your options:
JPEG
This is the most versatile file type to use when exporting images. The JPEG file is widely supported by many websites and programs so it is always a safe bet. However, the image quality can decrease as the file is condensed into a single layer.
PNG
This is my go-to file type. By exporting your image as a PNG file, it preserves the full quality of your work and it is also widely supported by many websites and programs. This file type also preserves transparency which is essential for work without a background.
TIFF
This is a great option if you’re printing your file. It preserves the full quality of the image and therefore will be much larger file size.
PSD
This file type is a game changer. The PSD file preserves your project (layers and all) and turns it into a file that’s compatible with Adobe Photoshop. This means you can share your full project with your friend or colleague who hasn’t joined the Procreate club yet.
This is the perfect option if you’re sending your file to be printed as is. You can choose your quality (Good, Better, Best) and it will be translated into a PDF file just like if you were to save a file on Microsoft word.
Procreate
This file type is unique to the app. It’s very cool as it will save your project exactly as it is on Procreate. Best quality is guaranteed and it will also embed the time-lapse recording of your project into the file (if you have this setting activated on your canvas).
Follow my step-by-step above until you get to Step 3. Once the window appears, you will have the option to save or share your file however you wish. You can share your file in many different ways such as via AirDrop, Mail, or Print. Choose your destination and voila, it’s done!

FAQs
I have briefly answered some of your frequently asked questions below:
Can you export Procreate files to Photoshop?
Yes! Follow my step-by-step above and ensure you export your project as a .PSD file. Once the file is ready and the next window appears, you will be able to save the file or send it directly to your Photoshop app.
Where are Procreate files saved?
With most of the available file types, you can choose where to save your file. The most common would be to save to your Camera Roll or save to your Files.
Can I save Procreate files as multiple file types?
Yes. You can save your project as many times as you want and in any format you need. For example, I can save my project as a JPEG if I need to send it via email, and then I can save it as a PNG also to use for printing.
Final Thoughts
Procreate’s file options are another great quality of the app. It allows for a broad range of choices and options thus you can guarantee you have the best file needed for your project. This is an essential tool for me as my diverse client list means I have to produce files for a multitude of functions.
Whether it’s printing brochures or providing animated NFT artwork, this app allows me full control when it comes to exporting my projects. The hard part is managing my storage on my devices so I can keep all of these awesome file types.
Do you have a go-to file type? Please feel free to share any information or tips you may have in the comments section below. I love hearing your feedback and I learn from each one of your comments.