
As long as you share pictures digitally, you will almost inevitably need to resize an image at some point. If you’ve been struggling to find the tools for this, Photopea is a convenient solution – it’s a free online photo editor which means you won’t need to download any software or even create an account.
Photopea has a familiar interface for those of you who are experienced in photo editing. It closely resembles Photoshop and does many of the same things. It’s also pretty intuitive and easy to pick up for new users.
In this tutorial, I’ll show you how to resize an image in Photopea, step by step – through opening the file, changing the dimensions, as well as some related questions that come up when using this tool.
Follow me and I’ll show you how!
Table of Contents
Step 1: Open Your Image
Open your file by selecting Open from Computer. Find your image on your computer then click open.
Step 2: Resize the Image
With your image open in Photopea, find the Image button on the top left. Select it and a drop-down menu will appear, from the menu select Image Size. Or, simultaneously hold down CTRL, ALT, and I – Photopea supports keyboard shortcuts.
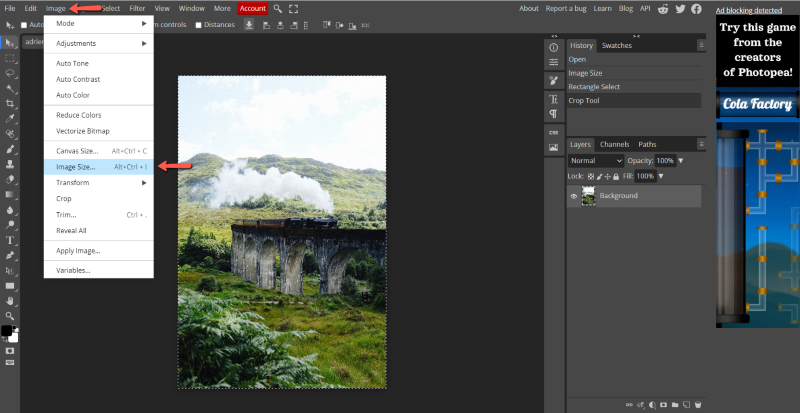
Photopea will give you the option to edit dimensions in pixels, percent, millimeters, or inches. Choose the option that works for you.
If you are not certain of the dimensions you want, be sure to select the chain link button to automatically maintain the proportion or aspect ratio. Unselecting it again will let you change height and width separately.
Once you’ve adjusted the dimensions to the desired size, hit OK.
Quality Considerations
Keep in mind that while making your image a smaller size won’t make it appear to be lower quality, it’s not possible to enlarge an image without losing quality. This is true regardless of software.
The “Image Size” menu also brings up an option to change DPI — meaning “Dots Per Inch”. This number indicates the picture quality. Making it lower will leave you with smaller file size, but try not to lower it beyond the standard 72 for screen or 300 for printed work.
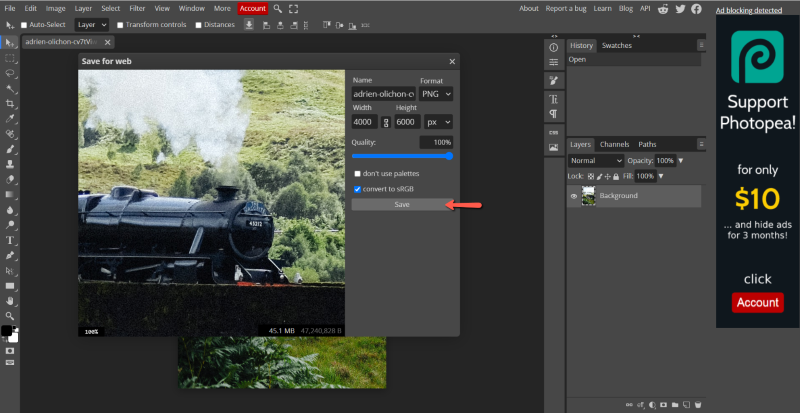
Step 3: Save the Resized Image
Navigate to the File button on the top left. From the drop-down menu, select Export as, and then whichever file type you’re using, likely JPG or PNG. JPG will give you a smaller file size, while PNG will give you lossless compression.

From here you’ll get another option to change the size and quality. You can choose to make your adjustments here if you find it more convenient. Hit save and the file will save to your computer.
Additional Tips
You may also find related tools like Canvas Size, the Crop tool, and Free Transform useful.
You can find Canvas Size directly above Image Size under the Image menu, or by holding down CTRL, ALT, and C. It brings up an options menu that looks similar to the Image Size menu. Changing the dimensions here, however, will crop the image rather than compress or expand it.
The Crop tool, found on the left-hand toolbar, performs the same function but allows you to experimentally drag the canvas borders rather than enter numbers.
The Free Transform tool lets you change the size of an image within the confines of the already set canvas size. Find the selection tool from the left hand toolbar, make the selection by clicking and dragging, and then right click. From the menu that pops up select Free Transform. Click anywhere on the edge and drag to resize, then click the checkmark to confirm.
Final Thoughts
Whenever you need to quickly change the size of a photo, you now have this handy tool called Photopea. Just make sure to remember the difference between image size and canvas size, and when image quality is important, maintain the quality by not enlarging the image or going below the standard DPI.
Have you found Photopea to be a convenient option for photo editing? Share your perspective in the comments and let me know if you have any questions.