
Resizing the canvas allows you to change the dimensions of your artwork, whether you want to make it larger or smaller. It’s a handy feature that can help you adjust the size of your composition or create a new canvas with specific measurements.
Hi there, I’m Zoe! As an illustrator and graphic designer familiar with the ins and outs of Clip Studio Paint.
In this article, I’ll cover all the essentials of resizing your canvas in Clip Studio Paint starting by exploring the Change Image Resolution function. I’ll also share some valuable tips to ensure your artwork maintains its quality, even if you decide to change its dimensions later on.
Let’s get started!
Table of Contents
Key Takeaways
- Remember, it’s always better to start on a larger canvas and reduce its size, as it preserves the quality of your work.
- Resizing is different from cropping. While cropping trims your canvas to a smaller area, resizing involves scaling your artwork either up or down.
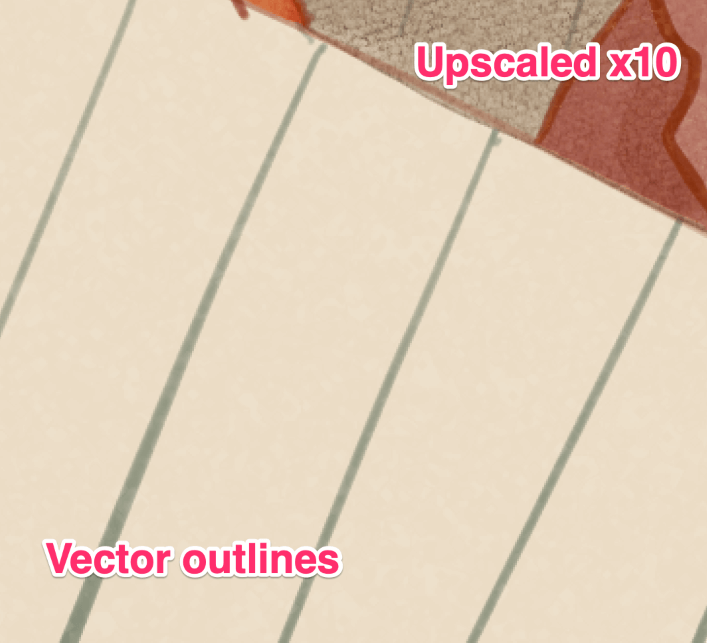
- Using vectors for your outlines from the start is a great habit to maintain. Vectors retain their quality when you resize them.
- You can undo the scaling using the keyboard shortcuts Ctrl + Z (Windows) or Command + Z (Mac), and start over until it looks its best.
Here’s the step-by-step guide to properly resizing your canvas in Clip Studio Paint.
Note: All screenshots from this tutorial are taken from the CSP Mac version.
How to Change Canvas Size in Clip Studio Paint
You can use the Change Image Resolution options to resize canvas in Clip Studio Paint. Here are the steps to get the perfect canvas size for your artwork.
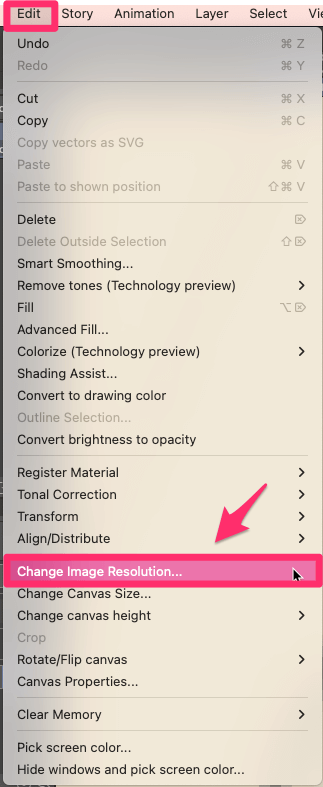
Step 1: Navigate to the top menu and click on Edit to reveal a dropdown menu. From the menu, select Change Image Resolution.
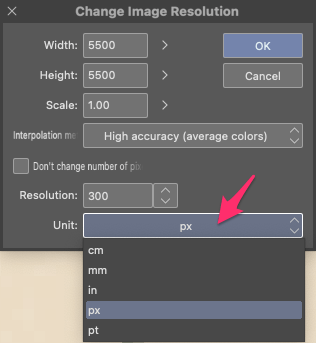
Step 2: In the Change Image Resolution dialog box, you’ll see different fields where you can input the new dimensions for your canvas. You have the option to adjust the width, height, resolution, and the measurement unit.
Click on the dropdown menu next to Unit and choose your preferred option, such as pixels, inches, centimeters, or millimeters.
Enter the desired Width and Height values in the respective fields. Both values are linked, so changing one will automatically adjust the other.
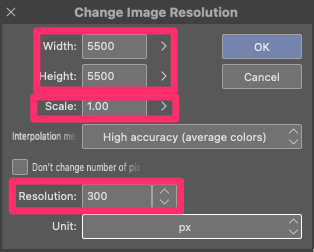
Alternatively, you can enter a Scale value to make your artwork bigger or smaller. For example, entering a value of 2 will double the size of your artwork. Changing the Scale value will automatically adjust the width and height accordingly, keeping everything in proportion.
Similarly, adjusting the Resolution will automatically change the canvas’ width and height. Opting for a higher resolution, such as 300 dpi, is a safe choice that works well for both digital art and printing, providing you with versatile options for your artwork.
Step 3: Choose an Interpolation Method that controls how edges and colors are adjusted during the resizing process. These methods determine the smoothness or sharpness of the final result.
If you’re simply resizing a blank canvas, you can skip this step.
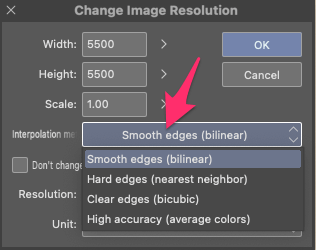
Here’s a quick overview of the Interpolation Methods:
- Smooth Edges (Bilinear): Blends nearby pixels for smooth transitions between colors, but may slightly blur the image.

- Hard Edges (Nearest Neighbor): Duplicates pixels without considering neighbors, maintaining sharp edges but potentially appearing slightly jagged.

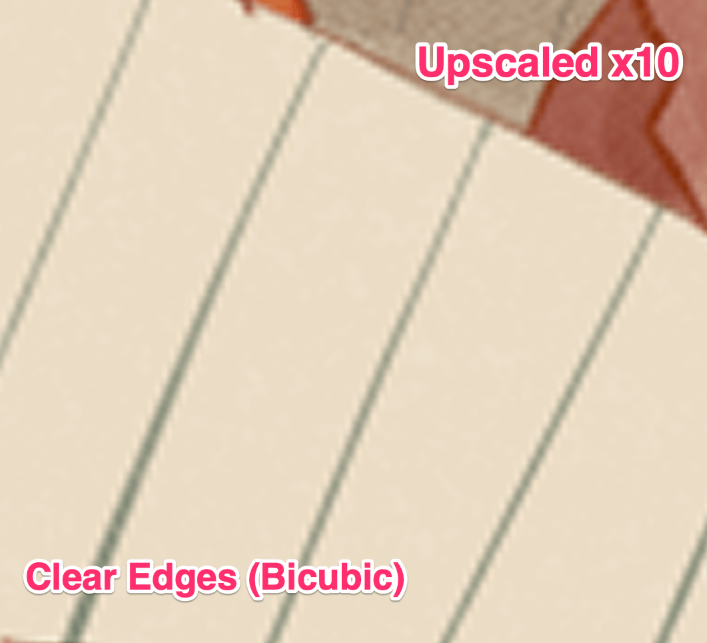
- Clear Edges (Bicubic): Blends neighboring pixel colors for smooth outlines, providing more defined edges than bilinear interpolation. May introduce some white noise around outlines.
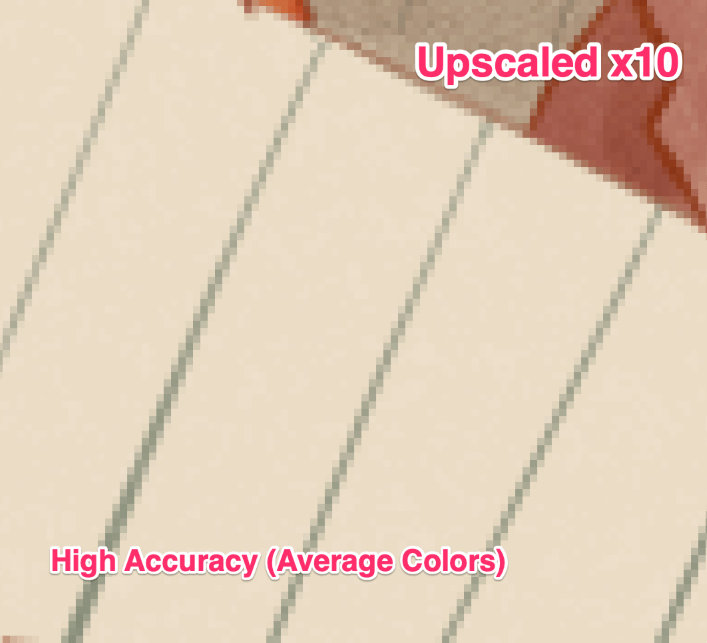
- High Accuracy (Average Colors): Calculates accurate average colors for each transformed pixel. Scaling up enhances sharpness, and scaling down produces smoother lines. This can result in some outline blurring and longer processing time.
Which method is best? It depends on your preference and the specific image. Bilinear is a popular choice for most scenarios, providing a good balance of smoothness and clarity. Experiment with different methods to find the one that suits your artwork best!
Step 4: Once you’ve set the desired dimensions and chosen the appropriate resampling method, click on the OK button to apply the changes. Clip Studio Paint will resize the canvas based on your specifications.
Your canvas is now resized! You can continue working on your artwork, adjusting the composition or adding new elements as needed.
Pro Tips on Upscaling and Downscaling Your Artwork
Now that you’ve learned how to rescale your canvas, let me share a few tips to enhance your workflow. By incorporating these tips into your creative process, you’ll always have the flexibility to ensure your illustrations look their best, regardless of their size.
- Start Big, Scale Down: If you’re unsure about the final size you want, it’s recommended to begin with a larger canvas and then scale it down later. This approach ensures that you maintain the quality and sharpness of your artwork during the resizing process.
- Downscaling: When you decrease the size of your artwork, there is no loss in quality. The software automatically adjusts the pixels to fit the new dimensions while preserving the sharpness of your artwork. This means you can confidently reduce the size without worrying about losing details or clarity.
- Upscaling and Vectors: If you find the need to increase the size of your artwork, vectors become incredibly useful. They preserve the definition of shapes when scaled up. In Clip Studio Paint, using vector layers is a smart approach to ensure clear outlines that can be easily scaled up whenever needed.
Remember, even if you didn’t apply these tips right now, it’s valuable to learn them in the future. Giving yourself flexibility and avoiding limitations in your artwork allows you to freely explore different directions without being constrained by initial decisions.
Final Thoughts
Resizing your canvas gives you the flexibility to explore layouts, adapt to different platforms, or prepare your artwork for printing. By following the steps and tips we’ve covered, you now have the knowledge and skills to confidently rescale your artwork.
I hope this guide has been helpful in understanding the process of resizing your canvas. If you have any feedback or tips, feel free to share them in the comments section below!