
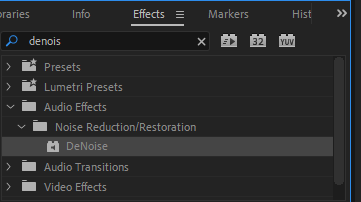
Getting rid of the wind noise in your footage in Adobe Premiere Pro is quite simple. Select the clip with the wind noise, go to Audio Effects, search for Denoise, then drag and drop it onto your audio clip. You can tweak how the fx behaves in your Effects Control Panel.
My name is David, and I am a video editor. I have worked with many known brands taking several movie and audio projects. I use Adobe Premiere Pro for all my projects, and I’ve been doing this for the past ten years.
In this article, I will explain how to eliminate wind noise using denoise, high pass, and parametric EQ f in Adobe Premiere Pro. And finally, I will give you some pro tips regarding wind noise.
Table of Contents
- Getting Rid of Wind Noise Using Denoise in Adobe Premiere Pro
- Getting Rid of Wind Noise Using the High Pass Filter in Adobe Premiere Pro
- How to Remove Wind Noise in Adobe Premiere Pro Using Parametric EQ
- How to Totally Remove Wind Noise in Adobe Premiere Pro
- How to Avoid Wind Noise in the Video Production Stage
- Conclusion
Getting Rid of Wind Noise Using Denoise in Adobe Premiere Pro
Choose the clip with the wind noise. Go to Audio Effects and search Denoise, then drag and drop it onto your audio clip.
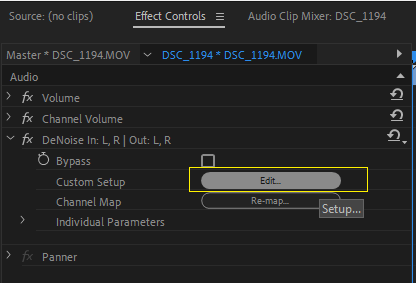
After that, go to the effect control panel and select denoise. Click the edit button to adjust the auto-denoise effect you dragged onto your audio clip.
Now a function box will pop up, and here you can choose from the presets if you want the noise reduction to be heavy or light. Drag the line under the Processing focus forward or backward to select your desired option and the intensity of that effect.
If you explore downward, you can adjust your denoise manually from the Processing Focus.
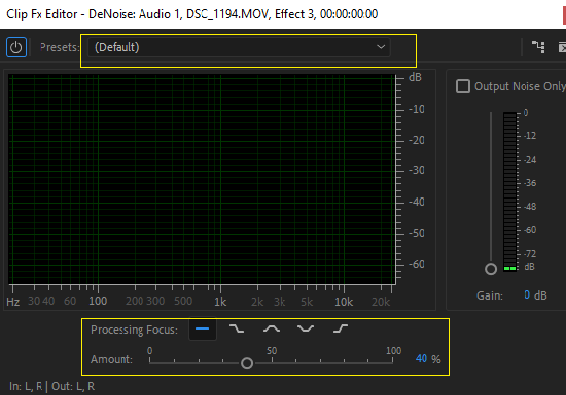
Be cautious and avoid focusing on the sounds. The DeNoiser effect can degrade the sound quality of speech or background music, so only use a small amount to decrease extraneous noise without distorting your voice.
Once satisfied, click on the Apply button to apply the effect.
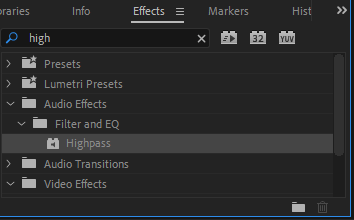
Getting Rid of Wind Noise Using the High Pass Filter in Adobe Premiere Pro
As expected, you have your Premiere Pro opened. Now, search the Effects Panel for the High Pass Filter fx. Drag and drop it onto your clip.
Open the high-pass filter settings and adjust the frequency to around 200 Hz. Begin with a minimum of 10 and gradually increase while monitoring audio. When you are satisfied with the results, continue with your editing process!
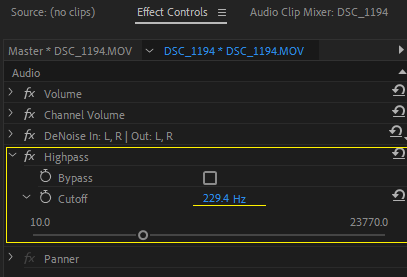
The problem with this approach is that it may thin down your vocals while reducing the wind noise; thus, it’s a quick but harsh way to eliminate wind noise.
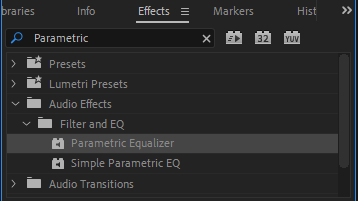
How to Remove Wind Noise in Adobe Premiere Pro Using Parametric EQ
Select the audio clip from which you want to reduce wind noise in the project panel. Go to the Effects panel and search for the Parametric EQ effect. Drag the parametric EQ effect onto the audio clip.
Adjust the Low Cut Frequency and High Cut Frequency in the Effect Controls panel. To reduce the wind noise, play the audio clip and adjust the Low Cut and High Cut until you have a good result.
To further reduce the wind noise, adjust the EQ and Gain sliders. When satisfied, click OK to apply the effect.

How to Totally Remove Wind Noise in Adobe Premiere Pro
Adobe Premiere Pro cannot totally eradicate wind noise. However, there are some techniques that you can use to reduce wind noise in your audio, such as using audio filters, noise reduction plugins, and equalization.
Additionally, you can use a windshield, pop filter, or other noise-reducing accessories when recording audio.
How to Avoid Wind Noise in the Video Production Stage
Move the microphone as far away from the source of wind as possible. Use a windscreen, foam, or a dead cat, as we call it (specialized windscreen), to reduce the sound of the wind.
Use a directional microphone that is more sensitive and less susceptible to sound coming from the side and back.
If possible, record indoors or in a sheltered area. If you are recording outdoors, choose a location with less wind. If shooting handheld, use a grip or shoulder mount for extra stability.
Choose the right gear for your production. For example, use a microphone with an extended low-frequency response if you are recording outdoors. Make sure your audio cables and connections are secure.
Experiment with different angles and distances between the microphone and the wind source.
Conclusion
After putting a lot of time and effort into editing and working on your footage, having the audio disrupted with wind noise will make all the effort useless. Thus, it’s advisable to work on the audio.
To get rid of the wind noise in your footage in Adobe Premiere Pro, select the clip with the wind noise. Go to Audio Effects and search “Denoise,” then drag and drop it onto your audio clip. After that, go to the effect control panel to tweak your settings. As simple as that.