
To remove background noise from your audio in Adobe Premiere Pro, go to the “Audio Effects” tab in the Effects panel. Select the “Denoise” effect. Set the “Noise Level” to the level you want to reduce the noise. Increase the “Reduction” level if necessary.
Preview how your clip will sound with the DeNoise effect applied. Make any necessary adjustments to the effect settings. Once you’re happy with the settings, click “OK” to apply the effect.
My name is David, and I am a video editor. I have worked with many known brands taking several movie and audio projects. I use Adobe Premiere Pro for all my projects, and I’ve been doing this for the past ten years.
In this article, I’ll show you how to remove audio background noise, how to best clean up audio, how to use an audio noise reduction plugin, and how it’s possible to remove background noise.
Table of Contents
How to Remove Background Noise from Audio in Premiere Pro
First, import your noisy audio into your sequence timeline in Adobe Premiere Pro and be ready to work on it by navigating to the Essential Sound panel.
To get to the essential sound panel, go to the Windows menu > Workspace > Audio. Alternatively, press ALT + SHIFT + 3, and the Essential Sound Panel will appear on the right side of your workspace.
Select your noisy audio in your timeline, and then select dialogue from your essential sound panel.
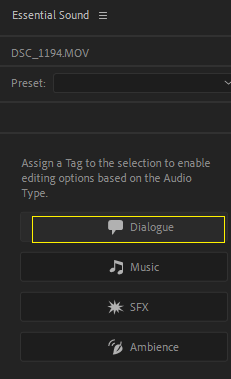
Afterward, go to the repair section under the dialogue function and double-check the reduced noise setting.
After checking the noise reduction, you will discover a slider under the “Noise Reduction” section. This will identify and reduce the background noise in the audio.

This slider will help you reduce or increase the intensity of the background noise in your audio. Let the intensity of the noise reduction bar be around the middle to avoid a bad output. By doing this effectively, your audio background noise will disappear.
Using Denoise in Adobe Premiere Pro
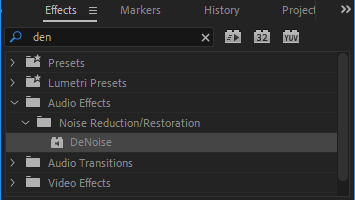
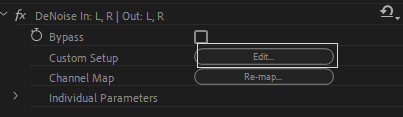
Go to the effect panel, search for denoise, select it, and drag it down on your audio clip. Then, go to the effect control panel and select denoise. Click the edit button to adjust the auto-denoise effect you dragged onto your audio clip.
Go to the effect controls panel to select edit from the denoise effect.
Now a function box will pop up, and here you can choose from the presets if you want the noise reduction to be heavy or light.
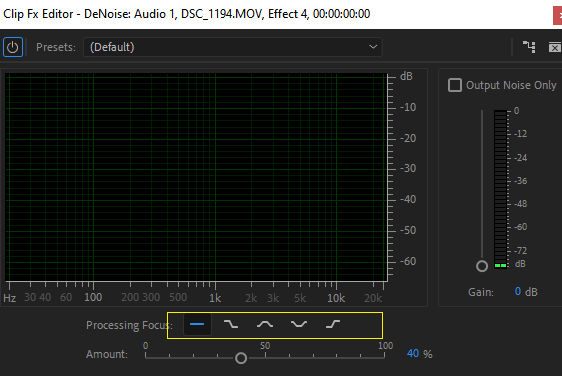
If you explore downward, you can adjust your denoise manually from the Processing Focus. Drag the line under the Processing focus forward or backward to select your desired option and the intensity of that effect.
Note: If you already have a good sound recording from your production stage (while recording), using these functions may work well or even better.
Presets for Noise Reduction in Adobe Premiere Pro
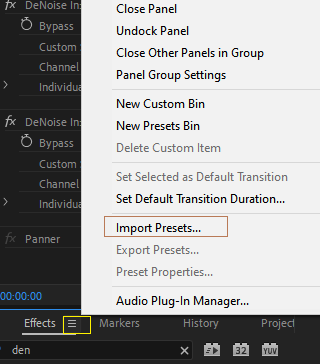
Just as its name implies, Presets can make life immensely easier. To import presets, Navigate to the three lines to the right of the effect panel; Select Import Presets from the drop-down menu. Choose the audio preset file that you wish to import.
Presets from a preset file now appear in the Effects Panel. Drag the preset from the effect panel to the audio clip in your sequence timeline.
You may need to modify it. To adjust, go to the effect control panel and choose Edit beneath the preset you dragged into your audio.
You can get various types of audio presets on the internet; a mere google search will do the magic!
Conclusion
It is simple to remove audio background noise in Adobe Premiere Pro. Keep listening to your audio throughout the editing process, as little tweaks may significantly impact the final product’s sound quality.
To summarize, to eliminate background noise with Adobe Premiere Pro, go to the effect panel and look for denoise. In your sequence timeline, drag this effect onto your audio clip.