
Recording your own voiceover in iMovie is as simple as selecting the voiceover tool, pressing the big red button to start recording, and pressing it again to stop recording when you’ve said what you had to say.
But as a long-time filmmaker, I know that the first time you try something in a movie editing program it can feel a bit foreign. I remember whispering and stumbling through my first few voice recordings in iMovie because I wasn’t really sure how it was all going to work.
So, in this article, I’ll take you through the steps in more detail and give you a few tips along the way.
Table of Contents
How to Record and Add Voiceover into iMovie Mac
Step 1: Click in your timeline wherever you want the recording to start. By clicking, you are setting the playhead (the vertical grey line which marks what will be shown in iMovie’s viewer) in this spot and telling iMovie where it should start recording your voice.
For example, in the screenshot below I have placed the playhead (see the #1 arrow) at the beginning of the clip where the Famous Actor is about to shout at the heavens.
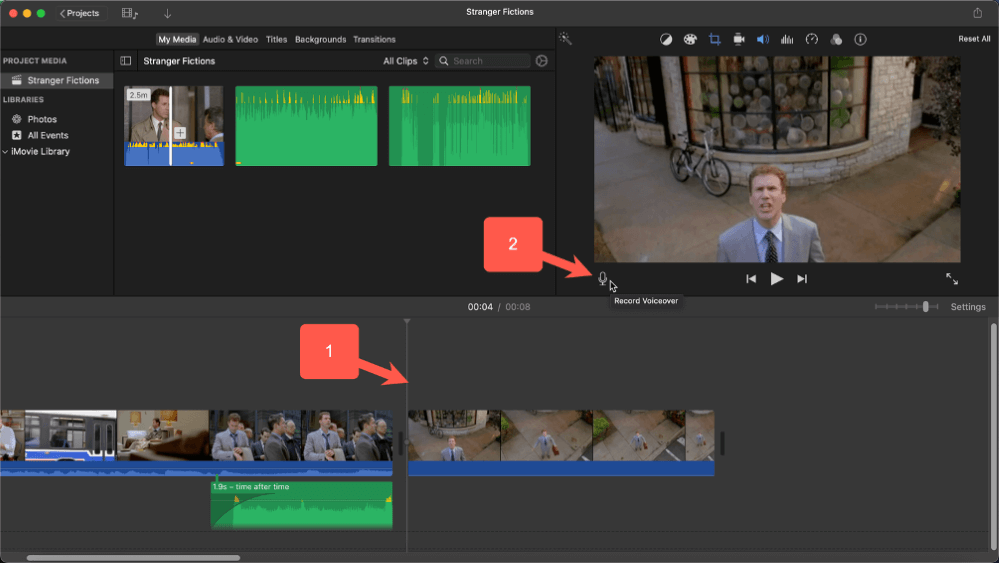
Step 2: Click the Record Voiceover icon, which is the microphone at the bottom left of the viewer window (where the #2 arrow in the screenshot above is pointing)
Once you’ve clicked on the record voiceover icon, the controls at the bottom of the viewer window changes and looks like the screenshot below.
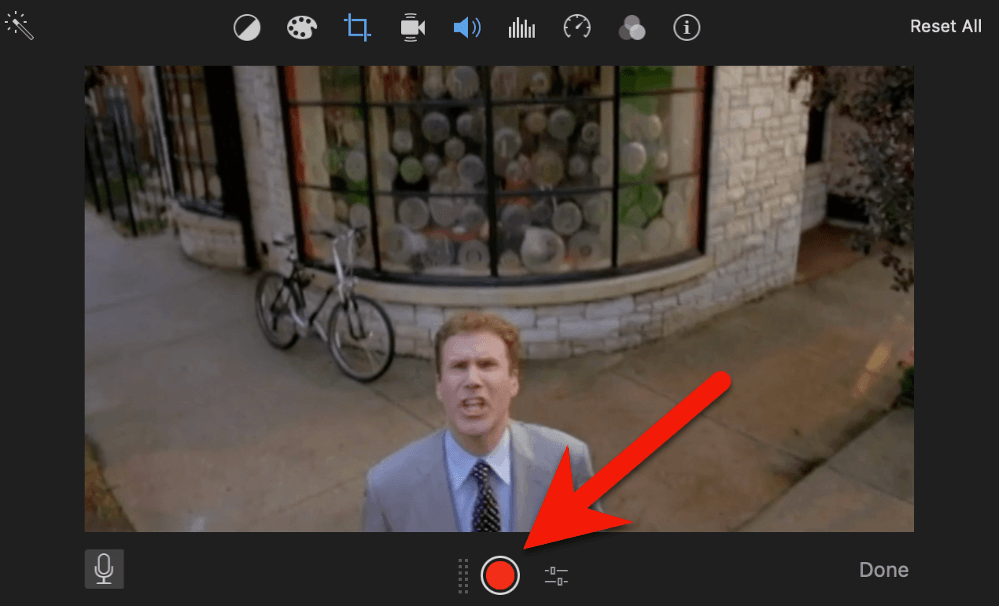
Step 3: To start recording, simply press the big red dot (shown by the big red arrow in the screenshot above).
Once you have pressed this button, a three-second countdown – which is marked by beeps and a series of numbered circles in the middle of your viewer – begins.
After the third beep, you can start talking, clapping, or recording whatever noise your Mac’s microphone can pick up. As it records, you will notice a new audio file, starting where your playhead was placed in step 1, and growing as you ramble on.
Step 4: To stop recording, click on the same big red record button (which is now a square shape). Or, you can also just press the spacebar.
At this point, you can play back the recording to see if you like it, by moving your playhead to the starting point, and pressing the spacebar to start your movie playing in the viewer.
And if you don’t like the recording, you can just select the audio clip, hit delete, put your playhead back at the starting point, press the (now round again) record button, and try again.
Step 5: When you are satisfied with your recording, click the Done button in the bottom right of the viewer menu and the voiceover recording controls will disappear and the usual play/pause controls will reappear at the bottom center of the viewer window.
Changing the Record Voiceover Settings in iMovie Mac
If you press the icon just to the right of the big red record button (where the red arrow is pointing in the screenshot below), a gray box appears with a short list of settings you can modify.
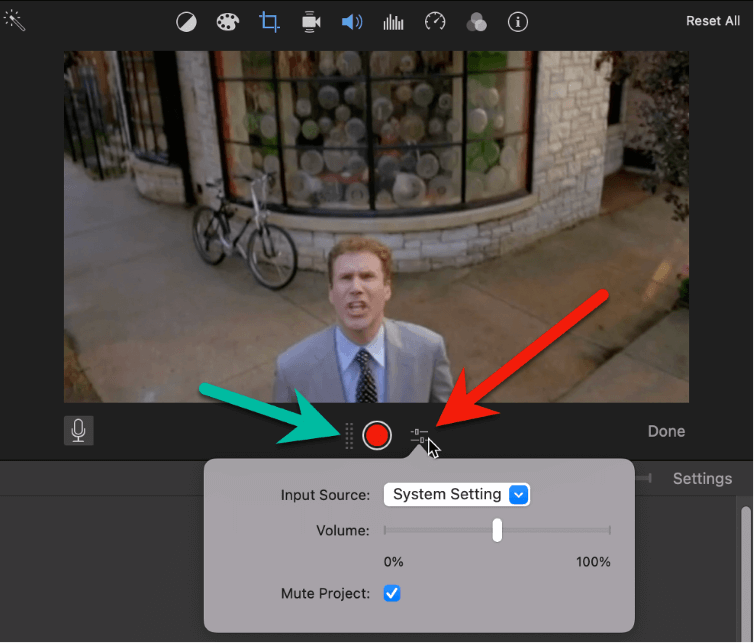
You can change the Input Source for your recording by clicking on the drop-down box. By default, it is set to “System Setting”, which means whatever input is selected in the Sound section of your Mac’s System Settings. This is usually your Mac’s microphone.
But if you own a specialty microphone that you have plugged into your mac, or have applications installed that allow you to record directly from them, you can select any of these as the source for the sound you will be recording.
The Volume setting allows you to change just how loud the recording will be. But note that you can always change the volume of your recording in iMovie by raising or lowering the volume of the track in the timeline.
Finally, Mute Project turns off any sound that would be played by your mac speakers if you were playing your video while recording. This can be handy if you want to talk about what is happening in your movie as your movie plays.
If the video wasn’t muted, you risk having the video sound duplicated – part of the video clips audio and in the background of your recorded voiceover clip.
Editing Your Voiceover Clip in iMovie Mac
You can edit your voiceover recording just like any other audio or video clip in iMovie.
You can move your music around in your timeline simply by clicking and dragging the music clip. You can also shorten or lengthen the clip the same way you would a video clip – by clicking on an edge and dragging the edge right or left.
You can also “fade in” or “fade out” the volume of your recording by dragging the Fade Handles in the audio clip to the left or right. For more information on fading audio see our article How to Fade Music or Audio in iMovie Mac.
Finally, if you want to change the volume of the clip, click on the clip, then move your pointer over the horizontal bar until your pointer changes to the up/down arrows, shown by the red arrow in the screenshot below.
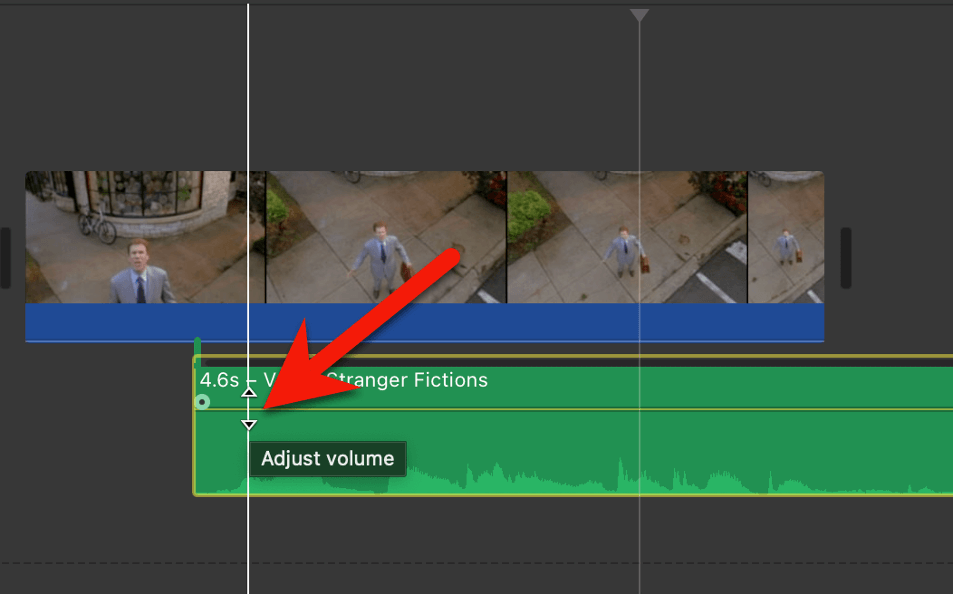
Once you see the up/down arrows, click and hold as you move your pointer up and down. The horizontal line will move with your pointer and the size of the waveform will grow and shrink as you raise or lower the volume.
Importing a Pre-Recorded Voiceover to iMovie on Mac
iMovie’s tools for recording voiceover are pretty straightforward and provide enough options in the settings to handle most voiceover needs.
But it is worth remembering that the audio clip iMovie produces through the recording tool is just another audio clip. You could record your voiceover in another application or have a friend (with a better voice) email you a recording.
However it is recorded, the resulting file can simply be dragged and dropped into your timeline from the Mac’s Finder, or even an email. And once it is in your timeline you can edit it in any of the ways we described above for editing voiceovers that you recorded yourself in iMovie.
Final Thoughts
I hope I’ve helped you feel confident enough about how recording a voiceover works in iMovie that you play around with it and can enjoy working it into your moviemaking.
And remember, you can record anything your microphone can pick up – it doesn’t have to be just you talking.
For example, maybe you need the sound of a dog barking in your movie. Well, if you have a dog, you know how to use iMovie’s record voiceover tool so all you need to know now is how to get your dog to bark.
Or maybe you want to record the swish of a revolving door and you have a MacBook with plenty of battery left… you get the idea.
In the meantime, please let me know if you found this article helpful or think it could have been clearer, simpler, or is missing something. All constructive feedback is appreciated. Thank you.