
Millions of people use iPhones for daily communication. Sometimes those text messages become important mementos used for work, study, and more — or even pieces of evidence for court.
Today, I’m going to share 4 different ways to print your iPhone text messages, along with step-by-step guides.

In case you’re in a rush to find a solution that works best for you, here’s a breakdown:
- If you only need to print a few texts, try Method 1 or Method 2.
- If you want to print dozens or hundreds of messages, try Method 3 or Method 4.
- If you intend to present your text messages in a court or for legal purposes, we advise you to consult a lawyer to confirm which format is valid.
Note: The screenshots below were taken from my iPhone with iOS 11. If you are using a new iPhone, the images may not be applicable. In any case, the process looks more or less similar to what is displayed below.
Table of Contents
1. Copy Text and Email It to Yourself via Mail App on iPhone
This is the best way to print out your messages when you don’t need time/date stamps. Mind that the contact information of the other party involved in the conversation — as in who says what, will be unavailable.
This method is a bit tedious for me because I have to copy and paste messages one by one. When it comes to a large amount of data, it’s definitely not an efficient solution. But if you want to print out just a couple of messages for backup purposes, it’ll come in handy.
Here’s how to do it on your iPhone:
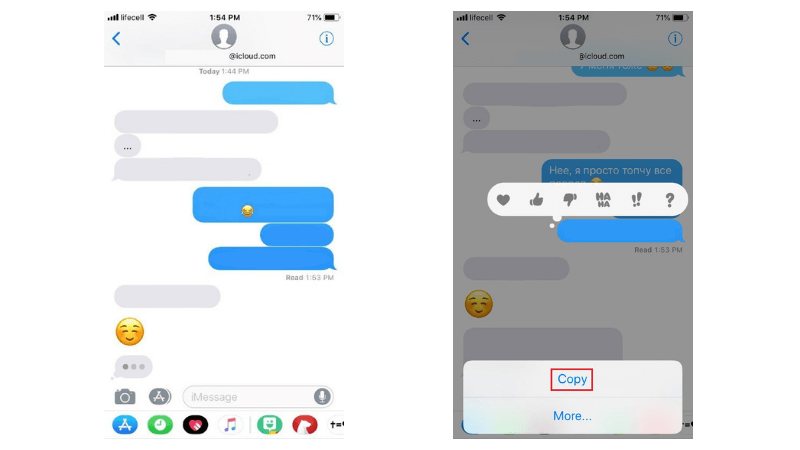
Step 1: Open iMessages or any other text message app on your iPhone. Choose a conversation, find a message you want to print out, press and hold it until you see a “Copy/More” dialogue. Then tap on the Copy option.
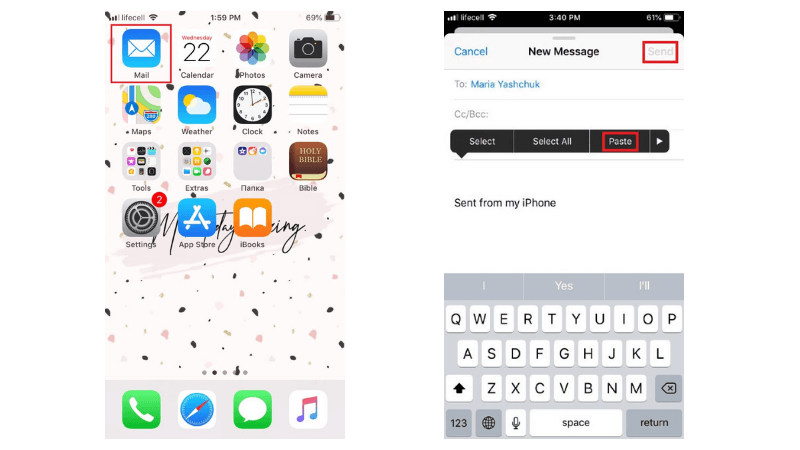
Step 2: Open the Mail app on your iPhone. Paste the copied text into the New Message field, enter your email address, and push “Send.”
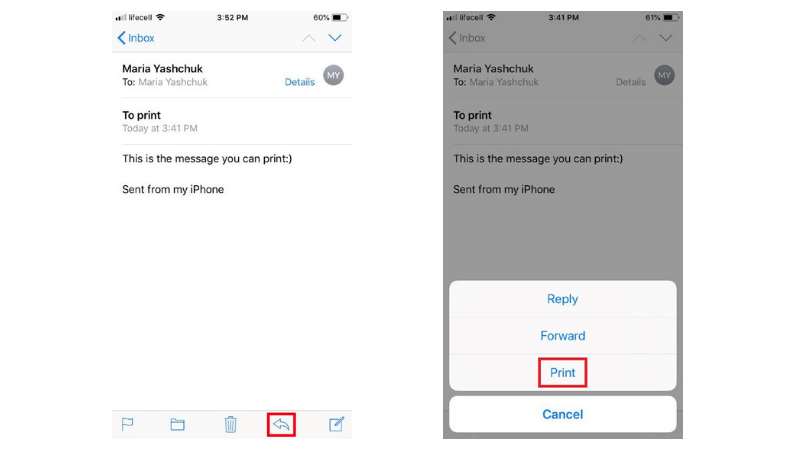
Step 3: Ding-dong! You have a new email. Open it, then tap on an arrow at the bottom right corner (it’s highlighted in red in the screenshot below). Choose the print option. Then select a connected AirPrint-enabled printer and start printing. That’s super simple!
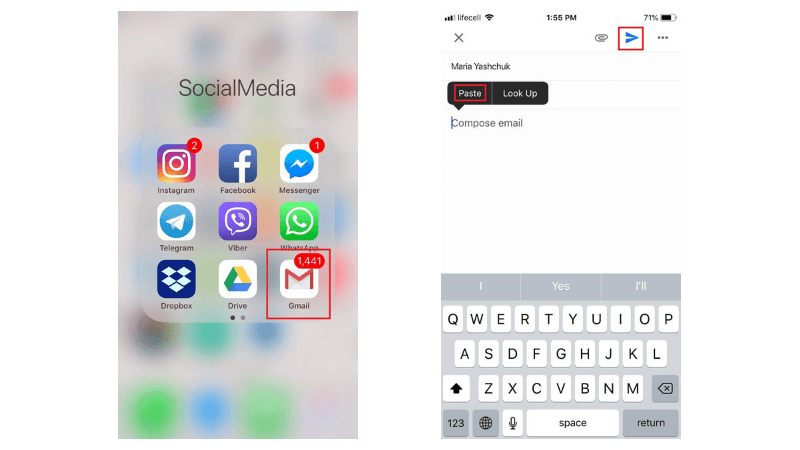
If you use any other apps to send emails, you can also use them. The steps are basically the same. For example, I prefer Gmail to the Mail app and I don’t have an AirPrint-enabled printer. That’s why sending emails with copied messages to my Windows PC via Gmail is much easier. Doing so, I can print out emails straight from my computer.
2. Take iPhone Screenshots and Print Out as Images
Like the previous method, this one requires you to have an AirPrint printer or a PC/Mac connected with a printer. The best part about taking screenshots is that it allows you to save all the important details, including contact info, together with the date and time of the conversation. Still, this method isn’t the best when you want to print a lot of messages at the same time.
Taking screenshots of your messages is especially helpful when dealing with a court case. You may be required to present actual screenshots from your iPhone. To be on the safe side, ask your lawyer whether you can present your text messages as a piece of evidence in a court case and which printing method is preferred.
To print out messages this way, you need to take screenshots and then print them from your iPhone via AirPrint printer. Here’s how to do that in detail:
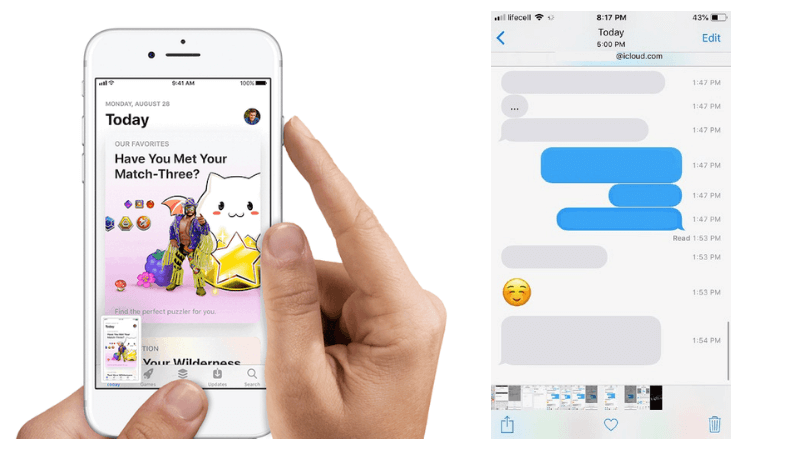
Step 1: Open the text conversation on your iPhone. To take a screenshot, press and hold the “Home” and “Power/Lock” buttons simultaneously for a few seconds. If you want to reveal each message’s time stamp, slide left on the screen. It may be hard at first to do that while holding the screenshot buttons, but you can get the hang of it quickly. This Apple guide has more.
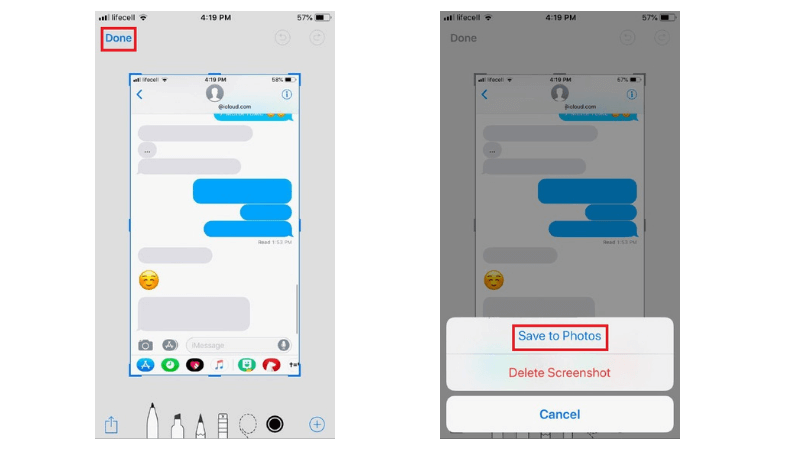
Step 2: Once the flash appears on your screen, the screenshot is done. To save it to Photos, tap on “Done” at the top left corner. You’ll see two new options — choose “Save to Photos.”
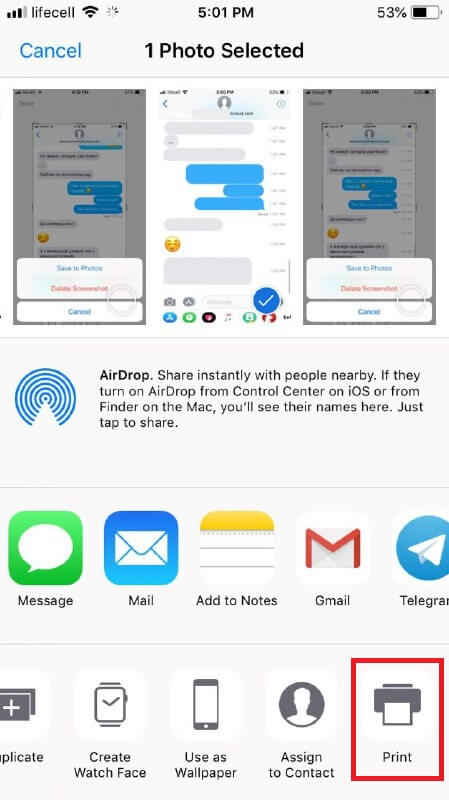
Step 3: Go to Photos app and select the screenshot you want to print. Tap on the square with an arrow pointing upwards and you’ll see the “Print” button. Press it to start printing.
You can also email these screenshots to yourself and print them as images from your PC or Mac.
3. Contact Your Phone Carrier to Request a Copy of Text Message History
You can request text messages for various reasons, but getting them from your phone carrier can be tricky. Not every service provider is ready to disclose such sensitive data. In fact, some of them don’t store the content of text messages at all — only your contacts, date and time.
The best way to get this done is to inquire from your phone carrier’s customer care about their text message policy. It’s likely that they will ask you to provide a good reason for your request. You may be even asked to fill out and notarize a special form. The phone carrier may also reject your request if you don’t present them a legal document from the court.
On this subject, my teammate JP has some info related to this. He was using phone services with AT&T while living in the United States. AT&T had a web portal that allowed him to not only check billing info, data usage but text message info as well.
So, if you don’t have the time to make a call, you may want to try logging into your phone carrier’s official website and check if you can get a copy of the text messages. It may not work for everyone, but it’s definitely worth spending a minute to check.
4. Export Messages in Batch using Software and Save as PDFs
When it comes to printing a lot of messages, there’s no better way than to back them up on your computer and save as PDFs. To perform this task, you’ll need your iPhone, a USB cable, an iPhone manager app, and a Windows PC or Mac computer.
As I mentioned before, I work on a Windows PC. I’ll show you how to export the messages using the program called AnyTrans. A good alternative is iMazing which also allows you to save and print text messages hassle-free.
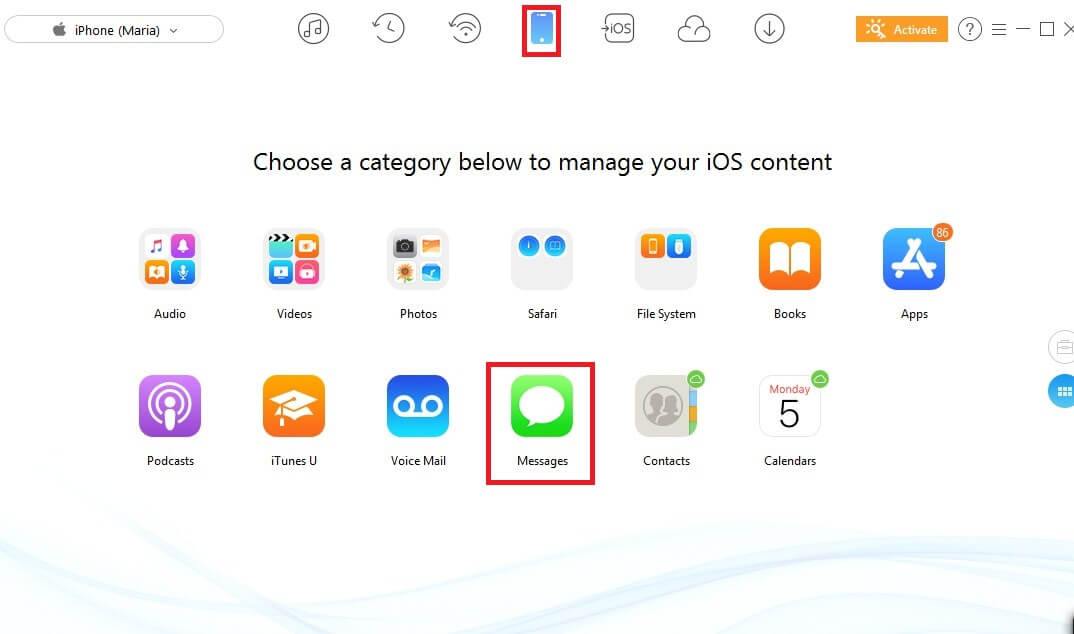
Step 1: Download AnyTrans and install the program on your computer and run it. Click the Device tab on the homepage and scroll down to manage your iOS content. Choose “Messages”.
Pro tip: If you find no messages here, click “Refresh” to back up your iPhone to PC first. Then, repeat the first step again.

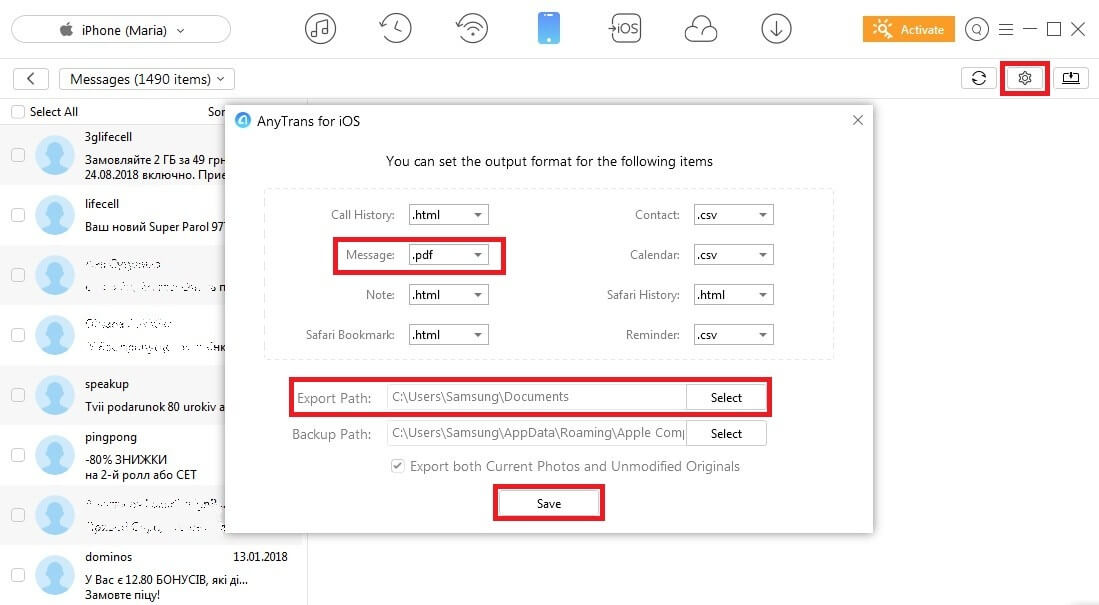
Step 2: With AnyTrans for Windows PC, you can choose to export text messages from your iPhone in PDF, HTML, and TEXT format. To select the required format, click “Settings”. Don’t forget to choose an Export Path and push the “Save” button.
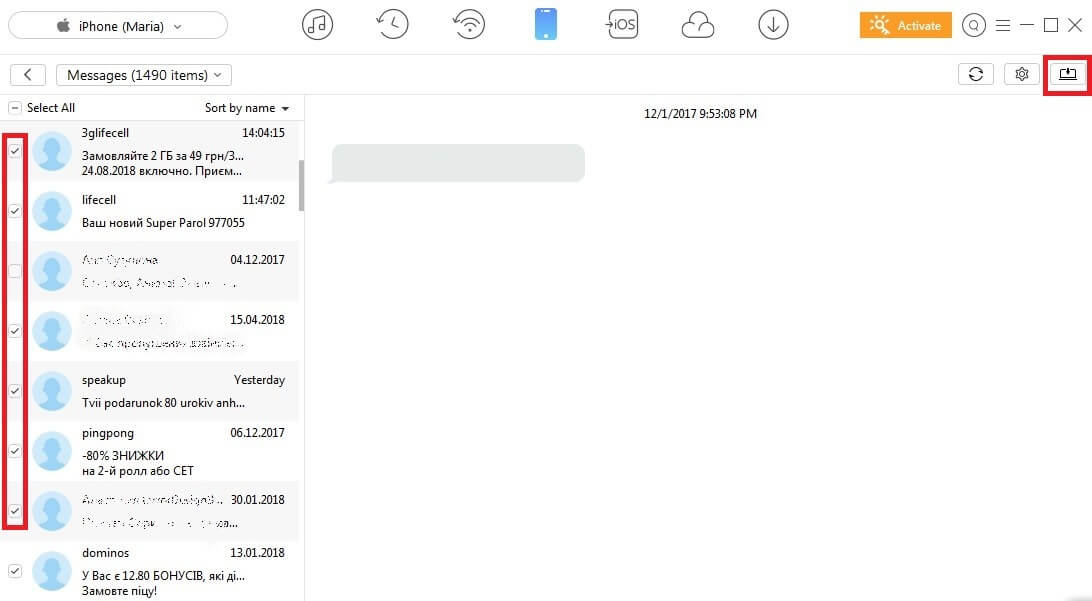
Step 3: On the left side, pick the contacts with text messages you want to print out. Then, click “To PC/Mac” button to export them to your computer.
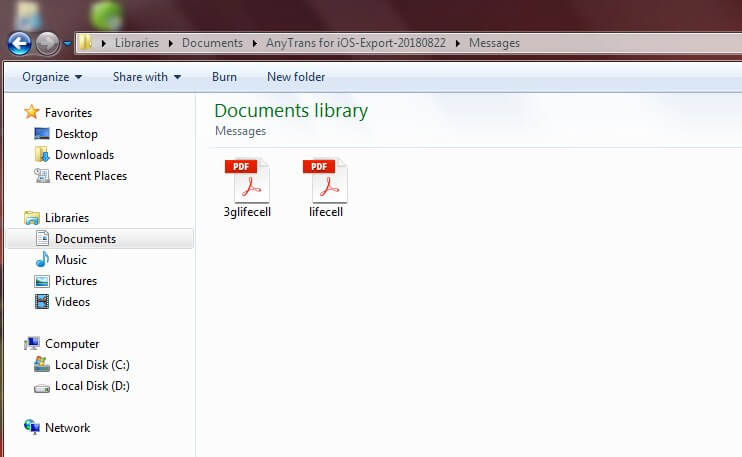
Step 4: Finally, open the chosen folder to view the exported messages on your PC. Use the connected printer to print them.
If you want to print out some text messages from your iPhone quickly, there are two surefire ways — sending an email with copied messages to yourself or taking screenshots and saving them as images. If you decide to contact your phone carrier to request to print your messages, be ready to prepare a set of special documents.
Conclusion
With AnyTrans or iMazing, you have an opportunity to export all your text messages right to your computer and save them as PDFs or in any other format, but it’s not free. The program has a free trial mode for you to evaluate its features. Then you need to buy the license to continue using it.
I hope these practical solutions have helped you print out the text messages from your iPhone hands down. Let me know if you have any questions about these methods. Also, feel free to share your suggestions in the comments below.
Is there a way to make the printed screenshot smaller? Right now it fills the whole page.
I am trying to copy and send a message from my message app to my mail app, but it will only paste in the “To” box, NOT the content area. What am I doing wrong?
Hi, I only have iPhone 7 and iPad 4, I want to print out a lot of text messages for court purposes. Can you tell me how I can do it? Thank you!
Lena
if you use the 4th method will it remove the texts from your phone or just copy them (in case something happens I want to keep them on the phone)
Excellent page for technology challenged person. Works great with the software and your step by step
Very helpful article, thank you