
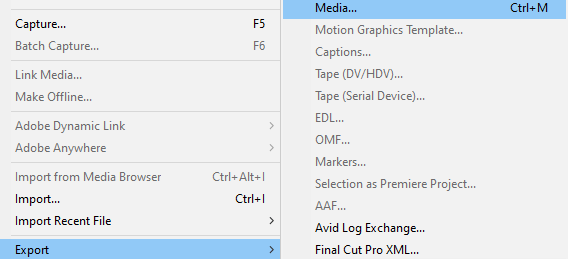
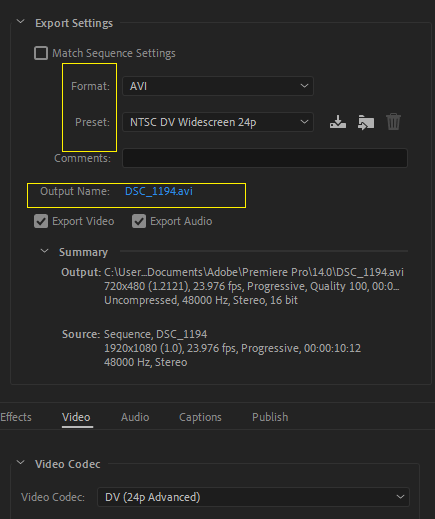
To package a project in Adobe Premiere Pro, go to the “File” menu and choose “Export” > “Media.” Select a format and preset it for your export. Choose where to save the output, and then click “Export.” With this, you have packaged your project for use.
Do you want to package the project for another editor? Then, continue reading this article.
If it’s your first time here, you’re welcome! I am David, a professional video editor, using Adobe Premiere Pro for the past few years. I use Windows PC, and this article provides steps for Windows; I believe it’s the same process for MAC users.
In this article, I will explain how to package your project and stay organized while editing, give tips for using Adobe Project Manager, and show you ways to share your packaged project.
Table of Contents
How to Package a Project for Another Editor in Premiere Pro
Depending on your process, you may need to pass an incomplete video production to someone else for color grading, fine-tuning, or another function.
You can assemble all the essential materials and bundle them with your project file in a single, moveable folder using Adobe Premiere Pro’s Project Manager function.
From the File menu, choose Export > Media. Select a format and pre-set it for your export. Choose where to save the output, and then click Export. When the export is complete, you can package it for another editor.
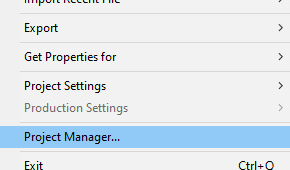
Do you want the editor to have access to your editing? Your timeline? Your sequences? Do you want them to be able to make edits to your entire project? Then, you must go to File > Project Manager and wait for a new window to appear.
If it is a single-sequence project, just go directly to “Collect Files and Copy to New Location,” but for projects with multiple sequences, select each to copy under “Sequences.”
Scroll to the bottom and select “Collect Files and Copy to New Location.”
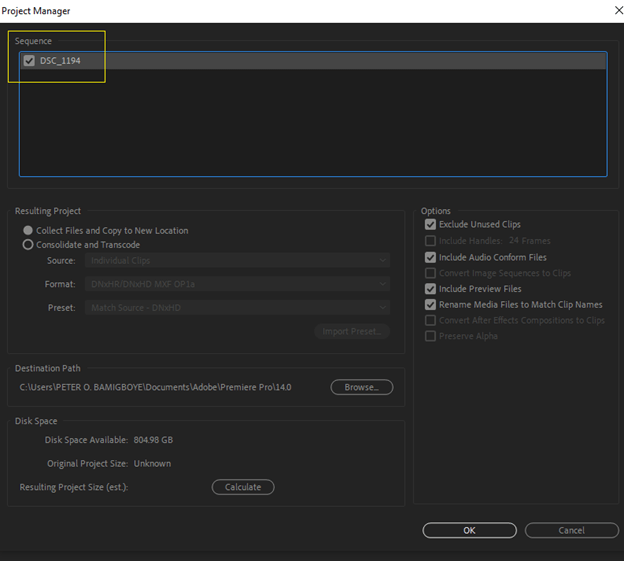
Options on the right side of the window include:
- Exclude unused clips: This implies that unused clips from the project will not be copied (not recommended).
- Include the following audio compliance files: To save space, uncheck the box. When you reopen the project, Premiere will automatically re-confirm the files.
- Include preview files: Uncheck this to save space. Premiere Pro will automatically create new previews.
- Rename media files to match clip names: If the clips are to be renamed in the project, the media files will be renamed to match.
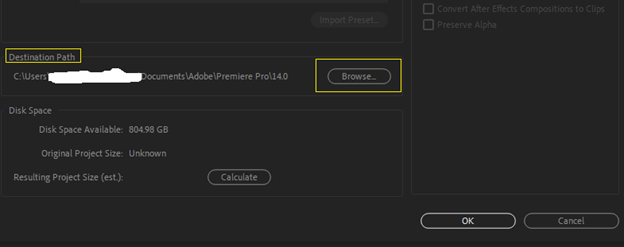
Click “Browse” under “Destination Path.” Choose a storage location (for example, directly to a flash drive or any other storage drive) and a name for the folder (whatever you want). Once you are done with that, click “OK.”
Adobe Premiere Pro will create a folder and copy all project-related files into that folder. This folder can be saved to a cloud storage service like Google Drive or transferred to a flash drive without re-linking issues.
Once the project is saved, it can be opened in another editor, such as Premiere Pro, using the same version of Premiere Pro that you exported.
How to Stay Organized While Editing Videos in Premiere Pro
If you will be packaging your project for another editor, it is essential to stay organized. Make life easier for them; let them know which is which. I will walk you through some critical things to note.
- Name Your Projects: When working on a video, give each project a descriptive name that indicates its content. This will help you keep track of each edit as you work on it, and it will be easier to find specific clips and sequences when needed.
- Organize Your Bin: Create a bin for each video you’re working on and use it to store any clips, audio, and images you’ll be using in the project. This will help keep your project organized and make finding specific clips and sequences easier when needed.
- Color-Code Your Clips: Use colors to differentiate between different types of footage. For example, you can use one color for interview clips, another for the b-rolls, and another for graphics. This will make it easier to quickly identify different types of footage in your timeline.
- Create Subclips: If you have a long clip, break it down into smaller chunks and create sub-clips. This will make finding specific moments in the clip easier and help keep your timeline uncluttered.
- Create Keyboard Shortcuts: Use keyboard shortcuts to access tools and commands quickly.
- Use presets: Save time by creating presets for everyday tasks such as transitions, effects, and titles.
- Organize your project panel: Keep it organized by creating subfolders and naming them.
- Storyboard: Create a storyboard to plan your video and keep track of what shots you need to shoot and edit.
Pro Tips for Using Adobe Project Manager
- Make sure to use the “Check In/Check Out” feature when making edits to a project to ensure that multiple users can’t make changes simultaneously.
- Use the “Share Resources” feature to easily collaborate and share resources with other users.
- Use the “Approvals” feature to manage the approval process for projects and tasks easily.
- Utilize the “Reports” feature to check on the progress of a project quickly.
You can export the project as a video file, then upload it to a video hosting website such as YouTube or Vimeo.
Also, you can share a link to the video file on social media platforms such as Twitter, Facebook, Instagram, etc.
Send the video file as an email attachment to the people you want to share it with.
Create a physical media file, such as a DVD or Blu-ray, and distribute it to the people you want to share the project with.
Export the project to an Adobe Premiere Pro file format and share it with others using a file-sharing program like Dropbox or Google Drive.
Conclusion
Collaboration is necessary sometimes, and you must learn how to stay organized and share your project.
You can assemble all the essential materials within your project file into a single, moveable folder using Adobe Premiere Pro’s Project Manager function.
From the File menu, select Export > Media. Select a format and preset it for export. Choose where to save the output, and click Export. With this, you have packaged your project for use.