
Many creators pour their focus into drawing, often overlooking the importance of text. However, outlined text can make your words pop, grab attention, and give your artwork a professional and polished look.
I’m Zoe, an illustrator who has spent years honing my skills with Clip Studio Paint. It was through creating webtoons that I truly understood the importance of text style in conveying emotions, enhancing storytelling, and engaging readers.
With my experience and insights, I’ll guide you through the steps and techniques of effectively outlining text in Clip Studio Paint. We’ll start with the basics, showing you how to outline your text in any color or thickness in a few steps.
We’ll also take it a step further and guide you on how to create gradient fills and patterns to add more flair and personality to your outlined text. By the end of this article, you’ll have the skills to create striking text effects that make your words jump off the page.
Let’s dive in!
Table of Contents
Key Takeaways:
- When you outline text in Clip Studio Paint, you can easily toggle the border effect, adjust width and color, and modify your text without losing the applied style.
- When applying effects like gradients and patterns, take advantage of clipping masks to layer multiple effects on your outlined text.
- Choosing the right typeface can make a world of difference in how your outlined text looks and feels. So, have fun exploring various fonts to find the perfect one that adds personality and enhances the style of your artwork.
Now, let’s get started with the four simple steps to outlining your text in Clip Studio Paint!
Note: All screenshots from this tutorial are taken from the CSP Mac version.
4 Easy Steps to Outline Your Text in Clip Studio Paint
You can outline any shape, including text, using the Border Effect tool from the Layer Property panel. These instructions will show you how:
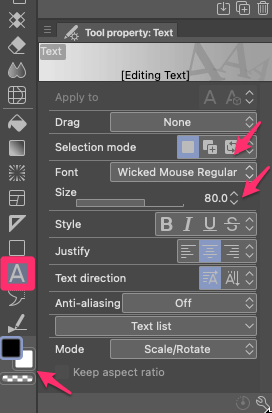
Step 1: Start by selecting the Text Tool from the toolbar on the left side of the screen. Click anywhere on the canvas to create a text box, and type in the desired text. To further customize your text, adjust the font, size, and color from the Tool Property panel and color palettes.
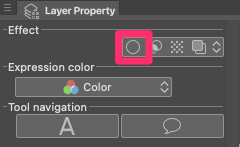
Step 2: In the Layer Property panel, find the Effect section and click on the Border Effect icon.
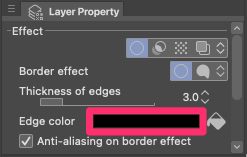
Step 3: Click on the color swatch labeled Edge Color to open the Color settings dialog. Explore different options by clicking on hues or using color pickers. You can also enter a specific color code for precise customization.
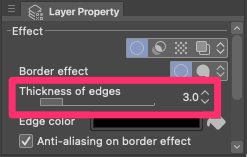
Step 4: Adjust the thickness of the outline using the Thickness of Edges slider. Move the slider left or right to achieve the desired width. Alternatively, double-click the number next to the slider and enter a specific value manually.
And voila! With these simple steps, you’ve successfully outlined your text in Clip Studio Paint. Now you can add a touch of style and emphasis to the text in your artwork.
Pro Tips on Text Styling
To add more style to your outlined text in Clip Studio Paint, you can learn how to apply effects like gradient fills or patterns. Here’s a step-by-step guide on creating clip masks and applying border effects to the folder containing the text:
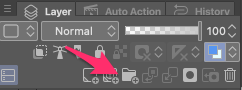
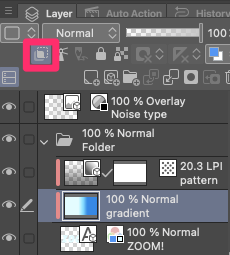
Step 1: After typing your text, create a new layer folder by clicking on the New Layer Folder icon in the Layer palette.
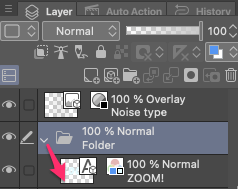
Step 2: Move the text layer into the newly created folder by dragging and dropping it onto the folder in the Layer palette.
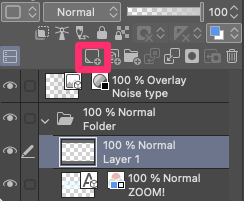
Step 3: Create a new layer within the folder by clicking on the New Raster Layer icon at the bottom of the Layer palette. This layer will be used for applying the gradient fill or pattern.
Step 4: Select the new layer within the folder. Choose the desired tool for creating the effect. For a gradient fill, use the Gradient tool, or for a pattern, use a tiled image from your Materials catalog.
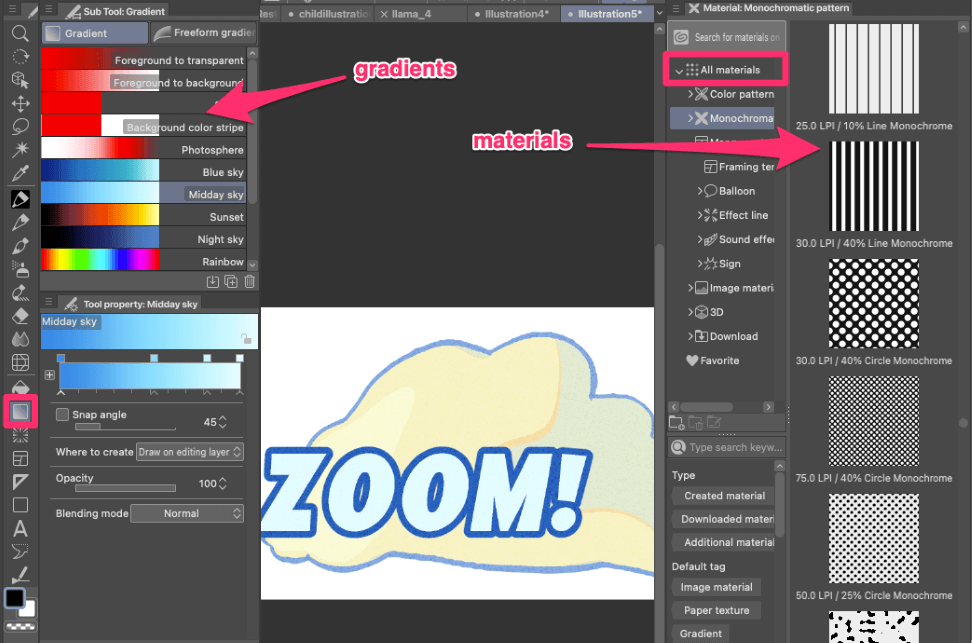
Step 5: Click and drag your gradient or pattern over the canvas. Adjust colors, and directions, or scale it according to your preferences. Take your time to experiment and find the perfect look for your outlined text.
Step 6: Once you’re satisfied with the effect, adjust its properties by selecting the layer containing the effect and modifying settings in the Layer Property panel. You can change blend modes, opacity, or add additional effects to the layer.
Step 7: Select the effect layer, go to the Layer Property panel, and click on the Clip to Layer Below icon. The effect will now be confined to the boundaries of the text.
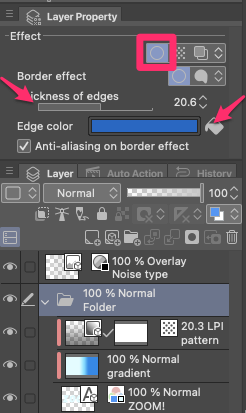
Step 8: To create the outline, apply the Border Effect to the entire folder instead of the text layer. In the Layer Property panel, click on the Border Effect icon. Adjust the width and color to your liking.
With these steps, you can not only outline your text but also add eye-catching effects like gradient fills or patterns to enhance its style. Let your creativity shine as you explore different combinations and experiment with various effects.

Final Thoughts
Knowing how to outline text is a valuable skill for creators of all kinds, whether you’re a graphic designer, comic illustrator, or social media content creator. It allows you to emphasize messages, create captivating titles, and draw attention to important details in your work.
Now it’s your turn to get creative! Don’t be afraid to play with colors, thicknesses, and effects to discover your unique style. I hope this guide has given you the knowledge and inspiration to add a touch of flair to the text in your artwork.
I’d love to hear about your experiences and see what you create with outlined text. Feel free to leave a comment and share your feedback!