
Do you need to make a grid fast in Adobe Illustrator? You’re in luck. With the Rectangular and Polar grid tools, you can create striking graphics in two to three clicks.
My name is Elianna. I have a Bachelor of Fine Arts in Illustration and have used Adobe Illustrator for over six years. I’ve used grids to create tables and as the basis for a variety of design elements.
In this post, I will teach you how to use the Rectangular and Polar grid tools in Adobe Illustrator. I will also teach you how to make an Isometric Grid using a rectangle grid as its base.
Let’s get into it!
Table of Contents
Key Takeaways
- Use View > Grid or the keyboard shortcut Ctrl/Command + ’ to view/hide Adobe Illustrator’s default grid.
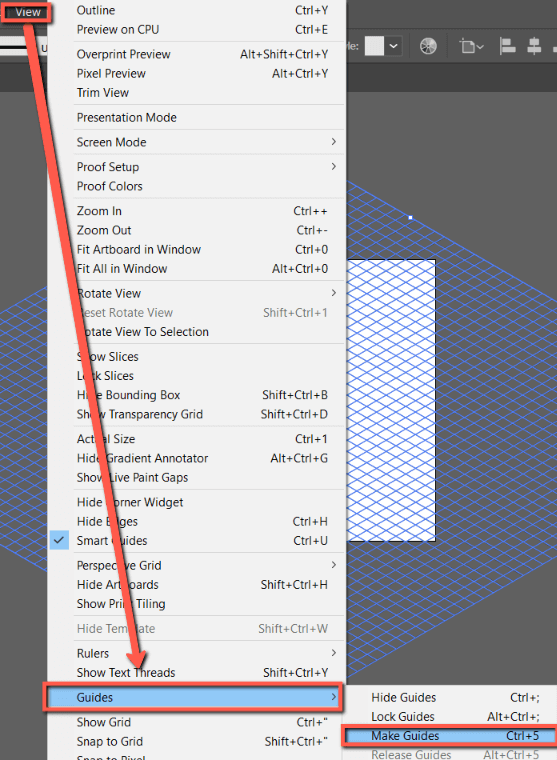
- Use View > Guides > Make Guides or the keyboard shortcut Ctrl/Command + 5 to make guides.
How to Show Grid in Adobe Illustrator?
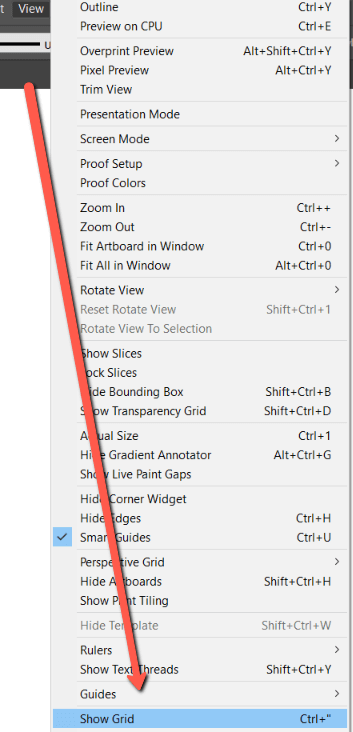
If you are simply looking for a way to show grid lines as a guide, you can do so with View > Grid, or by using the keyboard shortcut Ctrl/Command + ’
How to Use the Rectangular Grid Tool in Adobe Illustrator
There are two grid tools in Adobe Illustrator: the Rectangular and Polar Grid tools.
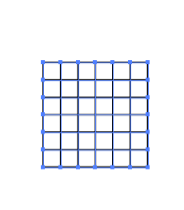
The Rectangular grid tool creates rectangle or square grids. This tool can be used to create data tables, pixel art, grid patterns, and can act as a basic for isometric illustrations when formatted correctly.
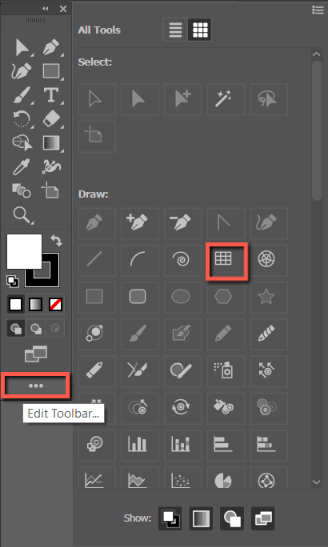
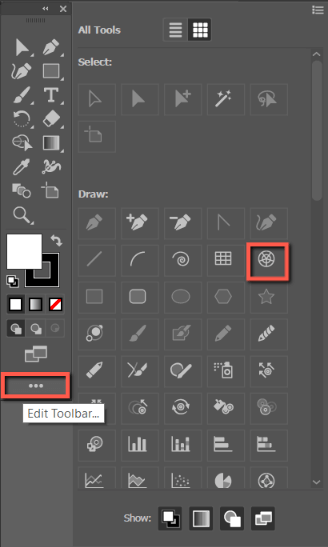
Step 1: Select the Rectangular Grid Tool. If you cannot find it, click on the Edit Toolbar (…) button to find it.
Step 2: Click and drag on your artboard to create your grid.
Alternatively, if you would like to create a custom grid, click on your artboard to open the Rectangular Grid Tool Options. In this menu, you can modify values such as:
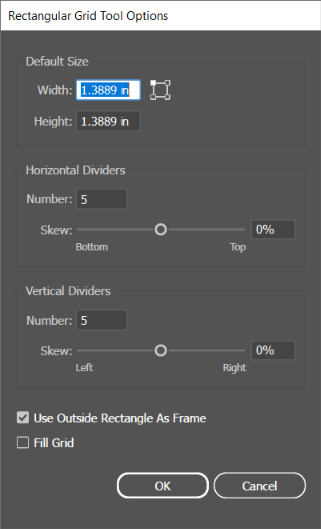
| Width/Height | Modifies the width/height of a grid by a set value. You can also set your grid reference point from one of the four. |
| Horizontal Dividers/Vertical Dividers | Modifies the number of horizontal and vertical dividers by a set value. |
| Skew | Modifies how horizontal lines are weighted from the top of the grid, and how vertical lines are weighted left or right in the grid. |
| Use Outside Rectangle as Frame | When checked, this option uses the outside rectangle as the grid frame (default option) |
| Fill grid | When checked, this option applies a Fill to a grid. |
Note that in these settings you are modifying the number of dividers, not columns. Therefore, if you wish to create a grid with six columns, you will need to input five for the number of vertical dividers.
Step 3: Modify your settings as desired. When you are finished click OK. Your rectangular grid will generate in your canvas.
How to Use the Polar Grid tool in Adobe Illustrator
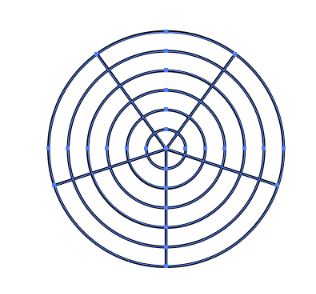
The Polar Grid tool creates circular grids. This tool can be useful for creating Pie Charts, Dartboard Patterns, and can act as a base for all sorts of other circular-based designs.
Creating a rectangular grid in Adobe Illustrator is easy. Here’s how to do it:
Step 1: Select the Polar Grid Tool. If you cannot find it, click on the Edit Toolbar (…) button to find it. Click and drag on your artboard to create your grid.
Alternatively, click on your artboard with the Polar Grid tool to open the Polar Grid Tool Options.
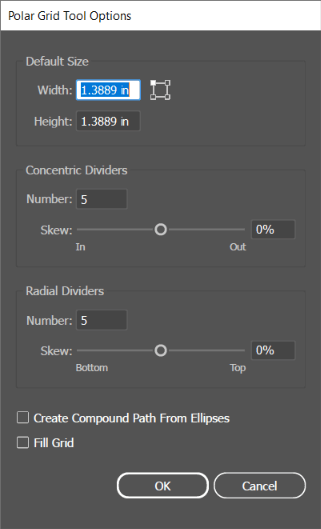
| Width/Height | Modifies the width/height of a grid by a set value. You can also set your grid reference point from one of the four. |
| Concentric/Radial Dividers | Modifies the number of concentric (circular), and radial (lines emanating from the center point) dividers in a polar grid. |
| Skew | Modifies how concentric dividers are weighted towards the inside/outside of the grid and how radial dividers are weighted clock/counterclockwise. |
| Create Compound Path from Ellipse | Creates a compound path from Ellipse |
| Fill grid | When checked, this option applies a Fill to a grid. |
Step 2: Modify your polar grid as desired. When you are done select OK. Your grid will generate in your canvas.
How to Make an Isometric Grid in Adobe Illustrator
You can also make isometric grids in Adobe Illustrator using a rectangular grid as a base.
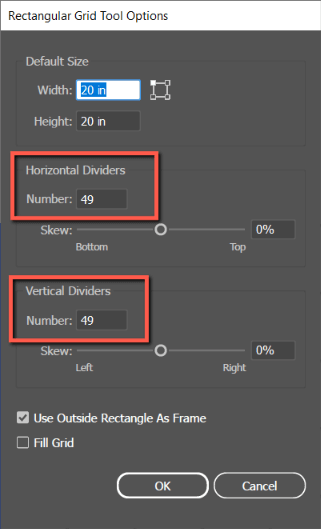
Step 1: Create a Rectangular Grid using the steps in the first method of this post. For this grief, I am setting my values for Vertical and Horizontal dividers to 49 and 49, but this may vary depending on the size of your project.
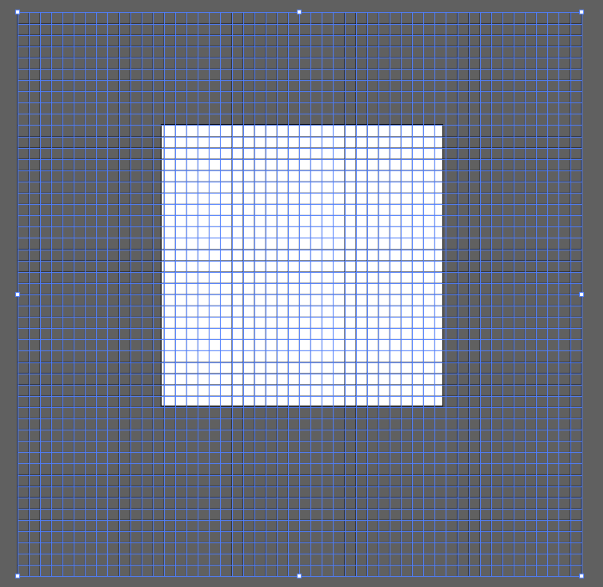
Your grid will generate on your artboard. Use the Selection Tool (V) to reposition it.
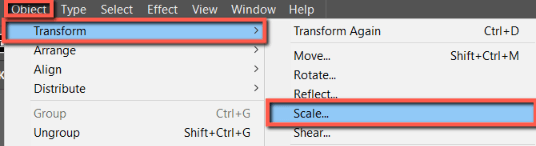
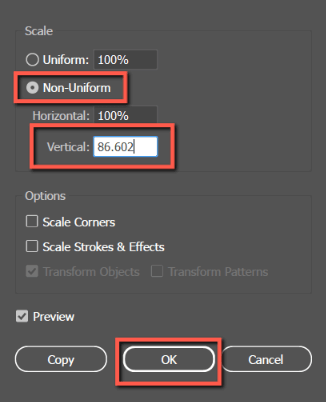
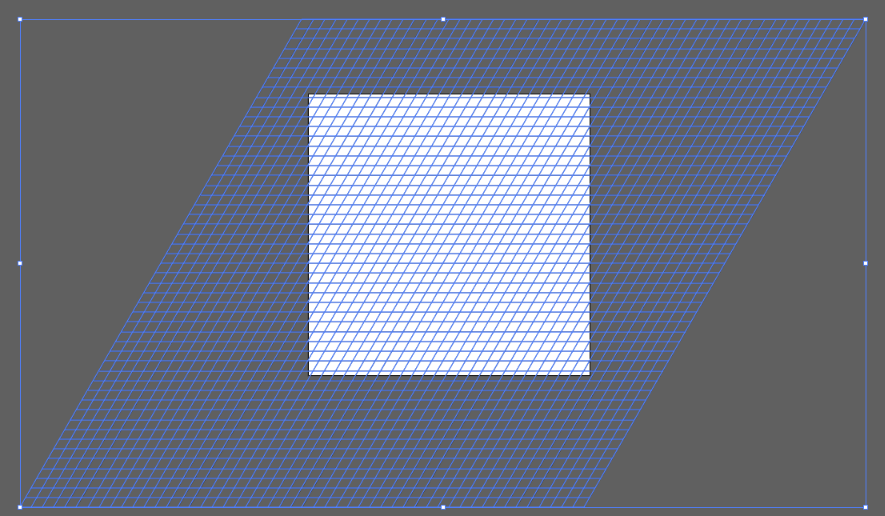
Step 2: Select your grid and click on Object > Transform > Scale to open the Scale menu. Check Non-Uniform and set the Vertical percentage to 86.602%.
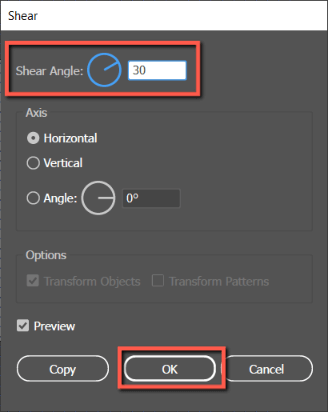
Step 3: With the grid still selected, use Object > Transform > Shear to set the Angle to 30. Click OK.

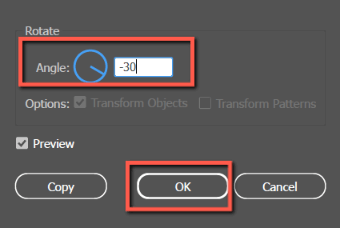
Step 4: Finally, use Object > Transform > Rotate to set an angle of -30 degrees. Click OK.

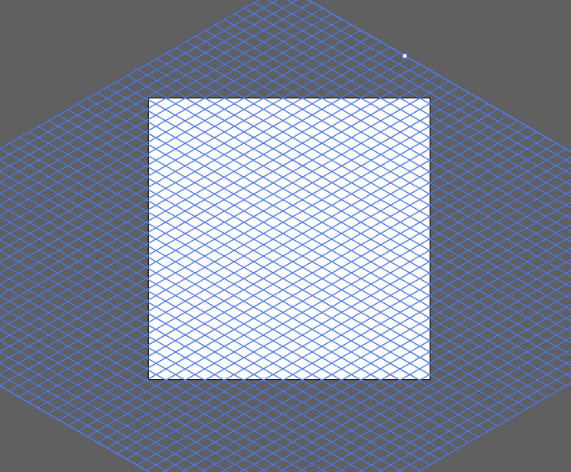
Step 5: Your isometric grid is complete! To make it a guide use View > Guides > Make Guides or use the keyboard shortcut Ctrl/Command + 5.
How to make a 3×3 grid in Adobe Illustrator?
To make a 3×3 grid, click on your artboard with the Rectangular Grid Tool and set your number of horizontal and vertical dividers to 2.
Final Thoughts
Creating a grid in Adobe Illustrator is easy using the Rectangular and Polar grid tools. With these tools, you can modify your grid’s width, height, skew, fill, and more. Just remember that dividers are not the same as columns, and adjust your values as such.
Furthermore, remember that you can use a rectangular grid as a base for an Isometric Grid by modifying it with Object > Transform > Scale/Shear and Rotate, and that you can easily convert grids to guides with View > Guides > Make.
Which type of grid do you use most? Tell me in the comments below!