
You can create your own GIFs by utilizing the video or animated social media template that is found on Canva and adding slides that change your image and add elements slightly in each frame. You can use either uploaded media or elements that can be found in the preloaded library.
Hello there! I’m Kerry, an artist, and designer who loves to explore ALL of the different websites and platforms that are out there for you creators. (Even if you are just beginning to dabble in graphic design, don’t worry – this is for you too!)
I have found that the website Canva is one of my favorites to use since it is so accessible and allows for the development of fun projects!
In this post, I’ll explain how you can make your own GIF that can be customized to meet your needs and vision. While there are lots of places to find premade GIFs, this is a really cool feature if you want to elevate your posts on social media or just send friends personalized GIFs!
Are you ready to get into it and learn how to create GIFs on the Canva platform? Fantastic! Here we go!
Table of Contents
Key Takeaways
- In order to create a GIF, you will want to make sure that you are using a template that will allow you to have multiple frames, such as a video template or an animated social media post.
- The fewer the number of slides that are in your canvas, the simpler the GIF will be.
- If you click on your added music which will be found underneath the canvas, you can adjust and edit the duration, transitions, and effects of the audio.
What is a GIF
You may have heard a few different ways to pronounce GIF, but regardless of how you’ve heard it said, you may be wondering what exactly is it. Well, the term GIF actually stands for the phrase Graphics Interchange Format, which basically is a rotating loop of images that forms a quick animation.
GIFs have become a mainstream tool for engagement as people have found alternative methods of communicating their ideas without the use of text. (Note that some GIFs can actually have text within them though!)
They are an easy way to express a thought, make a comment, or share a sentiment through a visual representation. And while there are websites and apps out there where you can find thousands of GIFs to use when texting, creating a presentation, or marketing, it is always cool to be able to create your own GIFs!
Canva allows users to have maximum creative potential when it comes to designing on the platform, and when it comes to creating your own GIFs, you get to control the customization with that too!
How to Create GIFs on Canva
Before you start creating your GIF, you will want to make sure that you are using a template that will allow you to have multiple frames or slides, such as a video template or an animated social media post.
This is important because the number of slides that you use in your project will affect how simple or complicated your final product turns out.
For example, the more slides that are incorporated into your canvas equals more animation and time to move objects and text around. If you are just starting, I would suggest beginning with a few slides and playing around with this feature. You can always add in more slides or create more complicated GIFs later on!
Follow these steps to learn how to create a GIF on Canva:
Step 1: You will first need to log into Canva using the credentials that you always use to sign into your account. On the home screen, navigate to the search bar at the top of the platform and search for a template that will allow you to have multiple slides to work on. (I would suggest a video or animated social media post.)

Step 2: Choose the video template that you want to use for your GIF creation and click on it. This will open up your new canvas to edit with the chosen template already embedded into it.
Step 3: At the bottom of the canvas, you will see the number of slides that are currently in your project. You can add more slides by clicking on the plus button (+). If you would like to delete a slide, simply click on it at the bottom of the canvas and then the delete button on your keyboard (or the garbage can button on the platform).

Step 4: Once your canvas is all set up and ready to go, it is time to add all of the elements that you want to use in your GIF. Go to the left side of the screen where you will see the main toolbar.
In the elements tab, you can search for and click on any photo, graphic, or image that you want to use in your GIF.
You can also upload your own elements by going to the Uploads tab instead of Elements and clicking on the Upload files option. Here you can add media from your device to the library on Canva where you will have access to it whenever you log in to your account.

Step 5: As you are adding in the elements to build your GIF, you can move and adjust any of the images or text that you are using within each frame or slide. You can click on each element and utilize the editing toolbar at the top of the screen!
Also, try to remember to move your added elements gradually across each frame to give the movement within your final product a more seamless flow.
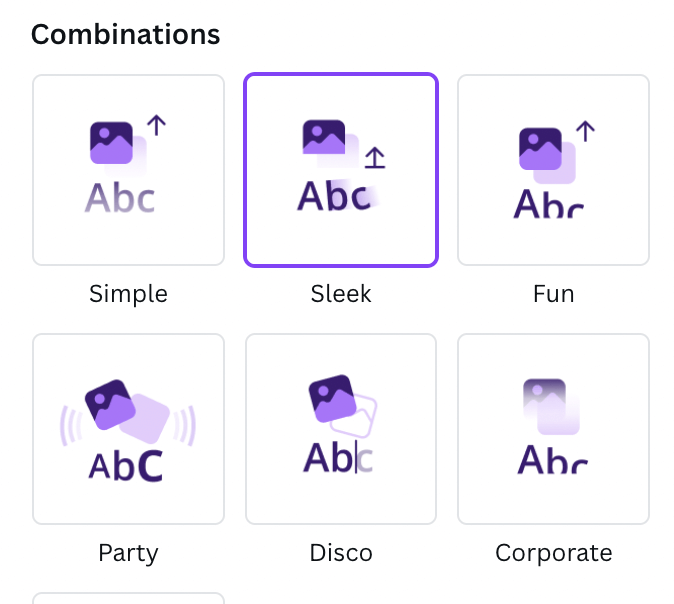
Step 6: Once you are satisfied with your added elements, you can click on them and then on the Animate button that will appear at the top of your canvas.

Here you can choose to either animate elements on the page or the entire movement of the slide by choosing either Page Animations or Photo Animations.

This will allow you to choose the style of animation that you want your particular objects to use, whether it be on the specific slide or throughout the whole project.
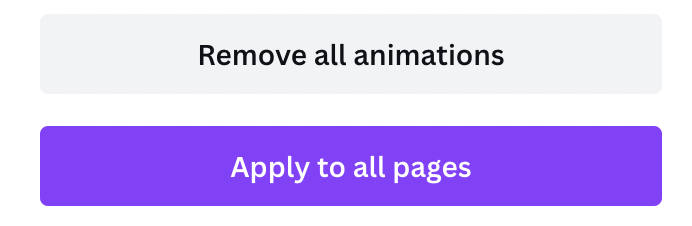
As I said earlier, it is easier to use fewer elements when you are first starting out in this process, and then you can add more once you get the hang of it! If you want to apply the same animation to multiple slides or remove them, within this tab click on the appropriate option!
Step 6: When you are ready to save your GIF, you can check out a preview of its animation by clicking on the play button that is located next to the Share button. By doing this, you will have a popup screen layer on top of your canvas where your project will play at the speed that it will save.

Step 7: Once you are satisfied with your final product, navigate to the Share button at the top right side of your screen and click on it. You will be able to choose the file type, slides, and other options for saving your video. In the dropdown menu, find the GIF option and click on it!
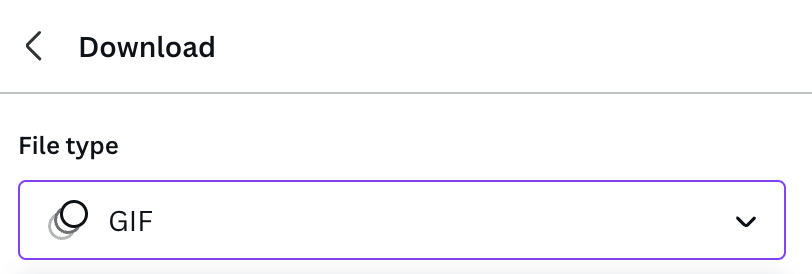
When you take this step, your new GIF will be saved to the device that you are working on and can be integrated into other projects, posts, and media. Being that it is a video file, it may take a little longer to download than a simple PDF or photo file.
Final Thoughts
Whether you are creating a simple GIF that consists of just an image moving, or if you take on the extra steps to add in multiple elements and text, creating GIFs is a fun skill to learn and can give you an extra edge to your design portfolio.
Have you ever dabbled in creating GIFs on Canva? Have you found any tips or tricks to make the process easier, especially for those who are just embarking on this journey? We would love to hear your thoughts about creating GIFs on the platform, so please share them in the comment section down below!