
A Keyframe is simply a user-designated/assigned frame. The definition itself is rather simple, as its meaning is in plain view in its name. However, despite the simple definition, the use of keyframes can be wildly complex and vary from software to software.
While there could be an entire book written about keyframes and every permutation of usage across the creative software available, we’ll be laser focused today on illustrating some of the specific usage and essential fundamentals within Adobe Premiere Pro.
By the end of this article, you’ll understand what a keyframe is in video editing and how you can use them in Premiere Pro to create a dynamic zoom for a shot/clip.
Table of Contents
What Are Keyframes?
As stated above, a Keyframe is a video/film frame that has been selected or designated for specific manipulation or change. In and of itself it is rather uneventful and simple, but the usage of multiple keyframes on a single effect/attribute or variable can be immensely powerful and impactful.
Why Use Multiple Keyframes?
When chaining multiple keyframes, your creative possibilities within a given clip or series of clips (if you are nesting, for example) is virtually limitless – with your imagination being one of the only limiting factors with regard to applying and using keyframes effectively.
For example, let’s say you have a clip that you would like to zoom in on, but do so over a very short or fast span of time, using two keyframes, you can easily achieve this effect. If you were to do this with a single keyframe alone, this is known as a Static Keyframe as there is no Frame Interpolation being done between these two distinct points of video time.
Essentially Frame Interpolation means that your video editing software is automatically adjusting/animating the given effect for you between your two (or more) keyframes. Here we are speaking specifically to frame motion/scale attributes, but again, you can use keyframes on just about everything within Premiere Pro, even on audio.
Though to keep to fundamentals and essentials, we’ll exclusively be focusing on video keyframes today.
Where Do I Set and Manipulate Keyframes?
There are many areas where you can set and manipulate keyframes, but the most common and often used in Premiere Pro will be the Effect Controls tab on the left side of your main window. It may not be showing by default, so be sure to click directly on a clip in your timeline to trigger the change in the left monitor window to display it.
Once you do so you should be seeing something similar here:
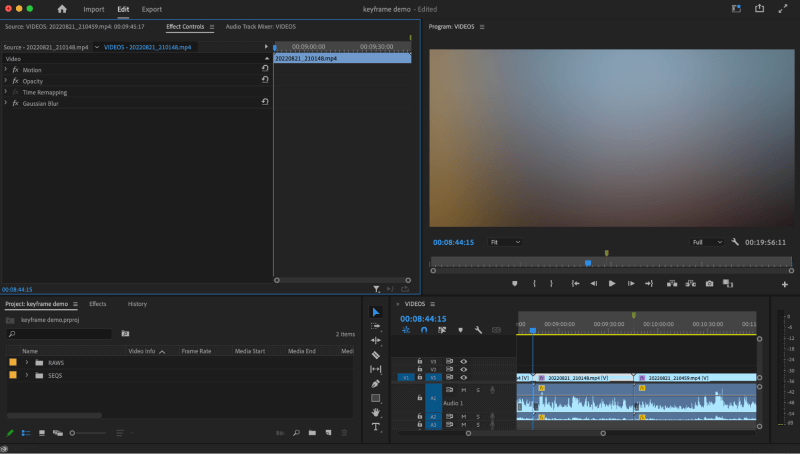
For the purposes of this illustration I’ve blurred the content of the piece I’m working on, and you will note that the “Gaussian Blur” effect is applied broadly to the clip I have selected and it is not utilizing keyframes.
Let’s click the drop down arrow and expand the Motion tab, and see where that gets us.
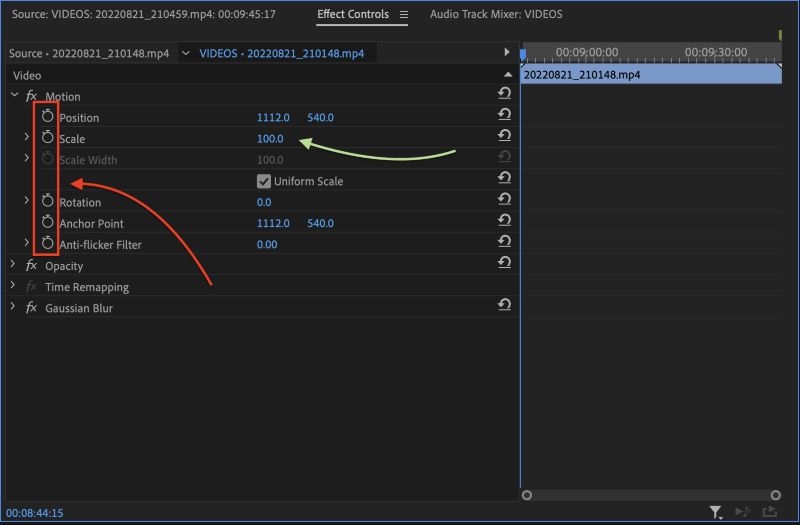
As you can see there is now a column of “stopwatch” icons that have appeared to the left of all of the available modifiable motion attributes for this clip. And you’ll also note that the default scale is still preserved at “100.0”.
Note also that there is a time window to the left of these variables and settings. This time window corresponds specifically to the length of the clip you have selected, not the overall timeline length. And it is here where you will be able to see and even manipulate your keyframes.
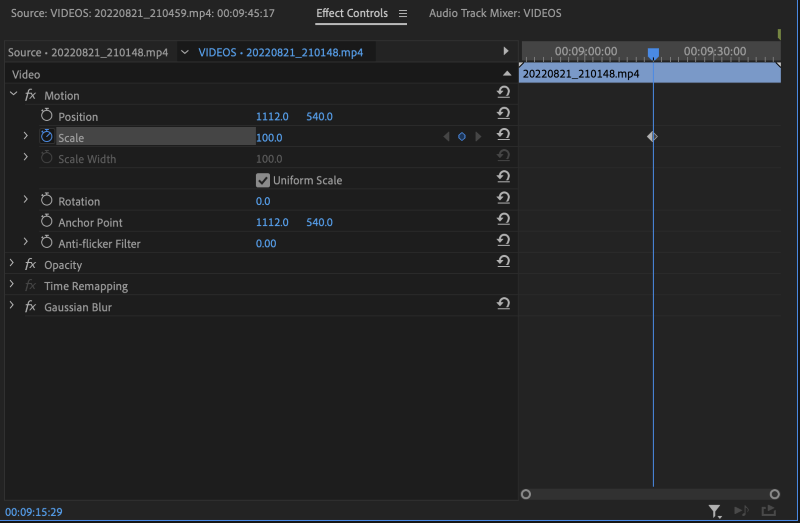
Let’s now shuttle the playhead in the keyframe window to the midway point in the clip, as this is where we would like our zoom to be complete. Having done that, let’s now click on the stopwatch icon to the immediate left of the “Scale” attribute.
If you’ve done so correctly, you should now be seeing something like this:
If your screen looks like the above, congratulations, you’ve just created your first video keyframe in Premiere Pro! But wait, there isn’t any change to the scale? Fret not, this is normal, we’ve only just created a singular “Static” keyframe, and we’ve yet to modify our values, so naturally nothing yet has changed.
Now, before we do so, let’s go ahead and shuttle the playhead in the keyframe time window left to the start of our clip. Once you’ve done so, go ahead and click on the now-blue (active) stopwatch icon next to the Scale attribute.
Now you should see two keyframes like so:
But wait, you say, there still hasn’t been any changes to the scale/zoom, and I’m nowhere near the middle keyframe now. Again, an easy and quick jump via this button seen below, should instantly help us get back to the middle keyframe so we can adjust our zoom.
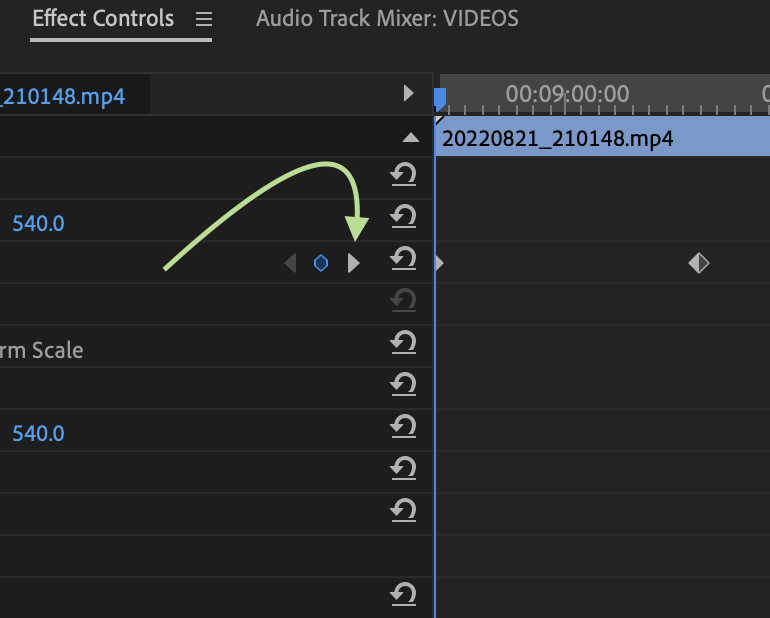
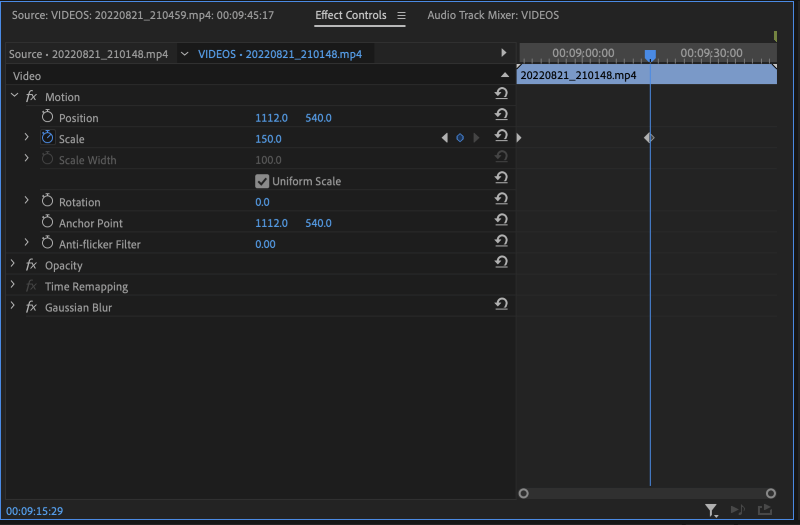
When you do so, you’ll see the playhead jump to the middle keyframe, and now you will be able to adjust the values for the scale attribute to yield the desired zoom/scale effect on your clip like so:
Congratulations, now you’ve successfully added your first digital dynamic zoom on your clip using dynamic keyframes! I knew you could do it. What’s that you say? You want to end the clip at the starting zoom length? No problem, that’s easy now that we have the other keyframes set.
Simply drag the playhead in the keyframe window to the right as far as it will go. Once there, let’s try another method for generating this final dynamic keyframe.
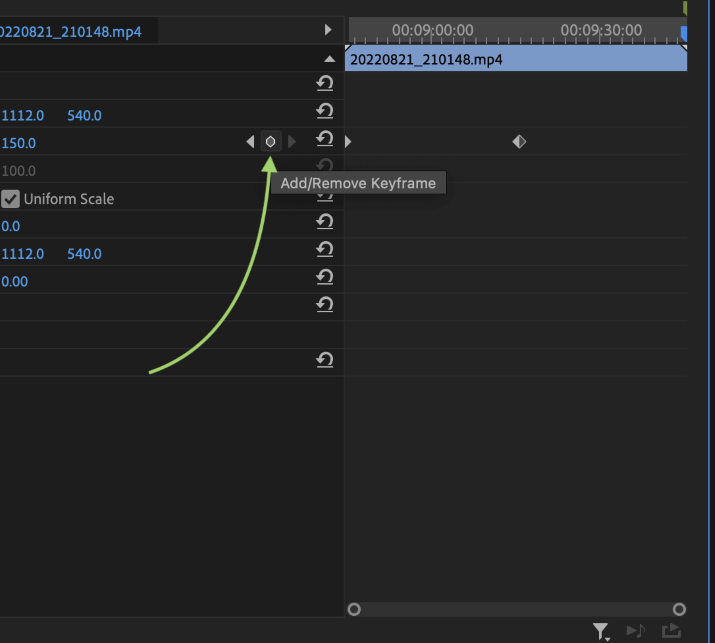
While you can always use the standard stopwatch icon to the left of a given attribute, and you can also (once having generated a primary keyframe) generate a second dynamic keyframe by modifying the given attribute values, there is this “Add/Remove Keyframe” button nestled here just between the keyframe navigation arrows.
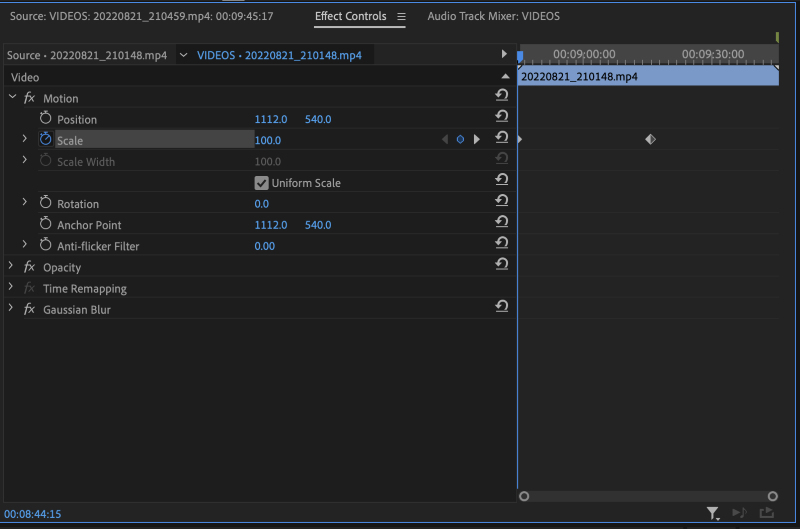
Since we have our playhead at the end of the clip where we would like it, click the “Add/Remove Keyframe” button now to generate your final keyframe. Once having done that, adjust the final keyframe value back to “100.0”.
Once you have, your final dynamic zoom for this clip should look like this:
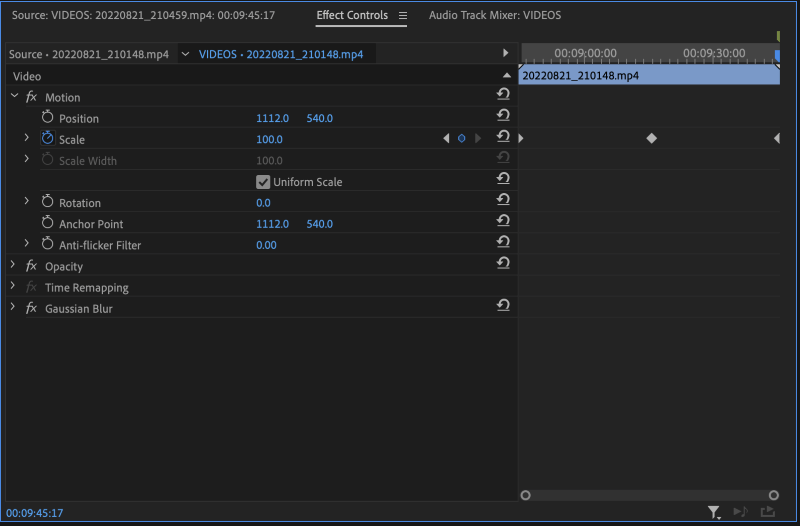
Congratulations, your shot is now complete and you’ve learned a great deal about how to set and apply dynamic keyframes! You’ll notice too that the graphic for the central keyframe has changed and become fully shaded/filled in now. This denotes that there is a keyframe on both sides of it, both behind and in front of it in time.
If we were to eliminate the first keyframe, it would look like so:

Do you see the difference? If not, compare the last few screens to see how the side of the diamond that symbolizes your keyframe has changed throughout the last few steps.
This shading is helpful, especially when you are dealing with a veritable sea of keyframes, and when you’re navigating or working on keyframes that aren’t easily viewable (especially when you are zoomed very far in on the keyframe timeline window).
There are instances where you would need to do frame-by-frame keyframes, but that is rather advanced and highly specialized, so you don’t need to worry about it now. However, now that you know how to navigate through the keyframe window and generate them with ease, these fundamentals can be applied to any effect you wish to manipulate throughout the runtime of any given video clip.
How do I Move a Keyframe that I Already Made?
This is easier than you might think and a function that you will need to be quite familiar with if you are seeking to tweak and refine your dynamic effects on a given clip.
Simply move your playhead to the point where you would like to move the keyframe to. In our case here we would like the shot to reach the “150” scale within the first quarter of the clip’s run. So we’ll move our playhead here. Note that the scale values will be adjusting automatically as you see below, this is normal.
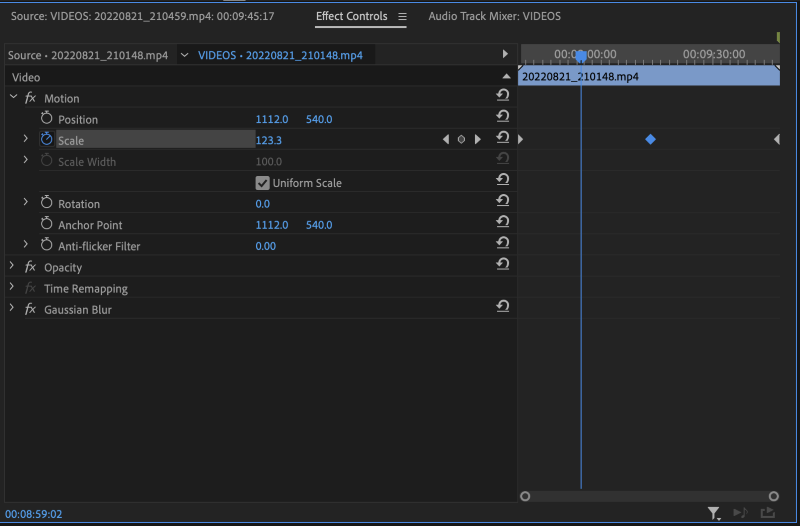
While it may be tempting to generate a new keyframe here and simply delete the middle one, doing so will effectively lock in the above pictured interpolated value of “123.3” and we don’t want that do we? We want to reach “150” sooner, and have the zoom out to “100” take much longer and be more dramatic across the last three quarters of this clip’s run.
So instead of generating a new keyframe, we will simply click on the middle keyframe (here you can see it is selected and highlighted in blue). And then merely drag the keyframe to the left and approach the vertical blue line that extends from the playhead.
The keyframe should “snap” as you get close to it (assuming you have snapping enabled) and this will give you the best frame accurate move without having to expand/scale the scope of the keyframe timeline window itself.
Once that is done, your completed dynamic zoom should be looking like so:

It’s good practice to shuttle through your complete keyframe move to ensure that the scale attributes are in keeping with your intended settings. Once you’ve done so and confirmed that your dynamic keyframes are aces, I’ve got great news, you officially know how to set and manipulate dynamic keyframes!
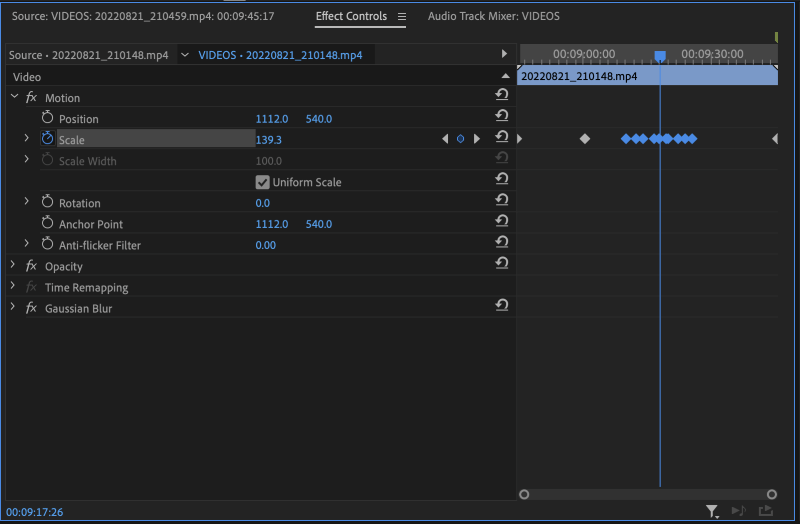
Wait, what? You’ve accidentally made a dozen extra ones and it’s gumming up your whole shot, and you can’t seem to get rid of them. No sweat.
Remember the “Add/Remove Keyframe” button safely nested between the navigation arrows we encountered above? Simply go through one by one and remove the errant dynamic keyframes using the navigation arrows, while taking care not to delete the keyframes you wish to keep.
If there is a swath of them that you would rather blast in a single strike of the delete key, that can be done too, simply click in the negative space above or below the array you’d like to remove, and drag your cursor to lasso the bad batch like so:
Once you have the selection simply hit the delete key and remove the blasted things. The same principle extends to any number of keyframes, simply select it and delete it, either with the “Add/Remove” button or just hitting delete.
If at any point you’d prefer to delete everything and start from scratch that too is easy, just hit the “stopwatch” icon we clicked to enable the first keyframe, and you should be presented with a window like this one:
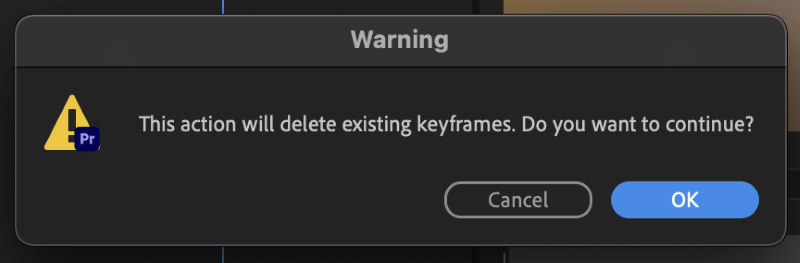
Simply hit “Ok” and you can start fresh if you need to, or if you hit this stopwatch icon by accident, don’t worry, simply hit “Cancel” and your keyframes will still be there, right where you left them.
It’s worth noting too that you can move a group of keyframes with the same method as above simply by lassoing them and grouping them as before. This can be immensely helpful, especially if you have the keyframe effect looking great, but at the wrong time span in the clip.
Simply grab the set and move it up or downstream in time until the clip is looking just how you would like it to. Et voila!
Final Thoughts
Now that you have a firm handle on the basics and core functionality and usage of dynamic keyframes, you are ready to dive headfirst into the infinite realm of creative possibilities that await you.
Keyframes in and of themselves are insanely simplistic, at least in terms of what they are, but as you can plainly see, the usage and manipulation of them can be quite complex, and this operation we’ve selected to illustrate here is one that is relatively simple. The learning curve from here can extend exponentially, or not, it all depends on what effects or attributes or functions the keyframes are charged with executing.
However, the fact remains that you are now familiar with and hopefully comfortable experimenting with them freely. From here, you can do as you please with any number of effects and also apply many of the same principles and fundamentals across a wide array of software and creative applications.
Keyframes are an essential part of any imaging/audio professional’s toolkit and while the interactions and applications vary, the fundamentals learned here will help you greatly in any of your creative endeavors regardless of the project or software.
As always, please let us know your thoughts and feedback in the comments section below. Would you agree that keyframes are an essential part of a professional’s toolkit?