
A Jump Cut in video editing is when the editor removes a section of interior time from a shot or clip, and thus creates a “jump” forward, forcing time to pass quicker than real-time without modulating the speed of the shot, and ultimately breaking the otherwise continuous/linear time flow.
However, the Jump Cut is by no means a new editing technique exclusive to video editing but has been around since the inception of filmmaking itself, and needn’t rely on editorial cutting alone, with many instances of jump cuts being shot in camera/on set.
By the end of this article, you’ll understand what a jump cut is in video editing and how you can use them in Adobe Premiere Pro, specifically we’ll be seeking to simulate a passage of time.
Table of Contents
Who Invented the Jump Cut?
While many may be quick to credit the legendary Jean Luc Godard with the invention of the jump cut with his seminal film Breathless (1960), it is far truer to say that he did not invent the technique, but certainly popularized and made expert use of it.
The genesis of this indispensable technique harkens from the very dawn of filmmaking itself, from another famous French film pioneer, Georges Méliès, on his film, The Vanishing Lady (1896).
As the story goes, Mr. Méliès was working on a shot when his camera jammed. Later when reviewing the footage, he noticed the error but was pleased with the effect it had on the shot. Since the camera hadn’t moved, nor the skyline, but only the people.
Thus the “jump cut” technique was born and immortalized forever on that day, not so much invented but really created by sheer accident (as so many inventions are, funny enough).
Why Use Jump Cuts?
There are so many reasons why you would want to use a jump cut in your film/video edit. You may recall seeing them in some of your most favorite films throughout the years.
Personally, I think Thelma Schoonmaker makes incredible use of them, especially in Martin Scorcese’s, The Departed (2006). Her usage here of the technique is almost percussive, and certainly an example of what I think to be “sharp” or “hard” jump cuts.
The effect is intentionally jarring, and often coincides with the beat of the music, or the synchronous blast of a handgun. All of which ultimately serves to draw the viewer in, unsettle them, and ratchet up the tension in a very creative way.
Another less percussive and subtle example of their usage in modern cinema can be seen throughout No Country for Old Men (2007). These help to move the action forward, especially when Llwellyn is preparing for his confrontations with Anton.
Examples aside, there are myriad ways and reasons why you might want to employ the technique. Sometimes, it is simply to compress a very long take (ie. showing someone move closer or further away from camera in a very long shot, chances are you can think of dozens of examples of this).
Other times, you may be seeking to show a deliberate repetition of action in a montage, where an actor is training and we see them attempting a feat again and again in the same setting, slightly differently until they master their skill.
And further still (by no means the extent of the usage cases) you may be using the technique to increase the emotional gravity in a scene, and allow the viewer to witness the despair, anger and varied spectrum of emotions of a character.
Here in particular I’m thinking of Adrian Lyne’s, Unfaithful (2002), and the scene where Diane Lane’s character is riding home on the train after having cheated, expressing a flurry of intense emotions, joy, regret, shame, sadness and more. A scene that is greatly enhanced through deft use of the jump cut technique, and one that further accentuates Lane’s superb performance.
Without the jump cut, this scene and countless others simply wouldn’t be the same. In a sense, we can use the technique to glimpse and highlight only the most important and key moments of a film’s scene and the character’s journey and discard all the rest.
How do I Make a Jump Cut in Premiere Pro?
While there are many possible uses and intentions with this technique, the fundamental action remains the same, irrespective of the format or the software being used.
By far the most common would be to do so in your edit sequence itself, though there is an alternative way which we won’t be covering here utilizing the source monitor. Perhaps we will cover this method in a future article, but for the time being we will focus on this key in-line method.
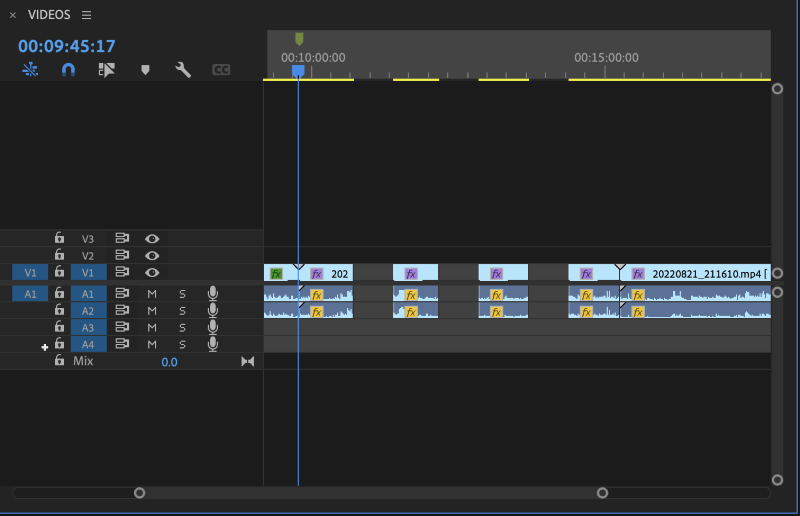
As you see below, there is a continuous clip (one where there are no edits or cuts yet applied). The intention here being to move through the shot quicker and establish a deliberate and obvious passage of time. In order to do so, we’ll need to remove the clip content as highlighted in the illustrated bounding boxes below.
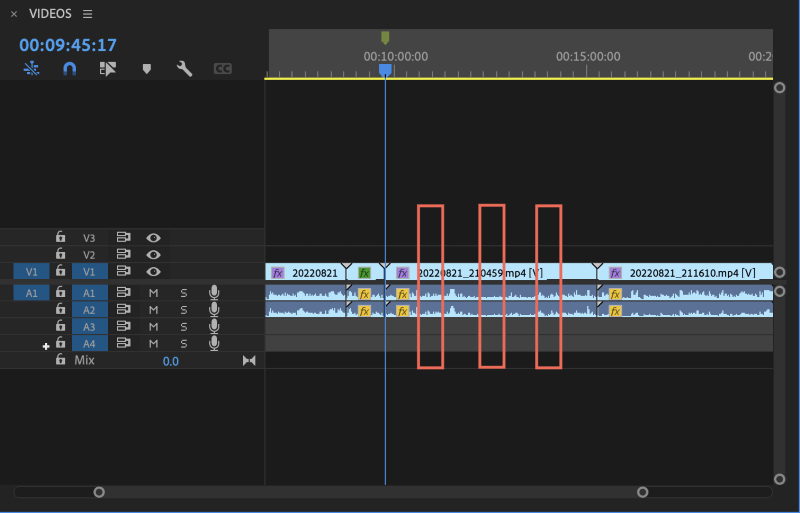
I have made the cuts uniform (of equal length) but this is merely for illustrative purposes and your cuts may be wildly different to achieve the effect you’re intending.
(Pro tip: You can use a combination of markers to predetermine your cut points, either on the clip itself, or on the timeline, or both. We won’t be using them here, but you may find this helpful to use for frame accuracy here.)
To cut the clip you can simply use the blade tool to manually splice each track, or you can use the immensely powerful shortcut key function “Add Edit to All Tracks”. If you don’t have this mapped yet, or if you haven’t used it before, navigate to your “Keyboard Shortcuts” menu and search for it as shown below.

When you do so, your shortcut key will likely be different from mine, as I have custom set mine to be a single key, “S” (a change I humbly and thoroughly recommend, I’ve used it for years).
This technique is vastly superior to manually cutting with the blade tool, and immensely quicker given that it can cut through an entire stack of tracks (quite helpful when you have 20 or more active tracks and you need to make a complex jump cut or trim to all of them).
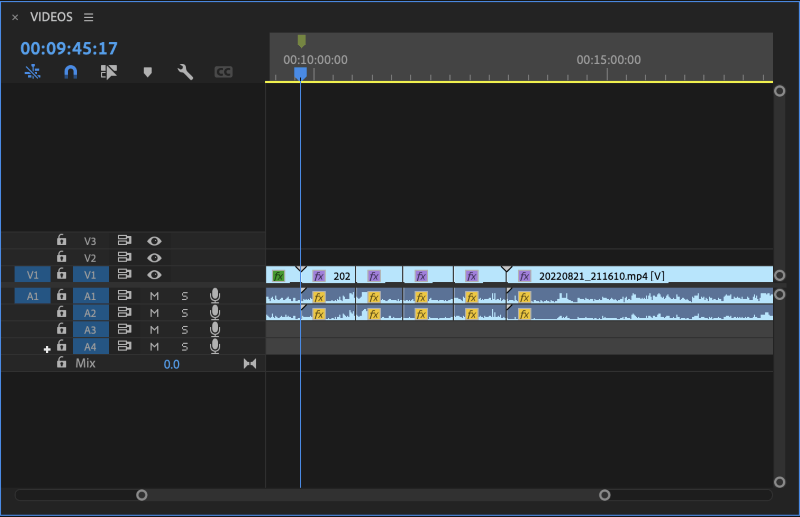
Once you’ve settled on your method and made the cuts, you should be left with a shot that looks like this, with seven shot segments in total:
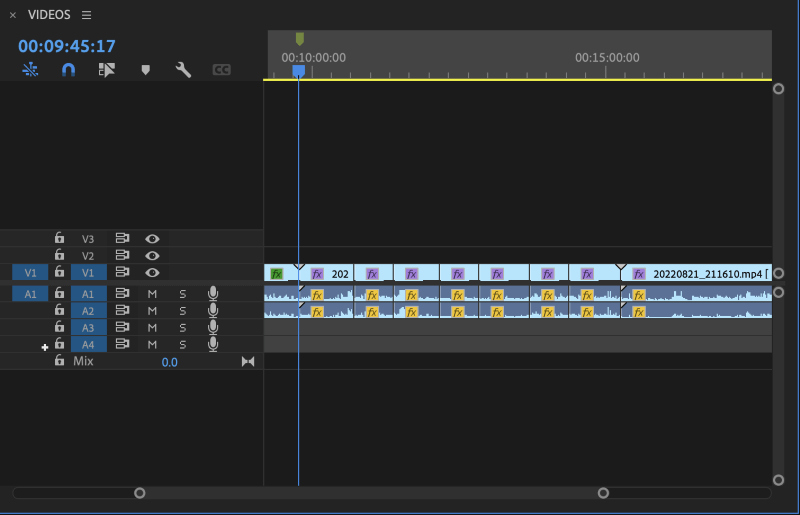
If you have the shot above cut like so, then there’s only one step left and that is to delete and cut away the segments we wish to remove in order to create the jump cut sequence.
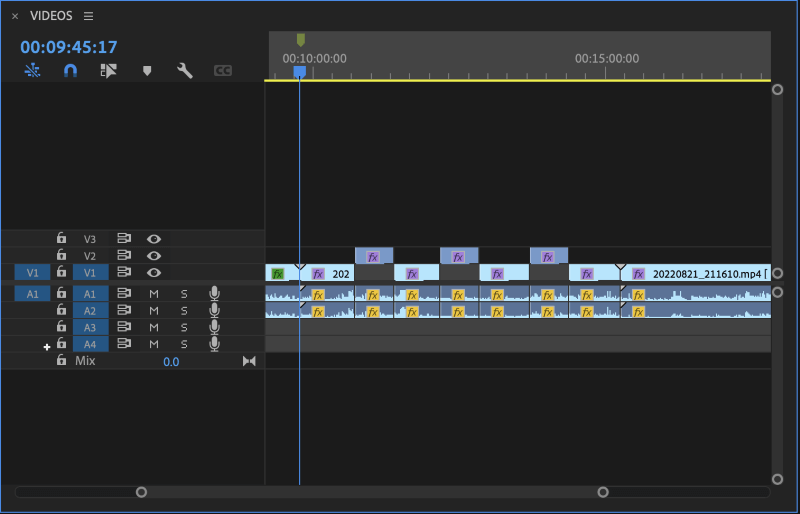
One simple and easy technique that can help you sort the sections of video you wish to keep from those you wish to cut away is to lift the intended deletions to the V2 layer above your primary V1 track layer, as illustrated above.
This isn’t necessary, but if you are doing complex cuts it can help to visualize the segments you are removing. Another method would be to label the sections a different color, but this may be more steps than necessary for the purposes of creating a jump cut here.
You needn’t move the audio either, as we are going to be cutting it out too, but you could preserve it in place if needed by locking all of the audio tracks prior to deletion. This would be a very different edit, and one we’re not seeking to implement here, but suffice to say, the option to do so certainly exists.
Now, simply lasso the combined selections, or click on either the video or the audio (if your clips are linked, mine are not, as you can see above) to grab the entire region of each cut section.
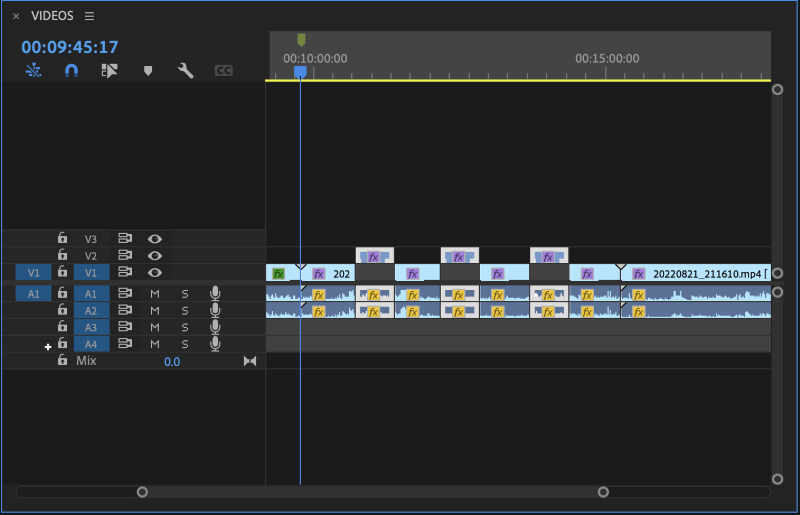
Pro tip: If you’d like to select all three segments at once, simply use the lasso tool and hold shift throughout your selection, and release the mouse, hover your cursor over the next section and click again, all while holding the shift key.
If you do so, you will end up with a selection that looks like this:
From here there are two methods of cutting these away. While you may be quick to simply hit delete, you will be left with empty black space where the regions were removed, like you see below:
In some cases, this may be acceptable or even intentional, but with regards to a jump cut, this isn’t correct, as you would have extended empty space between your images, which doesn’t make for a very good jump cut, does it?
The fix is easy enough to remove and delete the black space on each of these one by one, but this is the mark of a novice, as you will be effectively doubling your keystrokes and clicking, and thus doubling your editorial actions for something that could be achieved far quicker and easier.
How do I save time and keystrokes and cut like a pro, you say? Simple, you need only use the uber powerful Ripple Delete function on the multiple selections we had made before deleting manually. So, hit undo, and restore the selections and re-highlight/re-select them as before.
Now with all of the highlighted regions, simply hit the key combination for Ripple Delete, and watch as the clip regions themselves and the black space that would otherwise be left in the void of the edits all vanish and you are left with only the content you wish to preserve, like this:
As before, if you are unsure where the key shortcut is, simply navigate to the keyboard shortcuts menu (“Option, Command, K” on Mac) and search for “Ripple Delete” in the search box like so:

Your key assignment will not be “D” as mine is, as again, I have set mine to be a single keystroke for speed and efficiency, and if you want to follow along with me, I humbly suggest that it is a good idea to modify this to a single keystroke as well. However, it can certainly be any key you would like that isn’t already assigned elsewhere.
In any case, whichever delete method you have chosen to employ, you should now have the jump cut working just as you intended. Congratulations, you can now jump cut like the best of us and you didn’t need a camera jam to achieve it either!
Final Thoughts
Now that you have a firm handle on the basics and usage of jump cuts, you are ready to start jumping through time and space as you see fit in your edits.
As with most editing techniques, they are deceptively simple, but can be used to exceptional effect and with varied intentions throughout the medium and film genres.
From Schoonmaker to Godard to the happy accidental genesis of the technique itself through Méliès fortuitous camera jam in 1896, there is no limit to the application of a jump cut, and there’s little sign that this technique will ever be dispensed with.
Filmmakers have found countless creative ways to apply and wield the technique for over a century, constantly keeping it fresh and unique, and all signs point to it being so for many centuries to come. The jump cut is an essential technique, and an integral part of the very DNA of film/video editing, and undoubtedly here to stay.
As always, please let us know your thoughts and feedback in the comments section below. What are some of your favorite examples of jump cut usage? Which director/editor makes the best usage of the technique in your opinion?