
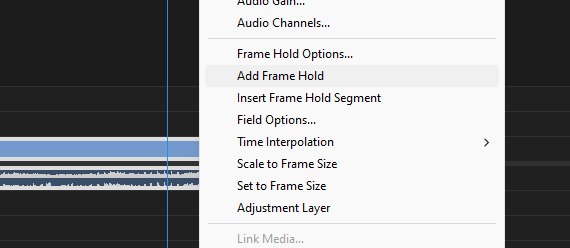
At the particular frame you want to freeze in Adobe Premiere Pro, right-click on the video clip in your timeline, then click on “Add Frame Hold”.
I am David, a professional video editor. I’ve been editing videos for creative organizations for the past few years, and I know the inside and out of Premiere Pro confidently.
In this article, I will discuss how to freeze frame, various ways you can freeze a frame, and finally, the great effects you can achieve with this freezing frame fx. Let’s get started.
Table of Contents
How to Freeze Frame in Adobe Premiere Pro
Freezing frames in Premiere Pro is so easy to achieve.
Frame hold is just like you holding a particular frame in your clip for a period of time. To do this, make sure you have your sequence opened. Also, in your timeline, navigate the playhead to the frame you want to freeze.
Right-click on the clip, then head over to Add Frame Hold.
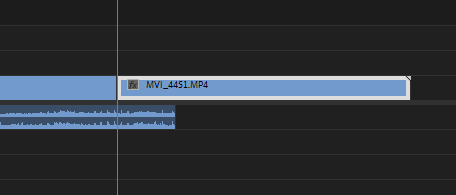
This will result in your clip getting split into two – the first part being the normal playback and the last part being the frozen frame. You can extend the frozen frame to as long as anything!
Do note that adding frame hold on your video clip will separate your audio from the video. Also, frame hold will not create a new media in your project folder. It will create a segment in your timeline that you can edit as you like.
Other Ways to Freeze Frame in Adobe Premiere Pro
There are several to which you can play around with things in Premiere Pro. It’s your choice to choose and fall in love with the one you prefer. Let me take you through other ways to freeze frames in Premiere Pro.
Freezing Frame with Frame Hold Options
First and foremost, you have to set your frame hold option. Then, you insert the frame hold segment.
To set your frame hold option, click on the frame and head to Clip Menu > Video Options > Frame Hold Options. Ensure the clip is selected; the option might be greyed out.
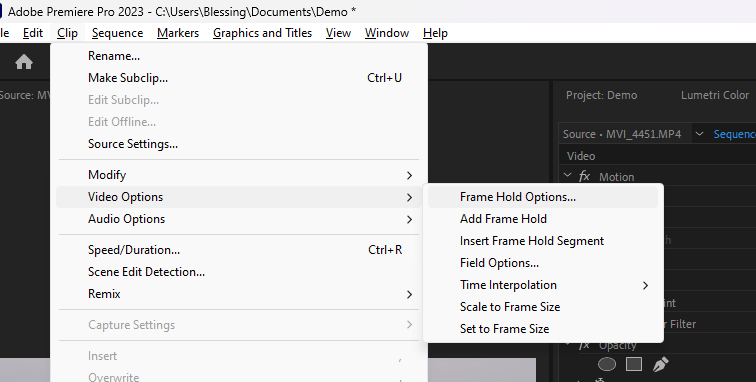
A faster route to this is right-clicking on the clip directly in your timeline and then Frame Hold Options.
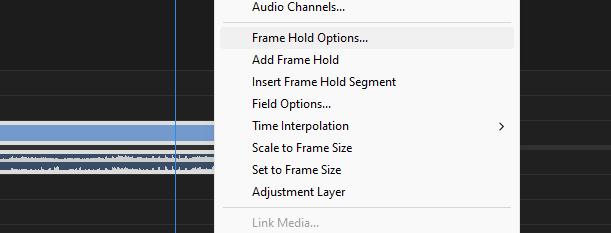
Now, you will have a pop-up box directly to your face. Ensure the hold-on box is still on check. There are some options to play around with. Let’s go through them.
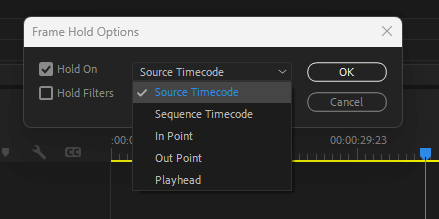
Source Timecode – With this option, you get to choose the particular timecode you want to freeze frame in your source (panel). At the particular duration, Premiere Pro will hold the frame for you!
Sequence Timecode – As the name implies, it will freeze the frame at the particular duration you input in your sequence (timeline panel).
In Point – If you have an in-point in your timeline, Premiere Pro will hold the frame for you at this particular in-point.
Out Point – At the out-point set in your timeline, Premiere Pro will freeze the frame for you. Easy pissy.
Playhead – Well, you know already, the point that you have your playhead at, Premiere Pro will ensure to freeze the frame for you.
Now that we set the frame hold option let’s insert the segment right away. To do this, go to the point you want to insert the frozen frame in your timeline, right-click and select Insert Frame Hold Segment.
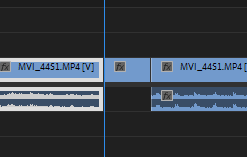
This will insert the frame you set in your frame hold option to that particular point. The image above shows the frame hold segment in the middle of the clip without audio. You can choose to extend or reduce it as you want. The choice is yours.
Freezing Frame by Image Grab in Premiere Pro
Another trick you can use to freeze a frame in Premiere Pro is to take a screengrab of the particular frame. Import it to the actual location and extend it as much as you want. Realistic and interesting to do. Let’s get on with it.
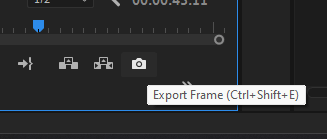
The first step is to head over to your timeline panel, look for the frame you want to freeze and place your playhead over there.
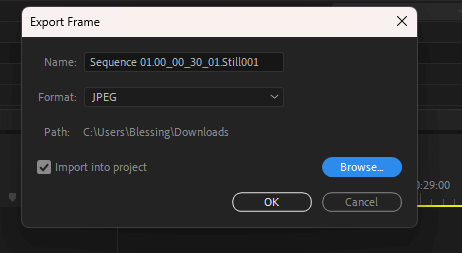
Then, head over to your program panel, and look for the camera icon, click on it to screen grab the particular frame.
Give it a name, select JPEG, which is the best format, and tick import into project.
Then, go to your project folder, find the frame, and drag it to the point you want to have in your timeline. There you go. The only difference with this method is that it will save the frame in your project.
Conclusion
Adding frame hold, using the frame hold option, and exporting the frame, I believe you have found the easiest method to work with. I prefer the frame hold method, but it can be tricky sometimes.
If you are facing any issues with these methods above, do let me know in the comment section.