
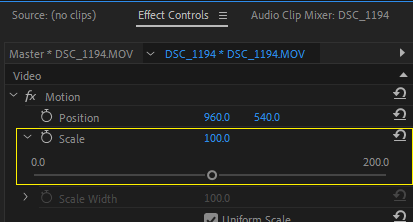
If you’re experiencing a zoomed video in Adobe Premiere Pro, simply select the clip, then click on the “Motion” tab from the Effects Controls panel. Then adjust the scale percentage to fit the size of your monitor.
My name is Dave. I’m an expert in Adobe Premiere Pro and have been using it for the past ten years while working with many known media companies for their video projects.
In this article, I’ll explain why your video is acting up and provide possible solutions. Get a cup of coffee and follow me.
Table of Contents
Why Video is Zoomed in Adobe Premiere Pro
When importing a 4K video into a 1080p project in Adobe Premiere Pro, the video may appear zoomed in on the monitor; This is because 4K video has a 3840 x 2160, while 1080p video has a resolution of 1920 x 1080.
Since the resolution of the 4K video is much higher than the resolution of the project, it will appear zoomed in on the monitor.
This can be beneficial for certain projects, as it allows for more detail and greater control over how the video looks when displayed.
However, it can also be a challenge for those not used to working with such a high resolution, as the video can appear more cluttered and difficult to work with on the monitor.
How to Fix a Zoomed Video Clip in Premiere Pro
You’ll need to scale down the 4K video to prevent this from happening. You can do this by going to the Effects Controls panel, selecting the 4K clip, then clicking on the “Motion” tab from the Effects Controls panel, and then adjusting the Scale slider until the video fits the frame of the 1080p project.
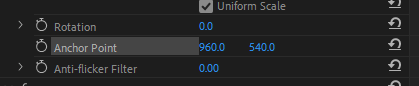
You can also adjust the Anchor Point slider to adjust the position of the video in the frame if necessary. Once you’ve changed the scale and anchor point settings, the 4K video should no longer appear zoomed in on the monitor.
Fix a Zoomed Video Clip in Premiere Pro Using Frame Size Option
On the other hand, if the video itself could have a larger frame size than the monitor is capable of displaying, To fix this, right-click on the clip in the timeline and choose “Set to Frame Size” from the drop-down menu.
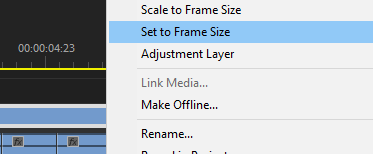
This will automatically scale the clip down using its longest dimension. Consider using an external monitor with a larger resolution to ensure your video displays accurately.
How to Adjust Aspect Ratio in Adobe Premiere Pro
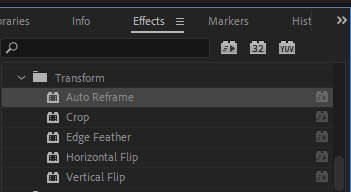
Open your project in Adobe Premiere Pro and select the clip you want to adjust the aspect ratio for. Select the “Effects” tab from the top menu bar.
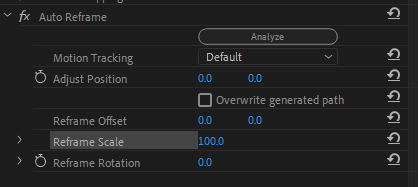
From the menu bar on the left, select the “Transform” folder. Select the “auto reframe” effect from the list of effects. Drag your zoom clip, which will automatically change the frame size. You can also use manual adjustment in the effect control panel.
Enter the desired aspect ratio into the “Desired Aspect Ratio” field. Click “OK” to apply the changes.
How to Adjust the Frame Rate of a Video in Adobe Premiere Pro
Open your video in Adobe Premiere Pro and select the clip you want to adjust. In the Program Monitor, right-click the clip and select Show Clip Keyframes > Frame Rate. Click OK.
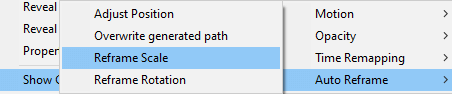
This will adjust your video’s frame rate to the chosen value. I recommend you render your video after adjusting the frame rate to ensure optimal playback performance.
Conclusion
Fixing a zoomed video in Adobe Premiere Pro is a simple process. All you need to do is adjust the scale and position parameters in the Effect Controls window, and you can quickly correct the issue.
Additionally, you can apply motion blurs and other effects to make the video look more professional. With a few simple steps and adjustments, you can take a zoomed-in video and make it look great in no time.