
Imagine that you’re trying to surf the web, listen to some music on Spotify, or work on an Excel spreadsheet. Even though you only have a few programs running, even none at all, your PC is still extremely slow.
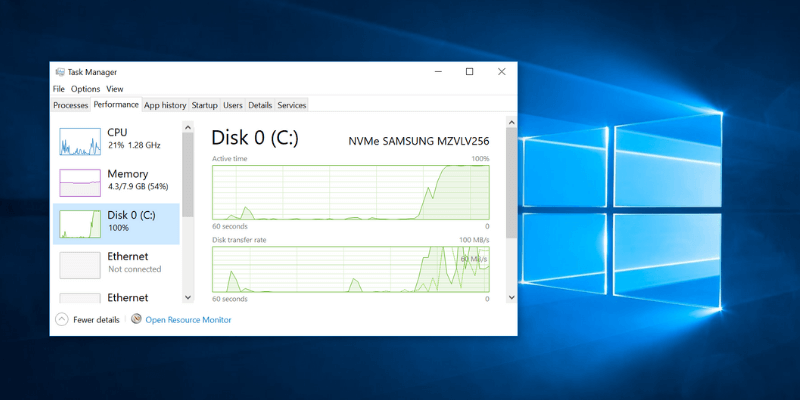
If this is you, there’s a chance you may be dealing with a 100% disk usage problem. It seems the latest version of Windows 10 has a problem with its drives being overworked.
Follow the steps below to find out if this is the case for you, and if so how to solve the issue so you can get back to binge-watching your favorite shows on Netflix.
Table of Contents
How to Know Disk is at 100% Usage on Windows 10?
To find out if your issue indeed lies with an overworked disk, you’ll have to use Task Manager.
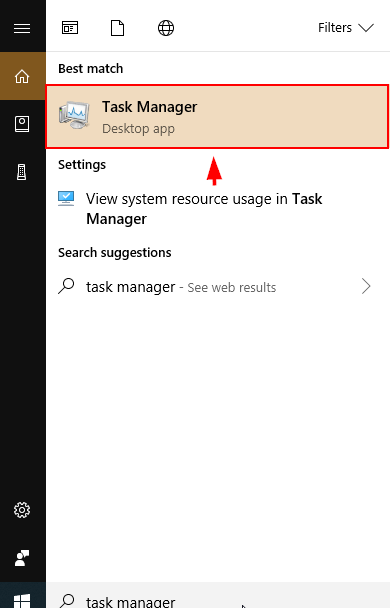
Step 1: Open Task Manager. You can do this by typing “Task Manager” in the Windows search tab and opening it, or by pressing CTRL + ALT + DELETE and selecting “Task Manager”.
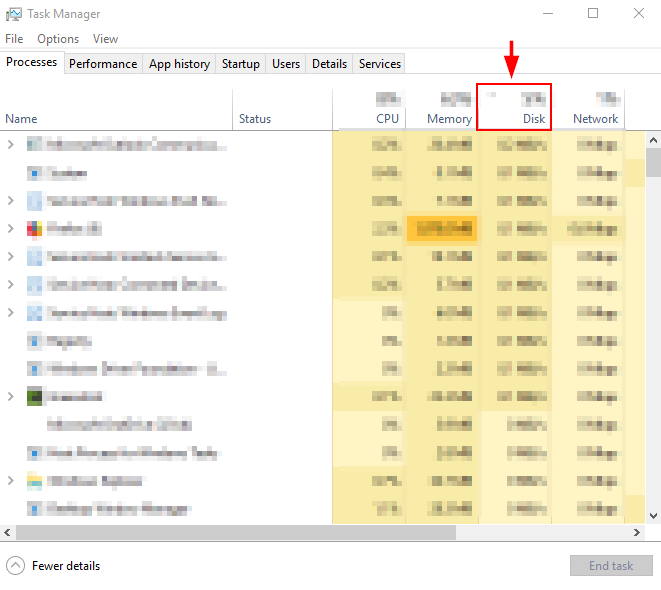
Step 2: Look at the column under Disk. Click Disk to sort the list of running programs from their impact on the disk. If your disk is running at or near 100%, this column will be highlighted in red. You can see the exact total percentage at the top of the column.
If you are running at 100% disk usage, below are some safe methods to fix the issue. If disk usage appears normal, you might want to consider checking for malware or background programs that are overworking your computer.
Ways to Fix the 100% Disk Usage Problem on Windows 10
Method 1: Turn off Windows Search
Windows 10 and Windows 8 have a bug called a “search loop” which results in high disk usage and slows your computer. To test Windows and see if this is the case, you can disable the feature temporarily. If it is indeed the cause of your slow PC, you can disable it permanently.
Disable Windows Search Temporarily
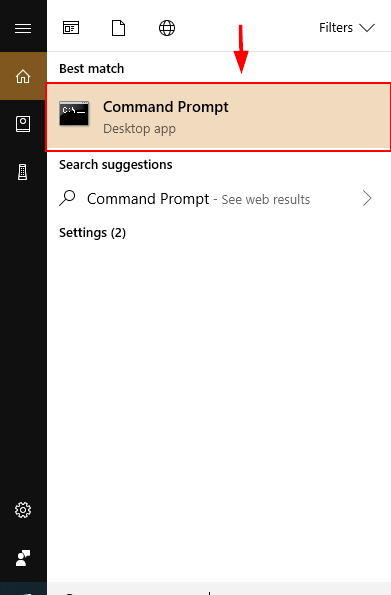
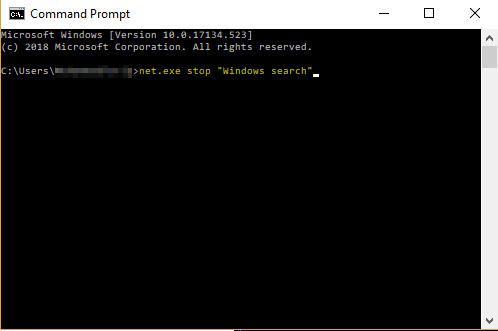
Step 1: Open up Command Prompt from the Windows search bar.
Step 2: Type and run the command net.exe stop “Windows search” in Command Prompt. Doing this will prevent Windows Search from running until Windows is restarted. If you notice better performance after doing this, you may consider disabling Windows Search permanently.
Disable Windows Search Permanently
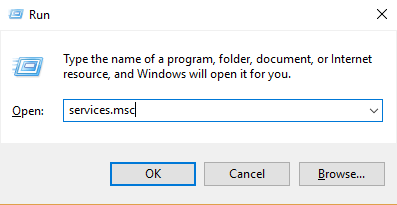
Step 1: Press Windows button + R. Type services.msc. Hit enter.
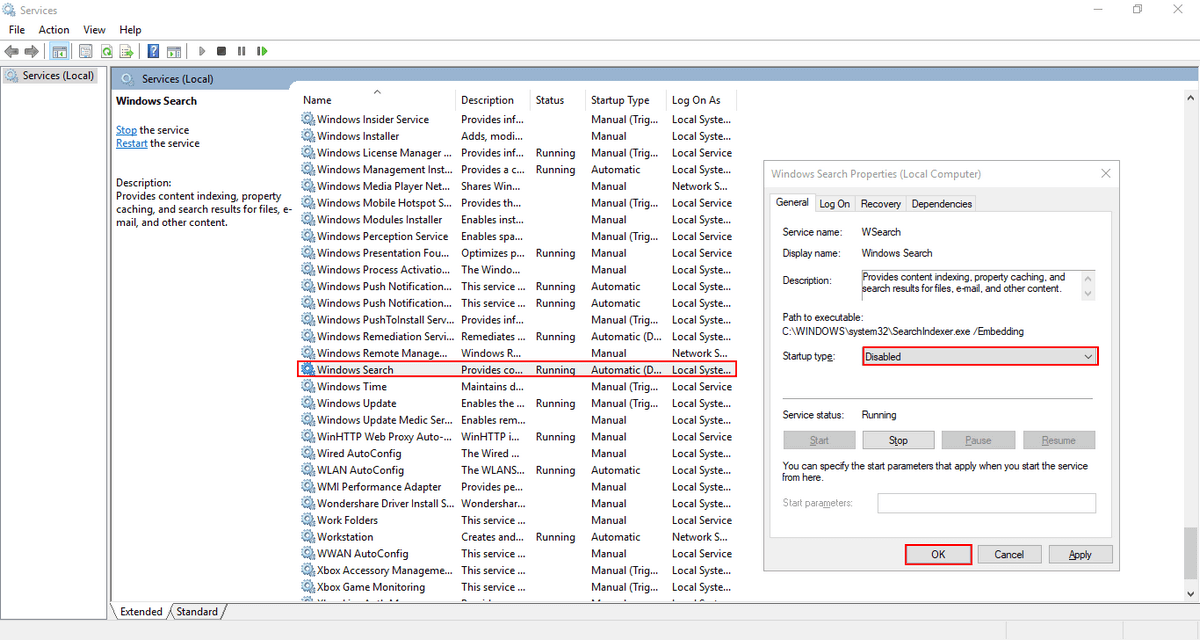
Step 2: Scroll down to find Windows Search. Double-click it to open up Windows Search Properties. Select Disabled for Startup type and hit OK. This will permanently disable Windows Search. This means you won’t be able to use the Windows search bar at the bottom of your screen.
Method 2: Fix App Settings
Sometimes changing your Skype or Google Chrome Settings might be beneficial for disk performance, as these applications have a known disk usage bug.
Google Chrome
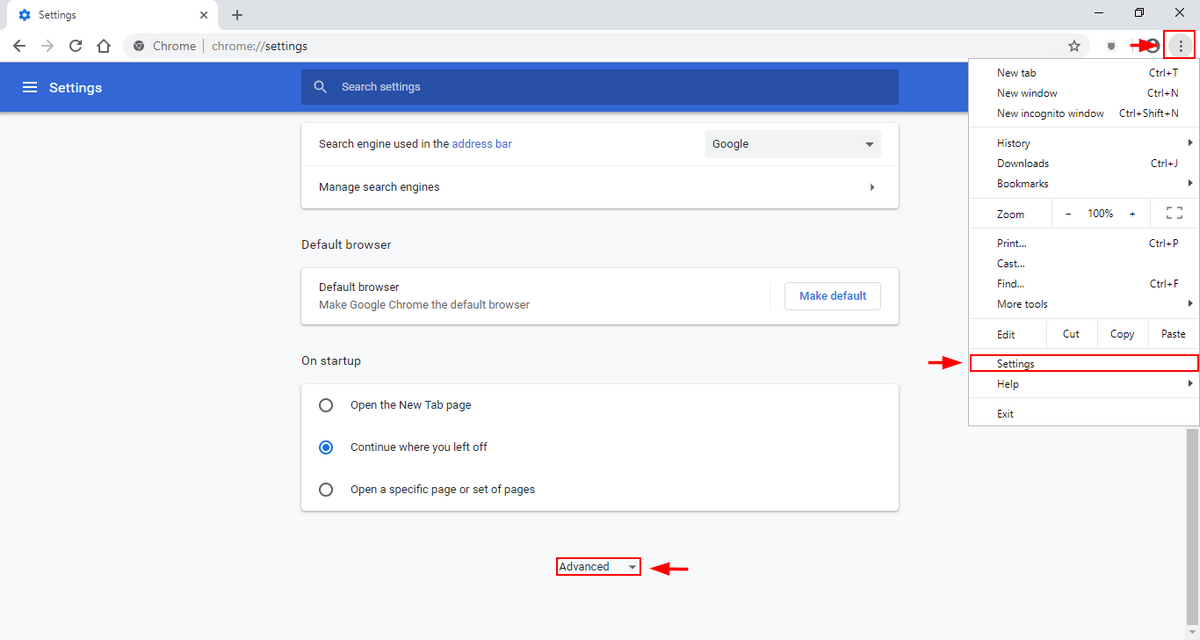
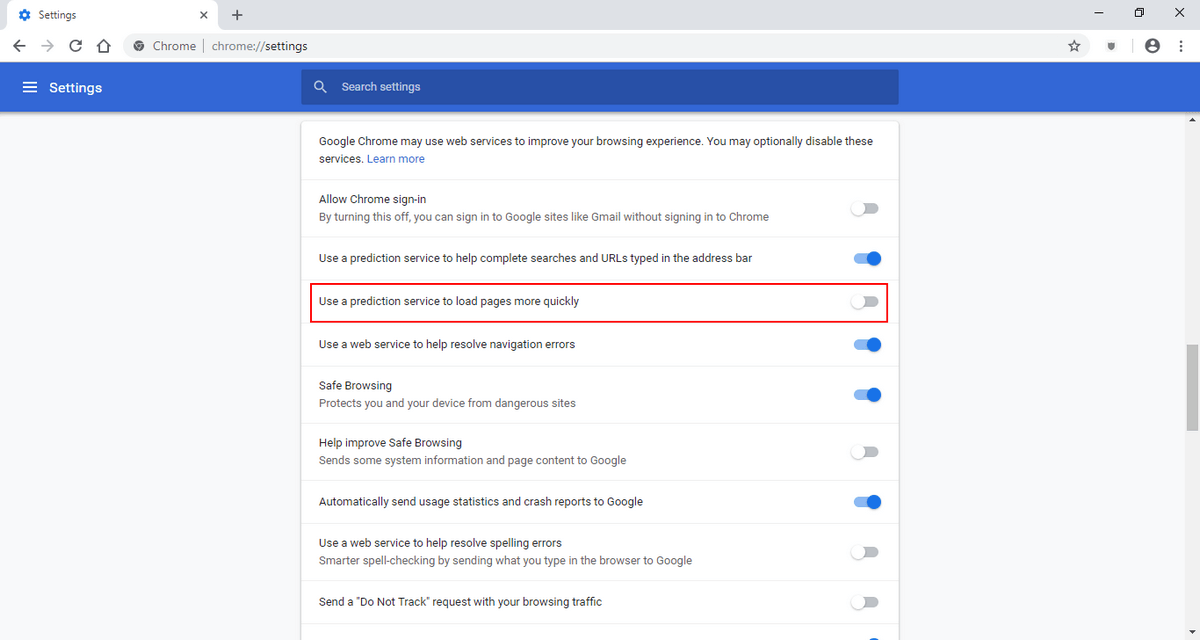
Step 1: Open Google Chrome. Click Settings. Then, scroll down and select Advanced Settings.
Step 2: In Advanced Settings, uncheck Use a Prediction Service to load pages more quickly.
Skype
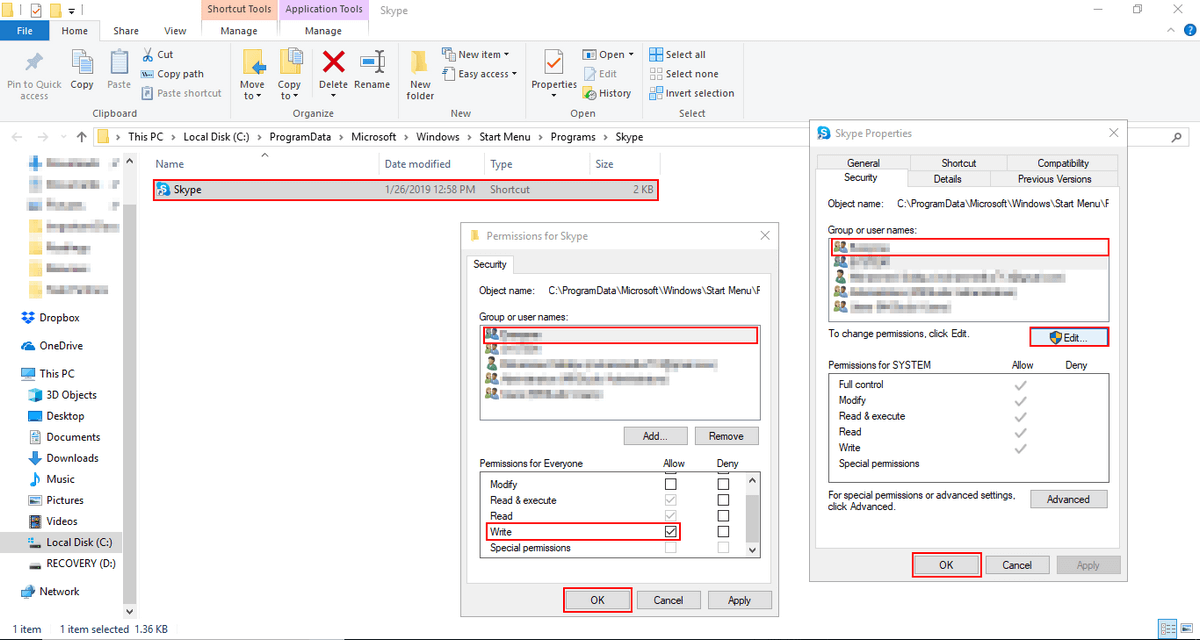
Step 1: Find the Skype application on your PC (you may want to use the Windows file search bar in the top right). Right-click the file and select Properties.
Then open the Security tab. From there, select Edit.
Select “All Application Packages“. Check Allow next to Write. Then click OK.
Method 3: Turn off Superfetch
Superfetch is a tool that watches your activity in the background and preloads frequently used apps to your RAM in advance. It can be a potential reason for 100% of your disk being used. Here’s how to fix it.
How to Temporarily Disable Superfetch
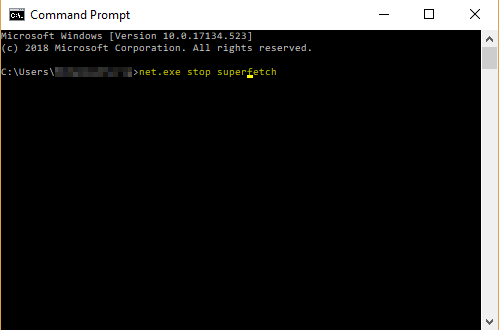
Step 1: Open Command Prompt by searching for it in the taskbar. Type the command net.exe stop superfetch.
If you notice improvement, consider permanently disabling it instead.
How to Permanently Disable Superfetch
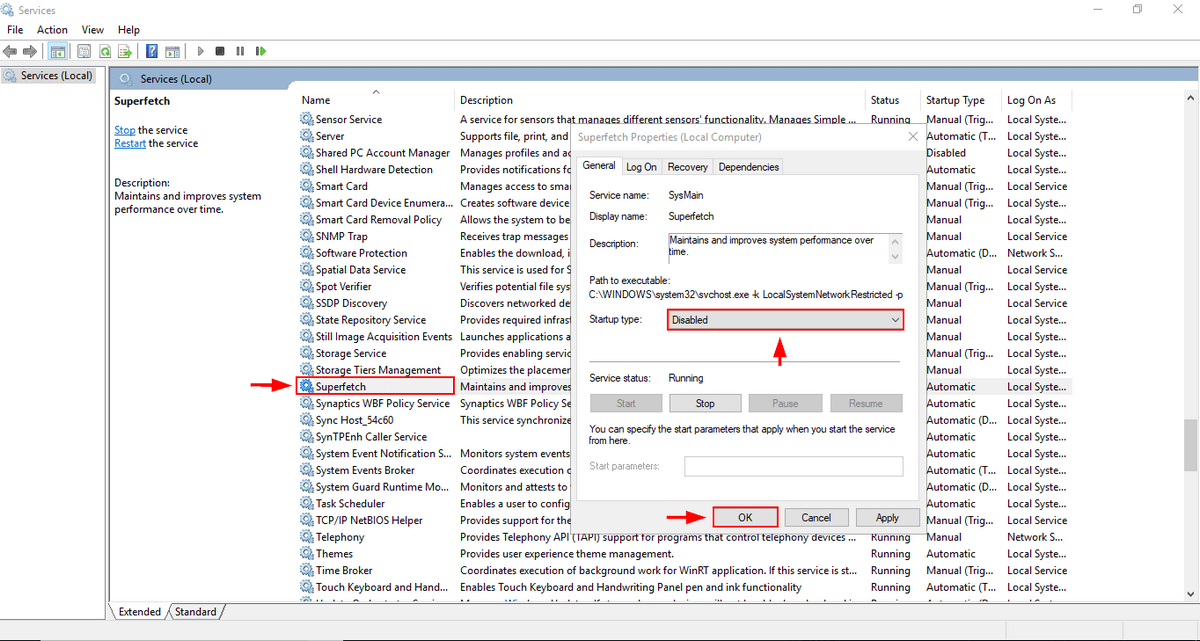
Step 1: Open up Windows Services by finding it through the Windows search bar (the one in the taskbar on the bottom left).
Scroll down to find Superfetch.
Double-click and select Disabled under the startup type in the pop-up which appears. Then hit OK.
Method 4: Change Energy Performance
Changing your PC from the Recommended or Power Saving option to High Performance might help users deal with the disk use issue, especially if you’re using a laptop.
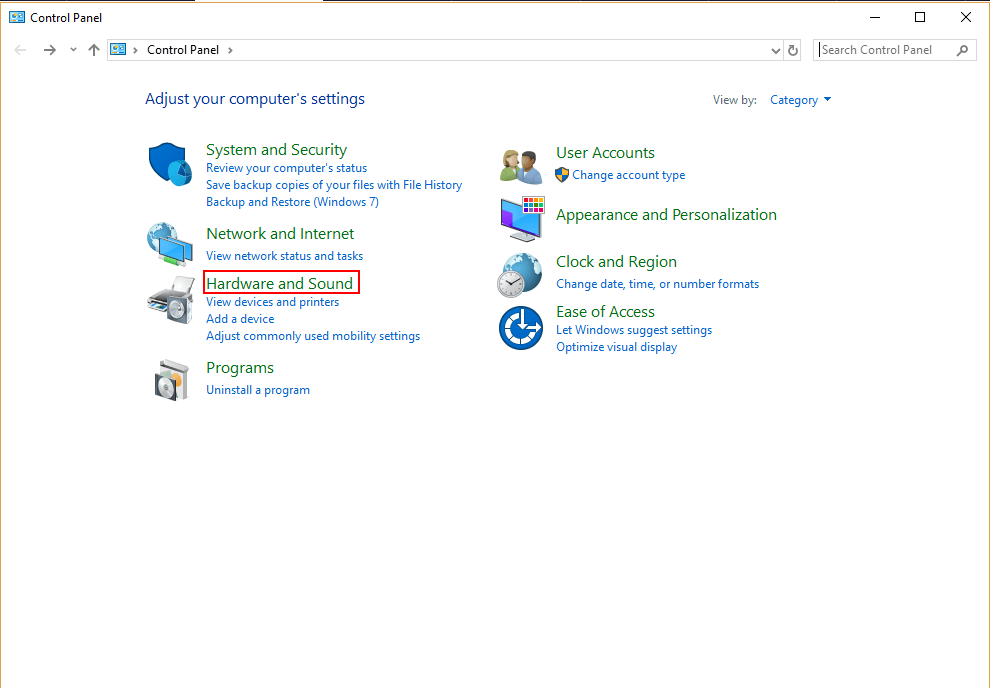
Step 1: Open the Control Panel. Open up Hardware and Sound.
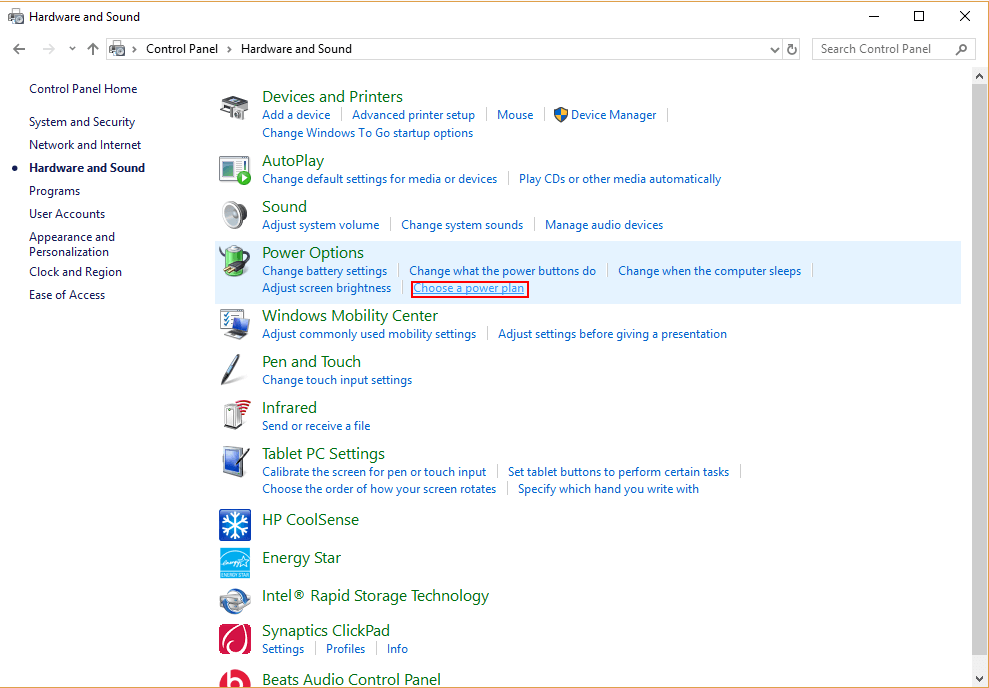
Step 2: Select Choose A Power Plan.
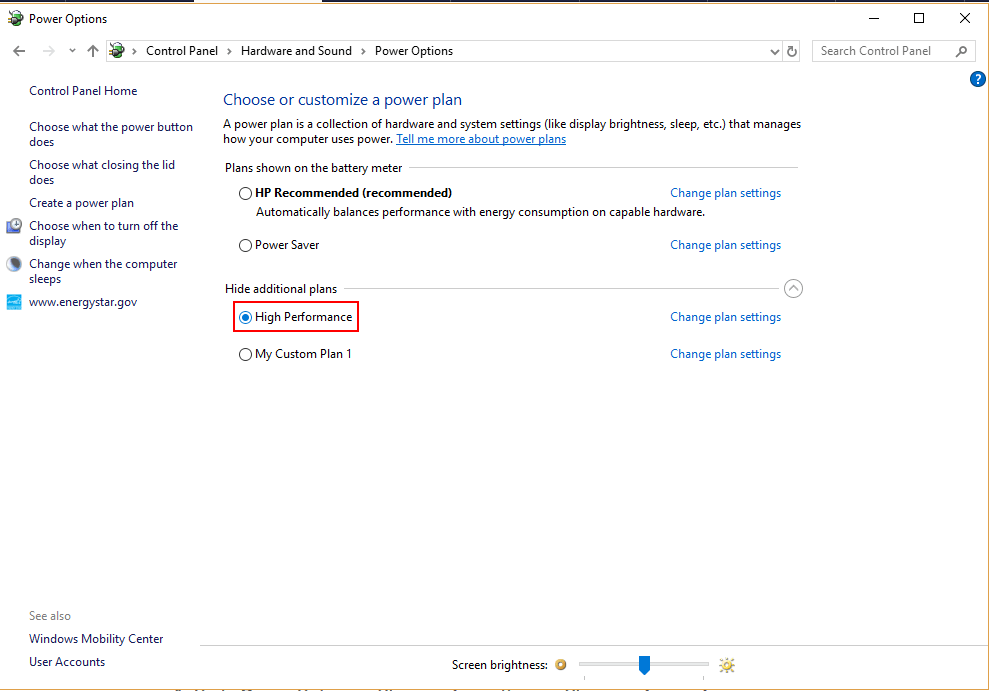
Step 3: Select High Performance.
If you’re using a laptop, you can also click the battery status icon in the bottom right corner of the screen and drag the slider from “best battery life” to “best performance”.
Method 5: Turn off your Antivirus
Many antivirus packages use up excessive disk space when running. You can check on this by opening the Task Manager (using the CTRL + ALT + DELETE keys or as shown in the previous section) and check which programs are using the disk. If antivirus is indeed the culprit, uninstall the antivirus and try another one.
Alternatively, a malicious program could be causing the issue. Running your antivirus software is a great way to check for this, so make sure to scan before you uninstall it.
Method 6: Remove all Temporary Files in Windows
Every application you use creates temporary files on your computer. Often times, you may have too many temporary files using your computer’s resources. Some may even be malware running in the background! By getting rid of all temporary files, you’ll also save space on your PC and save yourself from other potential risks.
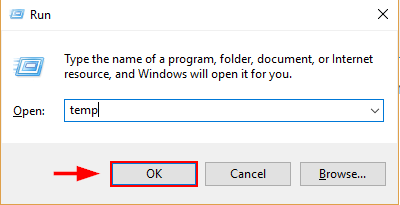
Step 1: Press the Windows Key + R. Type temp into the dialogue box which pops up and hit Enter.
Step 2: Windows Explorer will show you the temp folder with all of your temporary files. Select All and Delete.
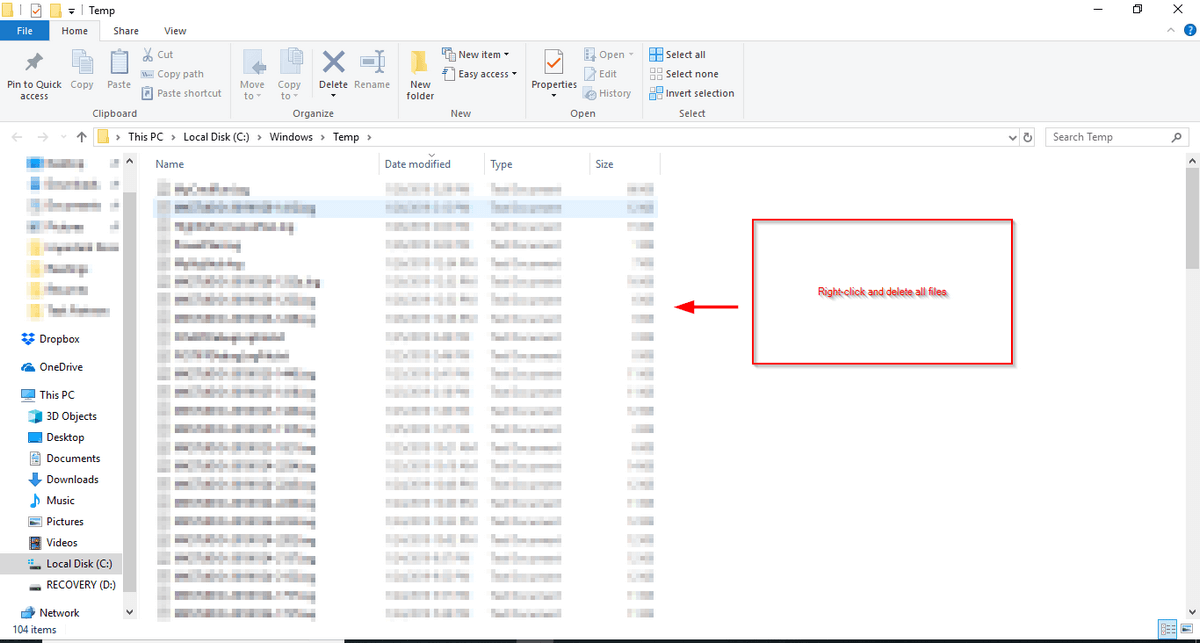
Step 3: Restart your PC.
Method 7: Check Disk
There’s a possibility the issue lies with your hard drive, so you’ll need to check that disk.
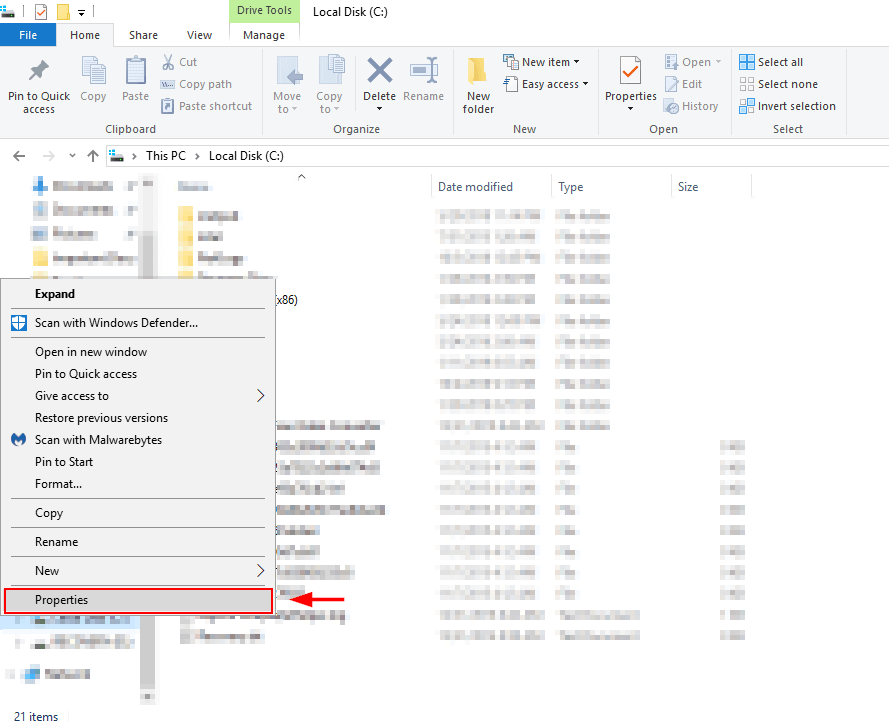
Step 1: Open File Explorer from the Windows search bar. Then find your Local Disk (the C: Drive), right-click, and select Properties.
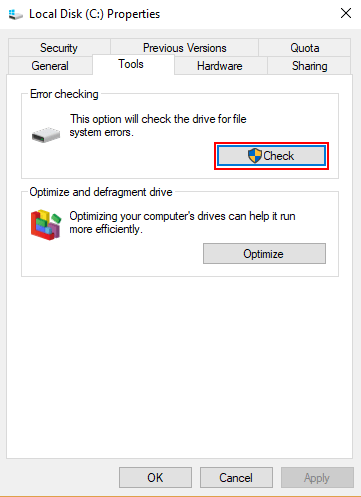
Step 2: Select the tools tab and click Check. This will tell you if anything is plaguing your disk and help you take the appropriate action to fix it.
Method 8: Update Windows
It’s also possible you’re running into disk usage issues because you’re using an out-of-date version of Windows. Updating Windows to the latest version may help tackle this problem.
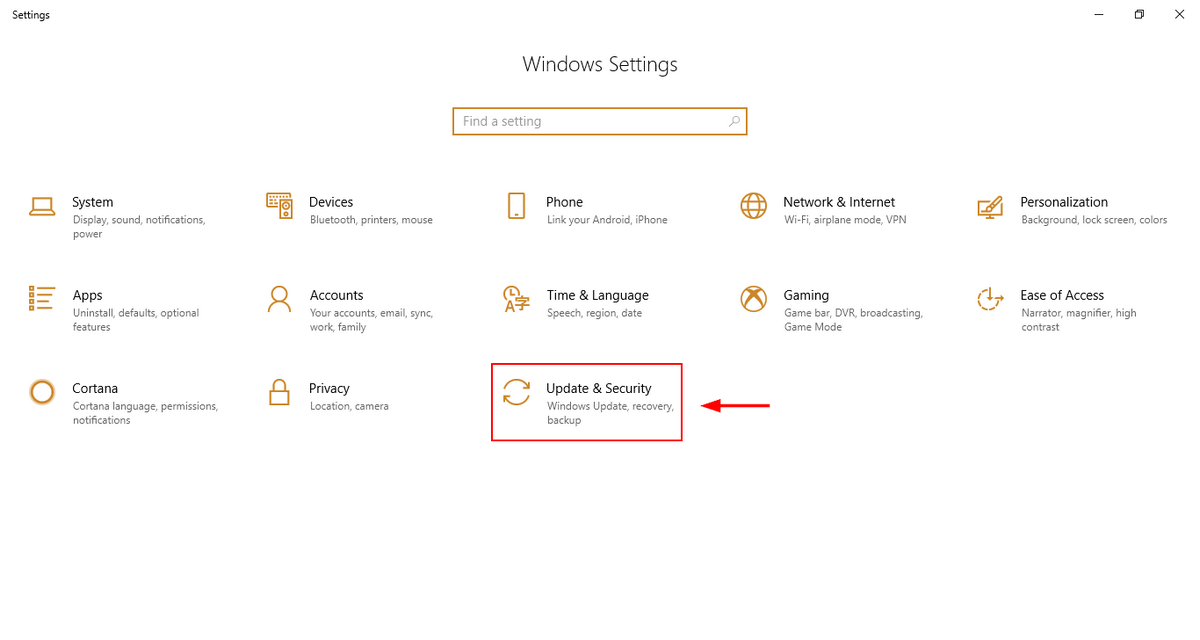
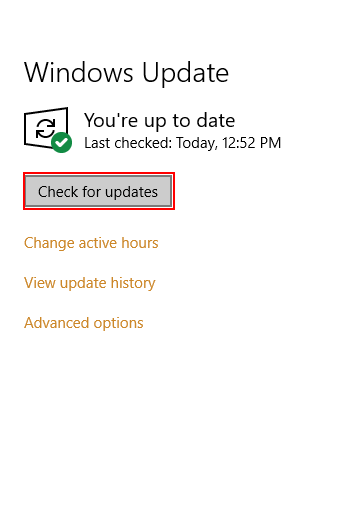
Step 1: Open up Settings from the Windows Search bar. Find Updates & Security and open it.
Step 2: Select Check for Updates. Windows will check for updates and install them. Staying up-to-date is helpful for avoiding security issues, getting better performance, and obtaining helpful new features.
Method 9: Wipe and Reinstall Windows
If absolutely nothing is working for you, the last resort is completely wiping and reinstalling Windows. When doing this, make sure you backup your files and have Windows 10 ready to install from a flash drive (or an installation disk, if you have a disk drive).
Don’t have a bootable version of Windows? You can learn the method here for creating one.
Windows 10 Download and Install
Follow the steps on this Microsoft page to download the Windows Media Creation tool and download Windows onto a USB drive.
Back Up Your Hard Drive Using Windows 10
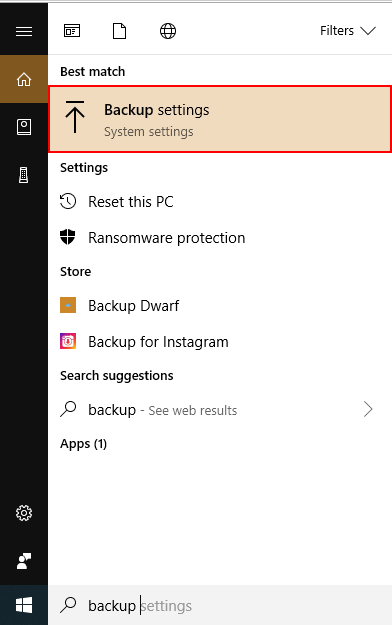
Step 1: Search for backup settings in the Windows Search box, then open it.
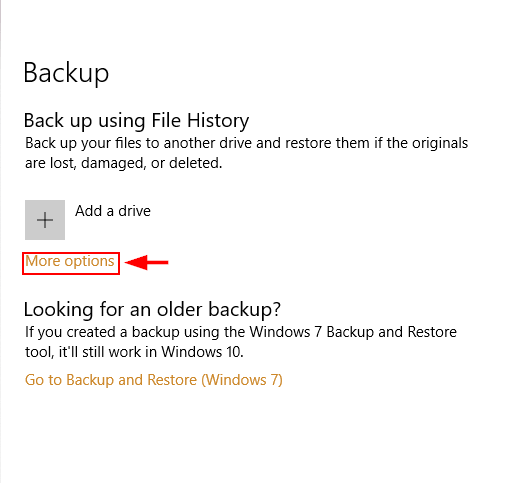
Step 2: Select More Options.
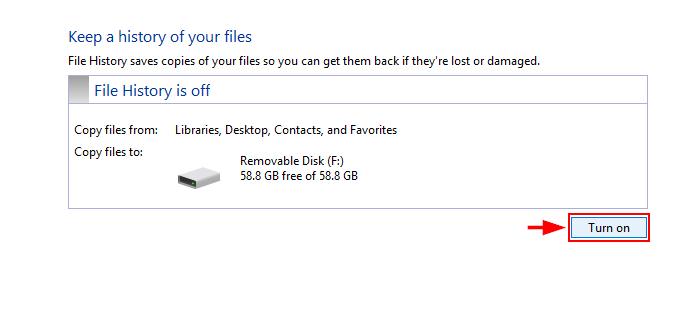
Step 3: Turn on File History after selecting a Drive.
Back up Your Hard Drive Using Minitool
Download and set up Minitool Partition Wizard. The free version is sufficient for this task. you can also use other equivalent drive cloning software.
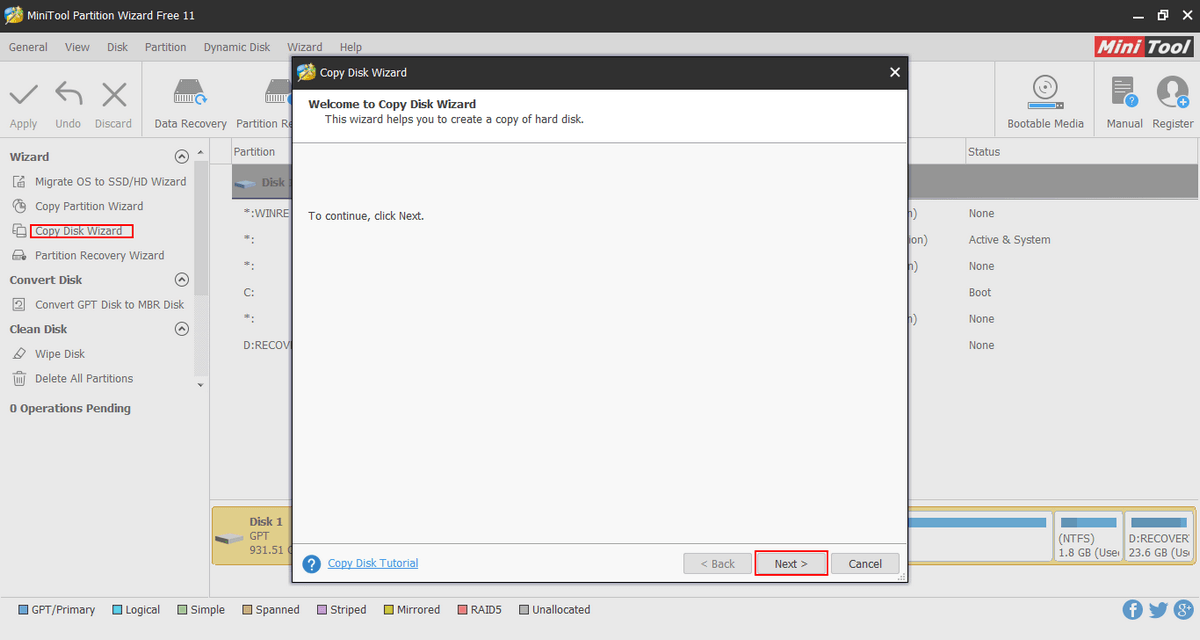
Step 1: Open up Minitool Partition Wizard. Select Copy Disk Wizard after selecting the System Disk.
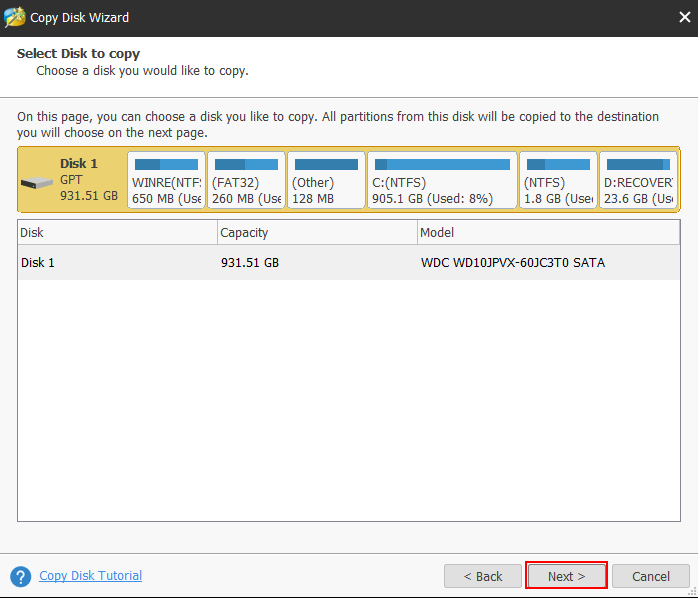
Step 2: Select the disk you want to copy and the one you wish to write over (the hard disk). Note that this will wipe existing files on the disk you’re writing on. Follow through the rest of the process and click Apply.
Restoring Windows 10: Using Windows 10
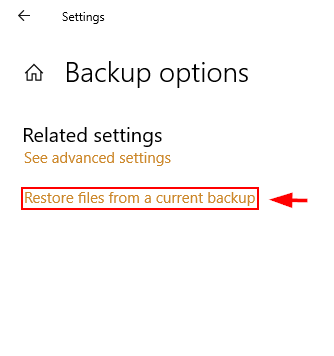
Step 1: Type backup in Windows 10 search bar.
Step 2: Under backup settings select Restore Files from a current backup. Follow the steps and click Start Backup.
Reinstall Windows 10 Using Minitool
Once you have wiped your disk, you can reinstall Windows.
Step 1: Connect your USB device with the Windows 10 installer on it to your PC.
Step 2: Select the appropriate sections of the hard drive (partitions) when prompted to choose a location to install Windows. Choose the unallocated space when doing a clean installation of Windows 10.
Your disk usage should be reduced. If not, replace the backup on your hard drive with the copy you saved. If you notice improved performance, the original hard drive was failing. Note this is a last resort process and should only be attempted if the other methods above fail to deliver satisfactory results.
Conclusion
Using a slow PC is an unwelcome experience. Thankfully, sometimes the root of the problem is simple and easy to fix. I hope one of the methods above helps you solve the 100% disk-usage issue on Windows 10.
As always, please feel free to comment on your experience handling this issue below.
Well done! Very thorough, like the pop-up thumbnails of screen captures. Lee