
There are many places around the internet where you can find a list of keyboard shortcuts for Final Cut Pro, and Apple itself publishes a comprehensive list online. But these lists can be daunting. What are the ones you really need to know?
Over the decade that I have been making home movies and professional films in Final Cut Pro, I’ve learned how helpful it is to master an ever-growing list of keyboard shortcuts. And that list has grown over the years as I’ve had one “Ah-ha!” moment after another when I discovered the shortcut for that task I had been doing the long way for too long.
As I also know how hard it is to memorize lists of random keystrokes, in this article I will explain why I think the shortcuts I’ve chosen are ones every Final Cut Pro editor should know.
Table of Contents
- Your Everyday Shortcuts
- Best Shortcuts for Importing Footage into Your Timeline
- Best Shortcuts for Navigating in the Timeline
- Basic (But Essential) Editing Shortcuts
- Best Shortcuts to Use When Playing Back Your Video
- 12 Random Annoyingly Difficult Tasks That Suddenly Become Easier with a Shortcut
- Final Thoughts
Your Everyday Shortcuts
You probably use the following shortcuts every day in one application or another but for completeness’ sake it is worth confirming that they work – and are just as useful – in Final Cut Pro too:
| Copy | Command-C |
| Cut | Command-X |
| Paste | Command-V |
| Undo | Command-Z |
| Undo Undo (redo) | Shift-Command-Z |
Best Shortcuts for Importing Footage into Your Timeline
When you are skimming through footage in the Browser (the part of the Final Cut Pro screen that shows all your raw footage) to find clips you want to add to your timeline, you can press the letter I anytime to mark a starting (in) point for a clip you want to use in your timeline. Pressing the letter O will mark a corresponding end (out) point.
| Mark an In point | I |
| Mark an Out point | O |
Once you have your In and Out points marked the area between them is outlined with a yellow line. You can click anywhere within that area and drag this bit of the clip into your timeline.
But what is great about the I and O shortcuts is that you can use them anytime, anywhere.
Maybe you are watching some footage in the Browser and think “I want to start my clip here” so you press I. Then, after watching the next 10 seconds of footage you realize the actor coughed, or flubbed the line, so you want your clip to start… now. Just press I again and the In point moves to where you are when you pressed I.
You can even work backwards. Maybe you know where you want the clip to end, so you press O there, then skim backwards in the clip looking to find a decent In point. When you do, just press I and you’re ready to drag that clip to your timeline.
Finally, I and O work in clips already in your timeline. For example, you can delete a selection of a clip by setting In and Out points and pressing Delete. And you can move part of a clip by marking the In and Out points, then dragging that section to wherever you want it to go.
My last two favorite shortcuts to use when searching through your footage and the F key, which marks a clip as a Favorite, and the E key which adds the clip to the end of your timeline.
| Mark a clip as a Favorite | F |
| Insert a clip at the end of your timeline | E |
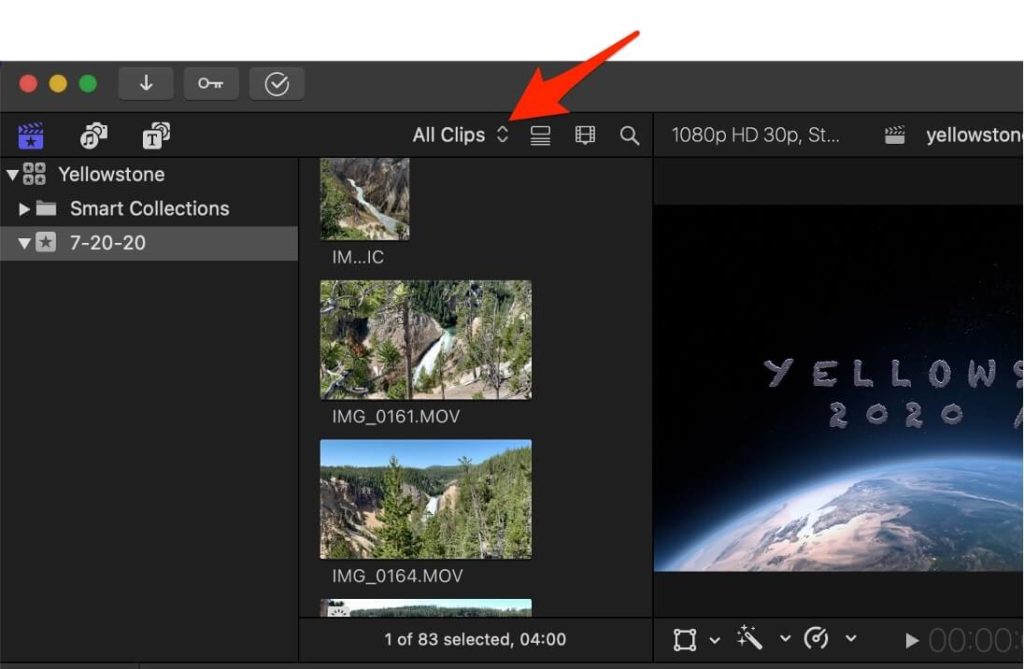
Marking a clip as a Favorite: On any clip, or part of a clip marked with I and O points, you can press F and it will be tagged as a Favorite. You can quickly find all of your favorite clips by changing the Filter pop-up menu (shown in the screenshot below) at the top of the browser from “All Clips” to “Favorites”.
Favoriting clips can be handy when you are just watching footage, see something that catches your eye, but don’t know where exactly you will use it. When that happens, just mark your I and O points, hit F, and later you can find that clip fast in your Favorites.
Adding a clip to the end of your timeline: If you press E when on a clip, or a part of clip marked with In and Out points, the clip will get teleported to the very end of your timeline.
This can make adding new footage to your timeline so much faster, especially when the footage is already in chronological order – you can just watch, mark your In and Out points, press E, and keep going without so much as a nudge of your mouse.
Moving around in the timeline quickly can really speed up your edits, helping you get your work done faster, or just implement all those ideas you had before you forget them.
The first thing you need to know is how to Zoom in and out of your timeline quickly. To do this, try these shortcuts:
| Zoom into the timeline | Command + |
|---|---|
| Zoom out of the timeline | Command – |
Shift-Z is also a really handy shortcut when you want to see the big picture because it instantly zoom’s your timeline out to its entire length. I use this all the time to quickly see where I want to work and then Zoom in from there using the above shortcuts.
| Zoom all the way out of your timeline: | Shift-Z |
Alternatively, the following shortcuts jump you right to the start or end of your timeline:
| Move to the beginning of your timeline | Fn Left-Arrow |
|---|---|
| Move to the end of your timeline | Fn Right-Arrow |
Finally, I usually find it helpful to insert some blank space to help me organize my timeline. I will probably end up deleting them, but having a gap here and there can help me see the different sections of my movie or just remember where I need to add some footage. To insert three seconds of blank space wherever your skimmer is, just press Option W.
| Insert some blank space in your timeline | Option-W |
Basic (But Essential) Editing Shortcuts
When editing in the Final Cut Pro timeline, there are several fundamental tools that can be accessed through the Tools dropdown menu, located where the red arrow is pointing in the screenshot below. While the menu gives you access to all the tools, each can also be accessed just by pressing the letter shown to the right of each tool.
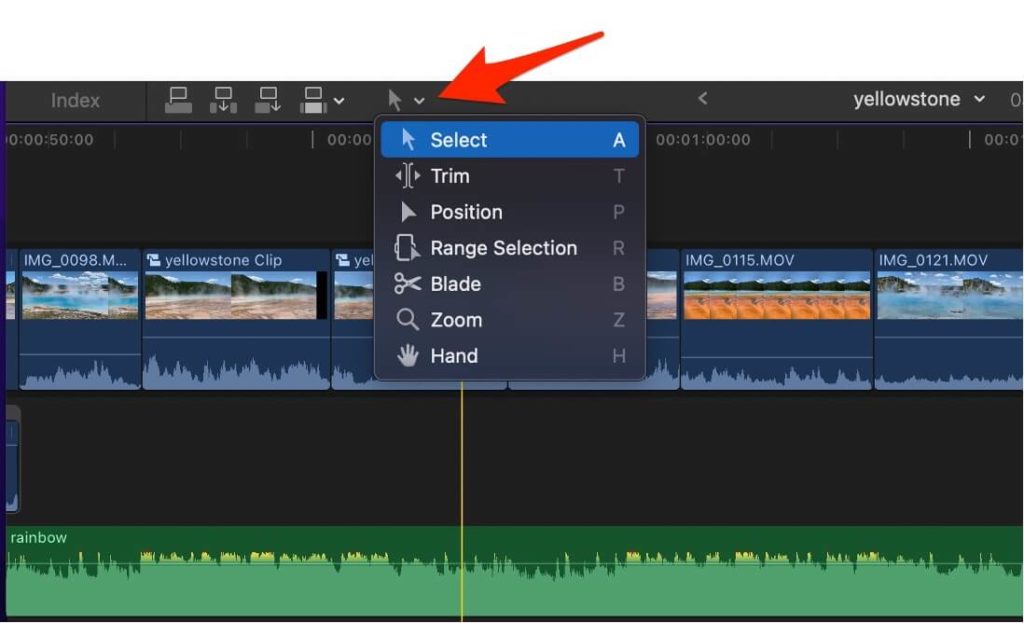
While all the tool’s shortcuts are shown in the screenshot above, for completeness’ sake below are the shortcuts for the most used tools:
| Select | A |
| Trim | T |
| Blade | B |
Note that the Select tool is the default tool, and the tool you will want to re-select after using any of the other tools. Failure to do so can result in lots of accidental cutting (if you had the Blade tool selected) or unnecessary trimming (if you had the Trim tool selected)!
But since cutting clips is a regular occurrence in editing, try to remember the following shortcut to cut a video clip on the fly.
With this shortcut, there is no need to press B to activate the Blade tool, click to make the cut, and then press A to go back to the Selector tool. Just press Command-B and a cut will appear in your video wherever your skimmer is. If you want to cut the audio too, hold the Shift key down when you press Command-B.
| To make a video cut on the fly | Command-B |
| To make a cut of all clips (including audio) | Shift-Command-B |
Now, along with making cuts, Trimming clips is the bread and butter of editing. Generally, you do this in Final Cut Pro by clicking on one side of a clip and dragging the yellow handle one direction or the other until you find the place you want the clip to begin or end.
But there is a much more precise way to do this with keyboard shortcuts and while I am embarrassed to admit I didn’t know about it for (literally) years, I tell you this because I want you to know them as soon as possible!
If you click on the edge of a clip to highlight it, you can then press the comma key to nudge the edge of that clip just one frame to the left or press the period key to nudge it just one frame to the right.
You can’t be more precise than one frame, and any experienced editor will tell you that getting your cut just right can be a matter of one or two frames.
(Years ago, in a film class – before I learned about adjusting cuts a frame at a time – my instructor was critiquing my edit in front of the whole class and all I heard for five minutes was either: “Few frames too soon” and then a grunt, or “Few frames too late” and then a grunt. I went up to him after class and moaned about how hard it was to get the cut just right with my trackpad. He replied, “learn about the comma and period” and then grunted.)
One more thing: if you know you have a lot to trim before you get to the point you will need the frame-by-frame level of precision, you can hold the Shift key while you press the comma or period keys and your trim will move ten frames with each press.
| Trim a clip one frame to the left | , |
| Trim a clip one frame to the right | . |
| Trim a clip 10 frames to the left | Shift , |
| Trim a clip 10 frames to the right | Shift . |
Best Shortcuts to Use When Playing Back Your Video
Editing is as much about watching as it is making cutting or trimming decisions. We need to see how a cut works, or get a sense of whether a particular shot is too long, or just see if the title you placed on screen lasts long enough.
(Pro Tip: A good rule of thumb for setting the duration of any on-screen text is that it should stay on the screen for 1.5 times the amount of time it takes you to read it.)
Because we are playing back our movie as much as we are editing it, knowing the keyboard shortcuts for playback can be just as critical to efficient editing.
The mother of all playback shortcuts is the Spacebar. Pressing it once starts the movie playing in your Viewer. Pressing it again stops it. It’s that simple.
| To start and stop playback | Space Bar |
For a little more control over playback, the J, K, and L keys (which are already in a row right under your fingers in a normal typing position) are amazingly powerful keyboard shortcuts.
J will play your video backwards from wherever your skimmer is, L will play it forward, and K will stop it. For example, if you place your skimmer near an edit, just by pressing the J and L keys over and over you can watch how well a cut works as many times as you need to.
Furthermore, if you hold J and K at the same time, your video will play backwards at ½ speed. Likewise, holding K and L at the same time will play it forward at ½ speed.
And, pressing J twice will play your video backwards at 2x speed, while pressing L twice will play it forward at 2x speed. You can also press either key three times and your movie will play at 4x speed, and who knows how long this multiplication can go on. I’ve never even tried pressing either key more than 3 times because playing the video at 2x is already fast enough for me.
| Play you video backward | J |
| Stop your video from playing | K |
| Play your video forward | L |
| Play you video backward at ½ speed | Hold J + K |
| Play your video forward at ½ speed | Hold K + L |
| Play your video backward at 2x speed | Tap J twice |
| Play your video forward at 2x speed | Tap L twice |
Given the control over both the direction and the speed of playback that the J, K, and L keys provide, I urge you to try them out and spend some time getting used to them. Quite simply, there are few keyboard shortcuts that can make more difference in your editing efficiency than the J, K, and L keys.
12 Random Annoyingly Difficult Tasks That Suddenly Become Easier with a Shortcut
In this final section I provide several keyboard shortcuts that (like the comma and period) I learned woefully late. I won’t provide as much explanation about them because I will assume you know what you find annoying and will thus rejoice when you see its shortcut revealed below:
1. I want to undo a range I have selected: Hold Option and click on it.
2. I want to raise/lower the audio just 1 decibel: Hold Control and press either = (to raise) or – (to lower).
3. I want to playback my movie Full Screen: Hold Shift and Command and press F. Note you can still use the spacebar to stop/start your movie when in Full Screen mode, and the Esc key will bring you back to Final Cut Pro.
4. I want to add a keyframe: Hold Option and click wherever you want it to appear.
5. I want to change the shape of an Audio Fade: Hold Control and click on the Fade Handle you want to change.
6. I want to silence a music track so I can hear the audio in the video clip: Click on the music and press V. (Pressing V again when the clip is selected will turn the music back on.)
7. I want to move the Stem that connects an audio track, an Effect, or a Title to a video clip: Hold Option and Command and the Stem will move to wherever you click.
8. I want to Freeze the video on a frame for a few seconds: Hold Option and press F where you want the video to freeze.
9. I want to change the duration of a clip to an exact number of seconds/frames: Click on the clip, hold Control, and press D. Now type a number in the format “Seconds dot Frames”. For example, typing “2.10” will change the clip’s duration to 2 seconds and 10 frames.
Pro Tip: You can change the duration of multiple clips at the same time with this shortcut. Just highlight all the ones you want to change before pressing Control D. This is very handy when you want to do a rapid montage of still images, think each should be 15 frames long, then realize 14 would be better, or maybe 13…
10. I want to paste Attributes from a clip I copied to another clip: Select the clip you want to receive the attributes, hold Shift and Command and press V. Similarly, if you want to paste the Effects from a clip, hold Option and Command and press V.
11. I want to increase the height of the audio clips so I can see the sound wave better: Hold Control and Option and press the up-arrow key. (To reduce it again, hold Control and Option and press the down-arrow key.)
12. I want to add a Marker: Move your skimmer to where you want it and press M. As I make notes to myself all the time and like to insert chapter dividers, I use this shortcut all the time. Note that pressing Control ‘ (apostrophe) will jump you to the next marker, which is very useful when you are trying to clean up all your notes at the end!
Okay, one more because 13 is lucky:
13. I want to toggle on/off the audio when I am skimming video clips: Hold Shift and press S.
Final Thoughts
Every shortcut in this article can be found in the ultimate shortcut to Final Cut Pro’s shortcuts: Apple’s own keyboard shortcut list which is available online here.
And every shortcut I discussed can be found inside Final Cut Pro itself by selecting the Final Cut Pro menu, choosing Commands, and then Customize. The Command Editor that pops up not only shows a complete list of every possible command in Final Cut Pro but also its keyboard shortcut if it has one.
Within the Command Editor, you can change any of the default shortcuts Final Cut Pro provides to a key combination you prefer, and you can even make up new shortcuts for commands that don’t have them.
By including the Command Editor in Final Cut Pro, I believe Apple is sending a clear message: Keyboard shortcuts are not just useful but will become an increasingly important part of your workflow as you progress as an editor.
We could not agree more. Whenever you find yourself doing something over and over in Final Cut Pro, take a second and think whether it might be worth looking for a shortcut in the Command Editor. It will take a minute, but the pain it saves will repay that time quicker than you might think.
Speaking of pain, please don’t hesitate to let me know if this article helped you or if you have suggestions to improve it. All comments – particularly constructive criticism such as letting me know I mistyped a shortcut (!) – are helpful to me and our fellow editors.
And if you have your own Random Annoyingly Difficult Tasks that Suddenly Becomes Easier with a Shortcut, please drop us a note! Thank you.