
To fade out music and audio in Adobe Premiere Pro, go to the Effects Panel and search for the Exponential Fade effect, drag it into your timeline and drop the Exponential Fade effect to the end of your audio clip.
When creating a project, there are many ways to ensure your audio is top-notch. One way to do this is to fade in and out music or audio correctly in Premiere Pro.
In this article, I will take you through the different methods to fade in and out music in Premiere Pro and give some tips for you. Yah! Let’s dive in.
Table of Contents
What is a Fade In Fade Out in Premiere Pro
A fade in audio is when the sound gradually gets louder. Editors often use it in movies and TV shows to signal a change in a scene or at the beginning of a video clip.
Fade-out audio is a technique used in sound design and mixing to gradually reduce the level of an audio signal. You can use the effect to create a sense of space or to transition between two different sounds.
Different Ways to Fade Out Music or Audio in Premiere Pro
There are many different ways to do the same task in Premiere Pro. Here are the top methods to fade out music or audio.
The Exponential Fade Effect
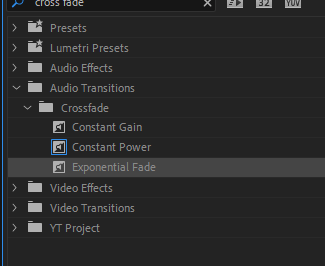
Open up and select the audio file you want to fade out in the Premiere Pro sequence timeline. Then, go to the Effects panel and search for the Exponential Fade effect. It is under the Audio Transitions in the crossfade section.
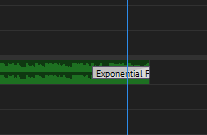
Drag it into your timeline and drop it at the end of your audio clip. There you have your fade-out effect.
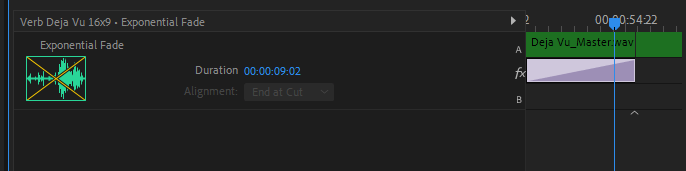
Let’s do some tweaking, it’s not necessary, but we can choose to play with it. While clicking on the effect on your audio clip, go to the Effect Controls Panel, and you can choose to play with different fade-out lengths by adjusting the duration of your effect.
You can also use Cross Fade transitions to blend two audio files, but if there is no other audio clip directly after the music, it will do a normal fading out instead.
Fading Audio and Out with Keyframes
As a creative mind, using a crossfade effect sometimes may give you a different effect. Therefore, you can choose to keyframe the volume of the music clip to create a manual fade.
With this method, expand your audio track by double-clicking on the audio track on which you want to apply the keyframes.
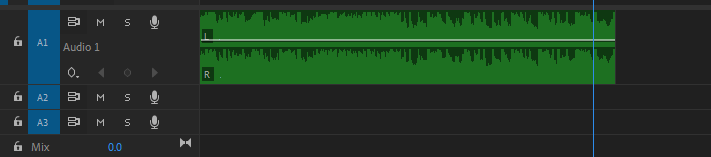
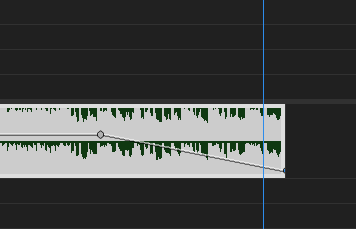
By now, you should see the audio wave having a straight line in the middle; the straight line is the volume line.
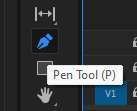
Then you select your pen tool by pressing the Key P, or you can get this on the tools panel beside your timeline.
When you intend to let the music go down, apply the node on that straight line using the pen tool, after which you can draw the remaining line down. Play with this to get this method straight. You can be very creative with this. It has a lot of potential.
The Constant Power Effect
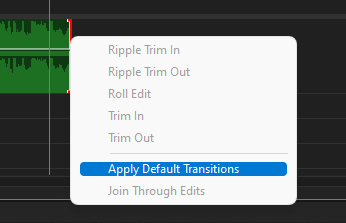
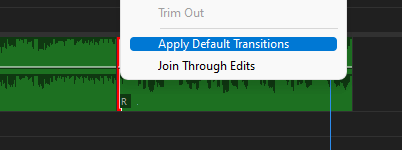
The constant power effect is the default audio transition for Premiere Pro. To apply this effect, you only need to go to the point you want to apply the effect, right-click at the point and select Apply Default Transitions.
Then you can choose to adjust the length or go to the Effect Controls to tweak the settings. You can change the default transitions in Premiere Pro. It’s achievable in the Preferences Setting.
There are a few reasons why it is good to fade in and fade out audio. Fading in and out can help to create a sense of depth in the soundscape. It can also help mask abrupt changes in the audio or sound level, which is vital for creating a smooth and natural-sounding audio experience for your audience.
Audio Transition Between Two Clips
This is a sound effect that affects two audio clips that are joined together. You can use this to indicate a smooth transition between the two audio pieces.
You can create audio transitions using various methods, including fading, cross-fading, and others, as discussed above. You only need to drop the transition in between the clips.
While joining audios together, ensure you join them at the point they both make sense, the point they both sound like a single track. Do not let your viewers have the sense of perception that the audio has changed. Let it flow seamlessly and smoothly.
When audio is faded in or out, it gradually becomes louder. You can use this to create a smooth transition between two pieces of audio or to make a piece of audio subtle.
Conclusion
Fading out music or audio in Premiere Pro is a relatively simple process. You can create a smooth transition that sounds professional by using the audio keyframes, default transition, and exponential effect.
Got any questions for me? I’m right here with you. Kindly drop them in the comment section, and I will reply promptly.