
Exporting your Premiere Pro project to MP4 is very easy. Go to File > Export > Media then change your format to H.264, preset to High Bitrate, and click Export.
My name is Dave. I’m an expert in Adobe Premiere Pro and have been using it for the past 10 years while working with many known media companies for their video projects.
In this article, I will explain how to export your Premiere Pro project to MP4 in just a few steps, and give you some pro tips and cover some frequently asked questions.
Please note that the screenshots in the tutorial below are taken from Adobe Premiere Pro for Windows, Mac or other versions might look slightly different. But definitely the same process.
Step by Step to Export your Premiere Pro Project to MP4
I believe you have your project opened, also you’ve opened up your sequence. If yes, let’s move on.
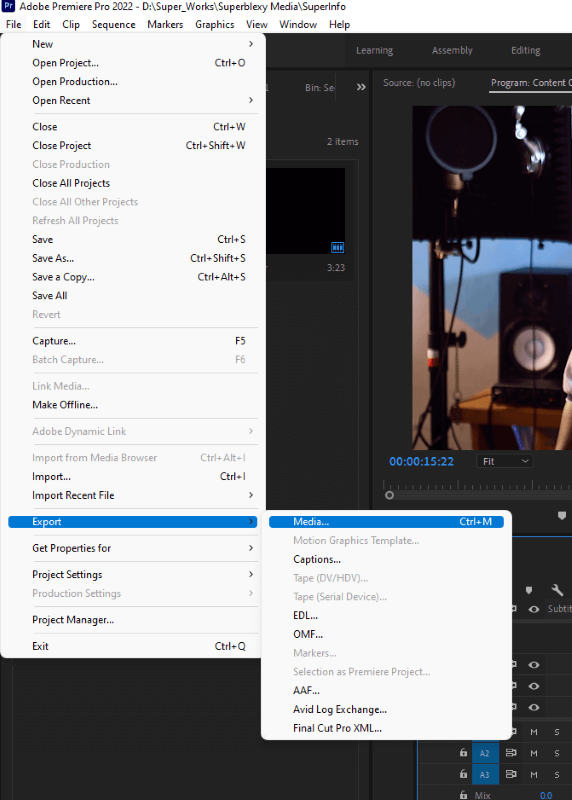
Step 1: Go to File > Export > Media.
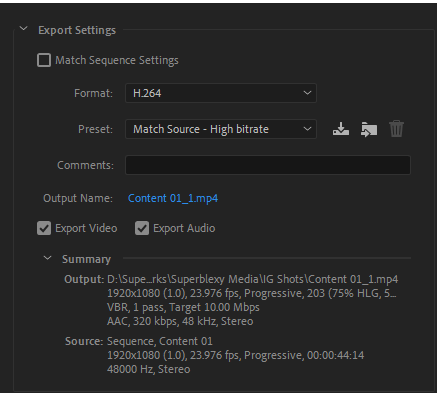
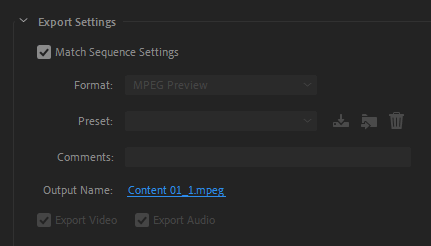
Step 2: In the dialog box, under export settings, change the format to H.264. Preset to Match Source – High Bitrate. In the Output Name, click on the blue link to change your export location and file name.
Step 3: Under the video section, ensure you click on Match Source to match the setting of your sequence to your export setting.
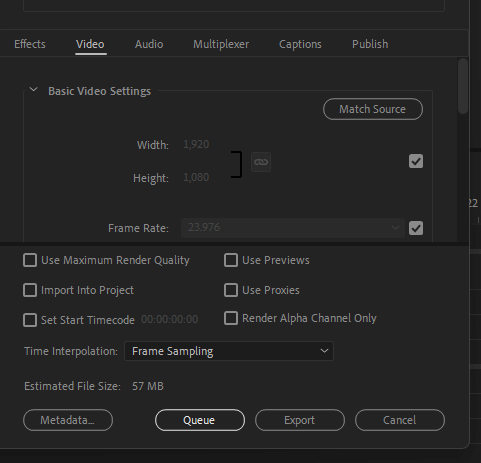
Step 4: Lastly, click on Export, wait for some minutes then go to your file location to preview your file. That’s all. Simple, isn’t it?
You may also want to check this article for an in-depth explanation of how to export your project.
Tips
1. Try to use keyboard shortcuts to hasten up your project. Instead of going to File > Export > Media to export, on Windows, you can just click on CTRL + M, and boom, there you go!
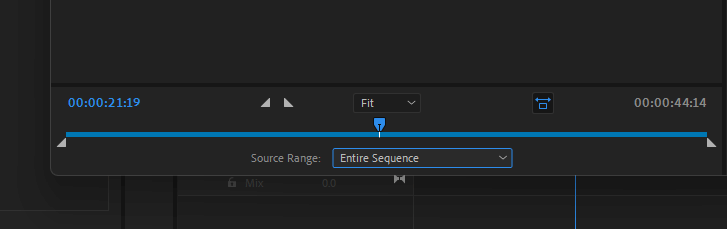
2. Ensure your Source Range is set to Entire Sequence or Sequence In/Out if you have set a starting and ending point on your timeline.
FAQs
Here are some other questions you might be curious about exporting Premiere Pro to MP4, I’ll briefly answer them below.
How Do I Export Premiere Pro to MP4 1080p?
Ensure your sequence frame size is set to 1920×1080, then follow the step above to Export. The same applies to 4K or any resolution you want.
What If My Format and Presets Are Grayed Out?
If you are unable to change the format and change the preset settings, make sure to untick the Match Sequence Settings and you’re good to go.
Why is My Export Taking So Long?
Well, maybe you have too much effect on your project. Also, maybe your computer is slow or it didn’t meet the system requirements of Premiere Pro. Chill, you have no worries, instead, take a coffee or stroll out and give yourself a break, before you know it, it’s done.
What to Do If Premiere Didn’t Export My Full Project?
Ensure you set your Source Range to Entire Sequence.
What If I Have Many Sequences to Export to MP4 at the Same Time?
You have to install Adobe Media Encoder, then instead of clicking on Export straight up, you will click on the Queue button instead. Once you’re done queuing all your sequences to Media Encoder, click on the Start/play button to get started.
Conclusion
Get that project to the world, and upload it on social media. Go to File > Export > Media then change your format to H.264, preset to High Bitrate, and you Export.
Do you have any challenges while exporting Adobe Premiere Pro to MP4? Kindly let me know in the comment section. I’ll be ready to help.