
When you finish editing, rendering, and exporting a video in DaVinci Resolve, there is nothing more frustrating than not knowing where the project went. Knowing the default location of your project will save you time on re-rendering the project, and knowing how to change the destination is essential.
My name is Nathan Menser. I am a writer, filmmaker, and stage actor. I have been video editing for the last six years, and even as an experienced editor, I found myself facepalming when I switched to DaVinci Resolve, as I had exported my project to an unknown location, so I am glad to help!
In this article, I will be covering where the default storage location is on PC and Mac, as well as how you can change the destination of the file, so you can organize and streamline your projects the way you want.
Where Are the Files Saved
- Click on the “Project Manager” symbol in the bottom right corner of the screen. It’s shaped like a house.
- Select “Show/Hide Databases” in the top left corner of the screen.
- Then choose “Open File Location” to the right of “Local Database.” A menu will pop up to the right called either the “DaVinci Resolve database location” or the “file path.”
This is the automatic file location for both OS
- Mac = Macintosh HD/Library/Application Support/Blackmagic Design/DaVinci Resolve/Resolve Disk Database
- Windows = C:/Users/<your user
name>/AppData/Roaming/BlackMagic Design/DaVinci Resolve/Support/Resolve Disk Database
You can also change the location your files are saved. To change your database location, choose “DaVinci Resolve” from the top left corner of the screen.
Click “Preferences.” Then, select “Add” and choose a location for the files to be saved inside.
Creating an Autosave Backup Location
- Navigate to the “DaVinci Resolve” menu. Then, select “Preferences” from the drop-down menu.
- Click “User” from the tabs available.
- Select “Project Save and Load” from the options in the vertical menu on the left.
- Under “Save Settings” check both the boxes for “Live Save” and “Project Backups.”
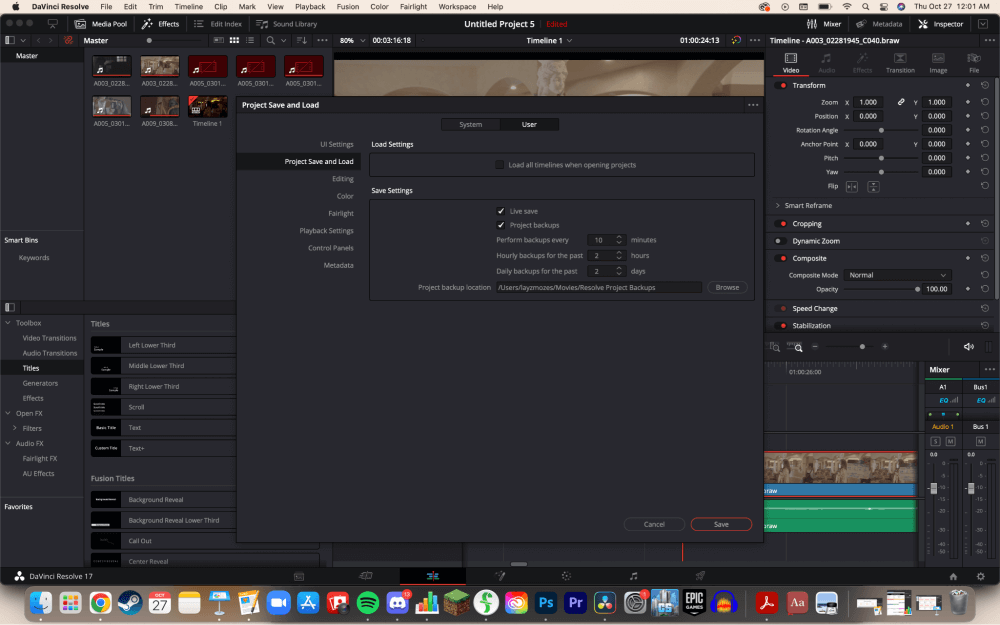
You can choose the frequency of the automatic saves by changing the numbers in this menu. To change the location in which DaVinci Resolve saves the backup files, click “Browse.” This will open your computer’s file finder, and you can select a new location to save your backup projects.
By following these steps, you will enable both automatic backups of your work to be saved to either an external storage unit or somewhere on your computer, but you’ll also be turning on live saves, which save each change you make as you go.
Conclusion
Finding your file export location is very simple, and can be done in seconds. Make sure, you change the file export location to something you can find easily, that way you don’t have to go digging through files every time you export a video.
Did this article help? If so, let me know by leaving a comment in the comment section. There you can also help me out by leaving constructive criticism, and what you want to read about next.