
Coloring your lineart can make all the difference in giving your artwork that extra pop and depth. It’s a subtle yet powerful technique that can completely transform the feel of your illustrations.
Hi there! I’m Zoe, a freelance illustrator. Over the years, I’ve discovered how a seemingly small step like coloring your lineart can make a huge difference in the overall impact of an illustration. Today, I’m excited to share my expertise and guide you through the process of coloring lineart like a pro.
In this guide, we’ll explore methods that can be used individually or combined for coloring lineart in Clip Studio Paint: using Layer Property Effects, adding Clipping Masks, and applying Gradient Maps. These techniques will allow you to add vibrant colors to your lineart while maintaining control over your artistic vision.
Let’s get to it!
Table of Contents
Key Takeaways
- It’s important to keep all the work you’ve put into your lineart intact. By choosing non-destructive methods like the ones we’ll explore, you can ensure that your efforts are not wasted and allow for easy adjustments later on.
- Drawing your lineart in black from the start gives you precise control over the shade you will apply to it later on, ensuring your colors turn out just right!
- There’s no limit to the number of layers you can clip to your lineart. This opens up a world of possibilities for creating various color effects and experimenting with different combinations and blending modes.
Here are the three best methods to change and enhance the color of your lineart in Clip Studio Paint.
Note: All screenshots from this tutorial are taken from the CSP Mac version.
Method 1: Change the Color of Lineart with Layer Property Effects
You can change the line colors from the Layer Property panel. Follow the steps below to see how it works.
Step 1: In the Layer menu, select your lineart. It’s best practice to draw your lineart in black and on a separate layer from your color filling. However, if you’ve drawn your lineart in a different color, don’t worry! We’ll show you how to change it to black in the steps below.
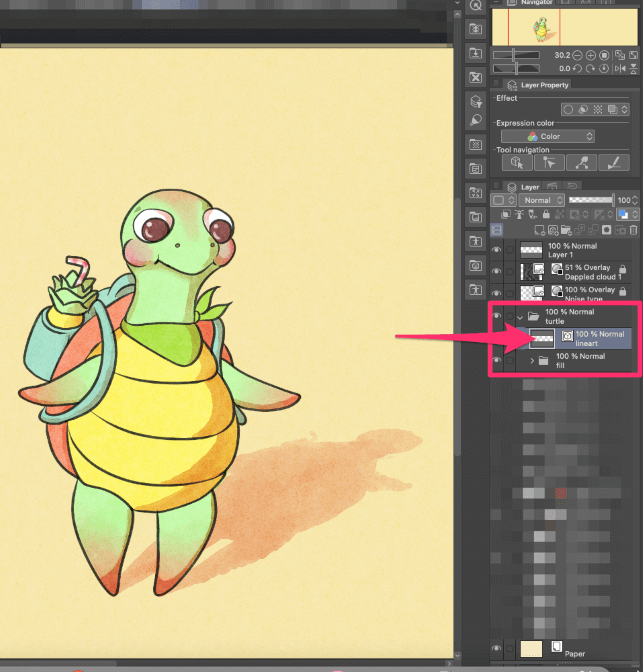
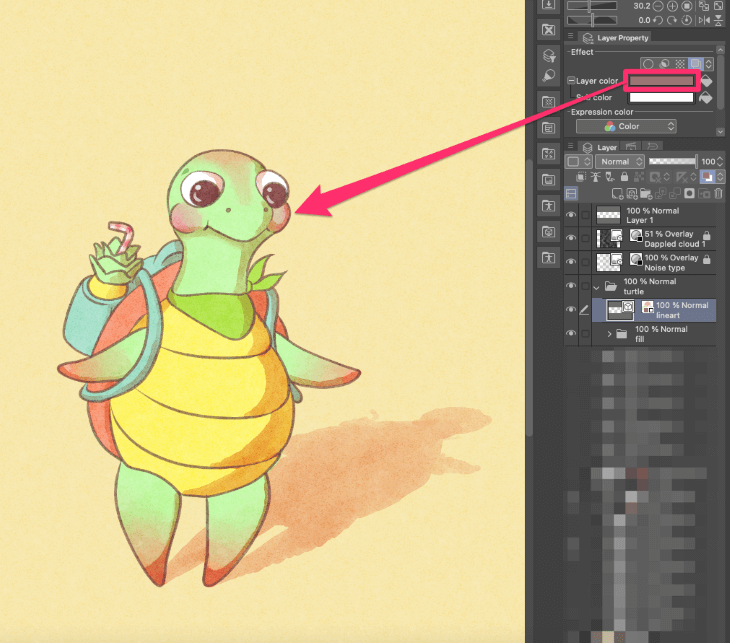
Step 2: Find the Layer Property window and click on the Layer Color icon (the icon with two overlapping squares) located under Effects. Your lineart will now appear in a blue color.
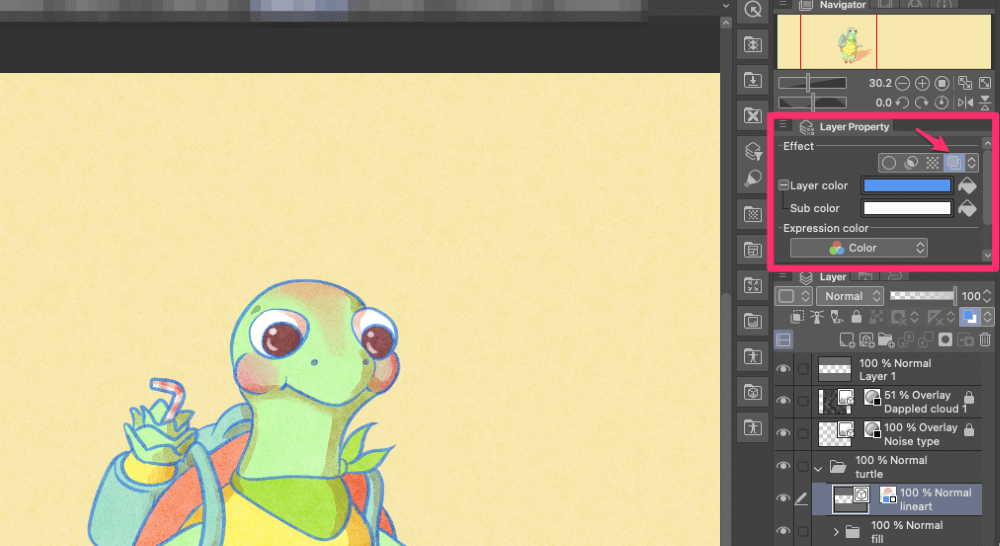
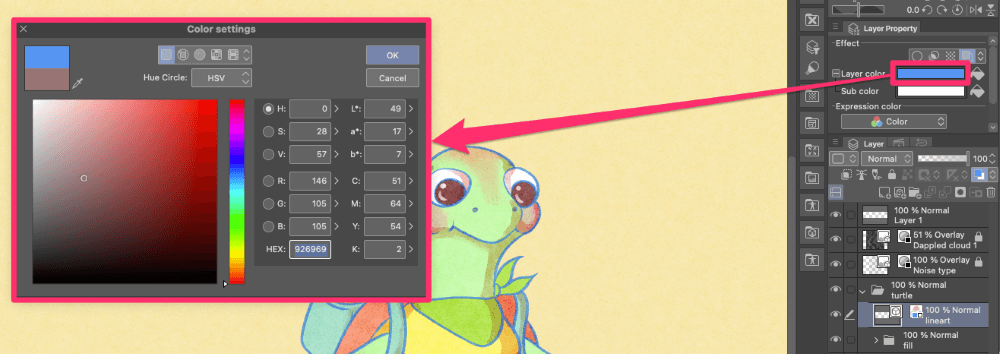
Step 3: Open the color picker by clicking on the first color swatch, which is your Base Color. If your lineart is black, no adjustments are needed for the Sub color, which only affects whites.
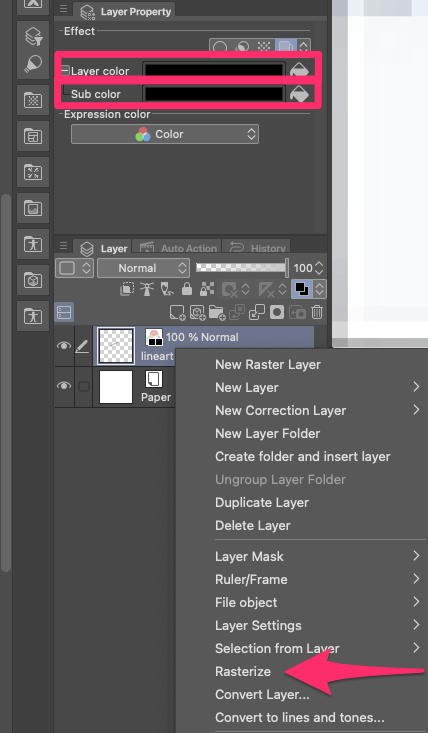
Note 1: If your raster lineart isn’t originally black, you can easily change your colored line by applying black as both the Base Color and Sub Color. Right-click on your lineart layer and select Rasterize to finalize the changes. Now, start over from Step 1.
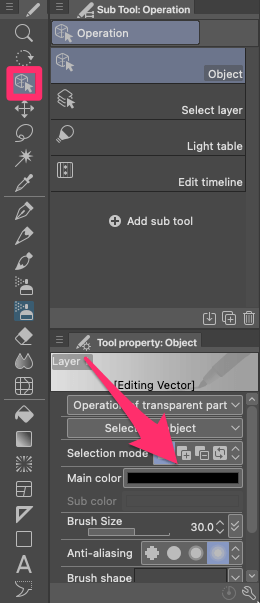
Note 2: If you created your lineart using vector graphics and want to switch to black, you have the advantage of being able to change the color at any point. Simply select your vector lineart, locate the Operation icon, and choose black from the Main Color swatch.
Step 4: Once you’ve chosen your colors, you’ll instantly see the effects on your lineart layer. The lineart will now appear in the selected Base Color. Experiment with different hues until you achieve the desired result.
The Layer Property Effects method offers the advantage of being non-destructive, allowing you to easily toggle the effect on or off in the Layer Properties window. If you want to change the color later on, simply click on the color swatches and select a new color.
This flexibility lets you explore different color schemes without permanently modifying your artwork. You can even apply Layer Property Effects to entire folders, giving your grayscale renderings a tint by experimenting with different Base and Sub Color combinations.
If you’re satisfied with your lineart color, you’re all set! But if you want to add more colors and effects, let’s move on to our second method.
Method 2: Add Color Variations with Clipping Masks
Another way to color lineart in Clip Studio Paint is by using clipping masks. Here are the steps:
Step 1: Click on the New Raster Layer icon on the bottom row of the Layers panel options, or use the keyboard shortcut Ctrl + Shift + N (Windows) or Command + Shift + N (Mac) to create a new layer above your lineart layer.
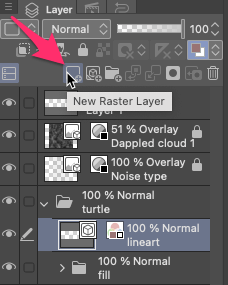
Step 2: With your new layer selected, click on the Clip to Layer Below icon on the far right of the Layers panel. This action links the new layer to the lineart layer below, allowing you to apply color exclusively within the boundaries of the lineart.
Step 3: Select your desired color from the color palette. Using brushes or gradient fills, begin coloring over the lineart. The color will only apply to the areas defined by the lineart, preserving its original quality.

Pro Tips:
- Create additional clipping mask layers above the lineart layer to add more colors.
- Use gradients as clipping mask layers to create lighting effects on your lineart.
- Experiment with blending modes like Glow Dodge or Add (Glow) for a saturated light effect, Multiply and Darken for shading, and Overlay for interesting color transitions.
- Adjust the layer opacity of your clipping mask layer to achieve smooth transitions.
Now that you’re familiar with the Layer Property Effects method and the Clipping Mask method, you have powerful tools to color your lineart with precision and creativity.
Both methods are most effective when you’ve finalized your fill and have a clear direction for your line color. However, if you’re still searching for the perfect color combination between your lineart and fill, don’t worry. We have one more method to explore that will give you a general idea of how different color schemes can bring out the best in your artwork.
Method 3: Explore Colors with Gradient Maps
Besides the common methods above, you can also use gradients to color lineart in Clip Studio Paint.
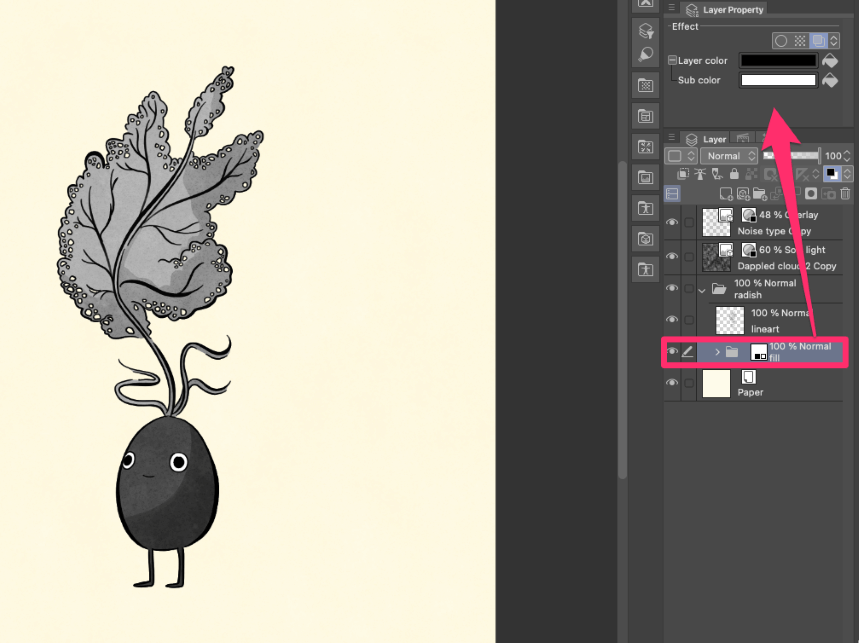
Step 1: Begin with a pure black lineart to have better control over the darkest color in the Gradient Map. While the Gradient Map can still affect colored drawings, having a grayscale fill allows for more precise control.
Convert your fill layers to shades of gray individually using the Layer Property Effects method, or apply the same method to a folder containing all the fill layers, using black as the Base Color and white as the Sub Color.
Step 2: Right-click on your lineart layer and navigate to the contextual menu, then select New Correction Layer followed by Gradient Map.
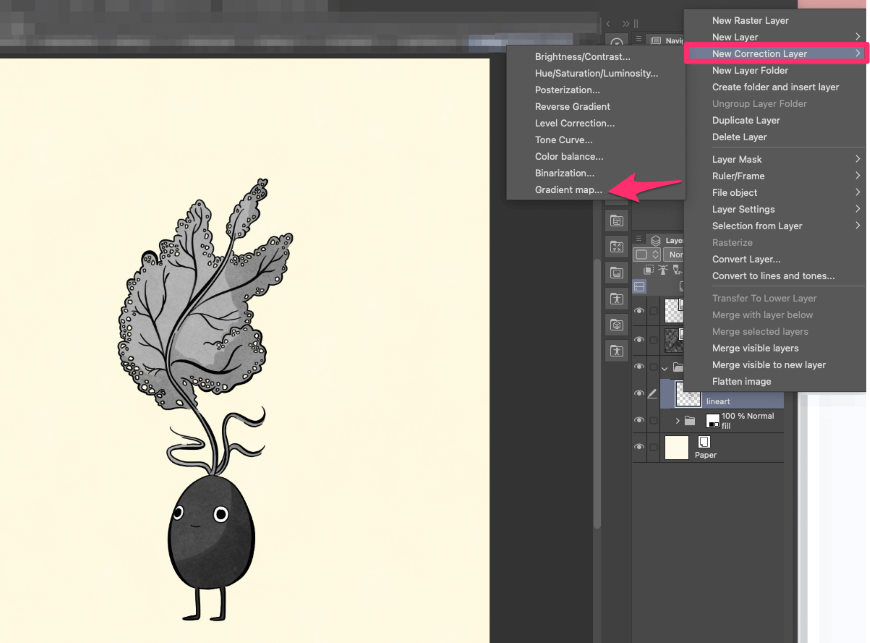
Step 3: In the Gradient Map window, you’ll find a default black-to-white gradient bar. To modify the colors, click on a color stop and its swatch. Add more hues by adding color stops along the gradient bar. You can also explore different Gradient Maps from pre-installed or downloaded options.
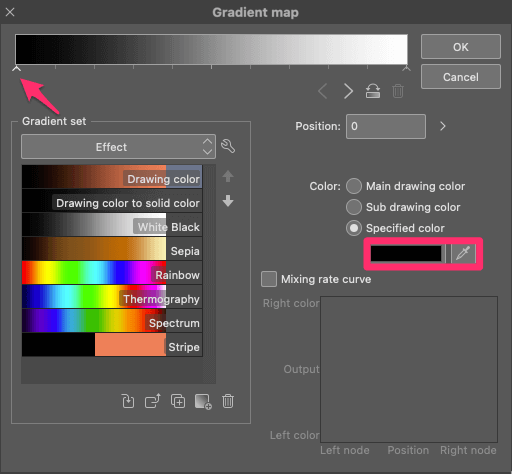
Step 4: Modifying the Gradient Map applies the chosen colors to your entire artwork, including the lineart and grayscale fill. To adjust your lineart, focus on the color on the far left of the gradient bar. This gives you a quick overview of the color scheme’s impact on your drawing, showcasing the transition from your line art’s darkest color to the rest of the artwork’s colors.
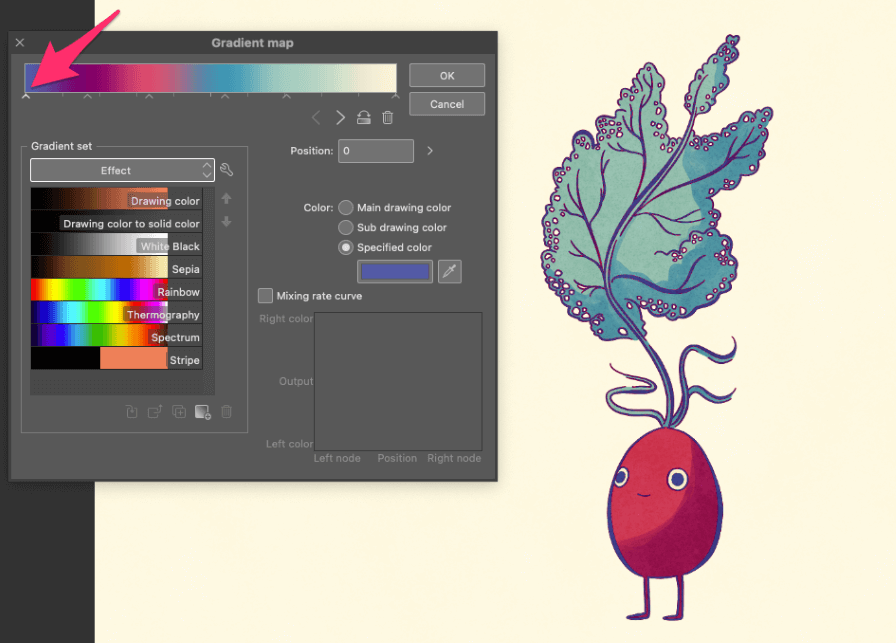
Step 5: Experiment with different hues until you achieve the desired effect. Click OK to confirm your Gradient Map. You can always modify it later by double-clicking on your Gradient Map Layer.
Addressing Anti-Aliasing Artifacts:
Gradient Maps are a fantastic way to experiment with color effects and find inspiration, but they don’t always give a completely clean result.
When you use Gradient Maps on lineart created with anti-aliased brushes (brushes that smooth out jagged edges by blending colors), you may encounter unwanted color variations along the edges of the lines. This happens because the Gradient Map assigns colors based on the pixel values, which can interpret the smaller and lighter pixels differently.
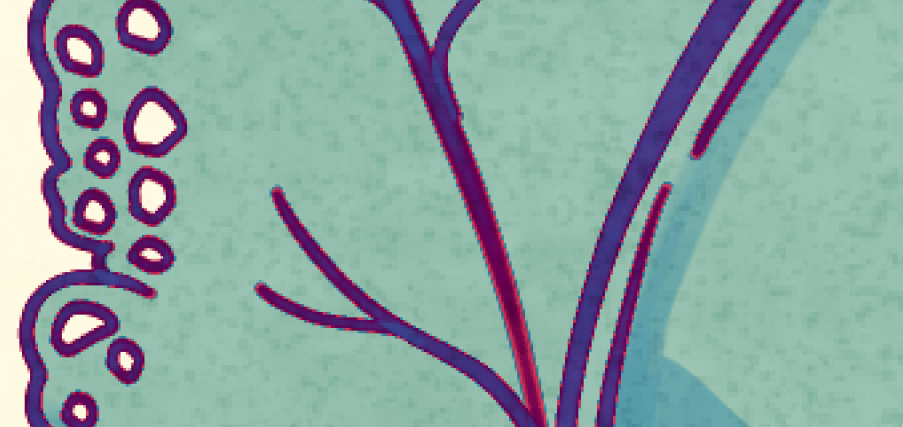
In most cases, these color flaws will primarily be visible on your lineart, and may not be as noticeable on the fill areas. To address this, you have the option to apply the Gradient Map solely to the fill layers, ensuring a cleaner result. Here’s how:
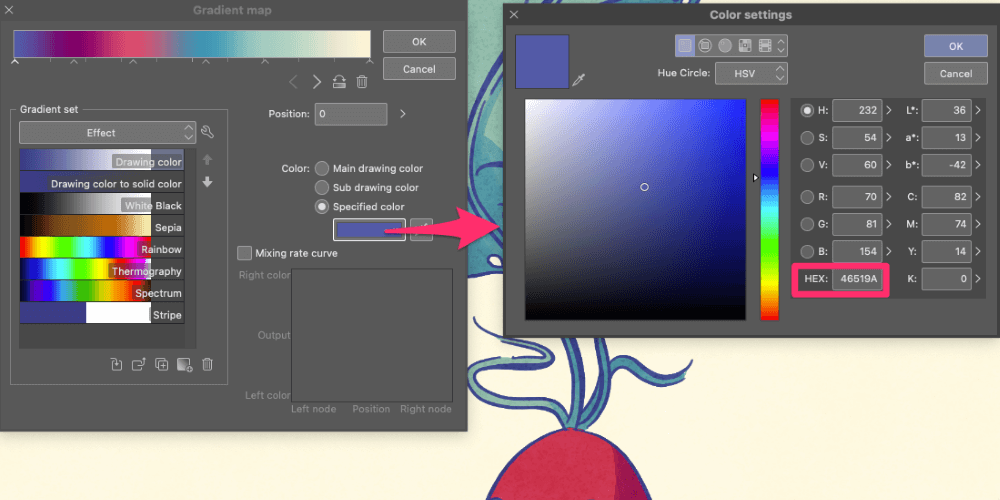
Step 1: Double-click on your Gradient Map to open the Gradient Map Editor again, and click on the swatch that corresponds to the color applied to your lineart. In the Color settings window, copy the HEX code of your color. You can then close the Gradient Map window.
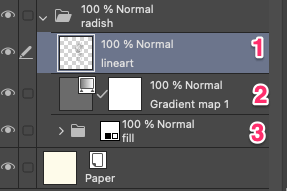
Step 2: Reorganize your layers by dragging the lineart layer above the Gradient Map layer in the Layers Panel.
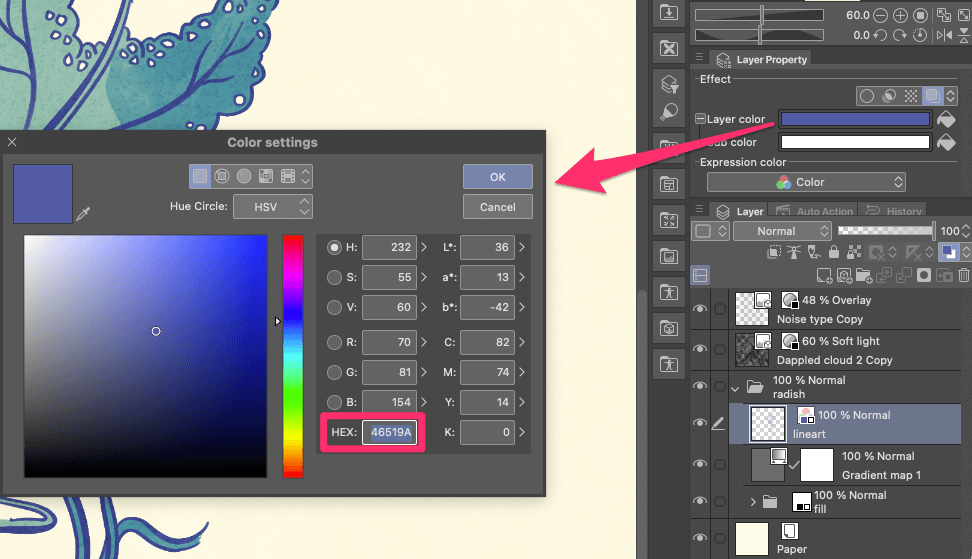
Step 3: Apply the Layer Property Effects method as discussed earlier. In the color picker window, paste the copied HEX code into the appropriate textbox.
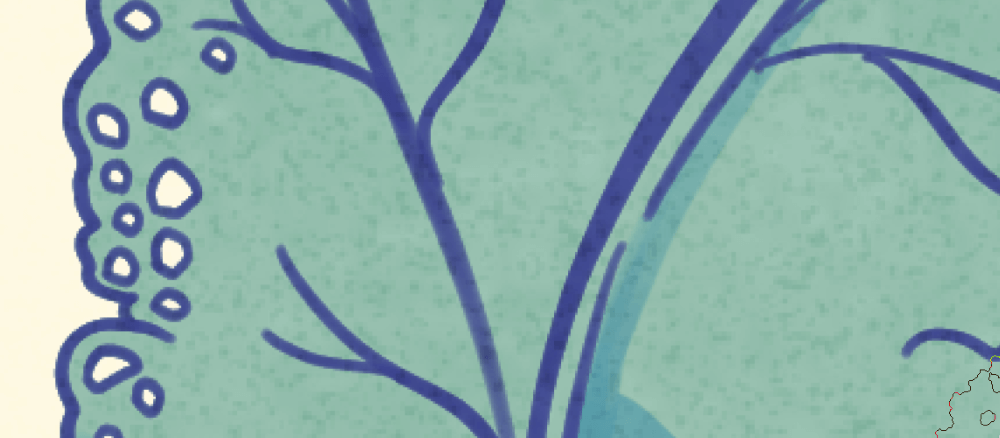
Now your line art’s edges should be smooth again, and you can continue making color variations in your lineart using Clipping Masks if desired!
Final Thoughts
You can confidently add stunning colors to your lineart and bring your illustrations to life using the methods in this tutorial. Coloring your lineart adds a natural and subtle touch, enhancing the overall appeal of your artwork. The best part is that these methods provide flexibility, allowing you to experiment and make changes without altering your original lineart.
Now it’s your turn! I would love to hear your thoughts and experiences with these coloring techniques. Feel free to share your feedback in the comments below.