
So, your Mac is running out of storage. You try to figure out what’s taking up your disk space by clicking the Apple logo on the top-left of the screen, selecting About This Mac, and hitting the Storage tab.
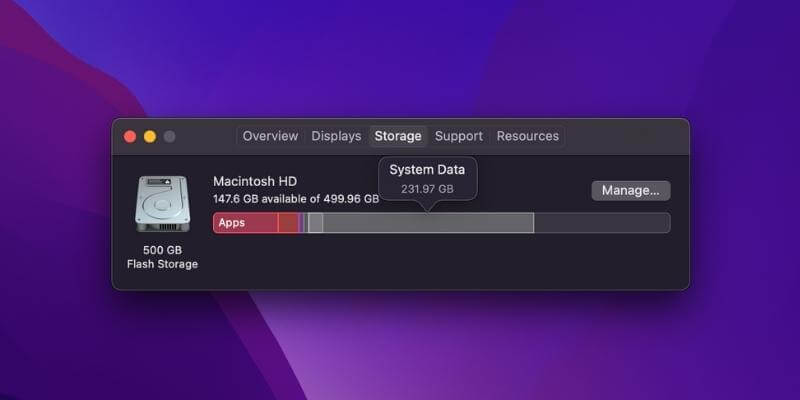
To your surprise, you see a grey bar “System Data” that seems to occupy way more space than you think it should. In the example above, the System Data takes an astonishing 232 GB of precious storage.
Worse yet, you have no idea what’s included in “System Data” storage, because clicking the “Manage” button brings you to this System Information window… and the “System Data” row is greyed out.
Why does my Mac system require so much space? What does it contain? Is it safe to remove some of those system data files? How do I regain more storage space?
Questions like these may easily get to your head. Although my Mac now has a decent amount of free disk space and I tend not to store large files on my Mac these days, I’m always wary of files that are taking up more space than they should.
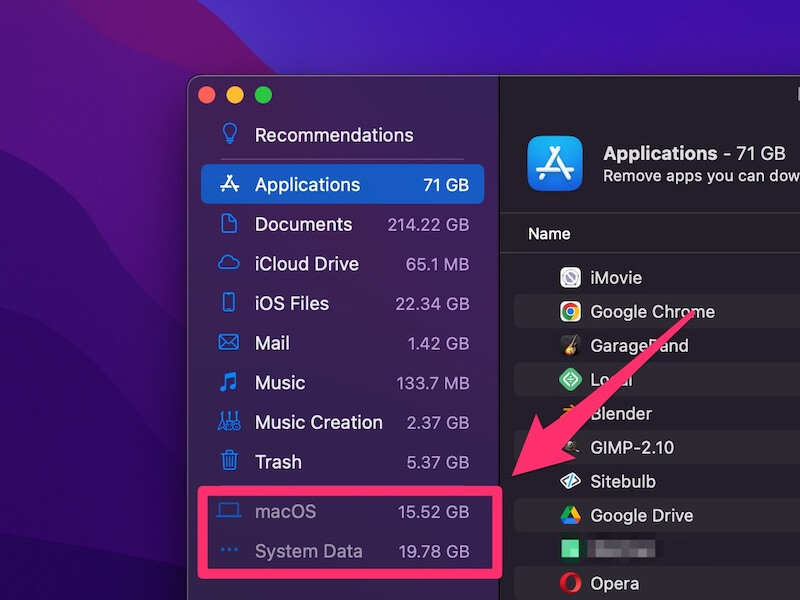
I have no idea why “System Data” is greyed out while “Documents,” “Music Creation,” “Trash,” etc. allow you to review the files based on size and type.
My hunch is that Apple does this on purpose to prevent users from deleting system files that could lead to serious issues.
Table of Contents
What is System Data on Mac?
During my research, I found many people report that Apple counts application leftovers (e.g. Adobe video cache files), disk images, plugins & extensions in the System Data category.
Since it’s greyed out and we are unable to click on that category for deeper analysis, we’ll have to use a third-party app to assist.
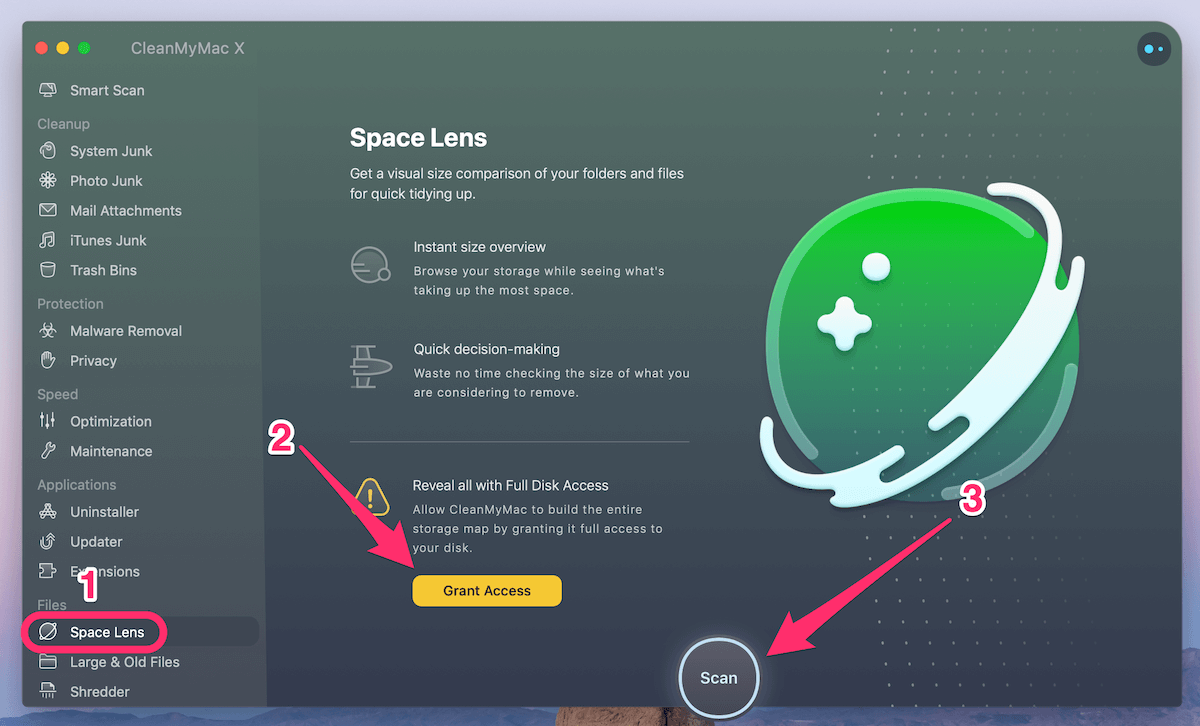
CleanMyMac X is perfect for this kind of analysis. Since I tested the app in our best Mac cleaner review, it immediately came to my head when I saw “System Data” was greyed out in Storage.
Note that CleanMyMac isn’t freeware, but the new “Space Lens” feature is free to use and it allows you to scan your Macintosh HD, and then show you an in-depth overview of what’s taking up disk space on your Mac.
Step 1: Download CleanMyMac and install the app on your Mac. Open it, under “Space Lens” module, first click the yellow “Grant Access” button to allow the app to access your Mac files and then select “Scan” to get started.
Step 2: Soon it’ll show you a folder/file tree and you can hover your cursor over each block (i.e. a folder). There you can find more details. In this case, I clicked “System” folder to continue.
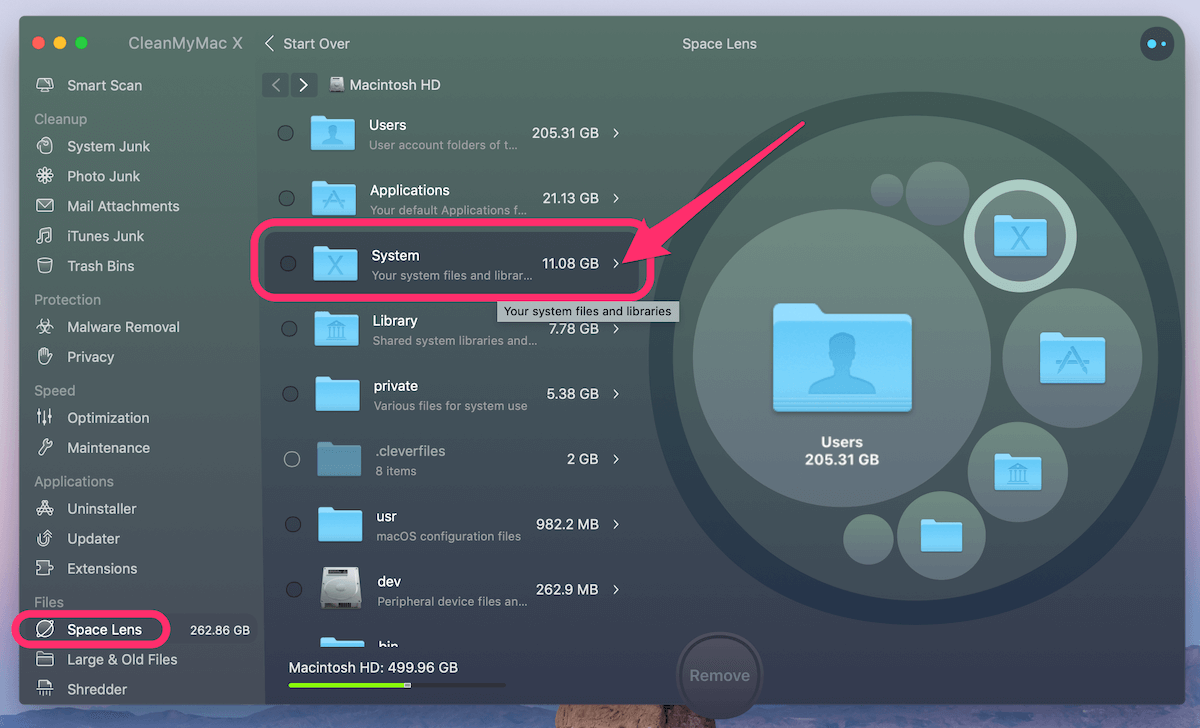
Step 3: The file breakdown below indicates that some Library and iOS Support files are the culprits.
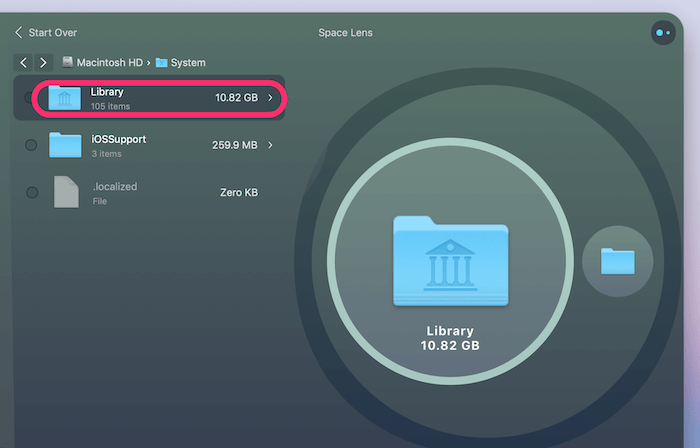
The interesting part is that the System file size shown in CleanMyMac is much smaller than the size shown in System Information. This puzzles me and makes me believe that Apple definitely has counted some other files (not real system files) in the System category.
What are they? I have no clue, honestly. But as reported by other Mac users who experienced the same issue, they said Apple also considers app caches and iTunes backup files as System files.
Out of curiosity, I ran CleanMyMac again for a quick scan. That app found 13.92 GB in iTunes Junk. Further review revealed that the junk files are old iOS device backups, software updates, broken downloads, etc.
But even after adding this amount to the original system files returned by CleanMyMac, the total size is still a bit less than what’s returned in System Information.
If cleaning the System Data is still not enough to bring your Mac’s available disk space to a normal level (i.e. 20% or more), check out the solutions below.
What Else Can I Do to Reduce System Data on Mac?
There are tons of ways out there. Here are a few of my favorites that should help you get back a decent amount of space quickly.
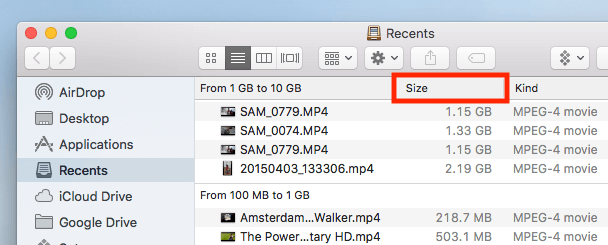
1. Sort all files by size and delete old large files.
Open Finder, go to Recents, and look at the Size column. Click on it to sort all recent files by file size (from large to small). You’ll have a clear overview of what items are eating up a large amount of space, e.g. From 1 GB to 10 GB, and from 100 MB to 1 GB.
On my MacBook Pro, I found a few large videos that could be transferred to an external drive.
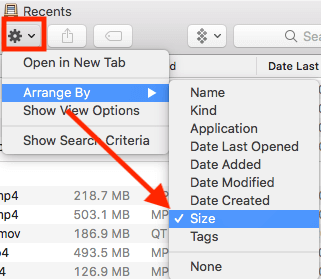
Note: If the Size column doesn’t show up, click on the Settings icon and select Arrange By > Size.
2. Delete applications that you don’t use.
In the “System Information” window, I noticed that the “Applications” category was taking 71 GB of disk space. So I clicked on it and in a few seconds, I quickly realized there were quite a few large apps (such as iMovie, GarageBand, Local, Blender, etc) that I don’t use at all or no longer use. Some of these are apps pre-installed by Apple by default.
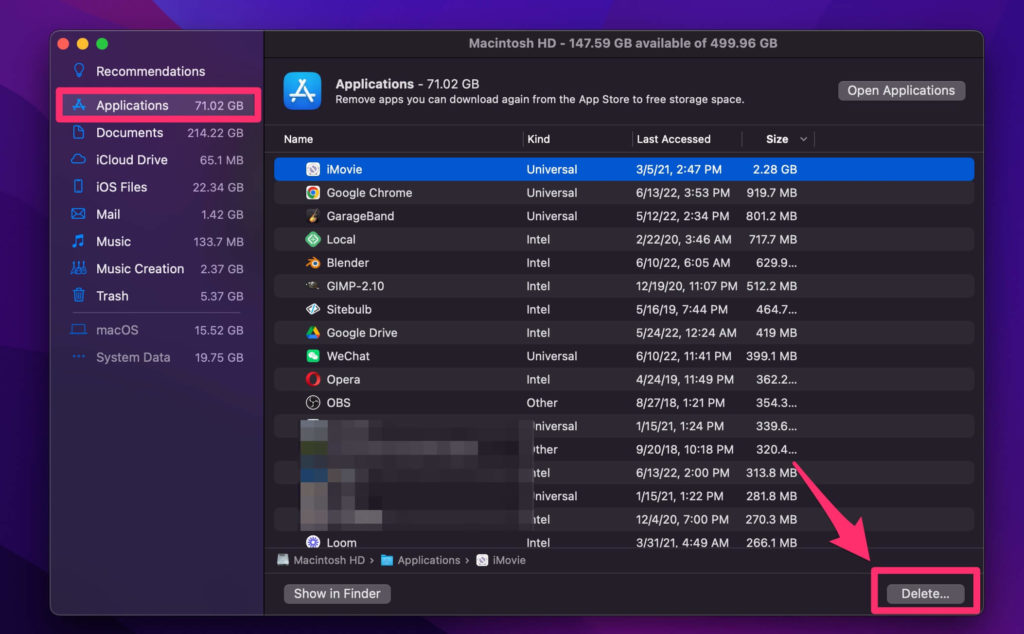
I have no idea why macOS also counts storage taken by third-party apps into “System Data”, but deleting these apps definitely helps me regain quite some disk space. All you have to do is select the apps and hit the “Delete” button.
3. Clean Trash and other unnecessary files.
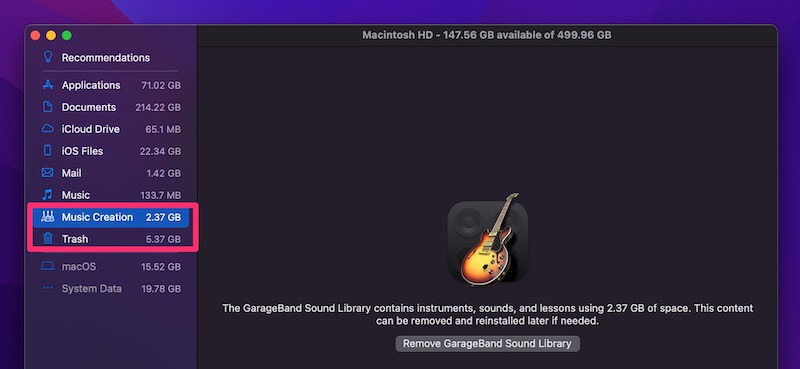
In the same “System Information” window, I also found these two categories “Music Creation” and “Trash” were taking 2.37 GB and 5.37 GB. I don’t use GarageBand, I certainly don’t know why “Music Creation” is taking away so much space. So I have no hesitation but to hit the “Remove GarageBand Sound Library” button.
Meanwhile, don’t forget to clean “Trash”. Since macOS doesn’t automatically delete files sent to Trash, it can add up very quickly. However, it’s better to take a closer look at the files in Trash before you hit the “Empty Trash” button.
4. Remove duplicate or similar files.
Last but not least, duplicates and similar files can stack up without you being aware of it. Finding them is sometimes time-consuming. That’s what Gemini 2 is designed for. Simply select a few frequently used folders (e.g. Documents, Downloads, etc.) in the main zone of Gemini.
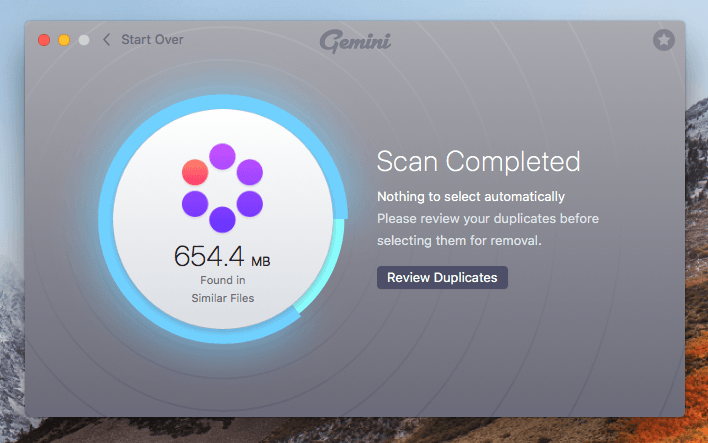
It then scans them and returns all the duplicate files that might be worth removing. Of course, it’s always a good practice to review them before doing so.
Wrapping It Up
Ever since Apple introduced the Optimized Storage feature, Mac users got the option of saving space by storing content in the cloud. Apple also has several new tools that make it easy to find and remove unneeded files.
That bar under the Storage tab is beautiful. It does allow you to get a quick overview of what’s taking up the most space on our hard drive. However, it still lacks insights into the “System Data” category as it’s greyed out.
Hopefully, the guides above have helped you figure out the reasons you’ve got so much system data, and most importantly you’ve reclaimed some disk space — especially for new MacBooks pre-installed with flash storage — every gigabyte is precious!
Just updated to Monterey, had heard that that would solve my problems from “Other” taking up a lot of my main hard drive space … It did not do anything except rename Other to “System Data” that takes up 625GB of my 1TB main drive …. Is Apple ever going to correct this problem ???
HI i have 905gb in my system. I have been researching and on my ominidisk i have only used 165gb. going nuts and cant find the file. Every time i delete something it keeps increasing. any help please thanks
I would be very wary of CleanMy Mac. I was warned off it by Apple last year but it seemed to be very useful and work well. Two days ago I did a CmeanMyMacX cleanup and it offered additional things, like Malware removal, stopping Apps on startup and couple of other things I can’t now remember. They looked innocuous enough so I ran them and then didn’t use the computer for a few hours. Then I found I could not access any of my Documents and Folders. Investigation found that they were completely missing from both my computer and my icloud drive Documents and Folders backup!
Most fortunately I also use Carbon Copy Cloner. I couldn’t drag the backup to my file system in Finder, but I got very helpful and rapid response from Bombich support, who sell CCC. Everything now restored. But I think that since the files were deleted on my computer, icloud drive faithfully deleted them too! 2 days later I get an automated response from MacPaw. Needless to say they got a short reply and I shall not be renewing my CLeanMyMacX subscription.
Full marks to CCC. But is there a better, Apple approved way of cleaning up junk?
I have 40 Gig in “System” and another 50 Gig in “Other” grayed out. I took it in to the Apple Store and they said its my iCloud. I only have 3 Gig in iCloud. Nobody has a clue what it is?
I stumbled on this page while trying to figure out what was using up all the system storage on my laptop, which isn’t my primary computer, but I use it to edit a lot of photos and kept running into “scratch disk” issues in Photoshop because something was hogging all my storage. Well, after hours of trying to get to the bottom of it I finally found a folder that was oddly hogging about 50% of the total system storage. One of the comments above recommended going into the user LIBRARY folder (Go-> Library… click option button while clicking GO if you don’t see it in the menu). Anyways, I went through every stinking folder in there and calculated the size (command i). The folder SCREEN RECORDINGS was hogging a whopping 40+Gs of storage! And it was only 3 videos that were completely random! I must have at some time unknowingly clicked a keyboard shortcut that recorded over an hour worth of screen video. I’m not saying this is everyone’s case, but it’s worth investigating.
These were the biggest storage hogs in the LIBRARY folder (for me):
SCREEN RECORDINGS (mine was 40+G)
APP SUPPORT (mine was 4G)
CASHES (mine was 1G)
These were smaller, but still kinda hefty folders:
CONTAINERS
LOGS
MESSAGES
MOBILE DOCS.
I hope this info helps someone else out 🙂
Don’t forget to reboot when you empty your trash to see your new storage space.
Thanks for sharing this, Danielle.
Mail->Window->Connection Doctor
Press Show button.
Delete them.
Mine was 980GB. You read that right…
Deleted these and I now have 906GB of free space!
Thanks for the tip dude!
CC
Any free applications to clear mac system storage ?
Yes, check out this post where we listed quite a few free apps: https://www.softwarehow.com/best-mac-cleaner/
In the list of files in ‘Storage’ was an item called iOS files, which was showing 103Gb of storage. It included backups from phones I had not had for 5 years+ AND iOS installers for the iPhone XS (which I don’t have) taking up 25Gb on their own.
Thanks, Apple.
I have the 8 TB 16″ Macbook pro and it took up way too much storage, this helped me
lol yeah 8TB is too much storage, I don’t even need that much.
Thank you so much I freed up at least 60GB of storage on the free version. You saved my SO much headache! You are amazing for sharing this!
Thanks CleanMyMac, you’ve helped me regain 430GB+ by removing junk from my system.
The system files were taking up 470GB of a 500GB disk.
Also starting the system in safe mode can help,
1. Turn off your Mac
2. Turn on your Mac and press the shift button until you see the login screen (it may take longer to start than usual)
3. Verify the storage in the system information again.
Hello, My mac is only a MacBook Air, and i only have 121 GB in total, and my system takes up to 80 GB, and now i only have 4.68 GB left, I always check for duplicate files and I have none, I am not sure why this is happening. I also really need my disk space for Education. If anybody can help then please do so.
My suggestion is that you buy the free version of CleanMyMacX. I used to have 2.1GB, now I have 63.7GB just from the free version.
My bad for saying buy. You don’t have to pay anything for the free version.
Purchased and ran CleanMyMac. It shows I have 10 GB of system memory. My Mac shows storage of 381 GB in system. I am left with under 100 GB to work with which is way to small for what I do (images). Any ideas of what else I can do? I’m on a MacBookPro with 500 GB of storage.
I had the same problem and called Apple and it was an easy fix. Check under “library” and it will show what is actually taking up that space. What shows up under “About this Mac” “storage” is misleading and in my case was inaccurate as to where the problem was located.
As I understand it, where to find exactly what is taking up space is Finder – Go – Library. Then go to each folder and click on the size of each one. She said it’s usually under user files when this happens.
I had inadvertently activated screen recording and had two huge files under Quicktime.
.
This helped — going to your Mac HD and going through folders. Thanks
i have 103 GB of system taken on my macbook air 2017 plz someone help
Thank goodness I found this site and information. JP thank you. I downloaded CleanMyMac and removed 830 gigs, yes gigs, of system files on my Mac mini. It was so bad I had to throw some applications away to make room for the CleanMyMac download. But boy did it work.
Best $35 I have ever spent. I was ready to buy a new computer.
I have the MacBook Pro from 2016, and my system, according to the about my Mac page, is taking up more than 230GB of disk storage. HELP HELP HELP>>>>>
I can’t tell you how helpful this was!!! Thank you so much for sharing. My system storage currently stands at over 200gb. I know 🙂 So am keen to reduce it asap. Cheers, Jay
Had the same issue, my problem turned out to be Onedrive, while I have Onedrive on an external drive the data seems to flow through the main drive. Going into my user library, containers, there were a couple of com.microsoft.onedrive folders, one which had grown to 56GB, this contained temp files for one drive.
Strangely I had changed my settings recently to not to download to my hard drive full copies, so I can only assume it got its’ knickers in a twist. Now knowing that I had nothing that needed syncing, I deleted the folder and for good measure my local copy of my one drive folder and instantly 56GB back.
Restart Onedrive, create new folder and start again.
My system takes up 994.68GB out of 1TB, so I’m trying to figure out if it is also storming the previous versions of mac OS and if I can delete them.
I only have 250GB in my MacBook Pro, but then system takes up 173GB of storage. I don’t know why this is happening.
My system is so full that I can’t even download anything to it. Any suggestions? I’ve deleted pretty much everything that I can
I really don’t get it why does System storage take 101GB for me , Its just like every 5 minutes i use my laptop it takes it into system storage . What is is this .?
Legendary! CleanMyMac found 165GB of system junk and iTunes junk. Just sitting there eating away at my storage this whole time!! WTF Apple!
My Mac uses all the space in system storage and when I delete anything from mac, system storage is imediatelly full again. I cannot download and install any cleaning app due to low space.
Help needed.
Hi! i just downloaded CleanMyMac. Just fyi, when I clicked on the link for Dr. Cleaner app, it took me to the app store but then said it was not available anymore.
Regardless, this helped a lot. Thank you!
My problem is that while I can delete files and uninstall apps it only temporarily frees up space. I can literally see the available GBs drop in the storage overview as if something else is eating up the space. It’s hundreds of MB per minute, so it can’t be because of something downloading. It appears that System sorry of scales to eat up ANY free space.
51GB of space? 95GB of space? Amateurs. My Late 2013 iMac is telling me I have 921GB of “System” being used.
Yes, you heard that right. 921GB. Out of a 1TB hard drive.
This is after I deleted about 300GB of files, emptied the trash can, and restarted my computer. Something ain’t right.
This is exactly what I was just dealing with! 968G of 1TB being used by “System”. After I found this page, I downloaded the Clean My Mac app as it suggested. I was finally able to see what was going on behind the scenes.
It was ROBLOX user files. My son had been using my desktop and apparently this game racked up so many files in matter of weeks. I could not believe it.
Clean My Mac cleared the 968G of user files within minutes. It was so worth the money! Many thanks to the author of this article.
Having this problem right now. I seriously hate Apple. Will not buy from them again.
The culprit on my MacBook Pro was apple mail logs taking up 220 GB!!!!
Deleting the logs regained the space.
Turn off logging in Mail Window Connection Doctor
The Macintosh HD had only 33.6 GB available of 1TB.
The Documents took 28.03GB while the system took the rest of it: 910.24 GB.
Why the system took so much storage?
Help Please…. SOS
Thanks for this article, JP!
My MacBook Pro’s 1TB SSD is using 466GB for “System” storage.
I’ll start cleaning it up following your tips.
why is my mac taking up 788 gb of storage out of my 1 terra byte .-.
I have this same problem 800gb out of a 1tb. Cannot figure this out. Anyone able to help?
The “system” file on my computer is taking up 322 GB! I can’t download anything to help me organize and delete as there is no space. I’ve deleted almost everything else on my computer and it won’t give me back any space whatsoever. Is there anything else I can do, or should I take it in to be professionally looked at?
Probably because you are not clearing trash. If you delete something and it doesn’t increase space on your disk, its because the trash keeps it for 30 days (or indefinitely depending on the option selected)
Food for thought – could it be that Apple creates the problem on purpose in order to increase iCloud sales for those they do not have the time to really look into it?…
system storage currently at 355GB! Yikes!
And mine takes up 660GB LOLLLLLLL
I have a 2011 mac and i have 500 gb of storage and 449gb are taken up by “system
plz plz plz help
400GB … yeah it was bad, all from Adobe! Unbelievable, I’m sure there is a clear cache button in PP (to be found next time ;), but how would I have ever known!
Thank you for writing this article!!
My Mac shows me that I have 95GB of System storage… thats sooo much. and my MacBook Pro 2017, only has 126GB of total disk storage.
HELP
Same Story here, its a huge pain.
If your using Adobe products remember to delete your cache!
Thank you my school laptop was using a whopping 112 GB of storage and i didnt want to have to turn my laptop in for inspection
Im downloading a game that should only be 13 gigs but my system keeps taking up the space instead and doubling it e.g 15 gigs becomes 30 gigs taken so instead of having 115 gb free i only have 90 gb free why?
Wow thanks, now I can make space for my other apps when “system” took 51 GB of space
548.79GB…. for me
582 GB for me on a 1TB drive (iMac i7 from 2010)
That’s got noting on mine, 804gb
this is useless when your memory is full i cannot download anything or barely open anything
what’d you do to fix the massive amount of space systems took up (it takes up the same on mine)
This would require removing files via Terminal if you are familiar with it. If you are not comfortable then I would not suggest it. All files removed via Terminal would be permanently removed.
This app above is simple in that you can analyze file space without buying a license and that’s all. Which is why it would be good to understand Terminal commands.
This was very helpful because my system is taking up so much storage and I was about to run out and I never knew why….
Thanks!
would files synced from Dropbox be in my system folder? my system folder is a whopping 193GB!! but the only thing that’s on my hard drive is basically photos.
My mac states “This Mac is no longer updating because there is not enough space to store optimized versions of your photos and videos.”
Help