
When you are putting together a project, the frame rate is an important component to consider. It can drastically change the feel of your edit and even impact the size, difficulty, and computing power required. In DaVinci Resolve, changing the frame rate is made easy.
My name is Nathan Menser. I am a writer, filmmaker, and stage actor. In my last 6 years as a video editor, I have made videos using a wide array of frame rates, so I am no stranger to changing the project frame rate to accommodate the video I am editing.
In this article, I will explain the different uses and standards for frame rate on videos, and also how to change the frame rate of your projects in DaVinci Resolve.
Table of Contents
How to Choose the Right Frame Rate
Most production teams decide on the frame rate before they begin filming. Oftentimes, the frame rate you need will be determined by where you will be featuring the footage and what type of project you’ve made.
It’s best to set the frame rate before you start working because if you have to go back and change it, you will end up redoing a lot of your work.
FPS stands for frames per second. So if it is 24 FPS, then it is the equivalent of taking 24 pictures every second. The higher the frame rate, the more “smooth” and realistic it gets. This is not always a good thing, as it has the potential to detract from the video if it is too smooth.
You have to keep in mind that as you go up in frame rate, you go up in file size. If you are shooting at 4k, 24 FPS, then a 1-minute file may be 1.5 GB. If you up it to 60 fps, you could be looking at double the file size! This is important to factor in when deciding on frame rate.
If you are going for the classic Hollywood cinema look, then you are looking for 24 FPS. However, there are many reasons for higher frame rates. For example, Peter Jackson shot Lord Of The Rings at a higher framerate to add a sense of realism.
European film and television are often shot at a higher frame rate. For example, a standard European broadcast is at 25 fps. Don’t ask why, because nobody is sure why.
Another use for a higher frame rate could be filming in slow motion. Depending on how slow you are wanting to get, you can shoot in high frame rates and slow it down in the editor. For example, shooting is 60, and slowing down to 30 will get you at half speed.
How to Change the Frame Rate in DaVinci Resolve
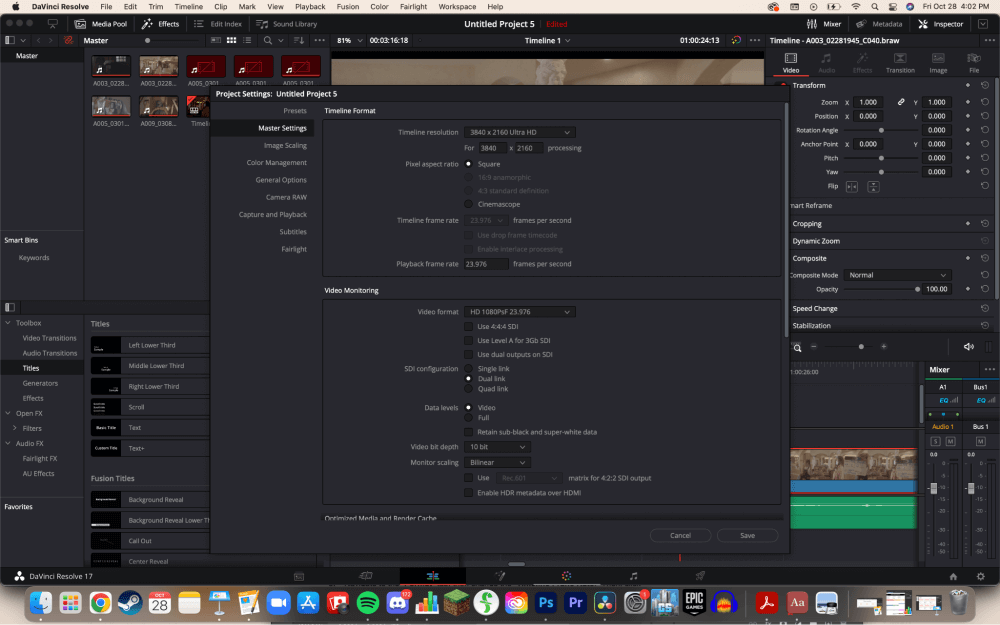
In the top left corner of the screen, select “File” then “Project Settings” from the vertical menu pop-up. This will open up the “Project Settings” menu. Go to the “Master Settings.”
You will see many options, such as altering the timeline resolution and pixel aspect ratio. You will have access to 2 different types of frame rates to change.
- The 1st option, “Timeline frame rate,” will change the actual frame rate of your videos as you edit them.
- The 2nd option, “Playback frame rate,” will change the speed at which the videos play in the playback viewer, but won’t change the actual videos.
Pro Tip: Make sure all videos in your timeline share the same frame rate unless you’ve changed the frame rate specifically for a special effect. It will make your videos appear choppy.
If your timeline frame rate option is unavailable, this is because you need to make a new timeline before you can change its framerate. If you already have videos in your timeline, you won’t be allowed to change the timeline frame rate. You can, however, create a new timeline.
Step 1: Navigate to the “Media Pool” in the top left corner of the screen.
Step 2: Right-click, or ctrl-click for Mac users, in the media pool. This will open another menu.
Step 3: Hover over “Timelines” and then select “Create New Timeline.” This will make a new pop-up.
Step 4: Uncheck the box next to “Project Use Settings.”
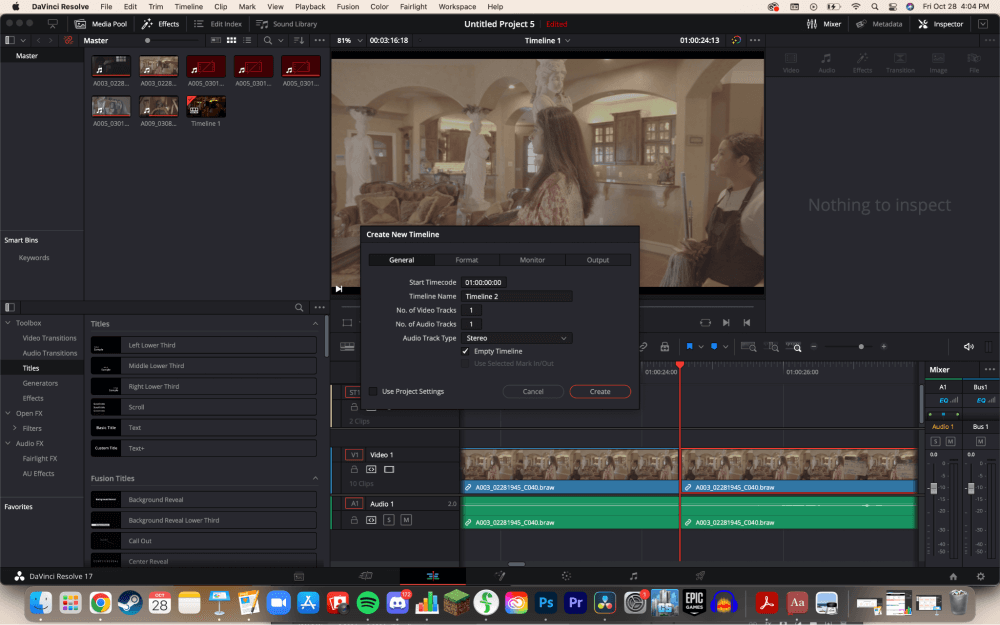
Step 5: Navigate to the “Format” tab, then change the “Timeline Frame Rate.” Then, click “Create.”
Step 6: Copy the old timeline by double-clicking it Cmd-A on Mac and Ctrl-A on Windows will copy the timeline. Use the shortkleys Cmd-V on Mac or Ctrl-V on Windows to paste the timeline.
Conclusion
Remember, there is not one right frame rate to use. Just because the rest of Hollywood uses 24, does not mean you have to as well. Just keep in mind, the higher your framerate, the bigger the file size.
If this article has taught you about frame rates and how to change them in DaVinci Resolve, let me know by dropping a comment in the comment section. I would also love to know how I can improve these articles, and what you want to read next!