
I notice a lot of cracked iPhone screens. Often, those users continue to use their phones despite the fragments of glass. But if you damage your screen too much, you won’t be able to use your phone at all. You’ll need to replace the screen or the whole phone.
Before you do either of those things, back up your phone so you don’t lose your valuable photos and files. Too often, you won’t have seriously thought about backups until it’s too late. That’s like thinking about car insurance after you’ve had an accident.
If you’re lucky, your data will still be on your phone after the repair. But no Apple employee or third-party repair guy guarantees that. It’s better to perform a backup first so that your data is safe.
In this article, I’ll assume you’ve severely damaged your screen so that you can’t read what it says or use the touch screen. We’ll cover 4 different backup methods in detail that will help you keep your phone’s contents safe.
But first, we’ll cover some of the roadblocks we need to find detours around.
Table of Contents
The Workarounds We Will Use
It’s almost impossible to use an iPhone with a badly damaged screen. You can’t see what’s on it, navigate, or enter information with the touch screen.
It gets worse. Apple has tightened its security so that if your phone is stolen, the thief won’t be able to access your data. Unfortunately, those same safeguards will make it more difficult to back up your phone now. However, it may be possible with workarounds. We’ll outline them below. The bottom line: if you can’t unlock your phone, you won’t be able to back it up.
These workarounds may incur a cost. If you don’t already own a Lightning to USB adapter or have spare keyboards lying around, you’ll have to buy them. And the use of third-party recovery software also costs money when it comes time to restore the data to your phone.
Here are the workarounds we’ll use so you can tell what is on your screen and navigate your phone:
1. Touch ID or Face ID
The first thing you must do is unlock your phone. Entering your PIN or password at the lock screen is difficult because you can’t see what’s on your screen or use the touchscreen.
Fortunately, with the introduction of Touch ID and Face ID, this is one problem that’s actually become more manageable. Biometrics have made unlocking iPhones so convenient that most users have embraced them and can unlock their phone with just a touch or a look.
Make sure you don’t restart your iPhone or let the battery die! After a restart, Touch ID and Face ID won’t be an option. You’ll be required to enter your password before Touch ID or Face ID will work.
If you can’t unlock your phone, you won’t be able to back it up. Your best bet is to replace the screen and hope the data is still there afterward.
2. VoiceOver
How can you tell what’s on your screen if you can’t see it? Hear it instead. VoiceOver is an accessibility feature designed for those with impaired sight. It’s a screen reader that will automatically read the contents of the screen aloud and make it easier to navigate your iPhone with an external keyboard.
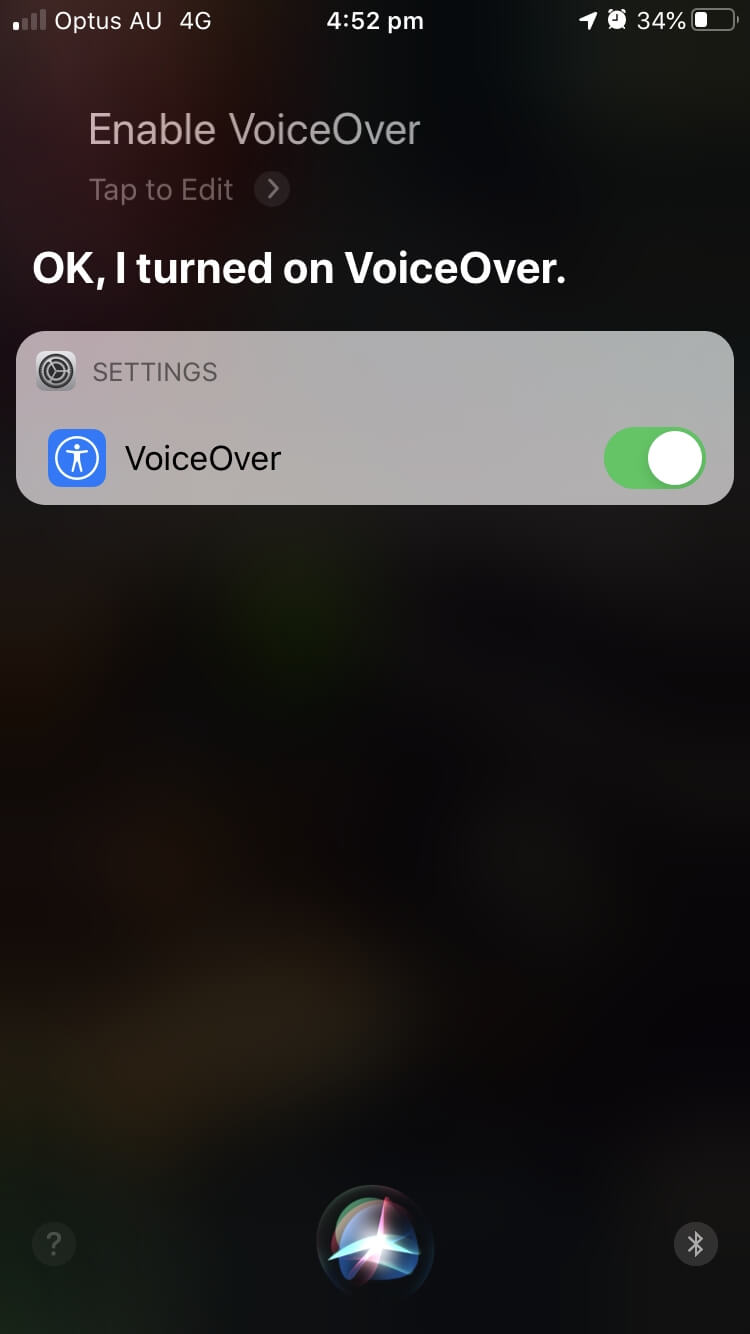
How do you turn VoiceOver on? The easiest way is to ask Siri to “enable VoiceOver.”
3. Siri
With a broken screen, Siri is more useful than ever. You can use it for many other tasks. Unfortunately, initiating a backup isn’t one of them, but it will help you more easily access the settings you need.
4. USB Keyboard
Without a working touch screen, you’ll need another way to navigate your phone’s settings and enter information: a USB keyboard. You may already have one, or you might borrow one. To connect it to your phone, you’ll also need a Lightning to USB adapter, which normally costs less than $30.
Unless you changed the settings before the accident, you wouldn’t be able to use the keyboard unless your phone is unlocked. This has been true since iOS 11.4.1; it means you won’t be able to use the keyboard to type your PIN or password. That’s why you need to have set up Touch ID or Face ID.
Once VoiceOver is enabled, you’ll be able to use the keyboard to tap buttons using a key combination:
- Ctrl-Alt-Space on keyboards with a Windows layout
- Control-Option-Space on keyboards with a Mac layout
Since most USB keyboards use a Windows layout, we’ll just call it Ctrl-Alt-Space for the remainder of the article.
5. Bluetooth Keyboard
If you plan to connect your iPhone to your computer for backup purposes, that connection will require your Lightning port. That means you won’t have room to plug in your USB keyboard. The solution: use a Bluetooth keyboard instead.
Unfortunately, unless you paired the keyboard before the accident, it will be tough to connect. You’ll need to use the USB keyboard to do the pairing, then unplug it and use the Bluetooth keyboard for the rest of the procedure.
Solution 1: Back Up to iCloud Using a USB Keyboard
What you’ll need:
- A USB keyboard
- A Lightning to USB adaptor
- An iCloud account with enough storage
- Connection to a Wi-Fi network
To get started, unlock your phone using Touch ID or Face ID and ask Siri to enable VoiceOver. Attach the Lightning to USB adaptor to your iPhone, then plug the USB keyboard in.
Ask Siri to open iCloud settings. You won’t be able to see the screen, so I’ll include screenshots to help you visualize what’s happening.
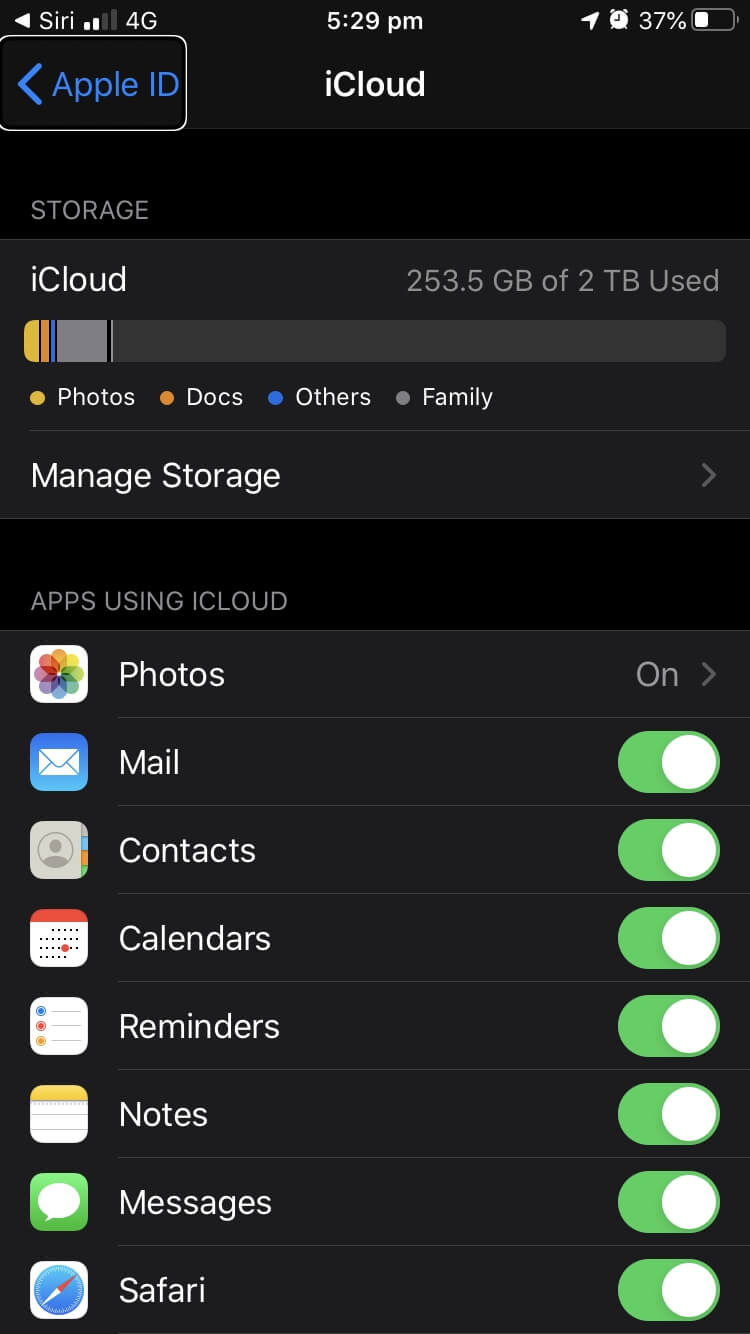
Notice the “Apple ID” button is currently selected. You move down the list of settings by pressing the Right cursor key on the keyboard. At the time of this writing, you need to press it 22 times to reach iCloud Backup. Each entry will be read aloud as you navigate.
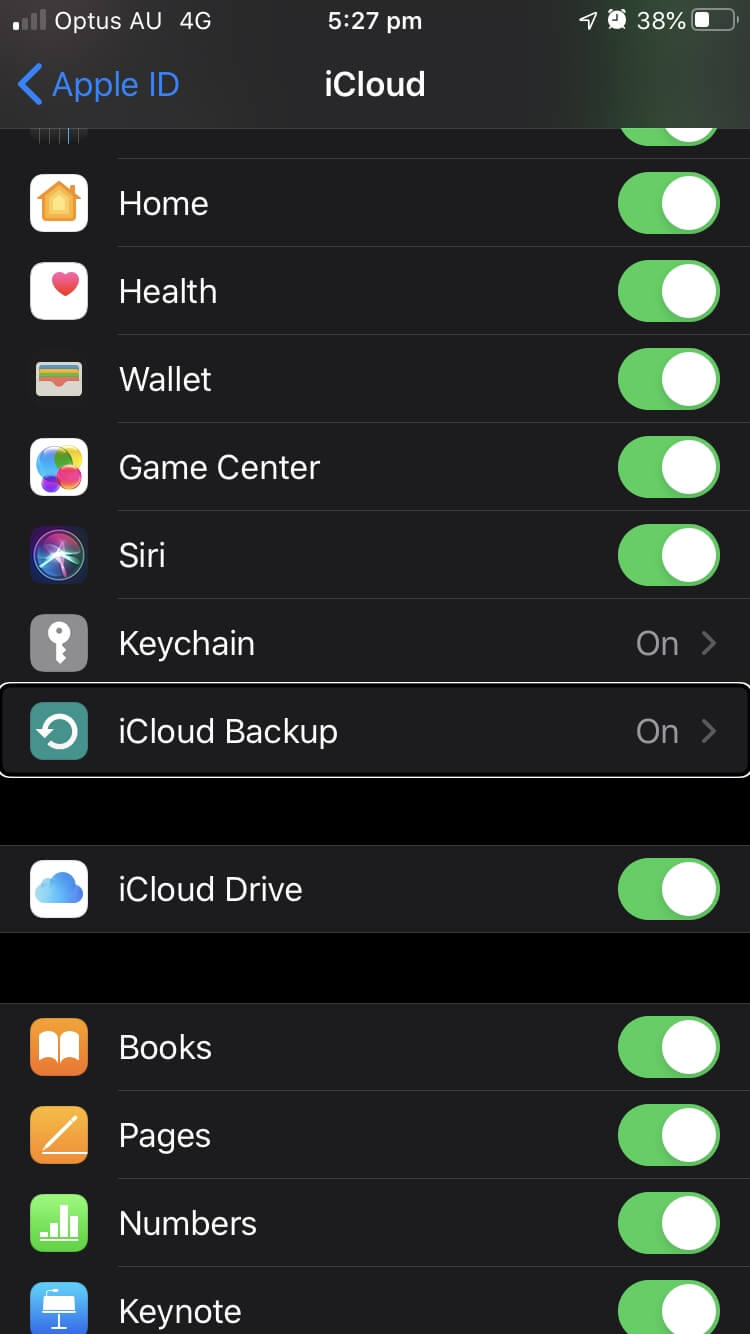
Tap on the iCloud Backup item by pressing Ctrl-Alt-Space (Control-Option-Space on Mac) on the keyboard.
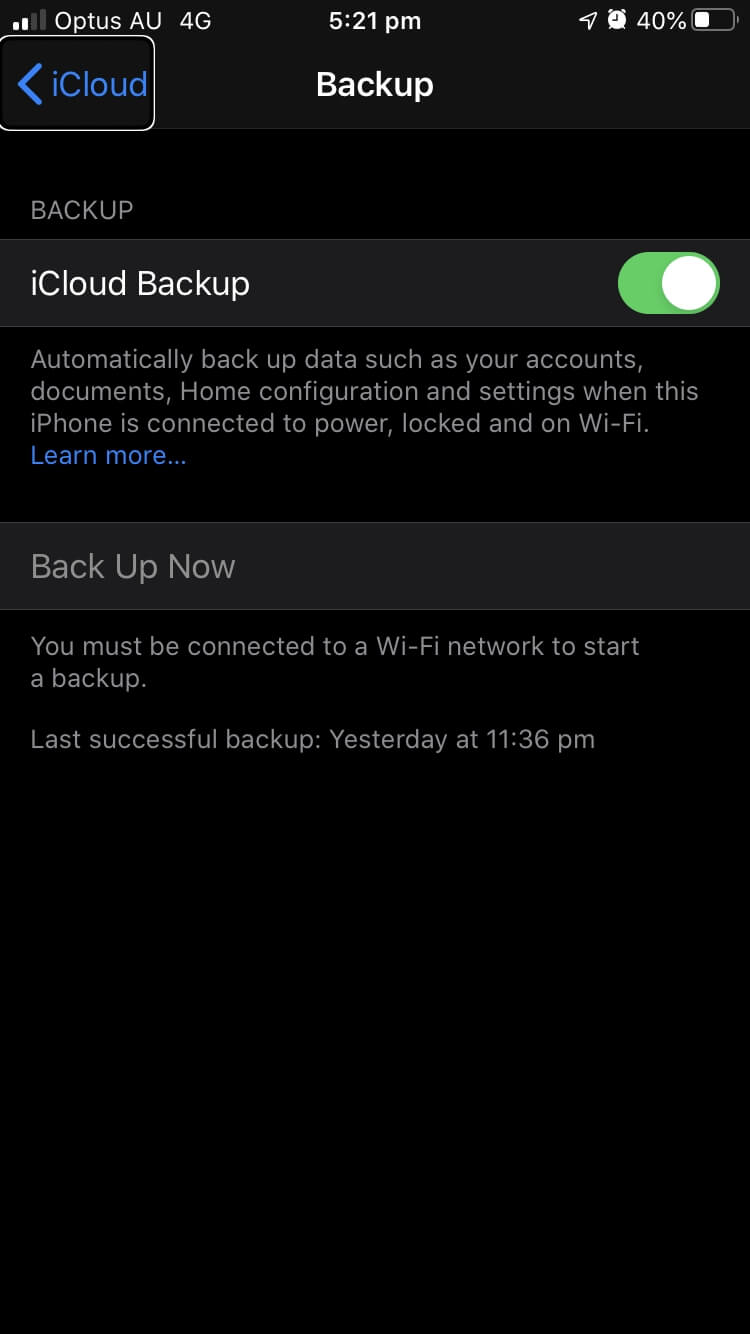
On my phone, iCloud Backup is already turned on. To find out if yours is on, press the Right cursor key three times. Then you’ll hear “iCloud Backup on” or “iCloud Backup off.” If yours is off, press Ctrl-Alt-Space (Control-Option-Space on Mac).
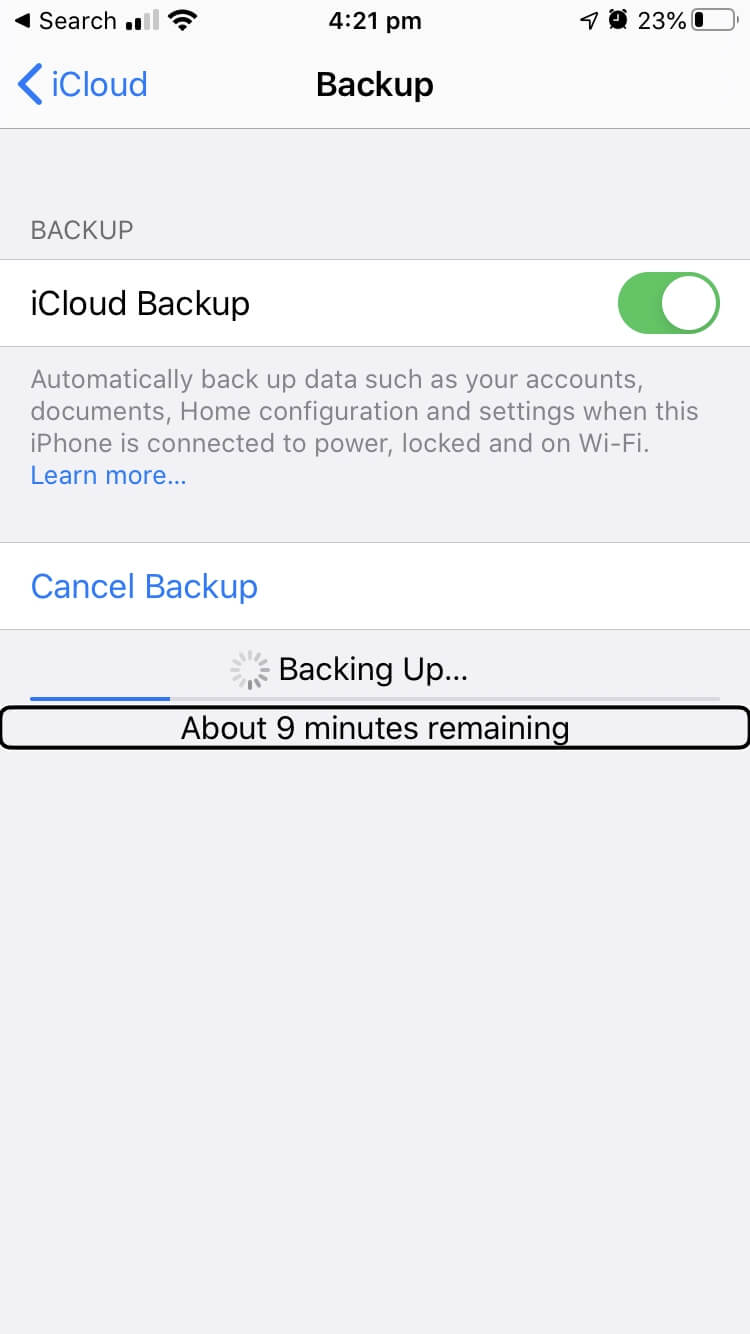
To back up, you need to be connected to a Wi-Fi network. I’ll assume that you’re doing this from home, and you’re already successfully connected. To press the Back Up Now button, press the Right cursor key twice, then Ctrl-Alt-Space (again, Control-Option-Space on Mac).
A progress bar will be displayed along with an estimate of the time remaining. You won’t be able to see the information, but you’ll be able to highlight that information using the Right cursor key to hear VoiceOver read it out.
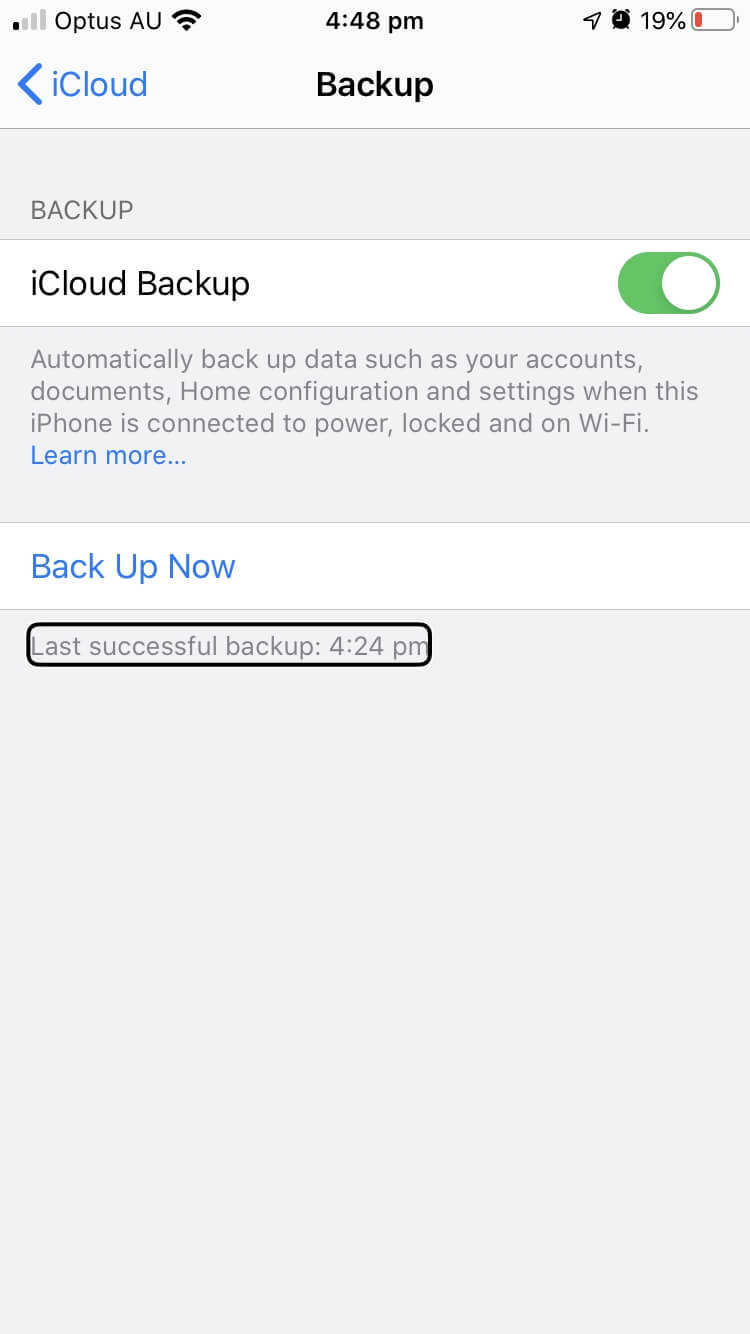
Once your backup is finished, the time of the last successful backup will be displayed and announced by VoiceOver when you select it with the cursor key.
If you need to copy that data back onto your phone after it’s repaired or replaced, Quick Start will allow you to download your data from the cloud when setting it up.
Solution 2: Migrate Your Data to a New Phone
What you need:
- A USB keyboard
- A Lightning to USB adaptor
- Connection to a Wi-Fi network
- A new iPhone running iOS 12.4 or later
If you’re replacing your phone rather than repairing your screen, a second option is to migrate your data directly from the old phone to the new one without making a backup first. Both phones need to be running iOS 12.4 or later and have Bluetooth turned on for this to work. If necessary, you can enable Bluetooth on your old phone by telling Siri to “turn Bluetooth on.”
You will be offered the choice to perform the procedure with a wired or wireless connection, but since you’ll need to have a keyboard plugged in, choose the wireless option. Unfortunately, I don’t have an old phone to test this on, so I can’t offer screenshots or give the same amount of detail as the other solutions.
Get started by enabling VoiceOver and plugging in your Lightning to USB adapter and USB keyboard.
Once you start to set up the new phone, you’ll come to Quick Start, a procedure that will set your new phone up just like your old one. Choose to do this directly from the old phone rather than from iCloud: “Transfer directly so this iPhone will be ready with your data when you finish setting up.” The procedure will probably take a couple of hours.
Place it near your old phone. When you turn your old phone on, a message you won’t see will pop up. It lets you know you’ll be setting up a new phone and offers an Unlock to Continue button.
You can’t tell whether the button is already selected, so you may need to use the Left or Right cursor key until VoiceOver lets you know the button is selected, then tap it by pressing Ctrl-Alt-Space (Control-Option-Space on Mac) on the keyboard. You’ll then need to use Touch ID or Face ID to unlock your phone.
Next, another pop-up will appear. It displays your Apple ID and offers a Continue button. Use the Left and Right cursor keys (if necessary) to select that button, then tap it by pressing Ctrl-Alt+Space (Mac: you know the drill) on the keyboard.
The next step is a little tricky. A pattern is displayed on your new phone, and you need to scan it into your old phone using its camera. This will take some trial and error because you can’t see what the camera is pointing at. With your old phone placed about a foot above your new one, slowly move it around until the pattern is scanned. Good luck! Let us know in the comments if you discovered any tricks to make this easier.
An alternative is to select the Authenticate Manually option, then follow the prompts. Apple’s support page doesn’t describe what comes next, but I assume you’ll be able to use the attached keyboard (and lots of patience) to answer any questions.
After that, Quick Start will continue on your new iPhone. There will be several prompts and questions to answer, and when you reach the Transfer Your Data page, select “Transfer from iPhone.” The migration will take some time, depending on how much data you have on the old one. Expect to wait a couple of hours.
Solution 3: Back Up to Your Computer Using USB and Bluetooth Keyboards
What you need:
- A USB keyboard
- A Lightning to USB adaptor
- A Bluetooth keyboard
- A computer (Mac or PC)
A third option is to back up your iPhone to your computer. If you’ve plugged your phone into your computer in the past, this is easy—all interaction will happen on your computer. If you haven’t, it’s more complicated than any of our other solutions.
That’s because you need to tap on a single button to confirm that you trust that computer. Because your phone is plugged into your computer, you can’t also have a USB keyboard plugged in. You’ll need to use a Bluetooth keyboard instead. But to get that working, you will need to use the USB keyboard—assuming that you haven’t paired it in the past.
To get started, unlock your phone using Touch ID or Face ID and turn on VoiceOver by telling Siri to “enable VoiceOver.” Connect your Lightning to USB adapter to your phone and plug your keyboard into it.
To pair your Bluetooth keyboard, you need to get to the Bluetooth section of the Settings app. The easiest way is to tell Siri to Open Bluetooth settings. If Bluetooth is turned on, ask Siri to “turn Bluetooth on.”
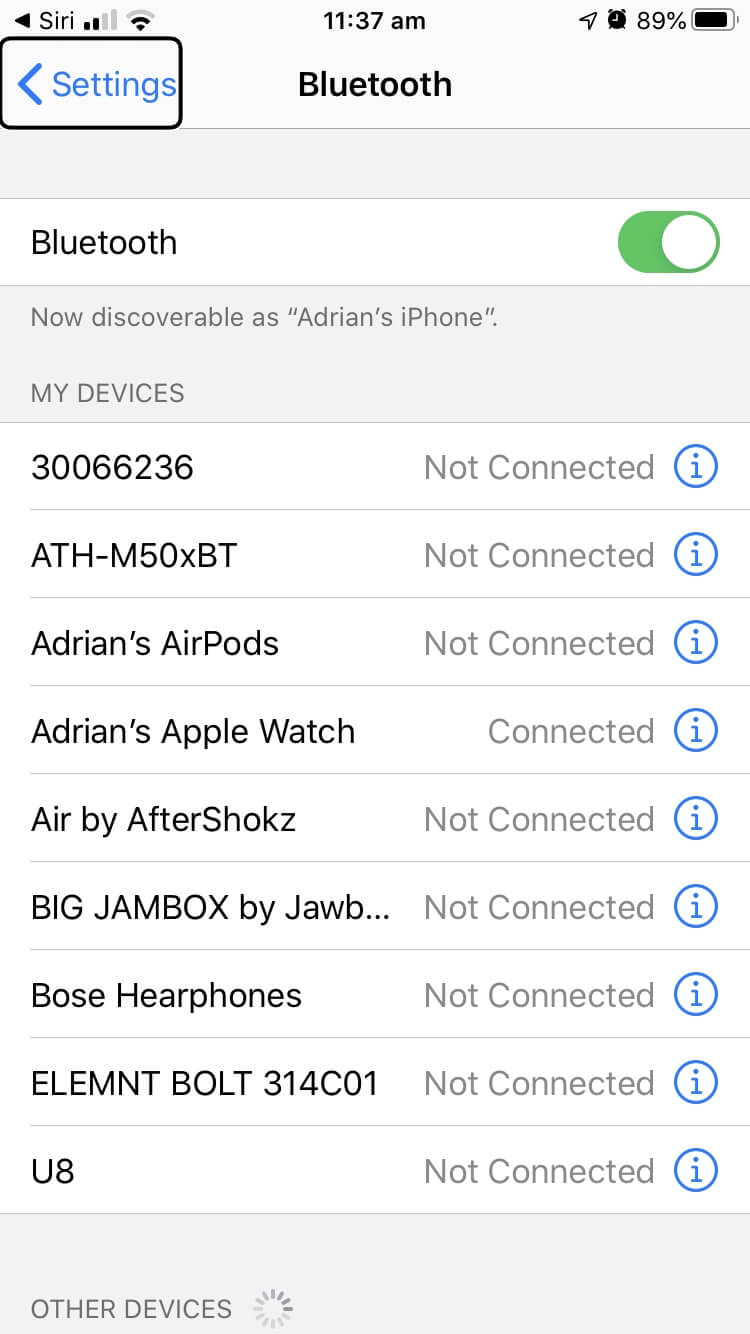
Turn on the Bluetooth keyboard and put it in pairing mode if necessary. Now, you need to navigate to that keyboard in the list. Press the Right cursor key on the USB keyboard until you can’t go further — you should be able to tell by listening to VoiceOver’s audio prompts.
You should now be at the bottom of the list where unpaired devices are located. The Bluetooth keyboard should be highlighted, and VoiceOver should automatically confirm this with an audible notification.
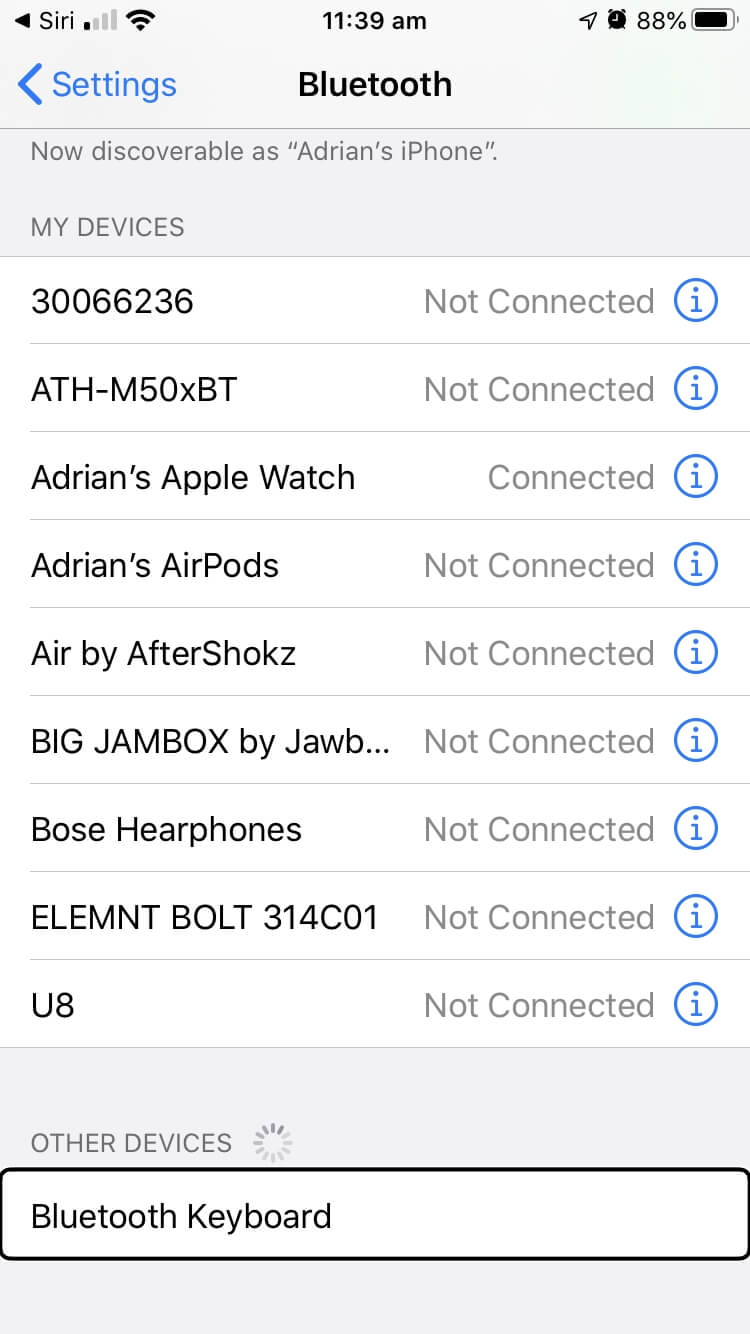
Press Ctrl-Alt-Space (Control-Option-Space on Mac) to connect the device.
Now that your Bluetooth keyboard is connected, you can unplug your USB keyboard and connect your phone to your computer using its charging cable. A message will be displayed on your iPhone; it’ll ask whether you trust the computer. You won’t be able to see it, so here’s a screenshot of what it will look like.

Press the Right cursor key twice to select the Trust button and tap it by pressing Ctrl-Alt-Space (Control-Option-Space on Mac) on the Bluetooth keyboard. Next, confirm that you want to trust the computer by using it to type your phone’s PIN or password.
Now you can back up your iPhone to your computer. On newer Macs running macOS Catalina or later, that is done using Finder. On PCs and older Macs, you’ll use iTunes. Here are the steps to follow using Finder.
Open Finder, and in the left navigation bar, select your iPhone.
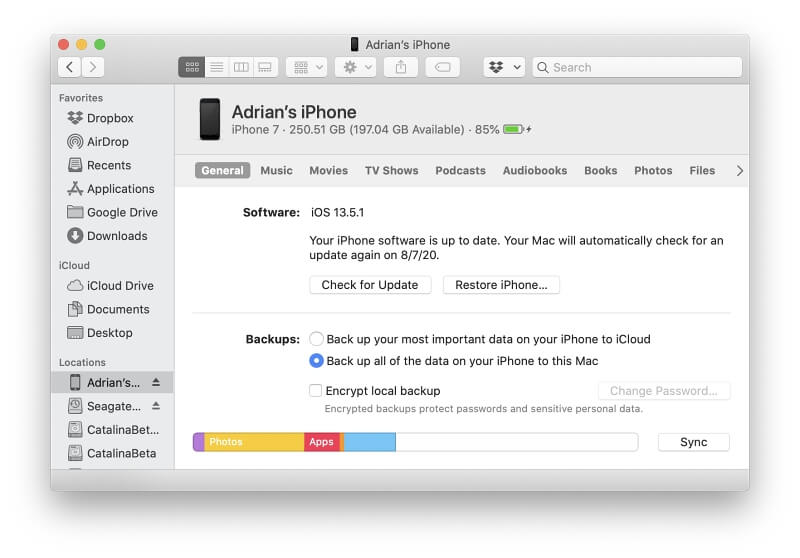
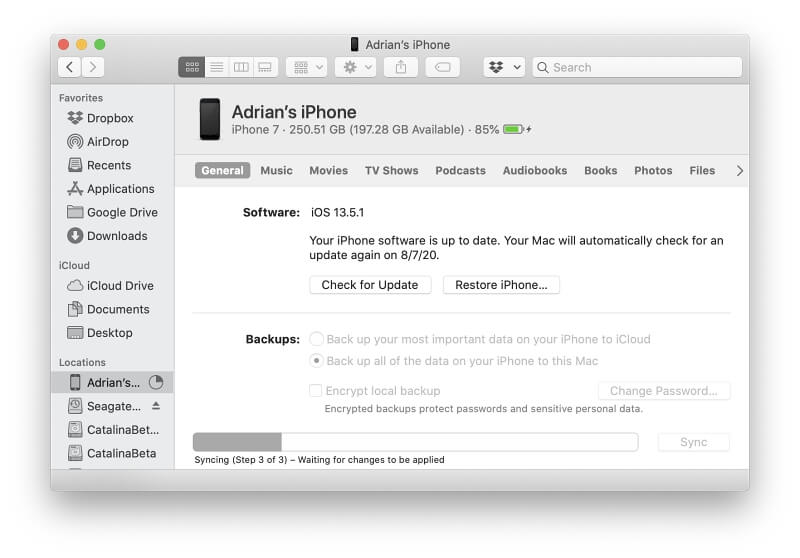
Under Backups, make sure that “Back up all of the data on your iPhone to this Mac” is selected. Then press the Sync button and wait for the backup to complete. Done!
If you need to use the backup after repairing or replacing your iPhone, connect your phone and press the Restore iPhone… button to get started.
Solution 4: Use Third-Party iPhone Data Recovery Software
What you need:
- A USB keyboard
- A Lightning to USB adaptor
- A Bluetooth keyboard
- A computer (Mac or PC)
- iPhone data recovery software like PhoneRescue
You can also use third-party software designed for disasters like your cracked screen.
In most cases, you’ll be able to back up your computer for free. To restore your data, you’ll have to purchase the software, which typically costs $60 or more. In your situation, that’s not a bad deal.
There’s a reasonable chance your data will still be intact after a screen replacement, and you only need to pay for the software if you actually lost your data. You can read about the strengths of each program as well as other competing apps in the roundup.
So What Should You Do?
Before you have your phone’s screen replaced or just replace the whole phone, it’s wise to do a backup. In the case of a repair, the backup is a safeguard — there’s a chance that your files and photos will still be on your phone when you get them back, but no repairer will guarantee that. If you get a new phone, a backup will let you set it up like your old one.
But with a broken screen, backups are difficult. If you can unlock your phone using Touch ID or Face ID, you can use an external keyboard or two to back up to iCloud; migrate your data to a new phone; or back up to your computer using Finder, iTunes, or third-party data recovery software.
If you can’t unlock your phone, you have a problem. At that point, you need to decide how valuable your information is to you. You might take a chance and hope your data is still intact after the repair.
Finally, make sure you learn from this experience. From now on, back up your phone regularly! I personally back up to iCloud. It costs a small amount of money each month, and backups are performed each night automatically. Alternatively, get into the habit of backing up your iPhone by plugging it into your computer regularly.
Excellent! Thanks – this has saved me.
NOTE: It is NOT necessary to connect a USB and/or bluetooth keyboard, if the touch function of the display still works (which was the case on my phone – display was completely broken and black, but still responsive to the touch)
Apple publishes a video on youTube on how to use the phone in voice over mode (WARNING: the gestures are completely different to what you’re used to!). If you watch this video and memorize the gestures, it is possible to turn on voice over using siri, and then use your phone completely “blind”. It even allows you to enter your unlock PIN.
thank you this information was easy to follow and successful.