
SD cards are popular. They’re small, convenient, and are used by a wide variety of devices. My wife uses them in her DSLR camera. I use one in my action cam and another in a synthesizer. They’re used in MP3 players, some smartphones, and laptops. Why are they so ubiquitous? They’re an inexpensive way of storing data and moving it between devices.
But like any computer storage gadget, things can go wrong. Data can become corrupted. They can stop working. They can be lost or stolen. What does that mean? You could lose valuable data. You need a backup!
You may also want to copy data off the card to free up space. For example, when your camera’s SD card is full of photos, you move them into the photo library on your computer or mobile device so you can take more photos.
In this article, we’ll cover a wide range of ways to back up your SD card, including how to back it up to your computer’s hard drive and cloud storage. We’ll also look at additional options that are handy for backing up photos and videos.
But first, let’s start with the gear you’ll need to get the job done.
Table of Contents
What You Need
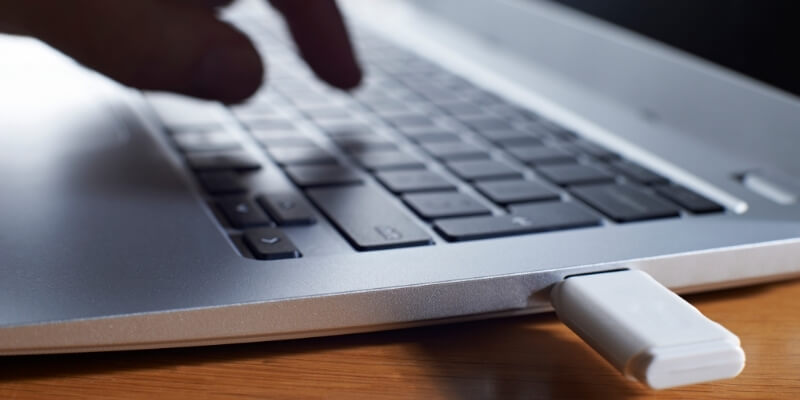
An SD Card
I’m sure that since you’re reading this article, you have one already, but let’s briefly look at the types of SD cards that are available. SD stands for “Secure Digital.” These cards provide portable digital storage for computers.
The cards come in three sizes (original, mini, and micro). According to Sandisk, there are three types determined by capacity:
- Standard Capacity (SDSC): 128 MB – 2 GB
- High Capacity (SDHC): 4 – 32 GB
- Extended Capacity (SDXC): 64 GB – 2 TB
Those are the basic details, though the SD landscape continues to evolve. For example, the Ultra-High-Speed Phase I and Phase II standards have been created to achieve faster data transfer speeds, while the SDIO interface allows you to connect peripherals to your SD port.
An SD Adapter
Some computers and smartphones offer built-in SD card slots, but that seems to have become a rarity. Chances are you’ll need some sort of adapter to back up your card. Make sure you purchase one that supports the size of your card (standard, mini, or micro) and the type of USB port your computer or mobile device has.
Here are some examples:
- The Unitek USB-C card reader offers slots for standard and micro SD cards, as well as the older Compact Flash
- The Sony MRW-S1 turns a micro SD card into a USB Flash drive
- The Satechi Aluminium Multi-Port Adapter is designed for newer MacBook models with USB-C ports and offers SD and micro SD ports, USB 3.0 ports, HDMI, Ethernet, and more
- The Apple USB-C to SD Card Reader allows you to use your card with modern MacBooks and iPad Pro
- The Apple Lightning to SD Card Camera Reader allows you to use your card with iPhone, iPod, and iPad Air
Disclosure: The above links are affiliate links (if you purchase through our links, we earn an affiliate commission at no additional cost to you). As an Amazon Associate, we earn from qualifying purchases. See our disclaimer.
Method 1: Back up SD Card to Your Computer
If you have easy access to your desktop or laptop computer, in most cases, you’ll find it the easiest way to back up your SD card.
Copy The Entire Card Content to a Folder
This is arguably the simplest way to back up your card to your computer. The steps are similar on both Mac and Windows.
On Mac
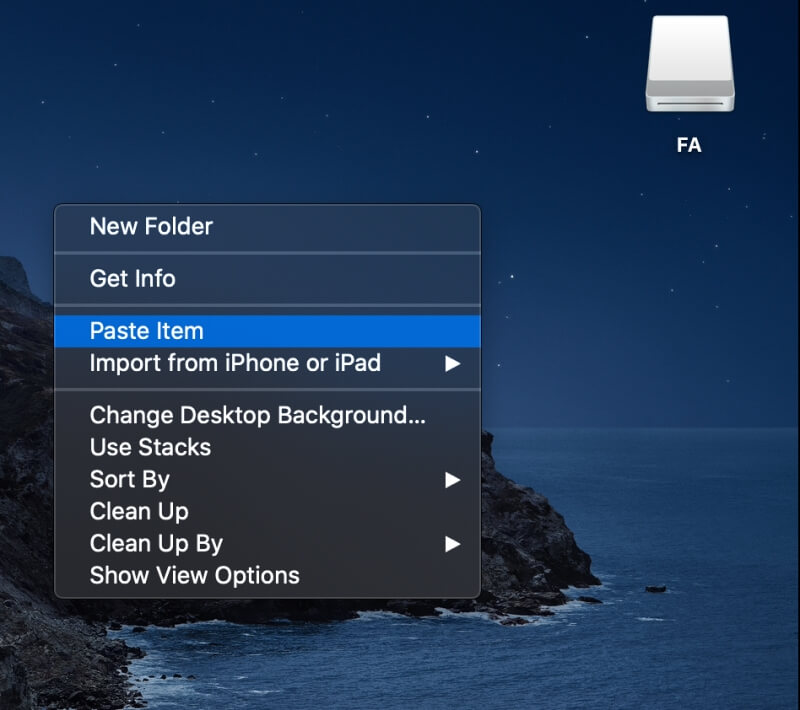
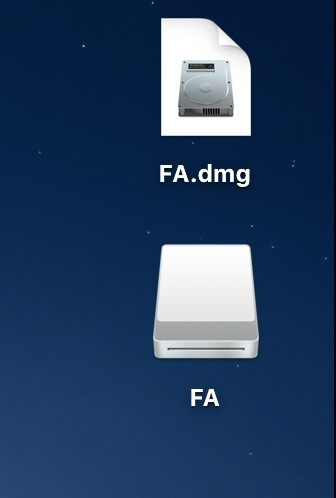
Right-click the SD Card icon on your desktop and select the Copy command from the menu. In the example below, the card I have inserted is called “FA,” so I see “Copy FA.”

Find the folder you want to copy the drive to. In this example, I’ll just use the desktop. Right-click and select the Paste Item command from the menu.
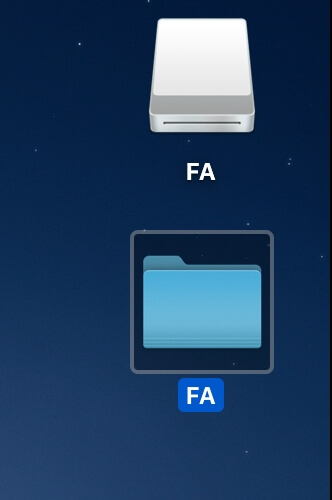
It’ll create a new folder with the same name as your card, and the contents are copied inside.
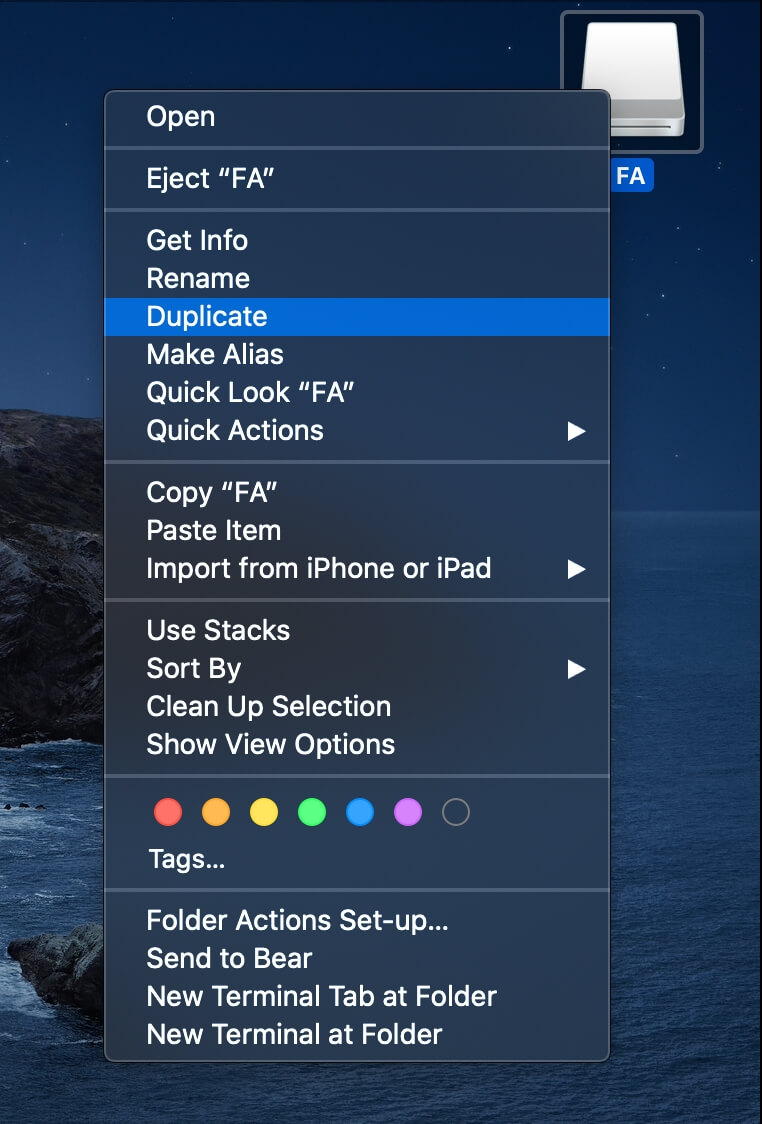
Alternatively, to copy the entire drive to the desktop in one step, simply right-click and select Duplicate from the menu.
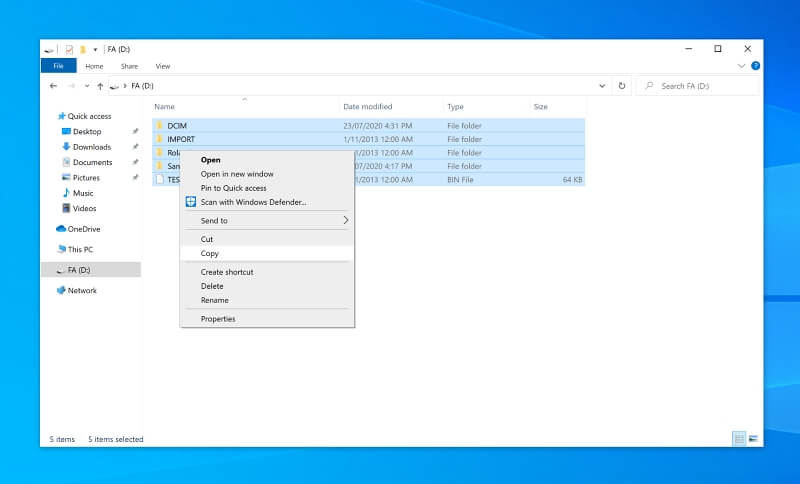
On Windows
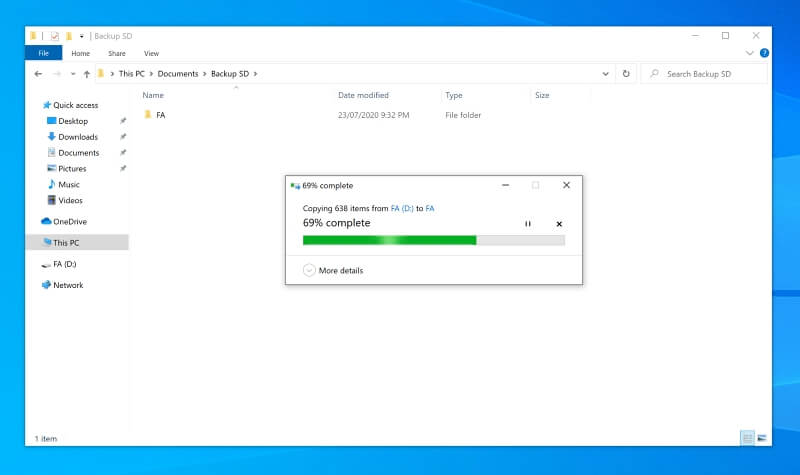
The steps in Windows are similar. Open File Explorer and right-click on the SD card in the left navigation pane. Select Copy from the menu.
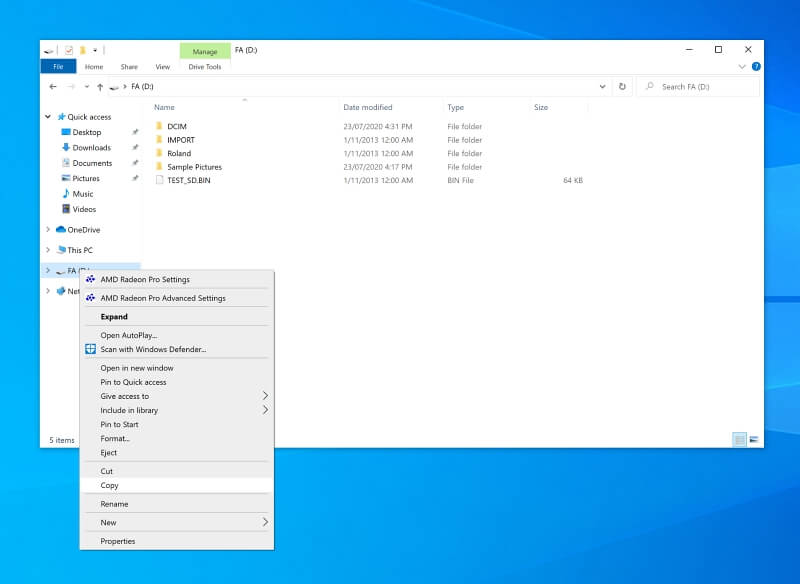
Now navigate to where you want to back up the files. Right-click on the folder’s background and select Paste.
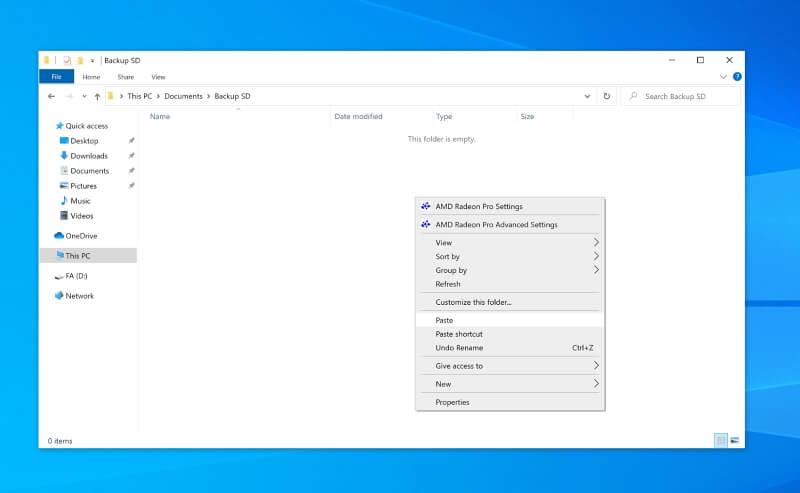
It’ll create a new folder with the same name as the SD card, and the files will be copied into the folder.
Copy and Paste Some or All Files to Your Computer
This method is almost as quick and easy as the first and gives you the option of selecting the files and folders you want to back up.
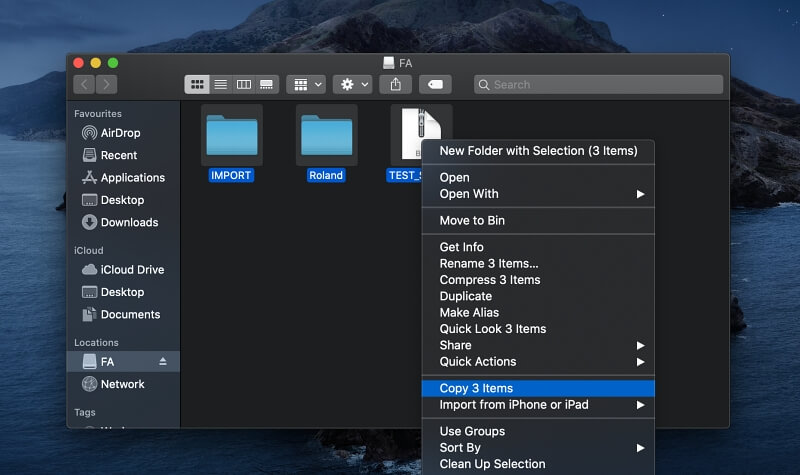
On Mac
Display the contents of your card and select the files and folders you want to copy or press Command-A to Select All. Copy the data by right-clicking and selecting Copy or use the keyboard shortcut Command-C.
Move to the folder where you want to back up the data (create a folder if it doesn’t exist yet). Paste the files by right-clicking and selecting Paste or use the keyboard shortcut Command-V.
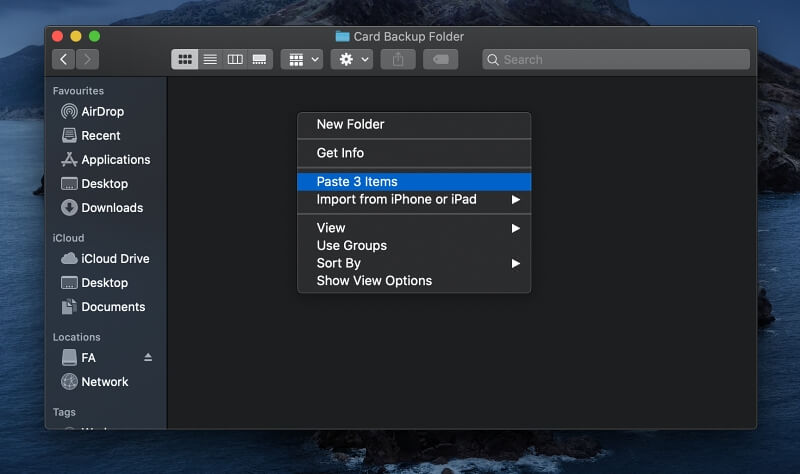
The selected files and folders will be copied to your computer.

On Windows
Open File Explorer and click on your SD card to display its contents. Select the files and folders you want to back up. If you’re backing up everything, use the keyboard shortcut Ctrl-A (Select All). Right-click on the files, then select Copy from the menu or use the keyboard shortcut Ctrl-C.
Navigate to the folder where you want to copy the files. Right-click on the folder’s background and select Paste from the menu or use the keyboard shortcut Ctrl-V.
The files will be copied to your PC.
Create a Disk Image of the SD Card
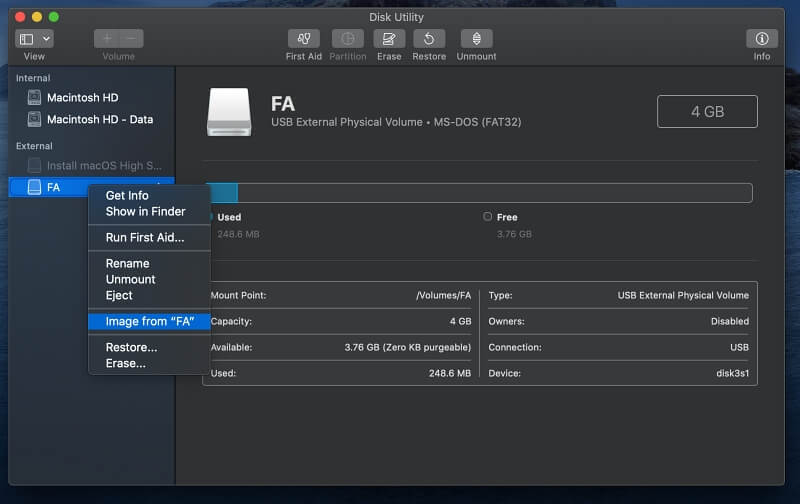
On Mac
Open Disk Utility, right-click on your SD Card, and select Image from the menu.
Choose where you would like the disk image to be saved.
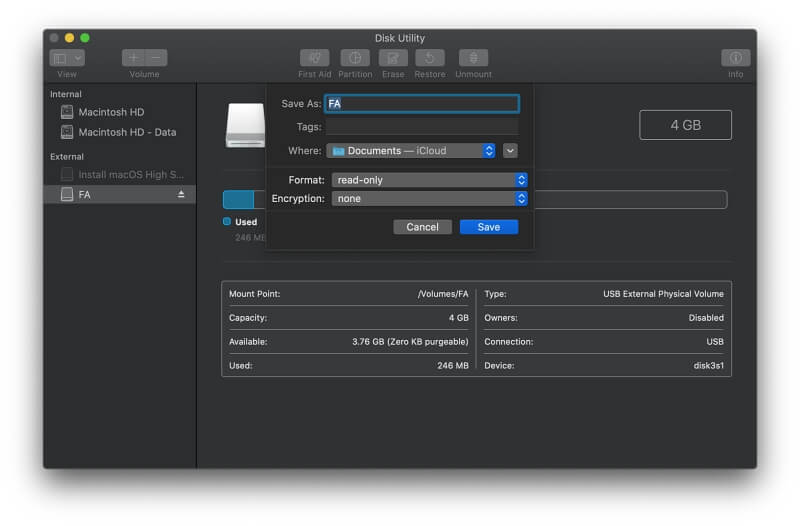
A DMG disk image—an exact duplicate, or clone—of your SD Card is created in that folder on your Mac.
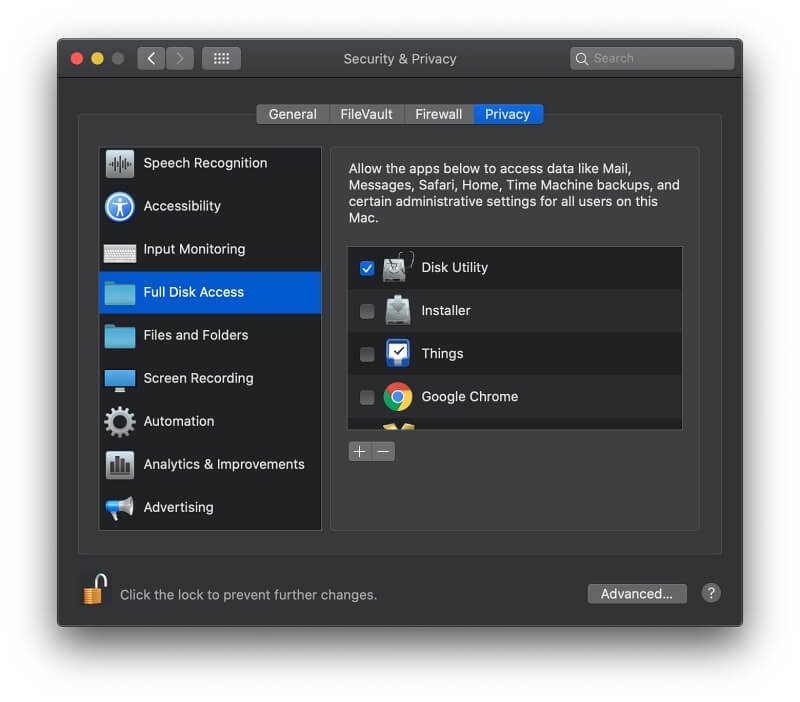
Important note: You may receive an “Operation Cancelled” error message, as I did when using macOS Catalina. The cause of the error is that Disk Utility doesn’t have full access to your drives.
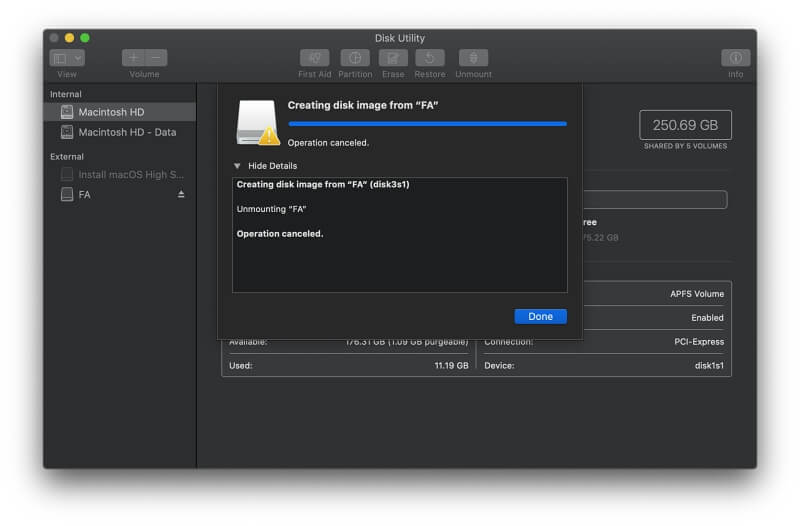
You can give the app access from System Preferences. Navigate to Security & Privacy and click on the Privacy tab.

Scroll down to Full Disk Access in the list on the left side of the window and click on it. You’ll see a list of applications that have full disk access. You need to add Disk Utility to the list. Click the “+” button at the top of the list. You’ll find Disk Utility in the Utilities folder under Applications.

Once you restart Disk Utility, it will have full disk access and be able to successfully create an image of your card.
On Windows
If you’re a Windows user, the best way to create a disk image is with a third-party backup application. We’ll cover some of the best in the section below.
Use a Third-Party Backup Application
There are plenty of third-party backup applications that make backing up an SD card a breeze. Check out our roundups that compare the best backup apps for Mac and the best backup software for Windows.
In most cases, using one of these apps to back up an SD card would be overkill. However, if you’re already familiar with the app you use to back up your Mac, it makes sense to use it for SD cards.
Method 2: Back up SD Card to the Cloud
Backing up your SD card to the cloud will keep your data safe even if you encounter issues with your computer, such as a hard drive failure. Most cloud storage providers offer some space for free; if you use more, you’ll need to pay a subscription price.
Back up to Google Drive
Google Drive is a convenient place to back up your files. You’re given 15 GB of storage space for free (and can purchase more as required), and there are multiple ways to perform a backup from your computer or mobile device. Here are a few:
Using the Google Drive Web App
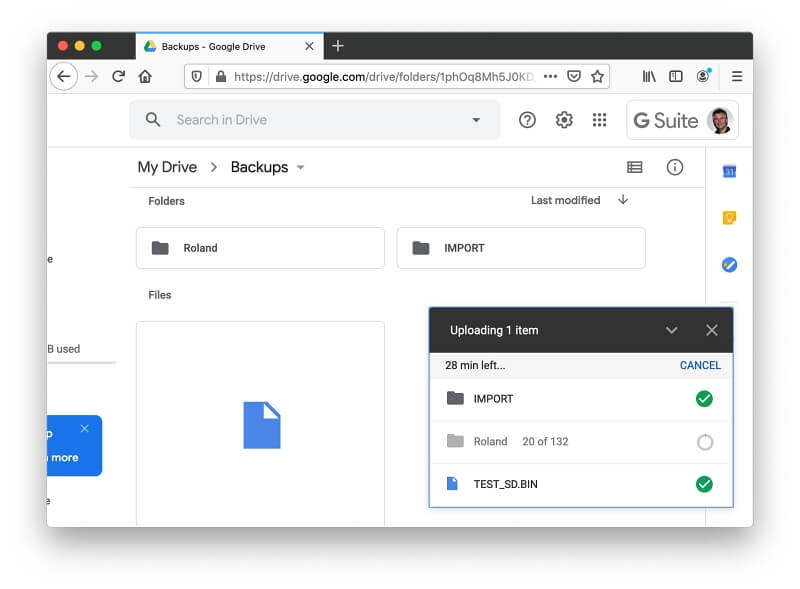
Log in to Google. Open the Google Drive web app (located at drive.google.com) in your browser and navigate to the folder you want to back up to. Insert the SD card and double-click its icon to display the files and folders it contains. Select the files and folders you want to upload and drag them into the web app’s folder.
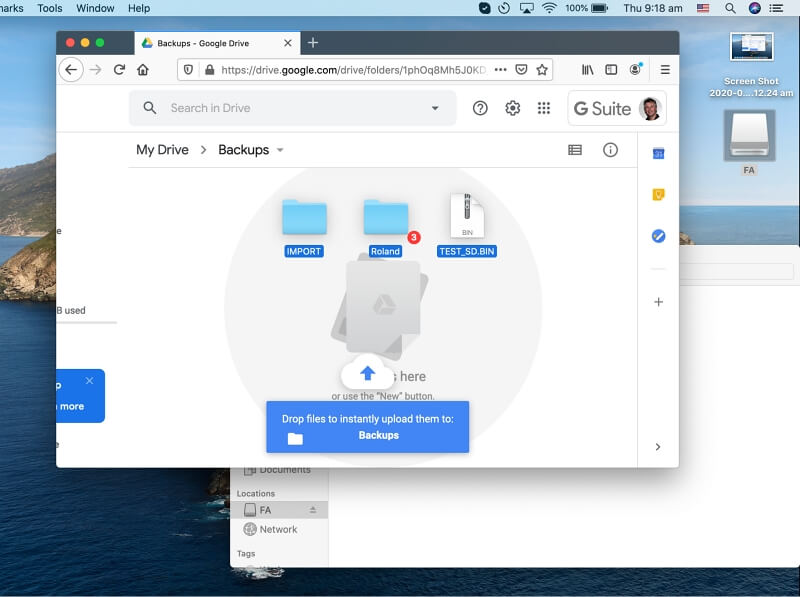
Your files are uploaded.
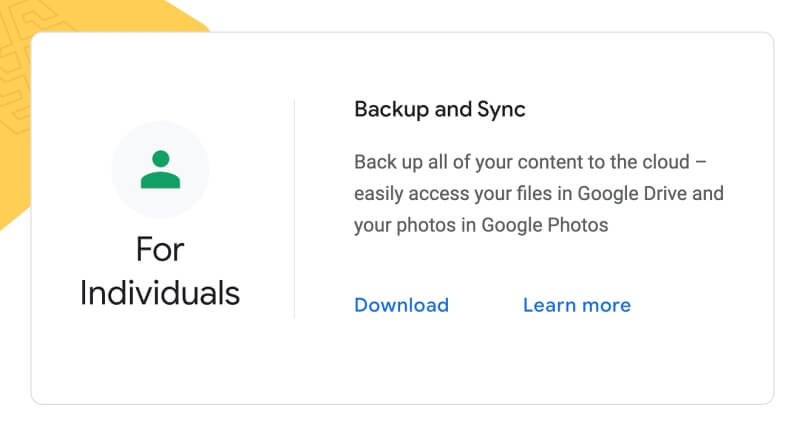
Using the Backup and Sync Desktop App
Alternatively, use Google’s Backup and Sync app for Mac and Windows.
Once the app is installed, it will automatically offer to back up your card when you insert it.
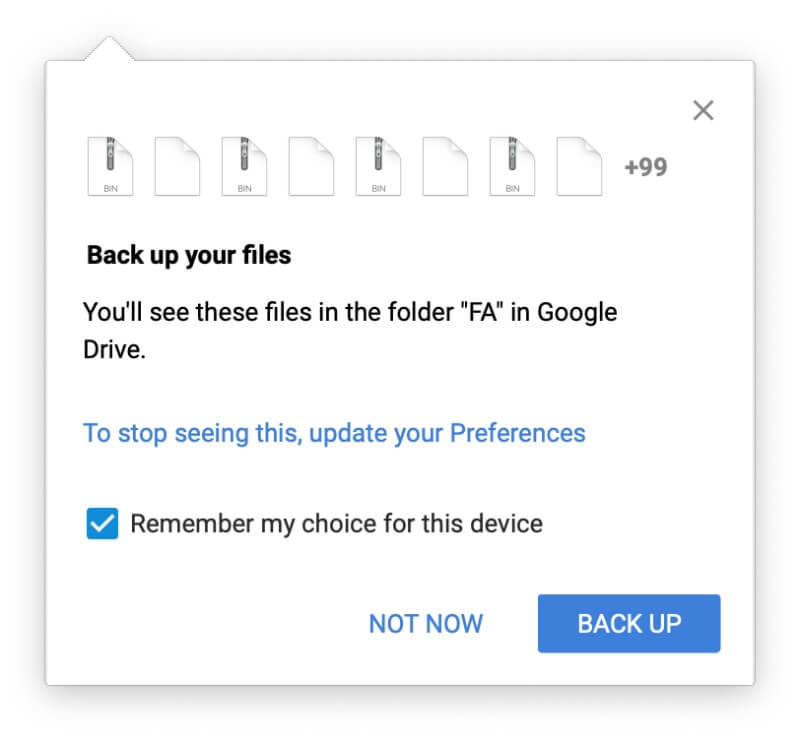
Click Back Up. Your files will be first copied to your computer, then uploaded to the web from there. That’s all you need to do—your card will be automatically backed up next time you insert it.
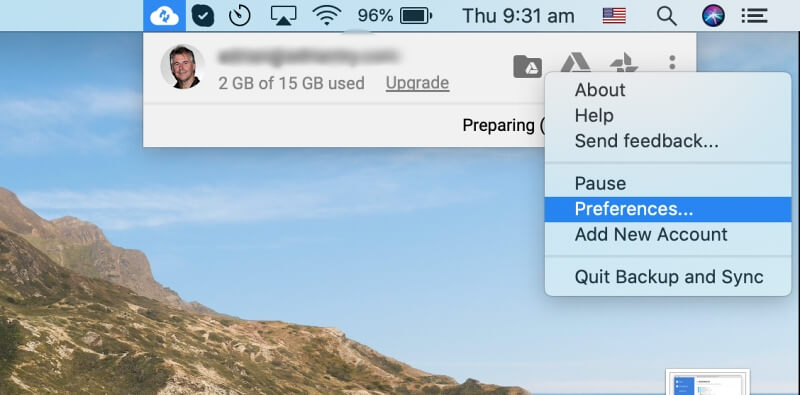
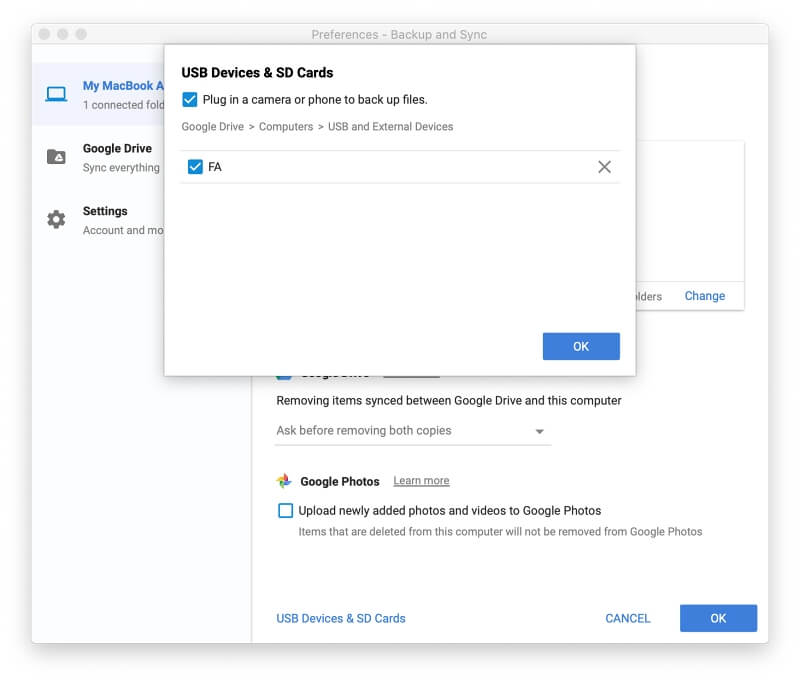
What if you previously clicked on Not Now, and the app has stopped offering to perform a backup? You can change that setting manually. Click the app’s icon in the menu bar, then click Preferences.
Click on USB Devices & SD Cards at the bottom of the window.
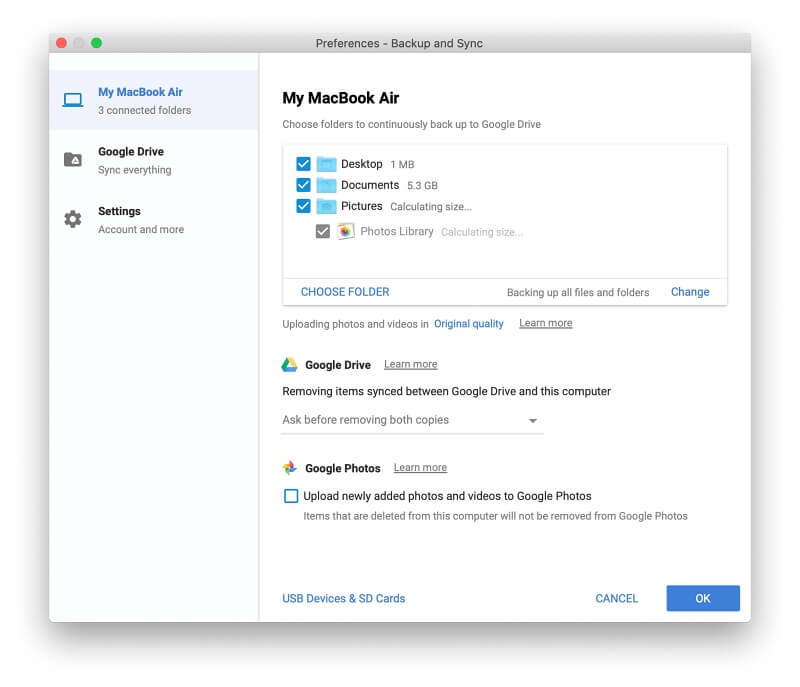
Finally, check the box for the SD card you wish to back up.
Using the Google Drive Mobile App on Android
The Google Drive mobile app is available for iOS and Android, but only the Android app is suitable for creating a backup of your SD card. Here’s how to do it:
- Open the Google Drive app
- Tap the “+” (plus) icon at the bottom right of the screen and select Upload
- Navigate to the SD card and select the files and folders you want to back up
- Tap Done
Using the Files App on iOS
Unfortunately, the Google Drive app for iOS won’t allow you to select multiple files, so it isn’t suitable for backing up your SD card. Instead, use Apple’s Files app.
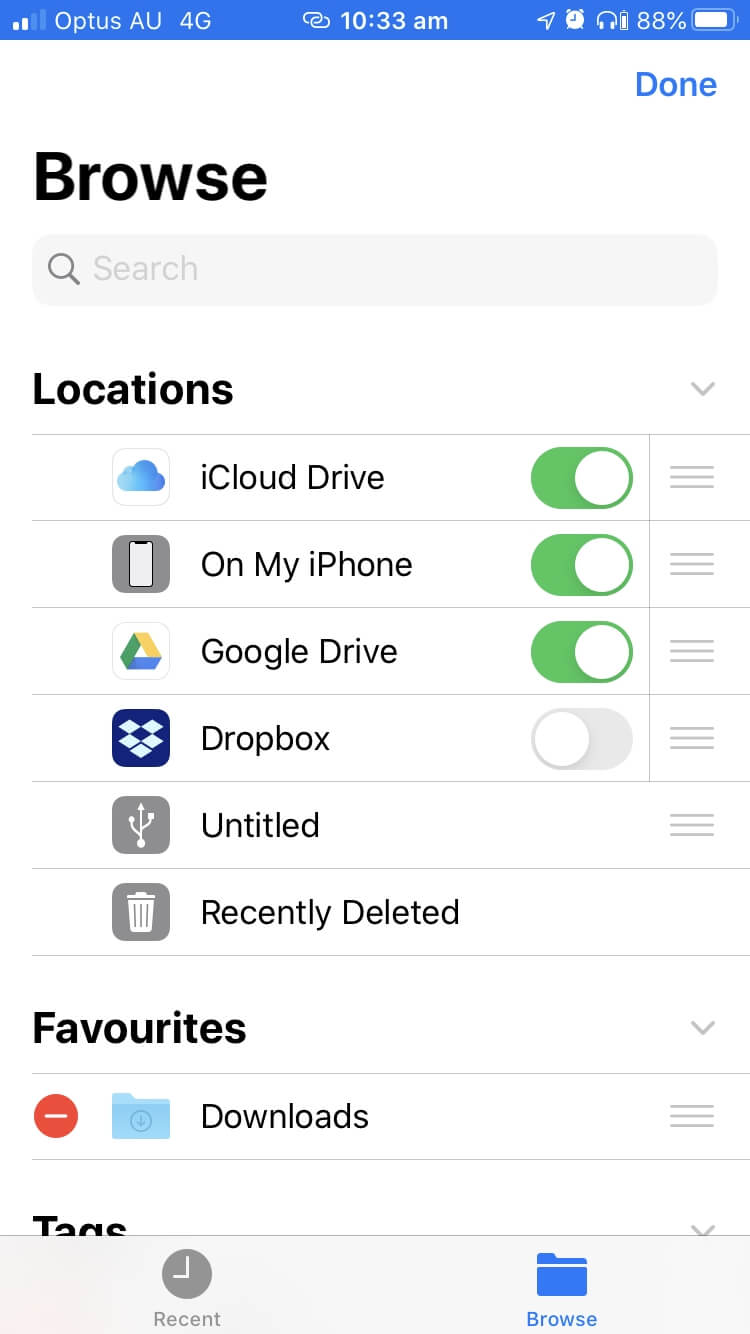
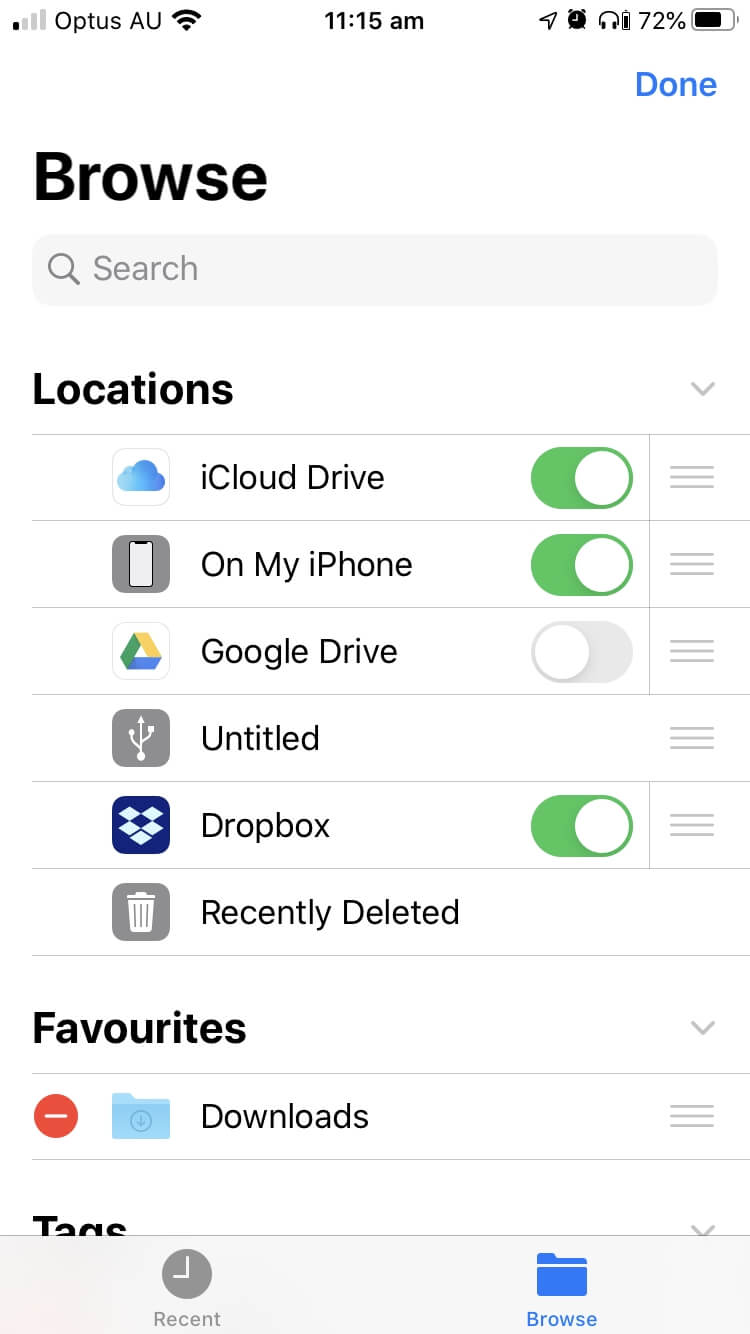
First, make sure that the app can access Google Drive. Tap on Browse at the bottom of the screen.

Then tap the Settings icon (the three dots) at the top right of the screen and select Edit.
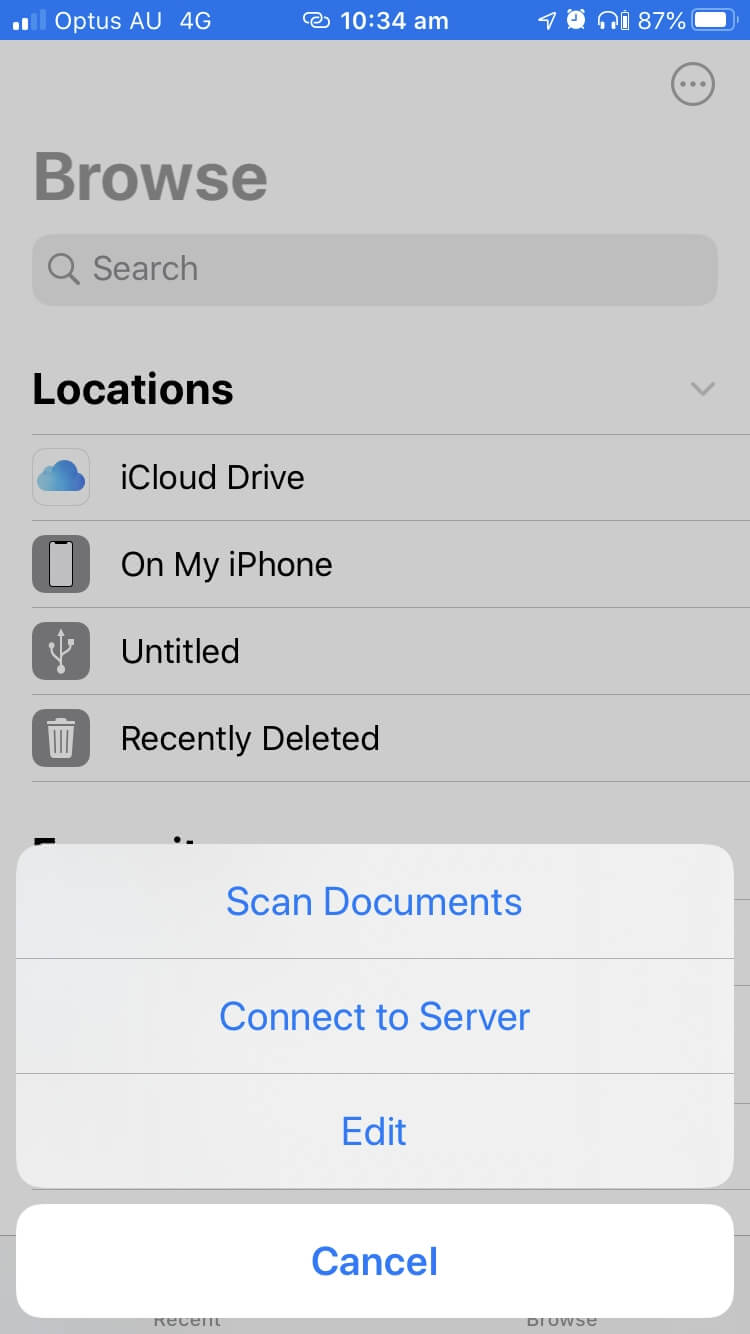
Make sure Google Drive is enabled, then click Done.
Next, we need to back up the SD card. Navigate to it.
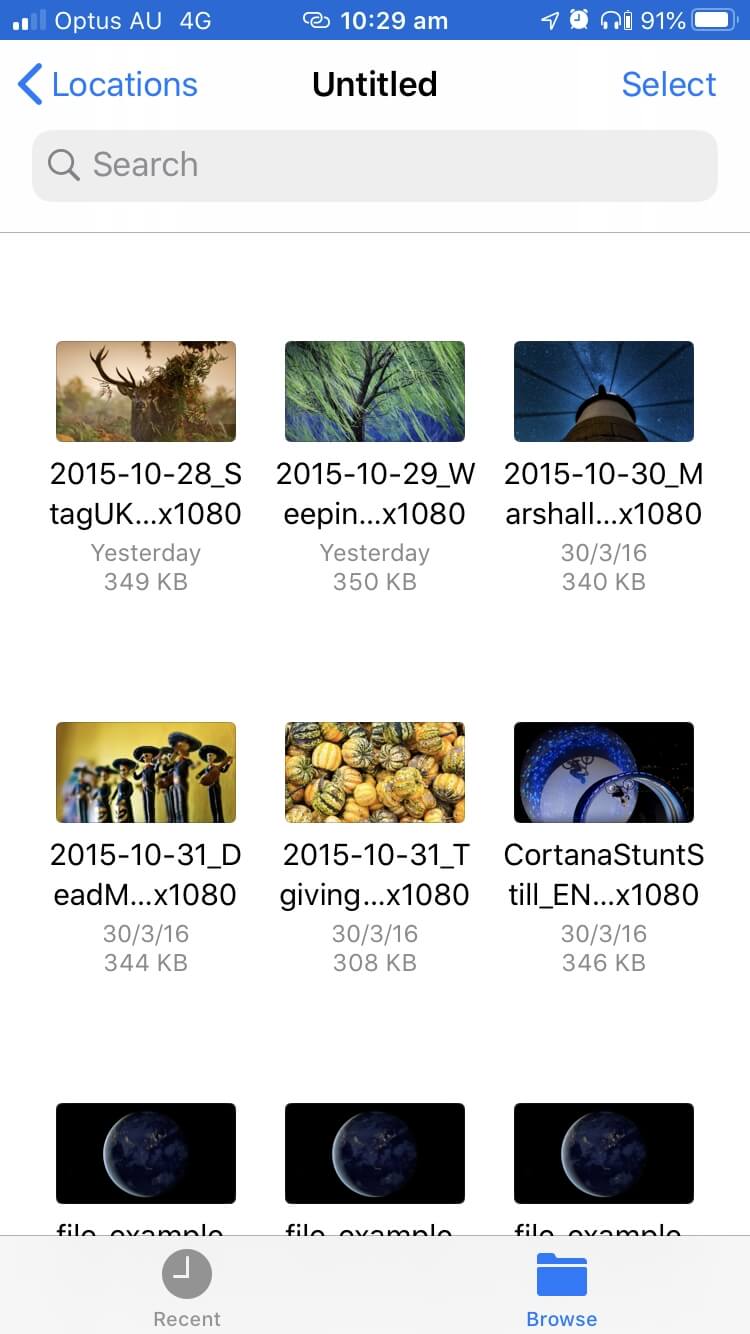
Select all of the files and folders by tapping on Select, then Select All.
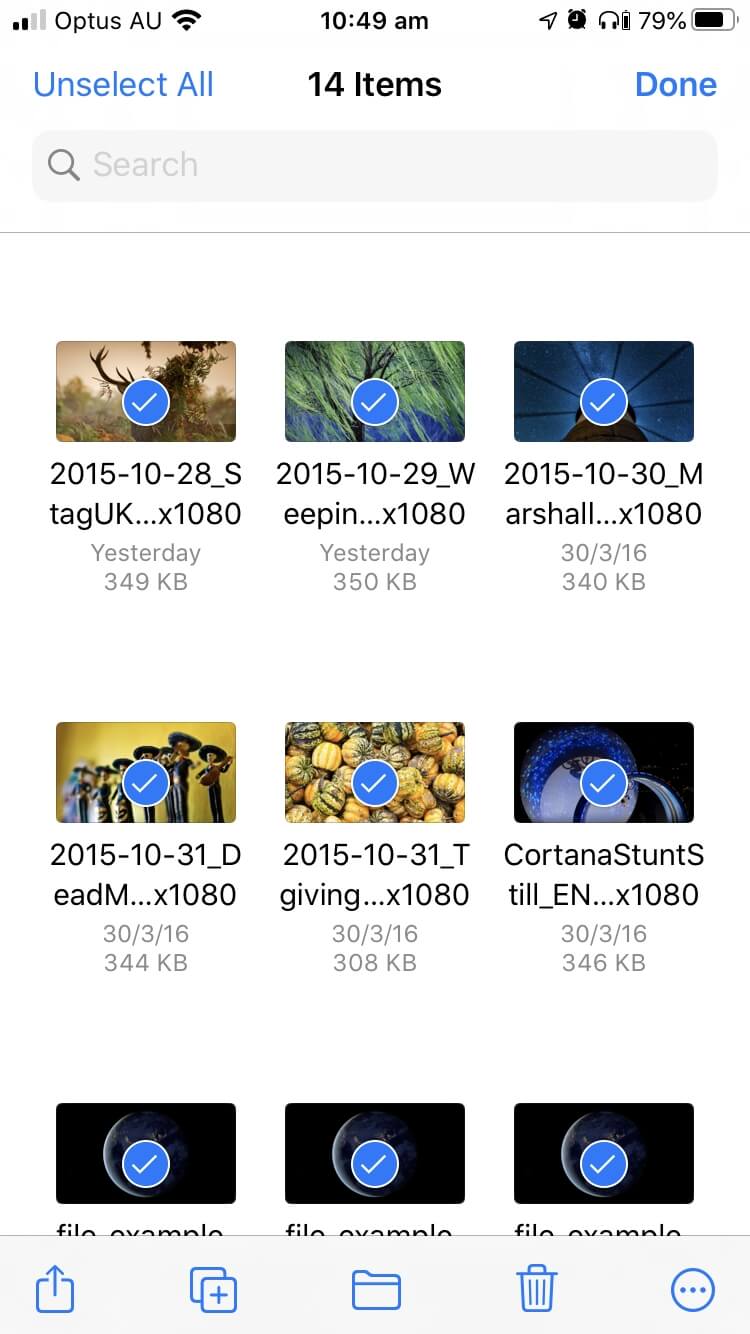
Tap on the folder icon at the center of the bottom of the screen.
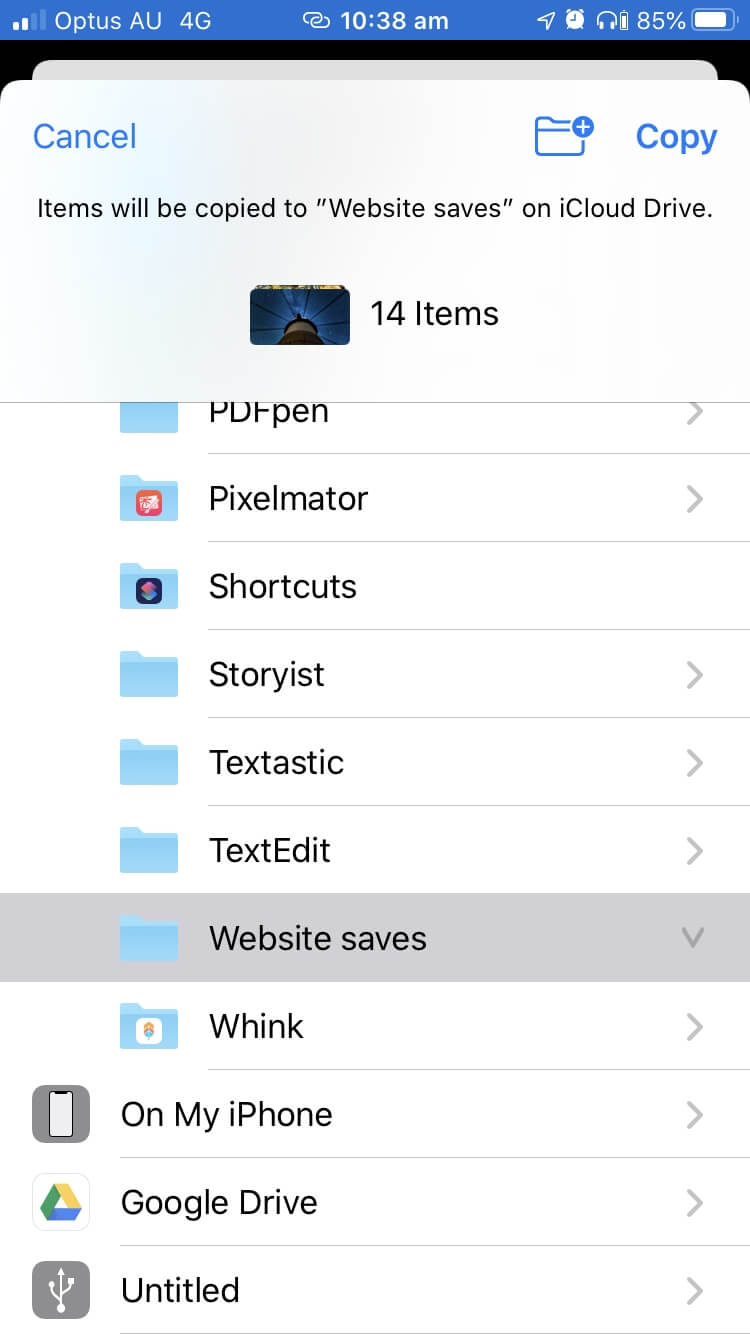
Navigate to Google Drive, then the folder you want to back up into. Create one if necessary.
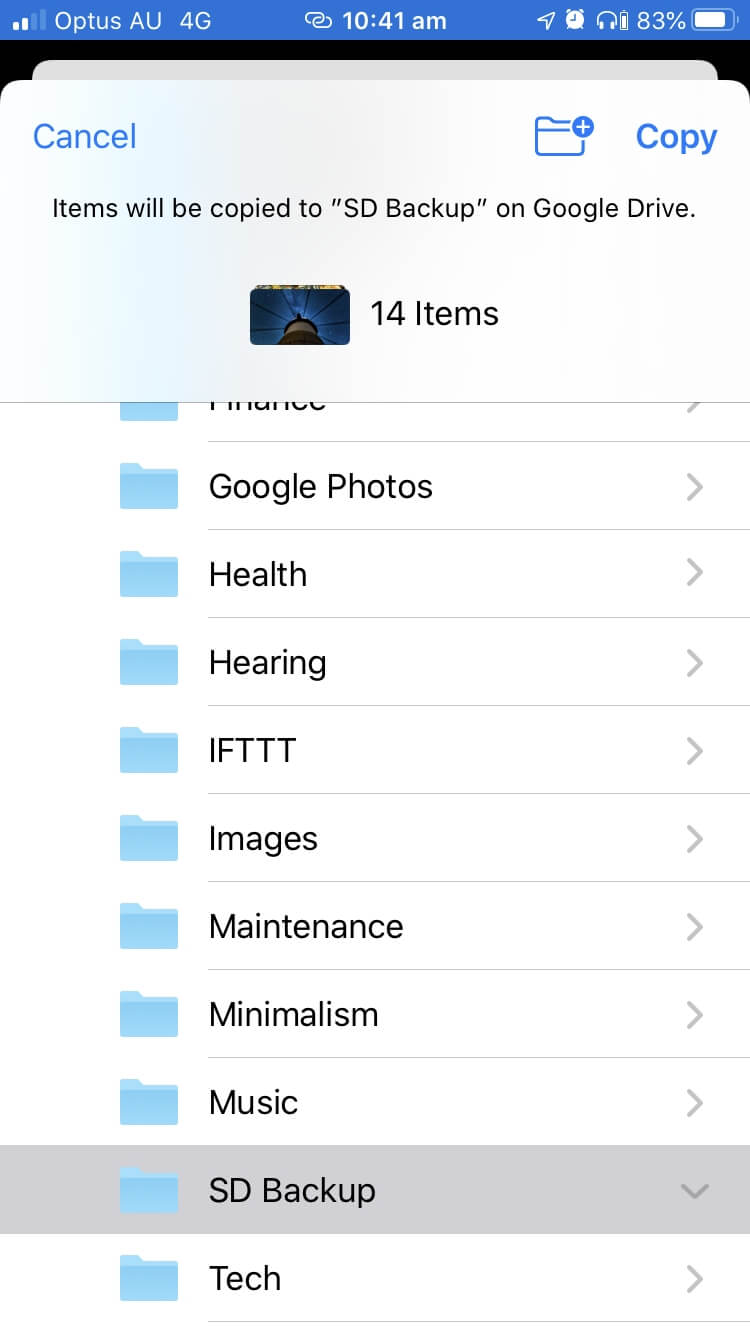
Finally, tap Copy. Your files will be uploaded.
Back up to Dropbox
Using the Dropbox Folder on Mac and Windows
The quickest way is to copy your SD card’s contents to Dropbox to simply drag them into your Dropbox folder on your computer. Just follow the steps on how to back up to your computer above. From there, they will be uploaded to the cloud automatically.
Using the Web App on Mac and Windows
Alternatively, you can use the Dropbox web app. This is especially convenient if you’re using someone else’s computer.
Log in to the Dropbox website and create a new folder for your backup.
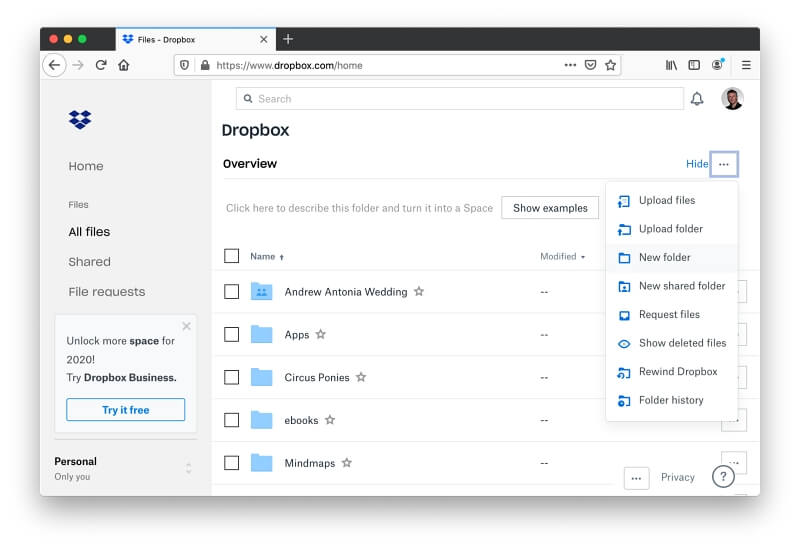
Ignore the menu entries for Upload File and Upload Folder—these will only upload a single item at a time. Instead, use drag and drop. Open your SD card, select all the files and folders, and drag them into the desired Dropbox folder in your web browser.
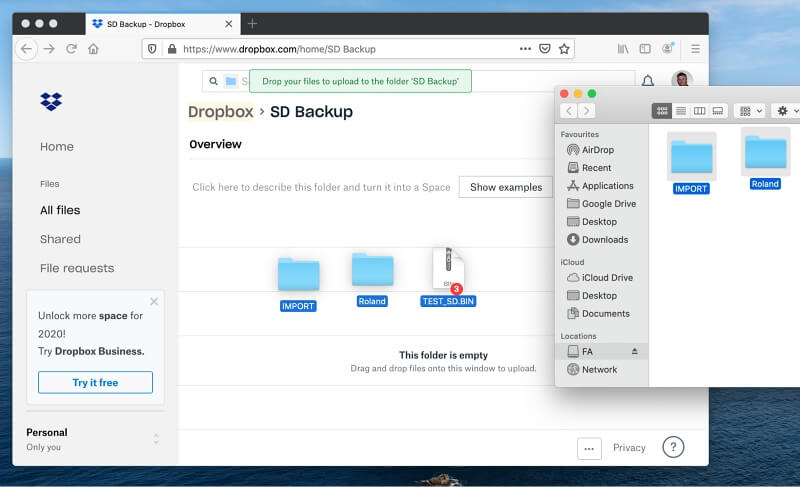
The selected files and folders will be uploaded.
Using the Dropbox Mobile App on Android
Dropbox offers mobile apps for iOS and Android, but (as was the case with Google Drive) only the Android app is suitable for backing up your SD card. Unfortunately, the iOS app doesn’t allow you to select multiple files.
Here’s how to back up your SD card to Dropbox on an Android device:
- Open the Dropbox app.
- Tap the “+” (plus) icon at the bottom of the screen and select Upload files.
- Navigate to the SD card and select the files and folders you want to back up.
- Tap Upload.
Using the Files App on iOS
On iOS, use the Files app instead. The steps are the same as backing up to Google Docs above. Just make sure that Dropbox is enabled in the app.
Back Up to iCloud Drive
Copy Files to the iCloud Drive Folder on Mac and Windows
iCloud is tightly integrated into macOS, so backing up your files there is convenient—it’s the same as backing up to your computer. On a Mac, drag the contents of your SD card into iCloud Drive in Finder. They will be uploaded to the cloud automatically from there.
Alternative: If you’ve chosen to store your Desktop and Documents files in iCloud, copying the files to one of those folders will also upload them to iCloud Drive.
Windows users can install iCloud Drive on their PCs. Once you’ve done that, copy the files from your SD card to the iCloud Drive folder on your PC.
Use the Files App on iOS
On iOS, use the Files app to back up your SD card to iCloud Drive. The steps are the same as for backing up to Google Drive above.
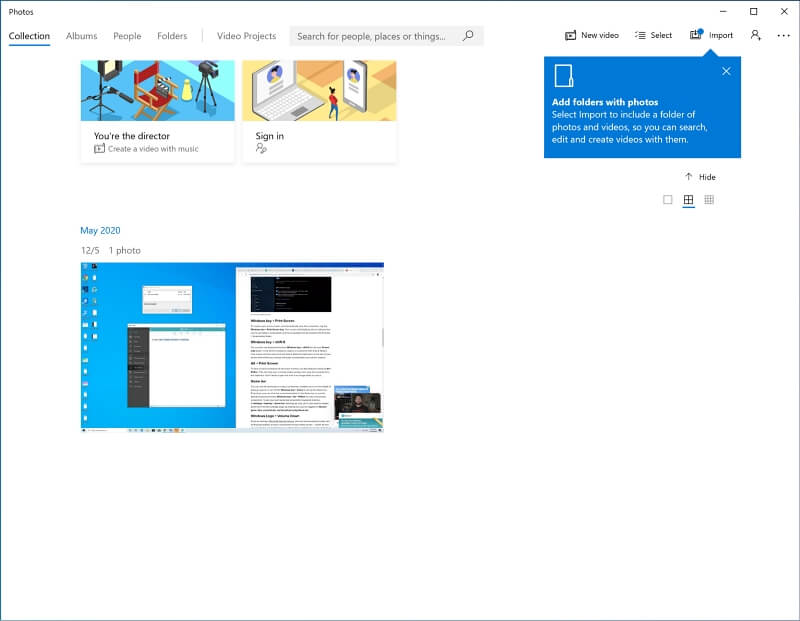
Method 3: Back up SD Card Photos and Videos
Most photo management applications can import photos and videos directly from an SD card. This is usually much quicker than importing them from your camera using a USB cable.
One photographer found that it took 45 minutes to transfer the contents of a 32 GB card by connecting his camera to his PC with a USB cable. Transferring them directly from the SD card will only take a few minutes, and you won’t have wasted 45 minutes of your camera’s battery.
Import to the Apple Photos App
On Mac
Open the Apple Photos app, then select File/Import from the menu.
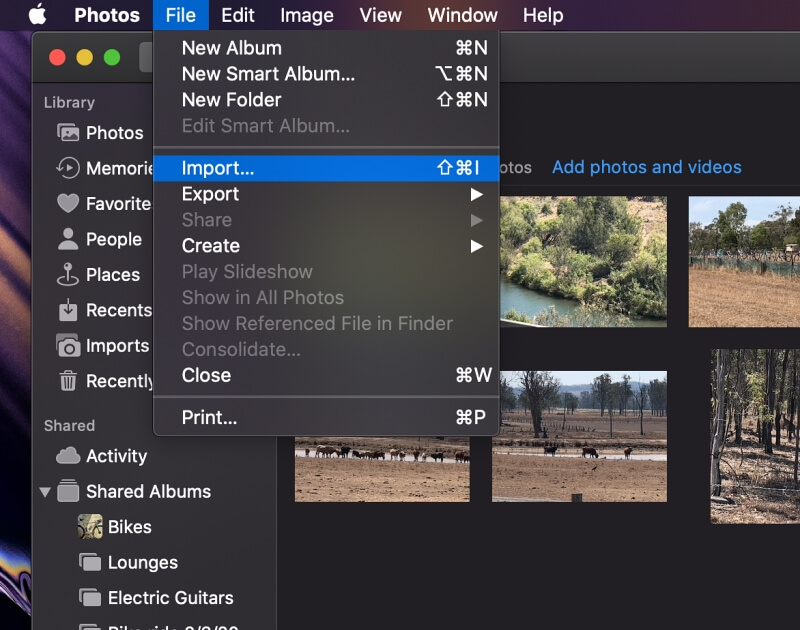
Select your SD Card from the left navigation bar. The one used in the example below is called Untitled.
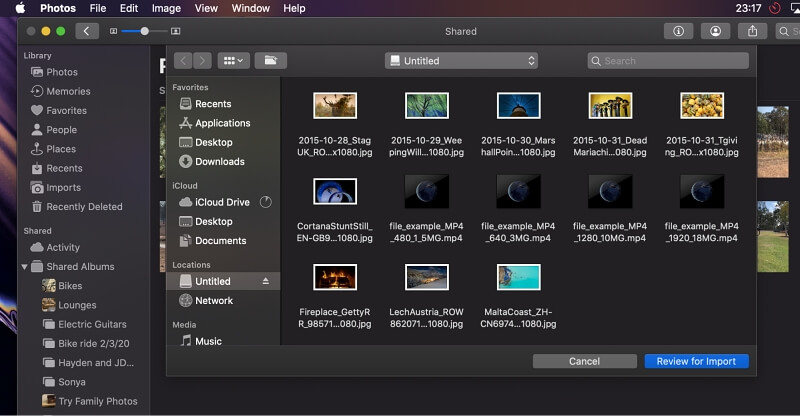
Click on Review for Import.
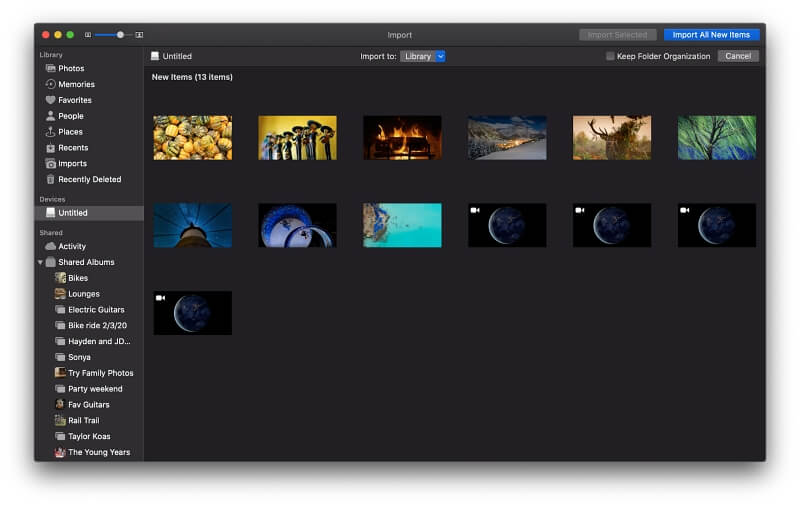
To import any new photos and videos (that haven’t already been imported into Photos), just click on Import All New Items.
They will be added to your Photos library. The files will still be on your SD Card as well, so you will need to delete them manually if you’d like to free up space to take more photos.
In iOS
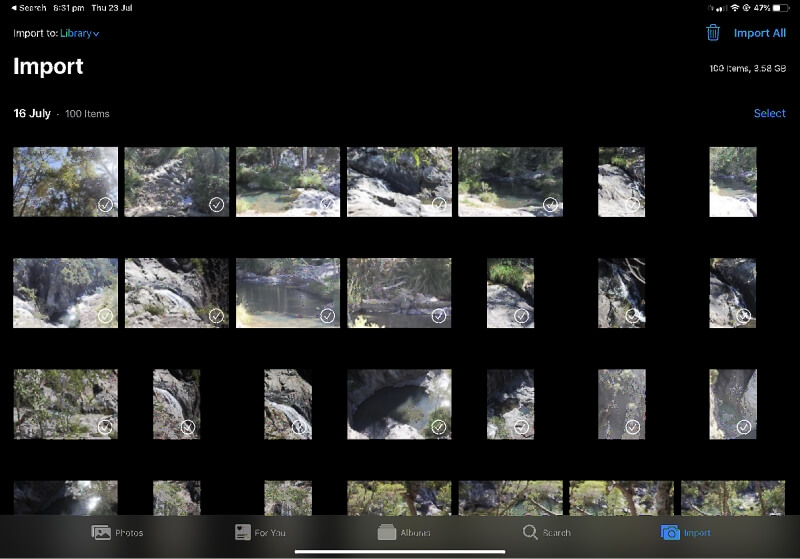
While older versions of iOS will automatically pop up a message offering to import your photos, recent versions do not. Instead, open the photos app. You’ll see an Import button at the bottom of the screen.
Open the Photos app. Once a digital camera’s SD card is inserted, you’ll find an Import button at the bottom of the screen. Tap it, then tap the Import All button at the top of the screen.
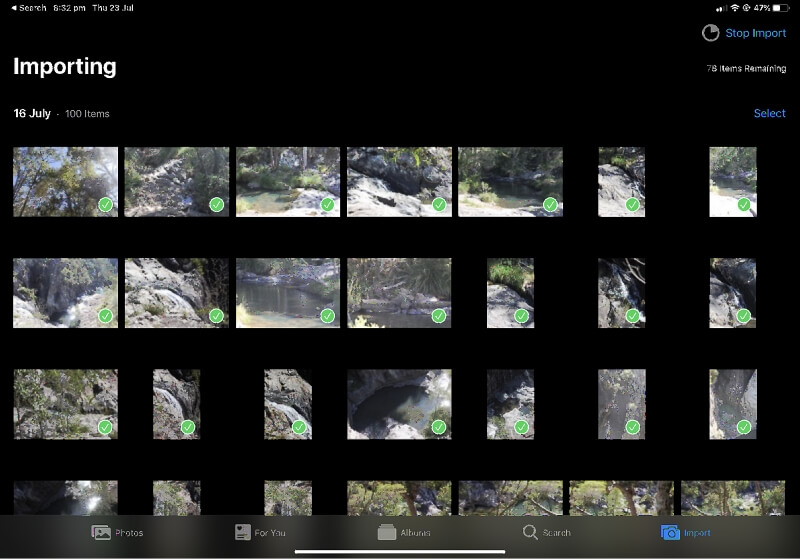
The photos will be imported.
Once this has been done, you’ll be asked whether you want to delete the photos from the SD card.
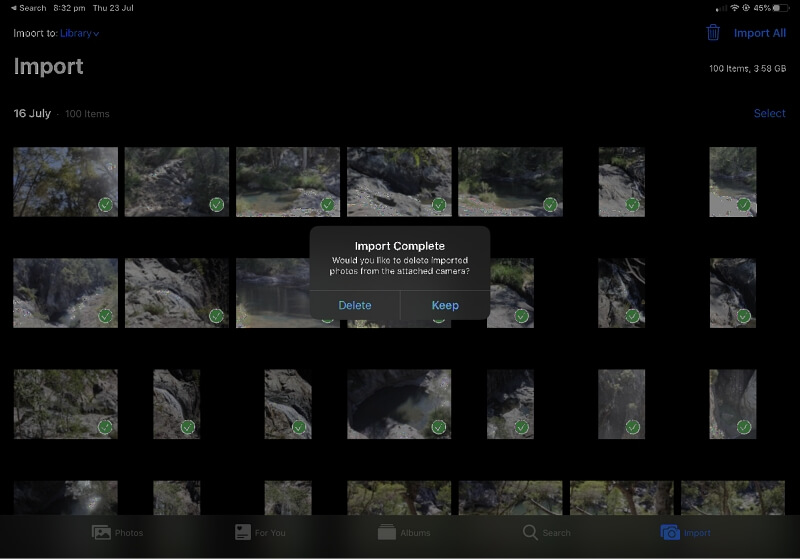
Often you’ll want to choose Delete to free space on the card for more photos.
Note: The iOS version will only import photos that were saved by a digital camera. These will be located in the DCIM (Digital Camera IMages) folder and have names similar to “IMG_1234”. If you have huge numbers of photos on the drive, it may take some time (even minutes) before iOS can process them. In the meantime, you’ll see a message that says, “No photos to import.” Be patient.
Import to Windows Photos
When you insert an SD card into a PC, Windows will pop up a message notifying you that it has been recognized.
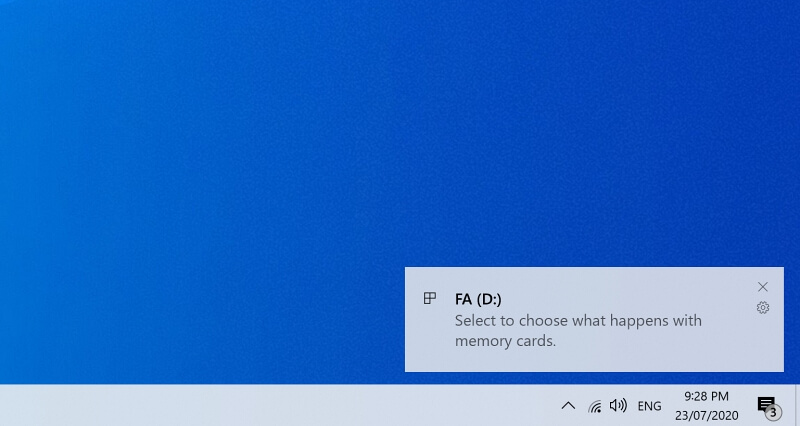
Clicking on that notification will pop up another message that allows you to choose what happens next.

Click on Import photos and videos to add them to Windows Photos.
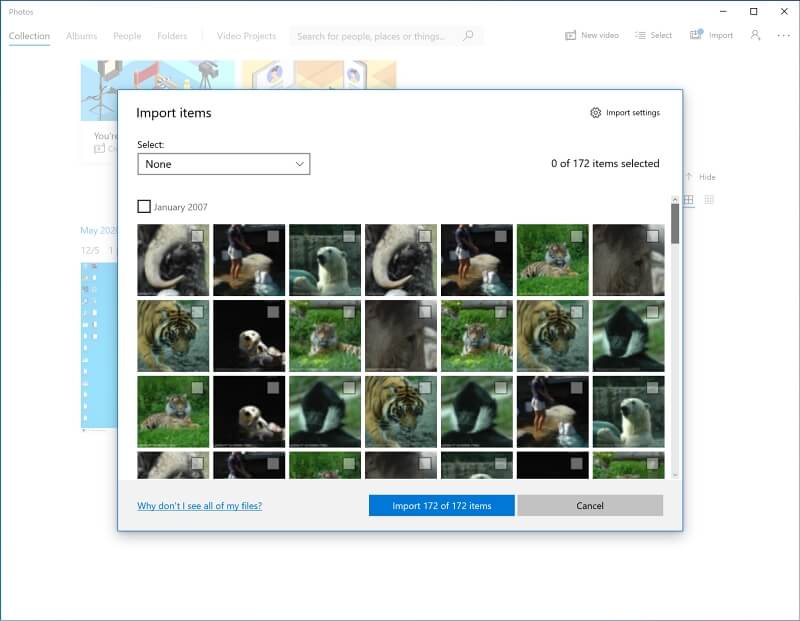
You can also import the photos manually. Open the Photos app. You’ll find the Import button at the top right of the window.
Click Import and select From a USB device.
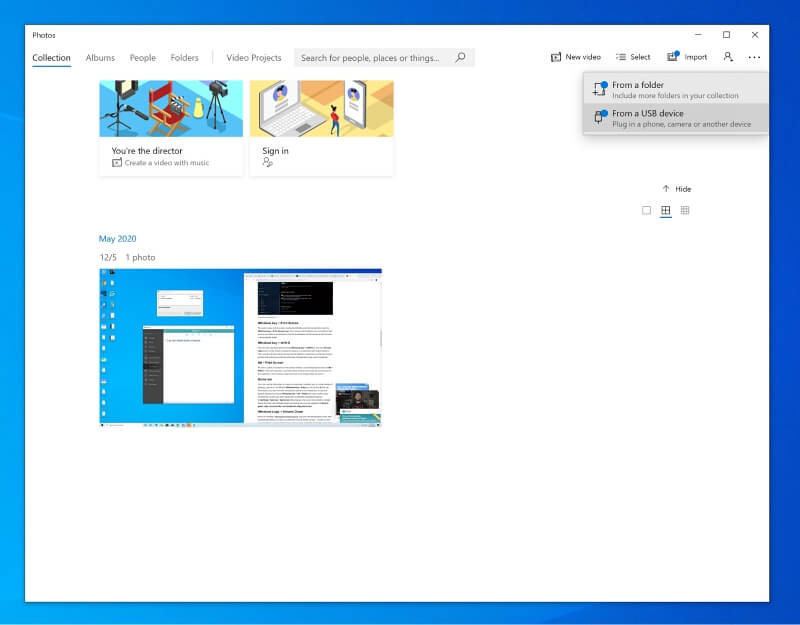
Click the Import button at the bottom of the window, and your photos will be added to Windows Photos.
Import to Google Photos
Google Photos lets you store an unlimited number of photos for free as long as you’re willing to have the resolution reduced. Those photos won’t count towards your storage quota. Alternatively, you can store photos in their original resolution, though this will reduce your available storage.
Using the Backup and Sync App on Mac and Windows
We’ve already seen that Google’s Backup and Sync app for Mac and Windows can automatically back up the contents of your SD card to Google Drive. In the app’s Preferences, there’s a setting to back up any photos to Google Photos as well.

Using the Google Photos Mobile App on Android
Here’s how to add photos to Google Photo on Android:
- Open Google Photos.
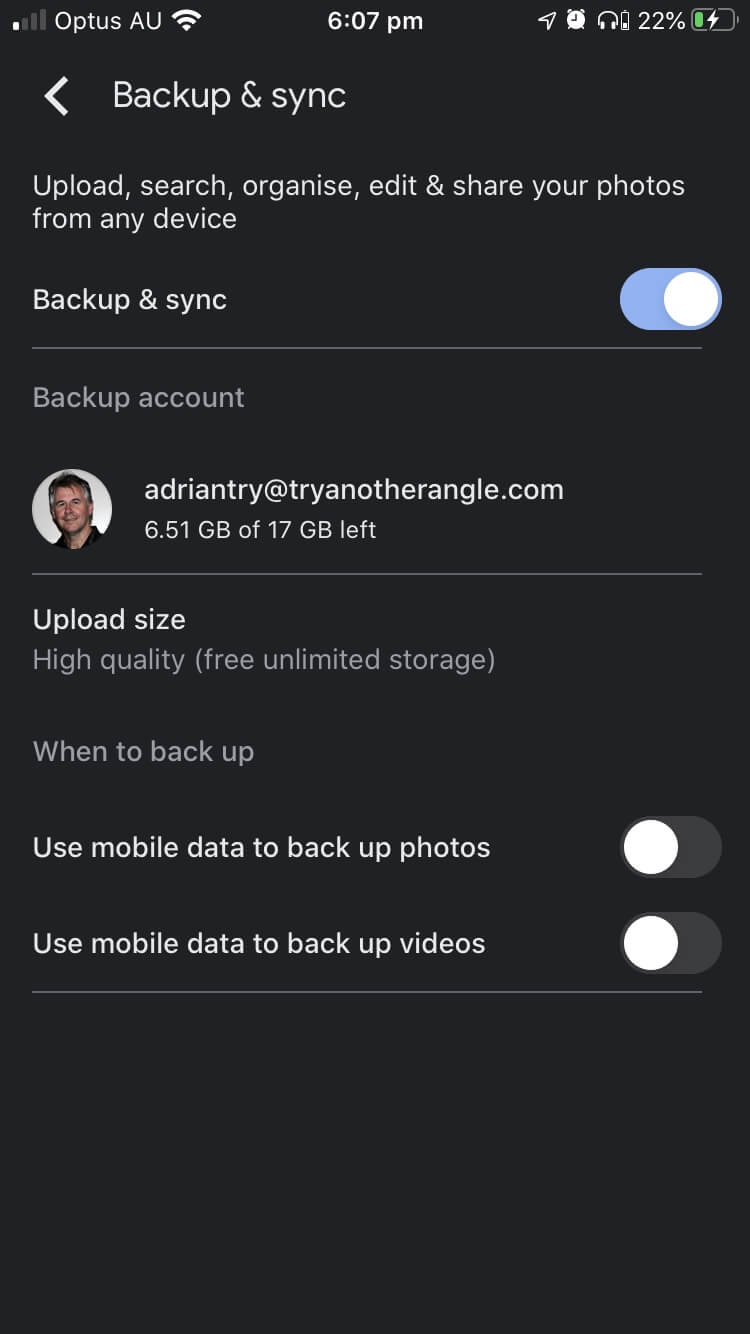
- Tap the menu button at the top left of the screen. Select Settings, then Back up & sync.
- Tap Choose folders to back up… and select the folders on the SD card that you want to import.
Using Apple Photos On iOS
The Google Photos iOS app can only import photos from your camera roll, not directly from your SD card. You’ll need to first import the photos into Apple Photos (see above), then set up Google Photos to back them up by enabling the Backup & sync setting.
If you’re a professional photographer or keen amateur, you probably don’t want your photos to be compressed. If that’s the case for you, consider using Google Drive (see above) rather than Google Photos.
Adobe Lightroom
Adobe Lightroom is a professional photo management tool. You can set it up to automatically initiate an import whenever you insert an SD card:
- Open the Import Options in Lightroom’s settings
- Check “Show import dialogue when a memory card is detected”
Alternatively, you can start an import manually each time by selecting File > Import Photos and Video… from the menu. From there, follow the prompts to decide how they are imported. Refer to Adobe’s user guide for further information.
Dropbox Camera Uploads
Dropbox offers an option that will automatically upload photos from your SD card or camera. It will create a folder called “Camera Uploads” on your computer. Your photos will first be copied there, then uploaded to Dropbox.
On Mac and Windows
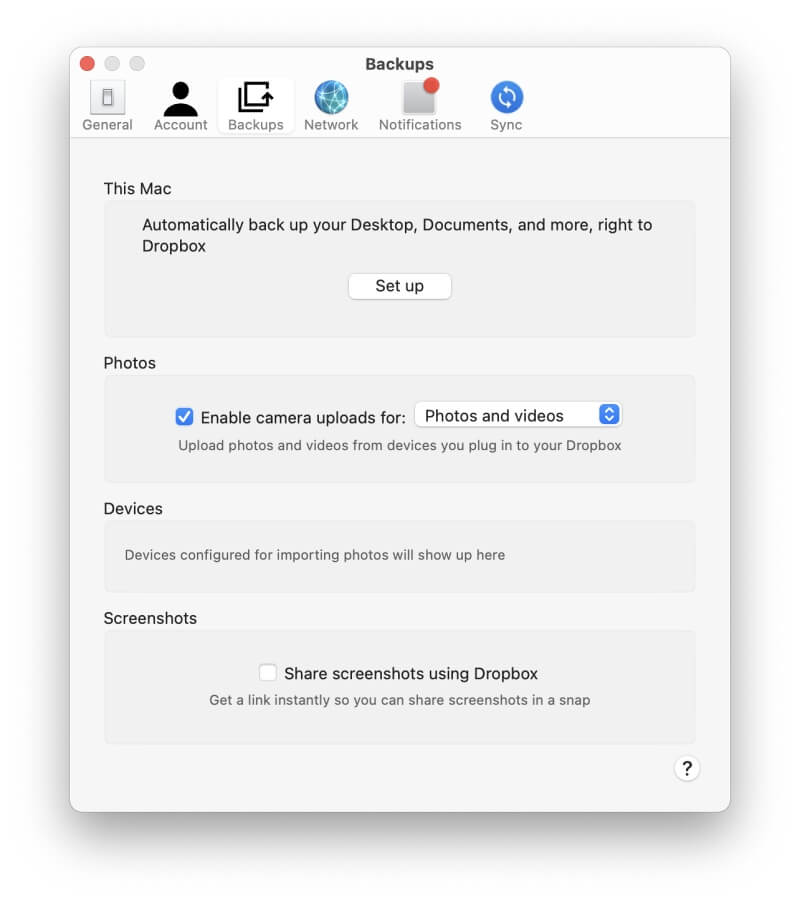
Click the Dropbox icon on the menu bar, then click your Avatar and select Preferences…
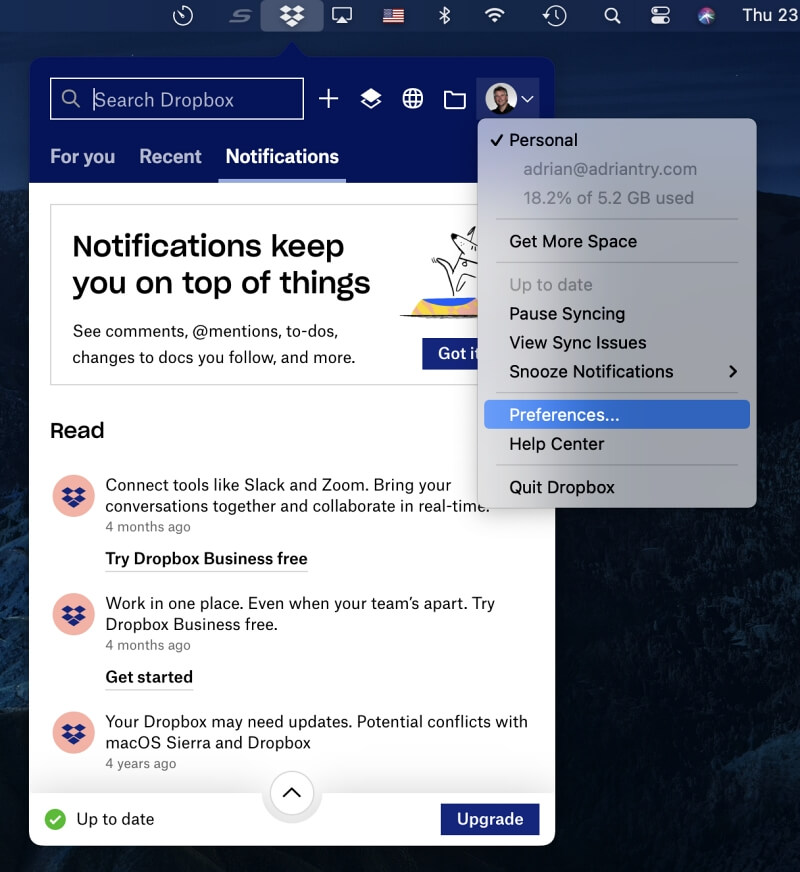
Check the Enable Camera Uploads box and choose to upload both photos and videos, or just photos.
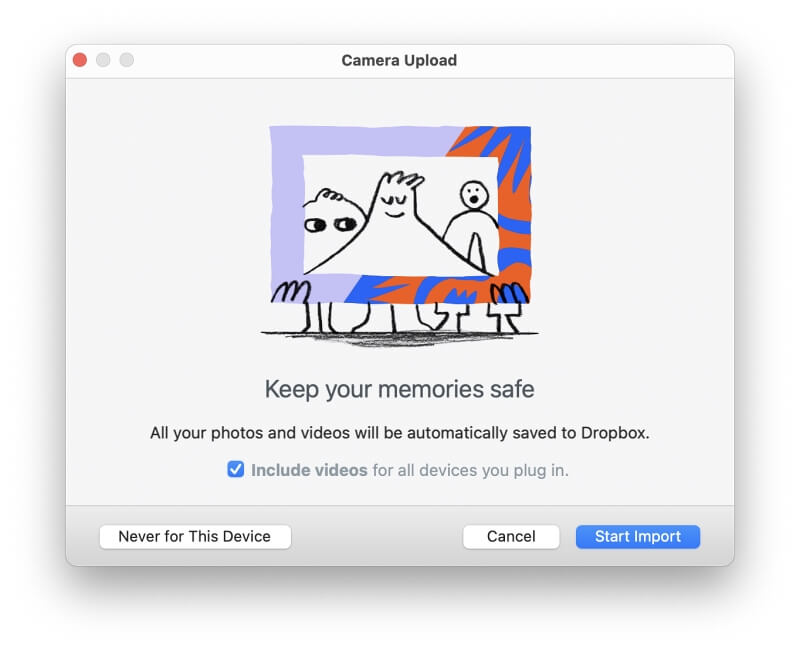
Next time you insert your SD card, a dialog box will pop up asking if you would like to import the photos and videos from the card to Dropbox. There’s a checkbox that will allow Dropbox to import them from all the devices you attach to your computer in the future.
On iOS and Android
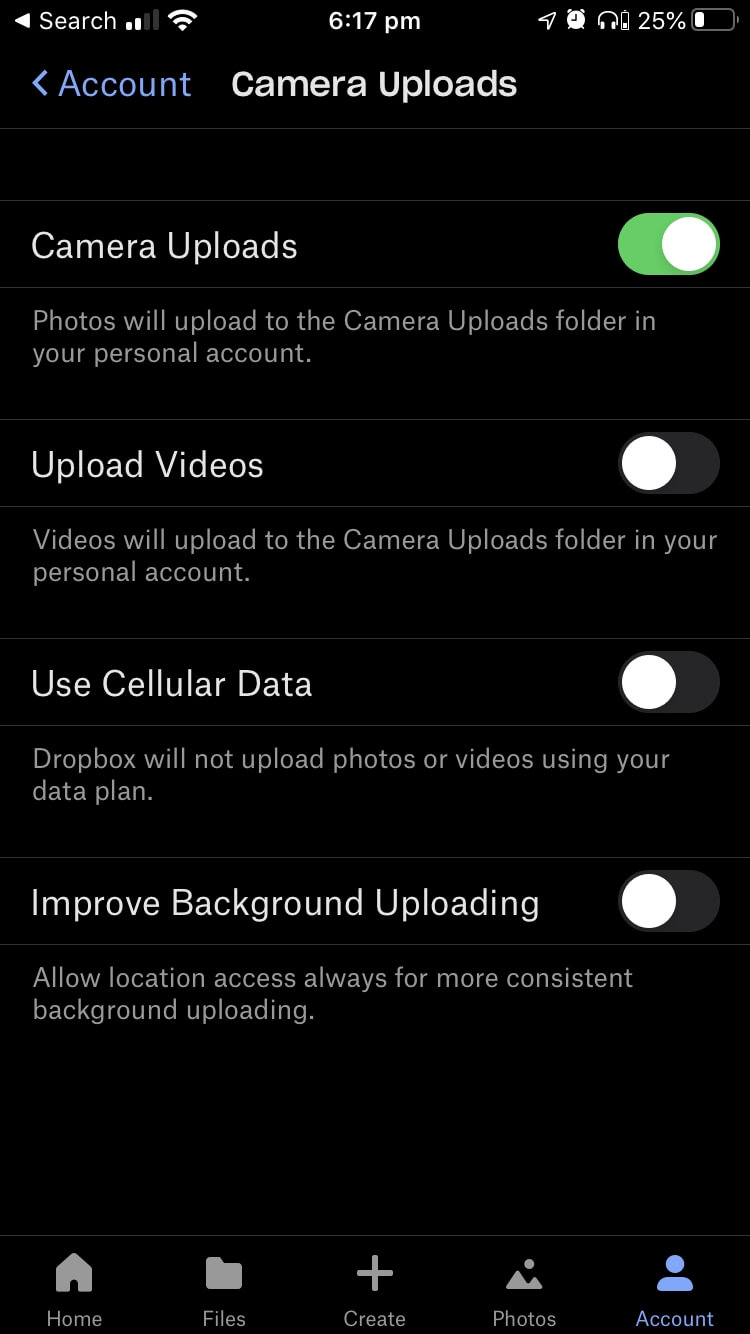
Here’s how to enable camera uploads in the mobile Dropbox app. Open the Dropbox app and tap Account at the bottom right.
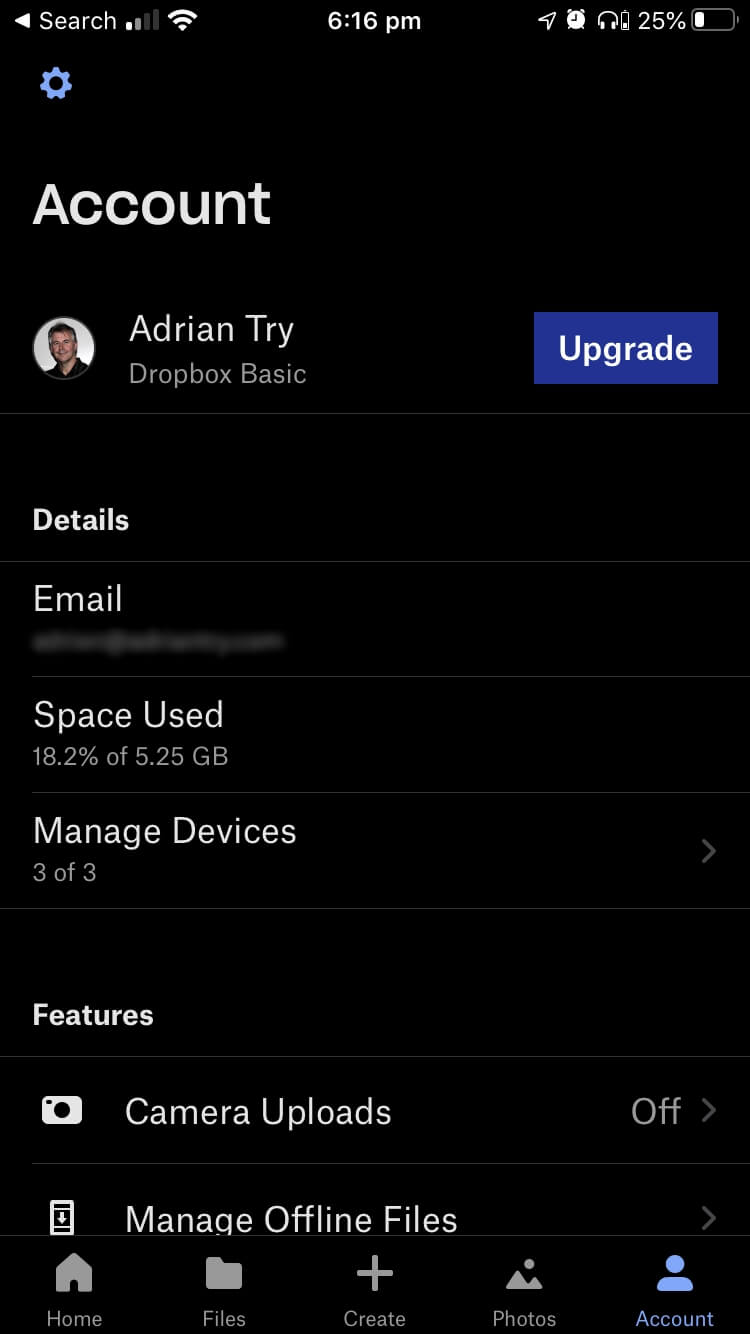
Tap Camera Uploads.
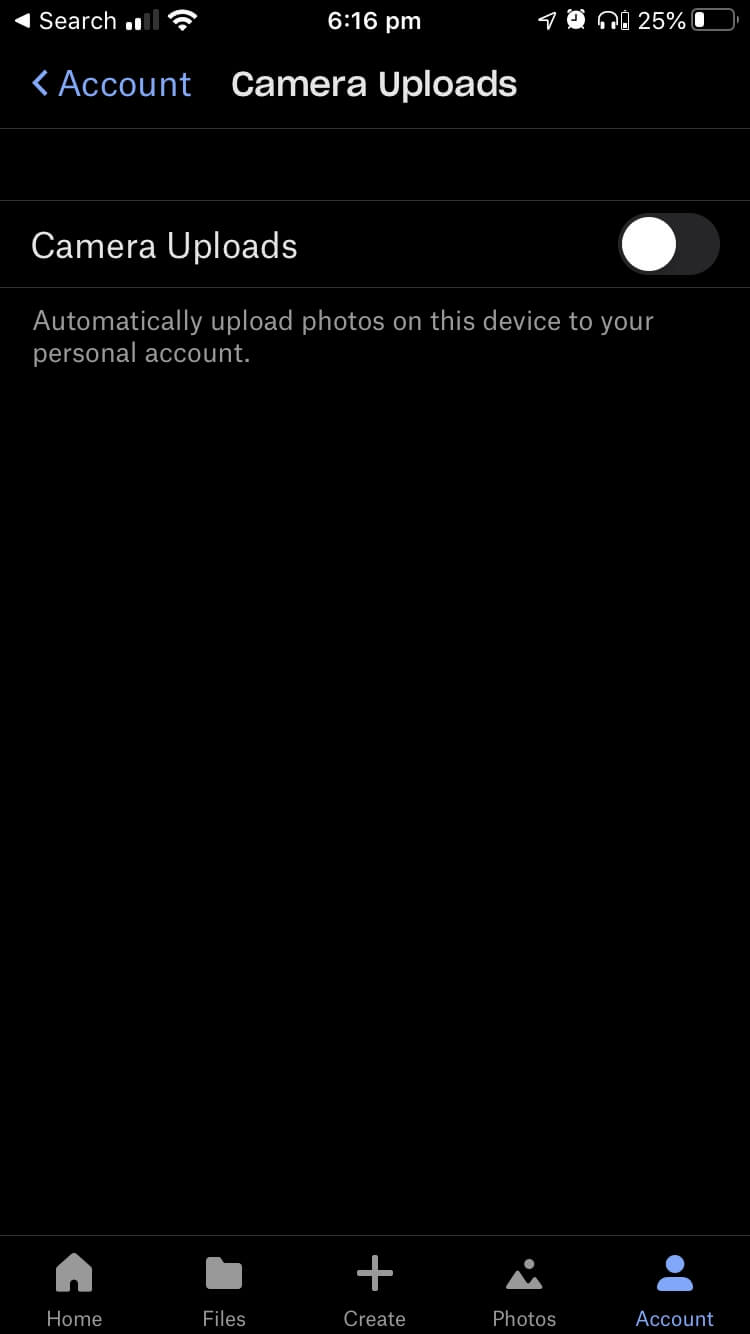
Turn Camera Uploads on and select the options you would like to use.
That’s it for this comprehensive guide. Which method did you choose to back up your SD card data? Let us know in the comment.