
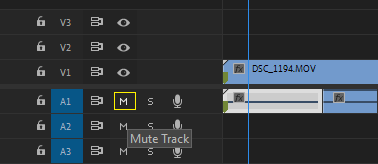
If your audio is not playing in Premiere Pro, check if your audio track layer is not muted in your Timeline in Adobe Premiere Pro. If it’s muted, you can unmute and mute the audio track by clicking the “M” on your audio layer.
I am David, a professional video editor. I have been using Adobe Premiere to edit audio and videos for decades.
In this article, I will explain some possible reasons why your audio is not playing, fix why the audio waveform is not showing, and let’s get on with it.
Table of Contents
How to Unmute the Audio Track via Audio Effects Panel
Unmuting audio in Adobe Premiere Pro is essential for any video project. It can be tricky to figure out how to do it, but with a few simple steps, you can play your sound in no time.
For new users, unlocking audio in Adobe Premiere Pro requires some understanding of the various tools and functions available. Here’s what you need to know to unmute sound successfully on your software.
Now, select the clip containing the muted audio, go into the Audio Effects Control Panel, and click on Audio Gain.

Increase or decrease this number until you reach your desired volume level, and make sure that “Mute” is not selected under Volume Controls. Once these steps are completed, press Play on the preview window and adjust according to preference until it sounds right!
In Adobe Premiere Pro, you can mute an audio track by clicking on the “mute” button in the audio track header. To unmute the audio track, click the “mute” button again.
How to Unmute The Audio Track via Timeline Panel
Select the track by clicking on it in the timeline; you will see so many things there – unlock icon, A1, unlink icon; M, which stands for mute; S, which stands for Solo; and the microphone icon.
Now, If the M is in yellow, it is muted, but if it has no highlighted color, it’s not muted. The speaker icon should now be highlighted, indicating that the audio track is unmuted.
Audio Hardware Preferences
This feature allows users to ensure that their system meets the minimum specifications for optimal performance when using Premiere Pro. Checking hardware preferences in Adobe Premiere Pro can be done in a few simple steps.
Open the program’s preferences menu by going to Edit > Preferences. From there, select “System” and then click on the “Hardware Preference” tab.
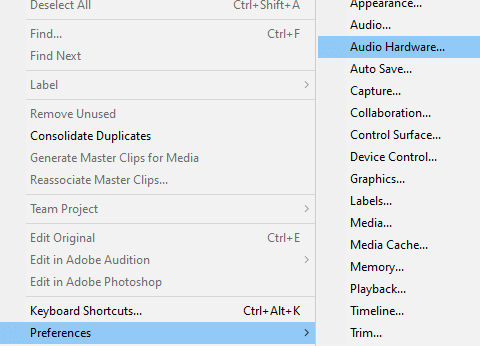
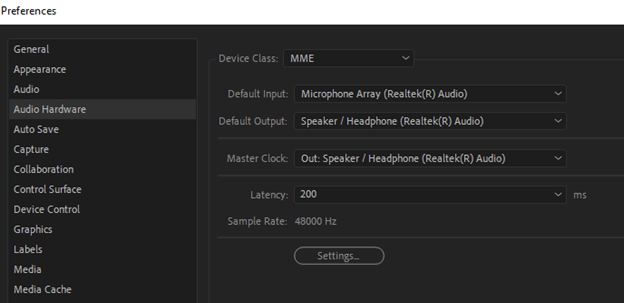
Here you will find several options that allow you to specify what type of hardware your computer should use for optimal performance with Adobe Premiere Pro. In Premiere Pro, make your selected device the default input device. Select Audio Hardware > Default Input from the Preferences menu.
Audio Waveform Not Visible in Adobe Premiere Pro
The audio waveform can be used to monitor your sound; you can use the level, the rise, and the fall of the sound to edit the audio. But if you can’t see this waveform, how do you want to work with your audio? It’s not just possible.
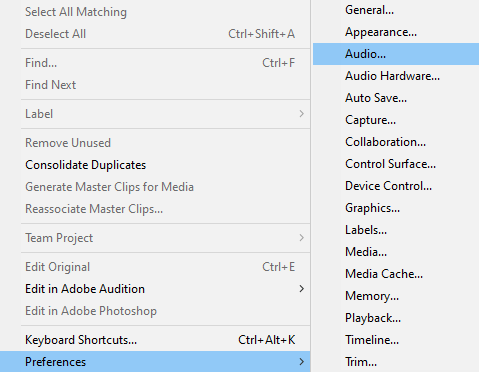
To enable or make your waveform display, go to Edit > Preferences > Audio and check the “Automatic audio waveform creation” box.

When you uncheck this box, waveforms are created when you import files; This does not affect previously imported clips; it only affects clips imported from now on. So, if you want to see the waveform of the existing audio files, delete and import them again.
Conclusion
It can be challenging to figure out why audio is not playing in Adobe Premiere Pro. However, by following the troubleshooting steps outlined in this article, you should be able to identify and address the issue.
It is important to remember that problems with audio could have several causes, so it is essential to take the time to go through each potential solution methodically.
Additionally, if none of the provided solutions work, it may be necessary to contact Adobe support for assistance or drop your question in the comment box below.