
Your Adobe Premiere Pro is so slow it weakens you; fret not, I got a solution for you. You can delete the media cache, turn on GPU, set low playbacks, mute fx, and render preview.
I am David, a professional video editor, using Adobe Premiere Pro for the past few years. I use Windows PC, and this article provides steps for Windows; I believe it’s the same process for Mac users.
In this article, I will explain why Adobe Premiere Pro’s performance happens to be slow and how to make it faster.
Table of Contents
- Why Your Adobe Premiere Pro is So Slow
- How to Delete The Media Cache in Adobe Premiere Pro
- How to Turn on GPU Acceleration in Adobe Premiere Pro
- How to Set Low Playback in Adobe Premiere Pro
- How to Mute FX in Adobe Premiere Pro
- How to Disable Unused Clips In Adobe Premiere Pro
- How to Render A Preview Video In Premiere Pro
- Conclusion
Why Your Adobe Premiere Pro is So Slow
Adobe Premiere Pro is one of the most powerful video editing programs available, yet it can also be surprisingly slow sometimes. One of the primary reasons for this is that Premiere Pro uses a lot of memory and processing power to render its real-time effects.
If you are editing videos with large files or multiple layers, you can expect long render times and increased strain on your machine.
Additionally, if your computer’s hardware isn’t quite up to snuff, such as an outdated processor or a lack of RAM, this would lead to even slower speeds while using Premiere Pro.
Likewise, a cluttered timeline can also cause performance issues in Premiere Pro since all elements require rendering time when added or adjusted during playback.
How to Delete The Media Cache in Adobe Premiere Pro
Do you need help with Adobe Premiere Pro’s media cache? If you need help with media cache files clogging up your hard drive, it can be challenging to figure out how to delete them. Getting rid of these pesky files is pretty straightforward.
Here’s a step-by-step guide on deleting the media cache in Adobe Premiere Pro to free up some space and keep your system running smoothly.
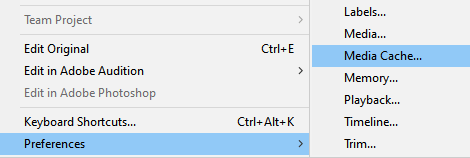
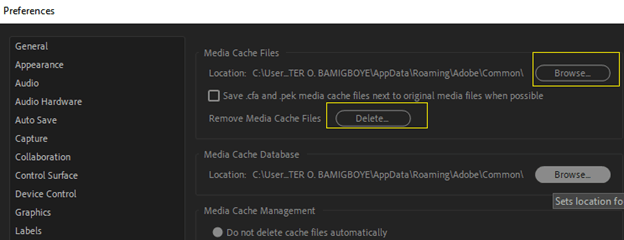
Go to “Preferences” from the “Edit” drop-down menu. Once there, select the “Media Cache” tab from the list of options along the left side of the window.
Your current media cache is saved on your computer; click Delete to remove them.
How to Turn on GPU Acceleration in Adobe Premiere Pro
Adobe Premiere Pro is the leading video editing software for professional filmmakers and digital content creators. It has a wide range of features and tools to help streamline the editing process, but GPU acceleration is one of its most powerful capabilities.
You can significantly improve performance in encoding, decoding video files, and rendering graphics-intensive effects by enabling GPU acceleration in Adobe Premiere Pro.
GPU acceleration accelerates specific processes in Adobe Premiere Pro by leveraging the power of a dedicated graphics processing unit (GPU); This allows Premiere Pro to offload some of its workloads onto the GPU – freeing up resources on your machine’s main processor for other tasks.
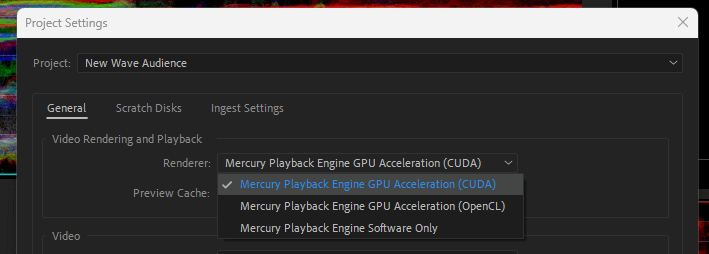
Enabling GPU acceleration in Adobe Premiere Pro is easy. Open the File menu > Project settings > General > Video Rendering and Playback.

Then, change the renderer to Mercury Playback Engine GPU Acceleration.
How to Set Low Playback in Adobe Premiere Pro
Low playback resolution allows you to preview and export your project at lower resolutions without affecting the quality or size of the final output; This will enable Premiere Pro to run smoother by reducing the strain on your computer’s processor and graphics card.
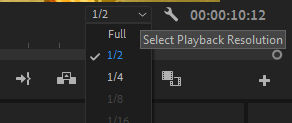
To change your playback resolution in Adobe Premiere Pro, select the Dynamic Quality option from the Settings menu in the screen’s upper-right corner. For playback, choose a lower resolution, such as 1:2 (half the resolution of the original content) or lower. Set the resolution for photographs that are paused.
You will see options to reduce playback to 1/2, 1/4, 1/8, or 1/16 of the native resolution depending on your clip size.
How to Mute FX in Adobe Premiere Pro
You can use this to turn off all effects in your sequence temporarily. Activate the FX button by pressing the plus (+) icon at the bottom right of the Program Monitor to open up the Button Editors.
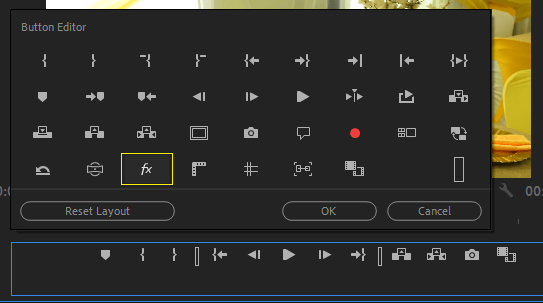
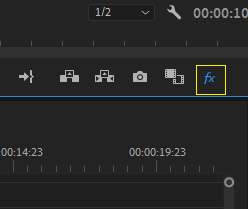
Click and drag the fx icon to the button panel. After that, press the FX button to toggle FX on or off.
How to Disable Unused Clips In Adobe Premiere Pro
To ensure that your editing process is as efficient as possible, it’s essential to disable any clips you’re not actively using. Here’s how to do it:
First, open up the timeline for the project you’re working on and select the clip you’d like to disable in Adobe Premiere Pro. Click on the eye before the video track you want to disable.
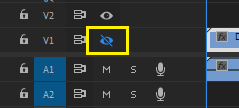
This will effectively remove it from your playback while keeping its contents intact so that you can re-enable them at any time.
How to Render A Preview Video In Premiere Pro
People frequently report slowness when playing back video productions in Adobe Premiere Pro. It might be because certain frames are skipped, or the transitions and effects are not working correctly.
If you’re experiencing the same problems, your video project requires rendering.
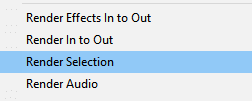
To render a video preview, select the area you want to render, then go to the sequence menu at the top to select render (Render Effects In to Out, Render In to Out, Render Selection, Render Audio).
Conclusion
Premiere Pro can be a very powerful and versatile tool for video editing. However, it is important to know what factors may cause Premiere Pro to slow down, as well as steps that you can take to help alleviate these issues.
By ensuring your hardware meets the minimum system requirements, keeping your media files organized in one central location, and updating your graphics card drivers regularly, you can take control of your video editing experience with Premiere Pro.