
Adding subtitles to your videos with Final Cut Pro is a relatively easy task and can help broaden your audience while enriching their viewing experience.
Many potential viewers of social media don’t or can’t watch videos with the sound on. A recent survey found that a whopping 92% of Americans watch videos with the sound off on their phones, and are much more likely to watch a video to the end if it has subtitles.
And because 1 in 8 American adults have hearing loss in both ears (source), it would be a shame to completely exclude a little over 30 million people from enjoying your film.
Similarly, adding subtitles in foreign languages can also broaden your audience to the world, though it does involve the additional step of translation.
But, speaking as a longtime video editor, I can tell you that captions sometimes play an important part in your story. For example, sometimes explaining what is on screen is a necessary part of the drama, or the joke. And sometimes a bit of dialogue is unfixable and adding a subtitle is just the Band-Aid needed.
Whatever the reason, being comfortable with the basics of adding subtitles is one of those essential skills of video editing, so let’s get started!
Table of Contents
Key Takeaways
- You can add a caption anytime in Final Cut Pro by selecting Captions from the Edit Menu, then Add Caption, or by pressing Control C.
- You can move captions by dragging and dropping them as you would a video clip.
- You can format your captions by clicking on them and using the Inspector to make changes.
The Subtle Difference Between Subtitles and Captions
People sometimes use the words “subtitles” and “captions” interchangeably but, technically, there is a difference: Subtitles show the spoken dialogue but assume the viewer can hear everything else. Captions assume the sound is off completely.
So, if the sound of the axe murderer sharpening his blade is critical to understanding what is about to happen next, you would add a “caption” (not a “subtitle”) that says something like “sounds of murderous blade sharpening”
While you might think adding captions could by achieved by adding text boxes or Titles, captions are different. They are always placed on top of everything else in your video, including titles or other text.
And what really makes a caption (or subtitle) a caption is that your viewers can turn them on or off while watching your movie, while Titles are part of your movie.
So Final Cut Pro doesn’t treat captions any differently from subtitles, thinking of them both as different kinds of optional text the viewer can toggle on or off. As such, Final Cut Pro only refers to the broader “captions” (not the more narrow “subtitles”) in its menu options.
Therefore, we will also use the word “captions” in this article even if we will be using the caption tools to create subtitles.
How to Create a New Caption in Final Cut Pro
Click to place your Playhead (the vertical white line highlighted by the green arrow in the screenshot below) where you want to start a caption, and then select “Add Caption” from the Edit menu (see the red arrow in the screenshot below).
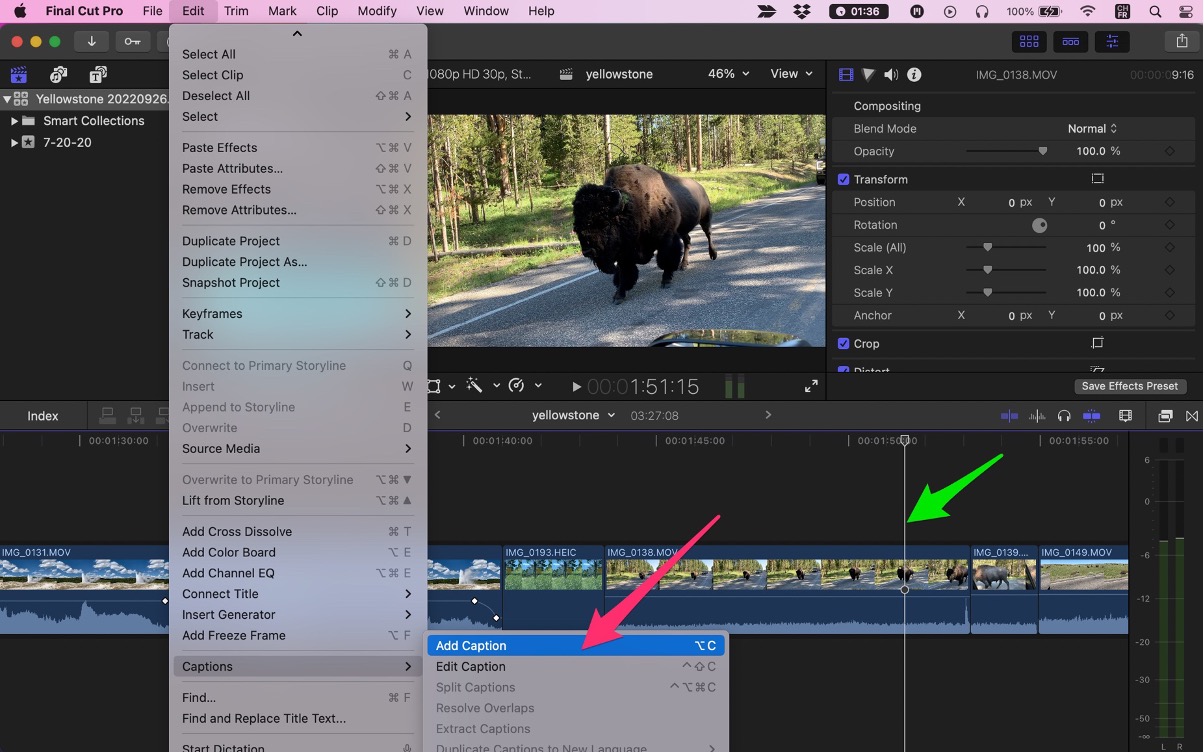
Keyboard Shortcut: Pressing Option C will add a new caption wherever your skimmer is.
After selecting “Add Caption” (or pressing Option C) a small purple box (marked by the green arrow in the screenshot below) will appear and a dialogue box (the Caption Editor) will appear just below it. This box allows you to type whatever you want the caption to say.
In the example below I typed “I’m walking here”.
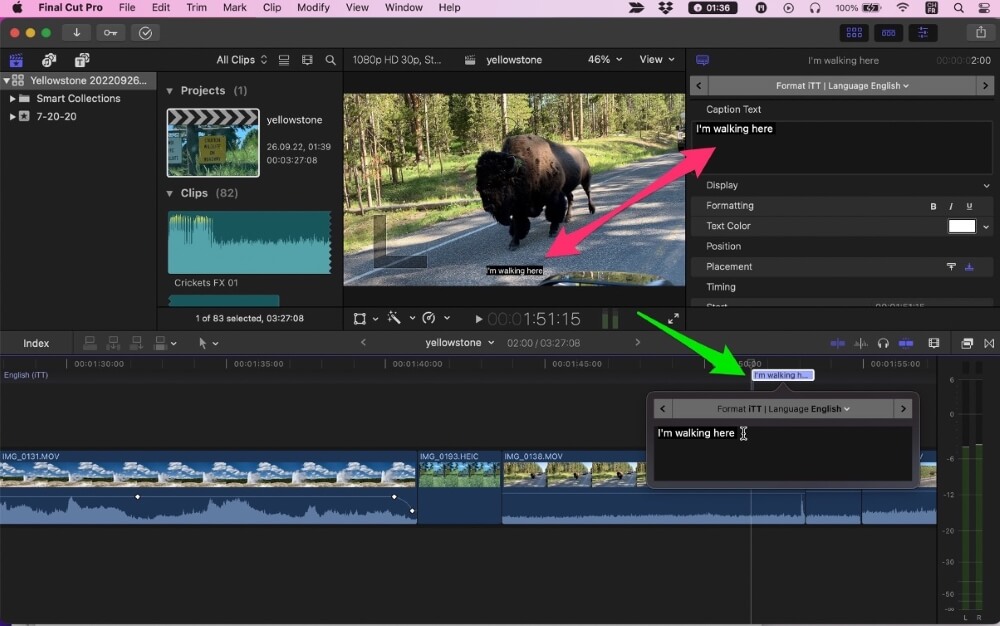
Note that this text also appears (as shown by the red arrows) in the Inspector (if you have that open) in the upper right part of your window, and in your Viewer.
Tip: You can edit the text in any caption anytime simply by double-clicking on it.
Moving Your Captions in Final Cut Pro
Captions are automatically attached to the video clip where they were created. This is handy because if you decide to move around your clips the captions will go with them.
But you can move a caption just by clicking, holding, and dragging it. Note that you can move titles left and right, but they always stay in their own row at the top of your timeline window.
To increase the length of time the caption stays on screen, click on the right edge of the caption (your pointer should change to the Trim symbol) and drag to the right. To shorten the clip, drag to the left.
Tip: You can delete a caption anytime by clicking on it and pressing Delete.
Caption Standards
Captions, like exported movie files, come in a variety of industry-standard formats. Remember, captions – unlike text or titles – is an optional layer that somebody watching YouTube or Netflix can choose to add or not.
As such, there does have to be some coordination between video editing programs like Final Cut Pro and the platforms that ultimately show the videos.
Final Cut Pro currently supports three caption standards: iTT, SRT, and CEA608.
YouTube and Vimeo can work with both the iTT and SRT standards, while iTunes likes iTT, and Facebook favors SRT. CEA608 is the standard format for broadcast video, and many websites. But, like exported movie files, formats come and go and companies like YouTube may change their caption preferences or options.
The bottom line is that you should ask yourself where you want your movie to be seen, and check with that platform to see what caption standard they prefer.
Formatting Your Captions in Final Cut Pro
To change the look of your captions, click on any caption (or select a group of captions) and turn your attention to the Inspector. (If the Inspector is not visible, press the Inspector toggle button highlighted by the red arrow in the screenshot below).
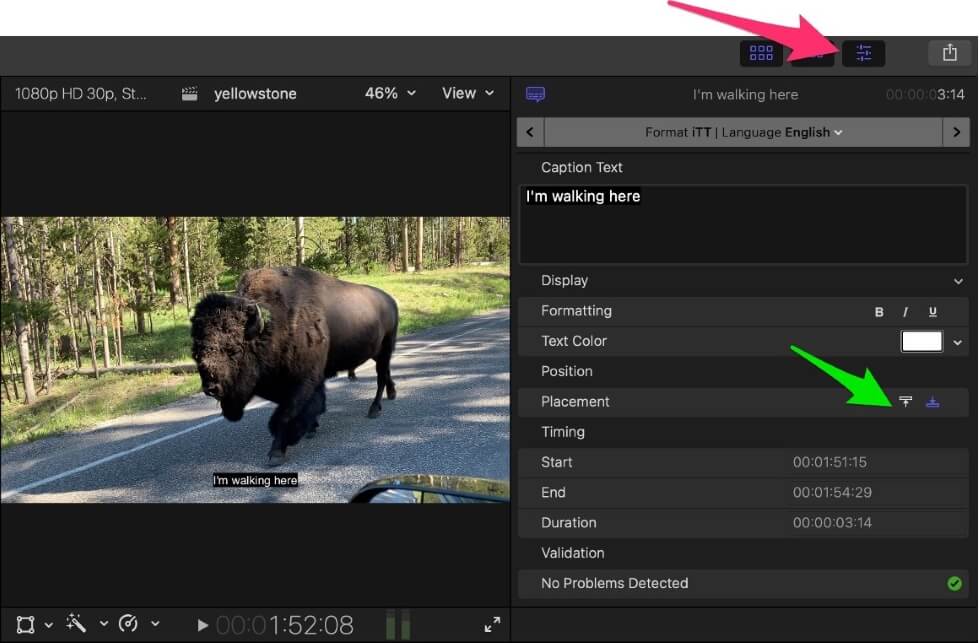
At the top of the Inspector you will see the current text (“I’m walking here”) in your caption.
Below that is a gray bar telling you what standard the caption is using (in our example it is iTT) and its language (English).
If you want to change the caption standard, click on the gray bar, and select “Edit Roles” from the dropdown menu. A dialogue box will pop up that will allow you to add a new “Caption Role” and choose a new caption standard. As navigating between different roles in Final Cut Pro is its own skill, I encourage you to review the Final Cut Pro Users Guide here for more information.
Below the gray bar is your caption’s text, which you can edit at will and a list of formatting options that will depend on which caption standard you are using.
In our example, using the iTT standard, you can make your text bold or italic and set the text color. While subtitles are conventionally white, this does give you the ability to change it if white makes it difficult to read in some scenes.
You can also place your captions at the top or bottom of your video by clicking on the Placement button (see the green arrow in the screenshot above), and you can manually edit the start/stop and duration times of the caption in the fields just below this.
Tip: You can find a very helpful list of standards and best practices for formatting your captions here.
The Future of Your Captioning
We have covered the basics of captioning in Final Cut Pro, but there is so much more that can be done.
For example, you can add additional “tracks” of captions as you add languages, and you can import caption files if you have hired a third-party service to transcribe your dialogue.
You can also experiment with the different caption standards. The CEA608 standard, for example, offers a lot more formatting options, including more control over where your text is displayed. It even allows having two different captions on the screen at the same time, in different colors, which can be handy when two people are talking on the screen.
So I encourage you to get started on adding captions to your movies!