
It’s quite easy to record screen video on a computer, as you can find a handful of free and paid screen recording software out there. But, what if you want to capture on-screen activities on your iPhone or iPad? That can be a different story.
Why? Because iOS or iPadOS didn’t make it easy for you to do so (before iOS 11). You’ll have to rely on a computer to capture moving activities on your device.
I’ve explored a dozen solutions while working on an app demo project, and during the process, I’ve learned a lot about the solutions and options available.
In this guide, I’ll share with you five methods on how to screen record an iPhone or iPad, and I’ll also point out the pros and cons of each method. My goal is simple — saving you time exploring so you can allocate more time to focus on the video editing part.
Note: I’ve opted out of those solutions that are either illegal or insecure (which require iOS jailbreaking), or contain vulnerabilities that jeopardize your device security. An example is Vidyo Screen Recorder, an app that was banned by Apple and pulled from the App Store in 2016 due to its violation of Apple’s security policies (more at TechCrunch).
Quick Summary
| Built-in iOS Feature | QuickTime | Camtasia | ScreenFlow | Reflector | |
| Cost | Free | Free | Paid | Paid | Paid |
| Compatibility | No computer needed | Mac only | PC & Mac | PC & Mac | PC & Mac |
| Video Editing | No | No | Yes | Yes | No |
Table of Contents
1. Built-in Feature in iOS (Recommended)
Now we have a new way to record iPhone screens without a computer or third-party tools. Apple’s iOS team has added a new feature i.e. “Screen Recording” to the iPhone running iOS 11 or later (you probably are).
You can learn how to use this built-in feature from this quick video:
2. QuickTime Player App on Mac
Best to use when: You want to make a video tutorial of an app or game on your iPhone or iPad without much editing.
Things to prepare:
- A Mac machine
- Your iPhone or iPad
- The lightning cable, i.e. the USB cable you use to charge your iPhone or iPad
- The QuickTime Player app (installed on Mac by default)
How to use (tutorial):
Step 1: Connect your iOS device to your Mac via the lightning cable. Hit “Trust” if you see a pop-up window on your device asking you, “Trust This Computer?”
Step 2: Open QuickTime player. Click the Spotlight Search icon on the top right corner, type “QuickTime,” and double-click the first result you see.

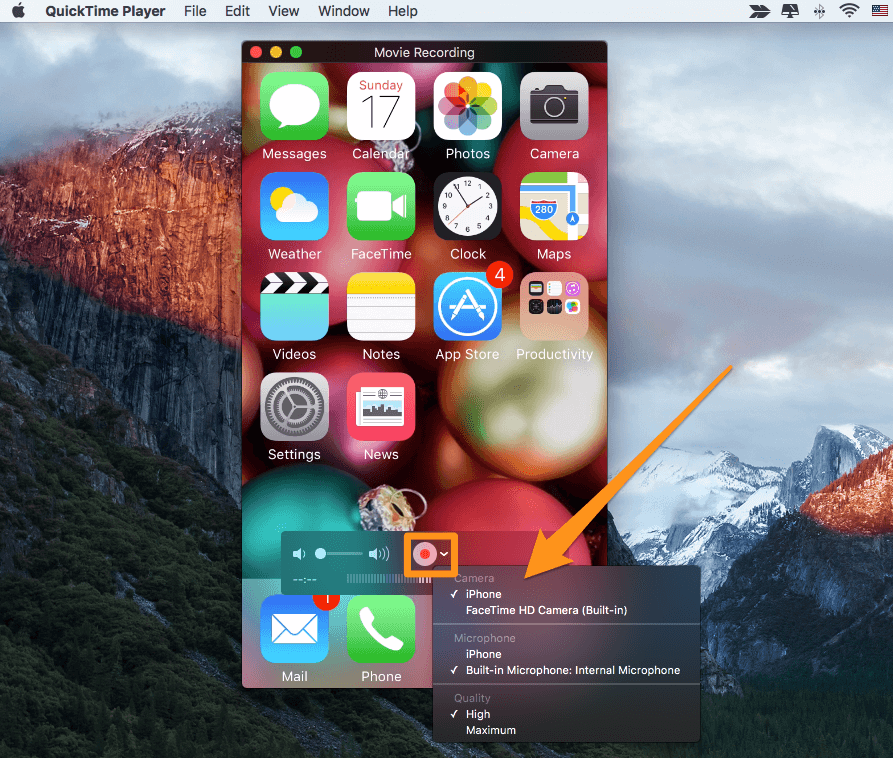
Step 3: On the top left corner, Click File > New Movie Recording.

Step 4: Move your cursor to the movie recording section. See the arrow down icon next to the small red circle? Click it. Under Camera, select your device name (in my case, it’s iPhone). Here, you also have the option to select which Microphone to use to make a voiceover, as well as the Quality of the video (High or Maximum).
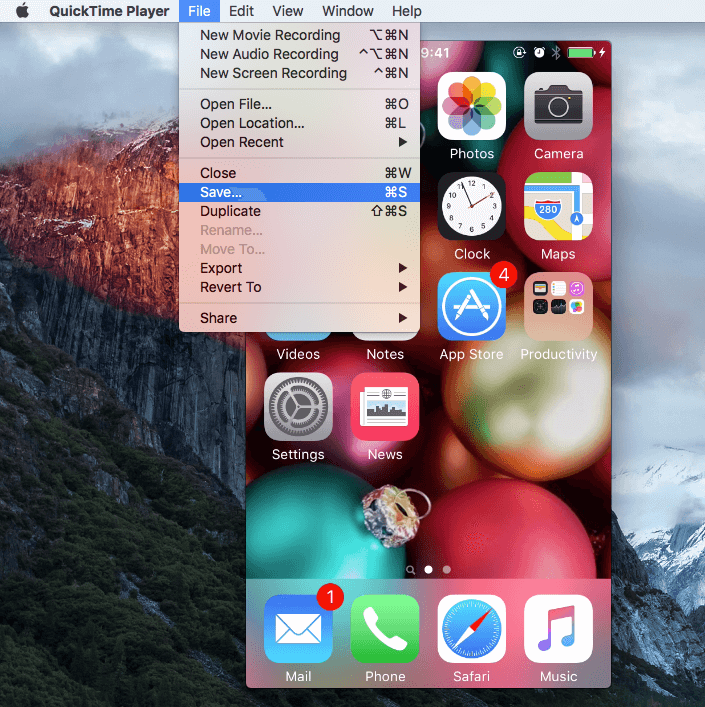
Step 5: Click the red circle button to start. Now, you’re good to go. Relax and navigate your iPhone or iPad, doing whatever you want to show to your audience. When you finish, hit the red circle button again to stop the process. Don’t forget to save the video (File > Save).
Pros:
- It’s free.
- Simple to use, no learning curve.
- Video quality is good. You can export at up to 1080p.
- Pretty neat interface. No carrier information is included.
- Also, you’ll notice the time on your phone or tablet was 9:41 AM, the classic Apple iPhone announcement time.
Cons:
- For Mac machines with OS X Yosemite or later. Not available on Windows PCs.
- Not compatible with devices that use iOS 7 or earlier.
- Lack of editing features e.g. add a device frame, gestures, callouts, background, etc. that are essential to make videos look professional.
- Background noise is hard to eliminate.
3. TechSmith Camtasia (for PC & Mac)
Best to use when: you want to capture your iPhone screen as well as edit the videos. Camtasia includes tons of advanced editing features that meet almost each of your needs. It is the tool I used to complete my app demo project, and I’m quite happy with the results I got. Learn more about the program from our review.
Things you’ll need:
- A personal computer. Macs require OS X Yosemite or later. If you are on a PC, you’ll need an extra mirroring app (see tutorial below for more)
- Your iOS device
- The lighting cable (optional, if you are on a PC)
- Camtasia software (paid, $199)
How to use (tutorial):
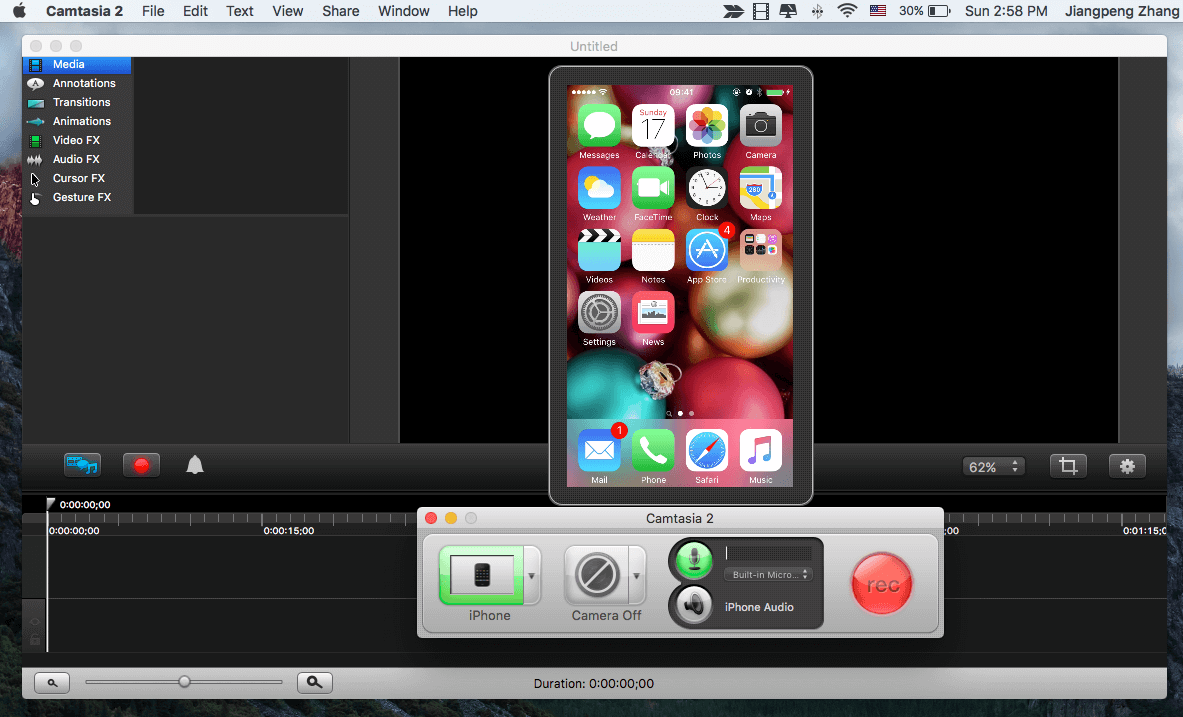
Recording and editing your iOS video can be done in one place. Simply download and install Camtasia, connect your device, and open the software to start capturing and editing the video thereafter.
Here’s a quick tutorial. You can also read more from our detailed Camtasia review.
Pros:
- The software itself is extremely easy to use with great UI.
- You can save time by directly exporting the edited videos to YouTube or Google Drive.
- Powerful video editing features such as cutting specifics, speed control, and the ability to add touch gestures, callouts, background images, etc.
- It allows you to separate screencasting and voiceovers so that you can add separate voiceovers.
Cons:
- It’s not free.
- Extra time and effort are needed to learn how to use the software, especially its advanced editing features.
4. ScreenFlow (Mac)
My opinion of ScreenFlow is pretty much the same as that of Camtasia, with some qualifications. I tried ScreenFlow for a time before switching to Camtasia, mainly because at that time I couldn’t add an iPhone frame to the video I took in ScreenFlow.
Also, I feel Camtasia is more user-friendly. For example, when I clicked the button to start, Screenflow didn’t show me what was going on (though it was working in the background), and I had to press the combination key Command + Shift + 2 to stop recording. How could new users figure that out on their own?
However, this is just my personal preference. It’s totally possible that ScreenFlow fans find it hard to use Camtasia.
How to use (tutorial):
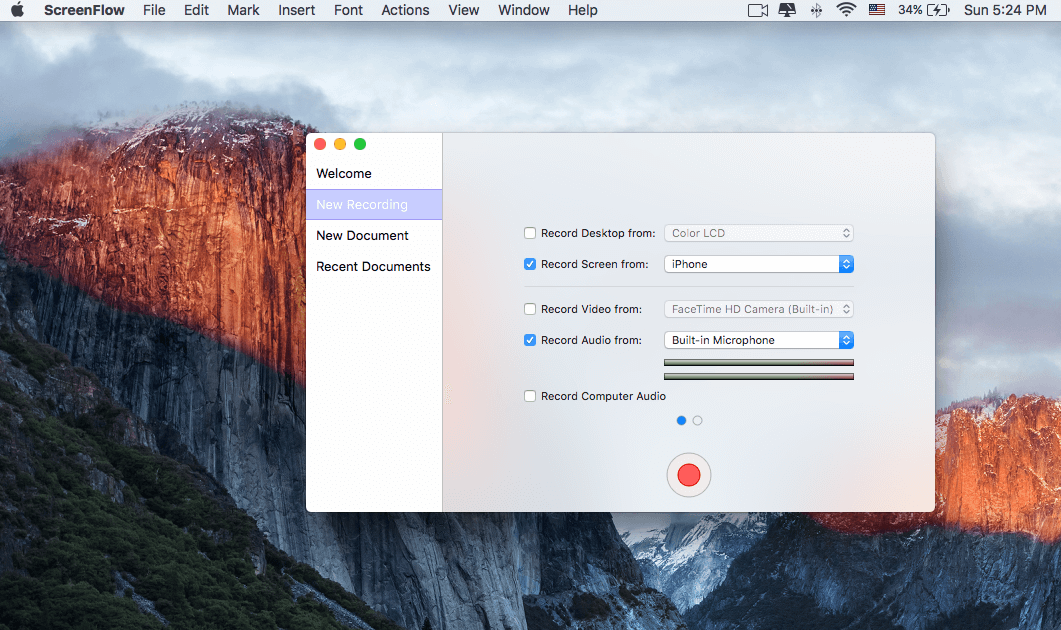
Step 1: Download and install ScreenFlow on your Mac, then connect your iPhone or iPad. Open the software and select “New Recording”. Then, specify the options you want. For example, if I only want to capture my iPhone screen, I just make sure I’ve checked “Record Screen from [device name]” and “Record Audio from (optional)”. Once that’s done, hit the red circle button to get started.
Step 2: Now is the tricky part. ScreenFlow will automatically start without you being aware of it. To stop it, simply press “Command + Shift + 2” on your Mac keyboard.
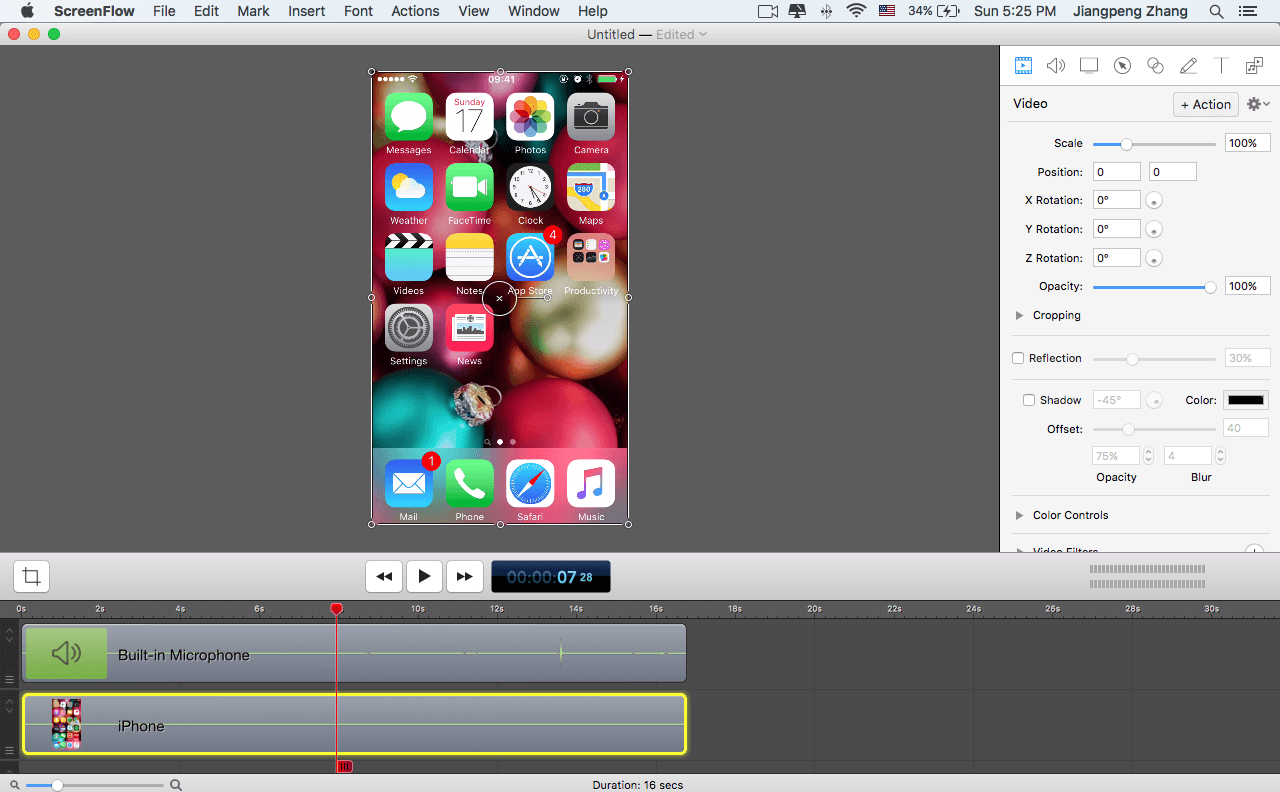
Step 3: Edit the video as you desire. You can cut and drag certain pieces, add callouts, adjust transparency, and more.
Pros:
- Relatively easy to use; no technical skill needed
- Advanced editing features enable you to make professional videos
- Directly publish to YouTube, Vimeo, Google Drive, Facebook, Dropbox, Wistia
- Great customer support
Cons:
- Not free
- Less user-friendly than Camtasia
- Doesn’t allow to add iOS device frames
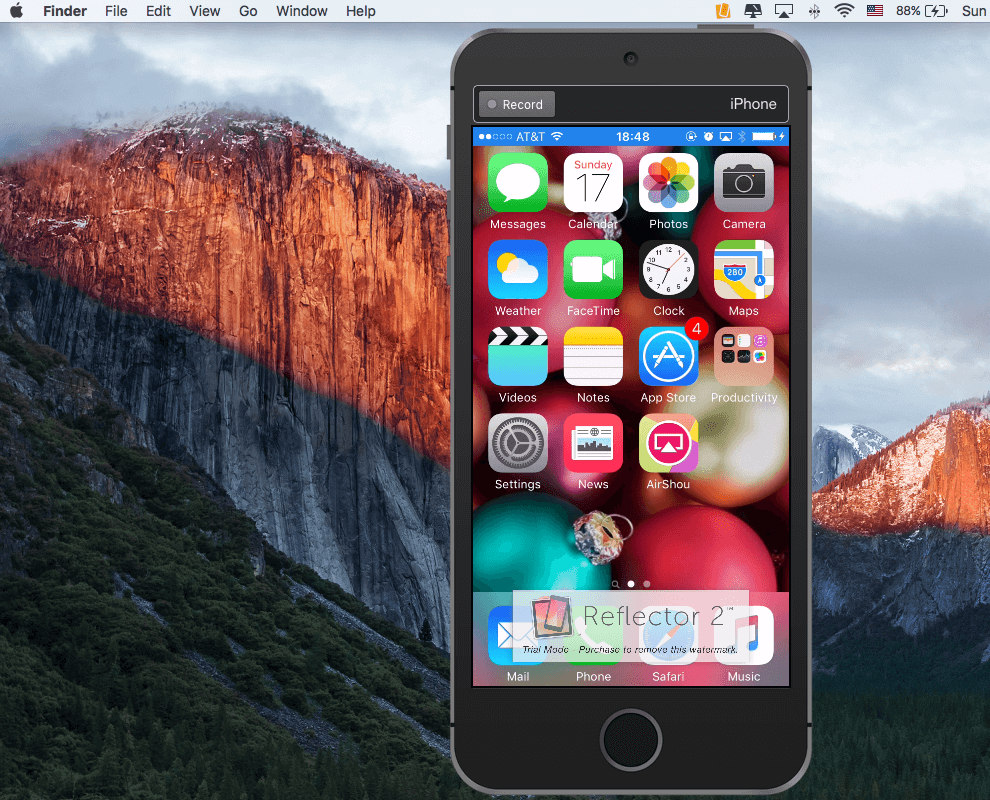
5. Reflector 4 App
Note: Reflector 4 is a commercial software that offers a 7-day free trial, which is what I downloaded for testing. I haven’t purchased the full version by the time I write this article.
Best to use when: You want to record iOS screens on a Windows PC, and don’t have many video editing needs. Reflector 4 also has a Mac version, but personally, I feel the Mac version doesn’t offer more value than Quicktime does, except that Reflector can add a device frame.
Things you’ll need:
- A Windows or Mac computer.
- The Reflector 4 software.
- Your iOS device (iPhone, iPad, etc.).
How to use (tutorial):
Step 1: Download and install the Reflector application on your PC or Mac.
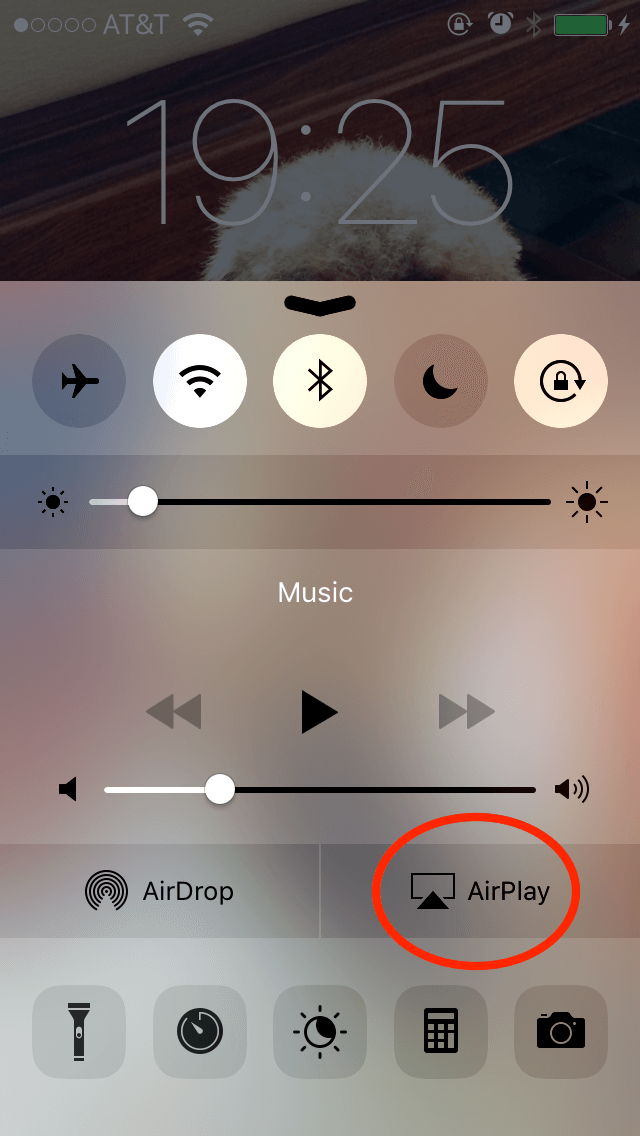
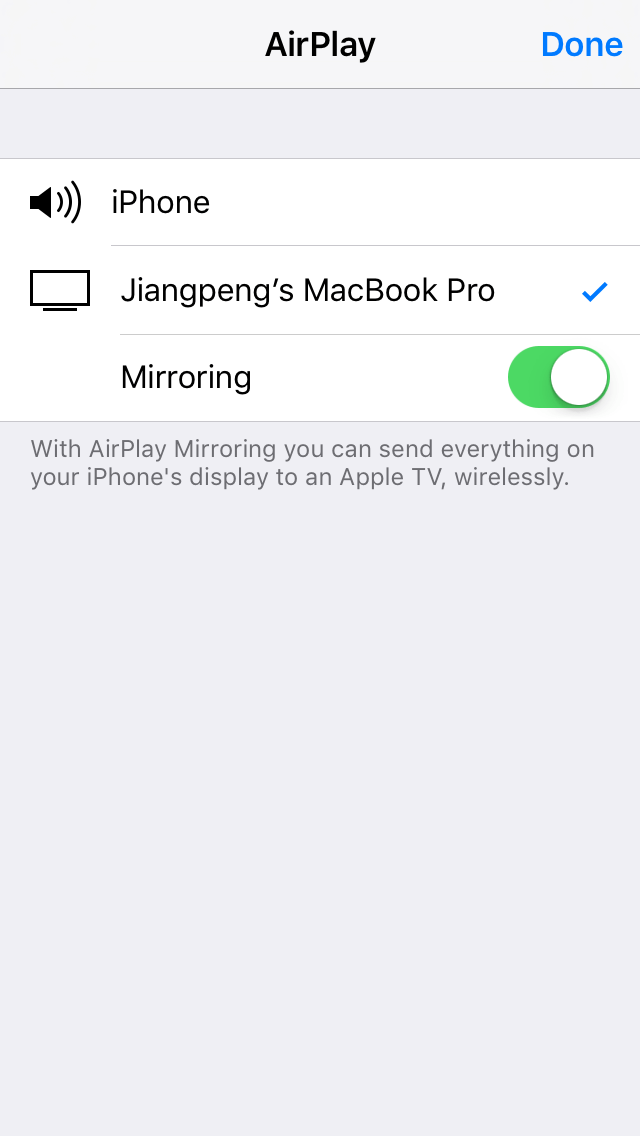
Step 2: Make sure your iPhone or iPad is connected to the same Wi-Fi network as your computer. Now, on your iOS device’s main interface, swipe up and tap AirPlay. After that, select your computer’s name and tab to enable Mirroring.
Step 3: Open the Reflector app, then click the Record button to continue. Once you’re finished, click the Stop button. Save the video to your desired destination. It’s pretty straightforward.
Pros:
- Trial version (with a Reflector watermark embedded) detects your iOS device and adds a device frame automatically
- You can customize recordings with several different preferences
- Wireless mirror — no lighting cable or third-party software needed
Cons:
- It’s not free
- No video editing features
Other Solutions?
Are there any other working alternatives? Of course. Actually, there are tons of them, some are free of charge while others require to pay. For example, I tested another app called AirShou — it’s free, but the process is super complicated and I spent way too much time getting it to work.
In general, I don’t recommend AirShou (Plus, the app doesn’t support iOS 10), even if it’s free. Also, I saw another solution called Elgato Game Capture which is quite popular among gaming players. It’s a hardware-based solution that costs a few hundred dollars. I’m not really a fan of gaming, so haven’t tried that yet.
Conclusion
When you work on a project involving screen recording like I did, you quickly learn that time is money. Free solutions like QuickTime are very good, but they lack advanced video editing features you probably need such as adding an iPhone or iPad frame, editing voiceovers, inserting touch gestures or call actions, directly publishing to YouTube, etc.
Anyway, I’ve shared all I knew about capturing iPhone screen videos. To recap, you should take advantage of the built-in feature immediately as I imagine it makes the recording process a breeze. But if you also have the need to edit videos, I also recommend using QuickTime (which is totally free) to achieve the purpose first, then use iMovie for editing. Alternatively, Camtasia and ScreenFlow are great choices though they are not free software and aren’t cheap.
Hope you like this guide, a kind share would be appreciated. If you bump into another awesome solution for recording iOS screen videos, feel free to leave a comment below. I’d be happy to test it out.
Thank you! Do you know which one has the highest quality?
Holy crap dude, you saved my life, I was making a video on my old iPhone 5 and I couldn’t screen record, thanks to you, i was able to send my gf a wonderful video for our anniversary.
Good stuff here. Thanks for the info JP. Any idea how to do basic screen recording on IOS11 when you are doing a screen mirror using the lightning to hdmi cable?
Wow… you’re written awesome….well, I’m using Quick time player….it was very nice without any interruptions….
Hello I M Linesh patil I am having IPad Pro with IOS 11 n it’s in built recording feature does not allow for Screen recording during mirroring my I pad screen to projector. I m not having mac book I only use window PC please provide me suggestions on how to record I pad screen during mirroring.
Thanks
Hi, JP. Thanks for taking the time for making this tutorial, really appreciated. This feature is definitely really important for many iOS users, especially Snapchat or Instagram users to record live videos. It’s one of the best additions on iOS 11. Currently, I’m using a desktop app call Acethinker iPhone screen recorder that mirrors my iPhone screen to the computer and use its screen recording function to make videos. It’s not that direct, but it works well. Share it here as an alternative method.
Hey JP, was wondering if you knew the solution to an issue I’m facing.
After using the screen recording function with the new iOS 11 (with a mic attached) and exporting it to my Mac. No audio is played except when the video is played on Quicktime Player.
It doesn’t work on any other video softwares.
Would love to get your expert opinion on this!
Thank you 🙂
Hi Douglas! Thanks for leaving the comment. Unfortunately, I had a hard time updating my iPad to iOS 11 (currently it’s still with 10.3.3) so yet to test out the “screen recording” feature. But I’ll keep your question in mind 🙂 Once I get a new iPhone, will give it a try and may update this post.
Hi, as an actor, I am super excited about the screen recorder feature with ios 11 so i can FINALLY capture the scenes I am in from a television show, movie, or commercial …. BUT… what I have found is that with certain formats, the sound doesn’t record. Am I doing something wrong or can I just NOT RECORD sound from certain websites, social media, or television networks? It won’t let me record the sound from youtube videos, itunes purchased shows (i purchase the shows i am in) and even a commercial that I had shared on facebook. Help!
Hi Donnie, thanks for the feedback. Truth is I can’t help you at this moment, because I’m struggling with installing iOS 11 on my iOS devices — it looks like they aren’t compatible with the latest iOS version. I’ll see if you could get hold of another iPhone to try out the internal screen recording feature, until then I can’t speak of how useful the function is. But I’ll keep your question in mind and may reply to it later.
Thanks for the tutorial. I’m looking for a specific feature (or lack of): removing mirroring. I want to record videos from Explain Everything (EE) but the internal recording option of EE is not suitable for my needs. When I project EE on a screen, my toolboxes disappear and this is what I am trying to recreate in a video. Unfortunately, mirroring always shows my toolboxes. Is there any app that “pretends” to be a projector so that EE does not send the information about toolboxes?
Thanks!
Hi Borel,
Thank you for leaving the comment and the question. I haven’t used the EE app before, so I downloaded it to my iPad and created a few projects just to get a feel of the app — found it really amazing (might buy it once the trial is over).
Back to your question, I don’t think there’s such app that allows you to disable the toolboxes, but I found a way that can make the toolbar and control bar disappear while project the iPad to an external screen (if that’s what you want to achieve). To do so, you first tap on the menu icon located on the top left corner of the EE app -> Settings -> General > External screen mode, select “2nd screen” here (by default, it’s Mirror).
I hope this helps. Thanks again for reading this article, and it’s good to know this fantastic app 🙂
– JP
Just wanted to follow up with the previous response I gave. I also reached out to the Explain Everything support team regarding your question, and Monika replied my query. In case you want to check it out, here it is: https://www.softwarehow.com/wp-content/uploads/Explain-Everything-email.png
Don’t know if you test 5kplayer. ‘Cause I am using Windows, I searched on Google “airplay on Windows”, and then found this 5kplayer, free. Seems it provides a Mac version, but I never use it on Mac. Tried mirroring and screen recording, easy. I am not a gamer, so I didn’t record game, not sure how it would be.
I heard that there is airserver that works the same too.
I’ll try it out. Thanks!
5k player works fine, I use it for recording yt vids. But like most wifi mirrors, it can lag a bit but easy to use.