
iMovie provides easy-to-use tools to let you “zoom in” (or “zoom out”) of a video clip, which can provide a lot of motion and emotion to any scene.
As a professional video editor, I can tell you that having dynamic clips that simulate the camera zooming in on a subject or panning (the technical term for moving the camera across an image) can really engage the audience and elevate a scene.
So, below I will cover the basics of how to implement these effects, show you some examples, and even talk a bit about why Apple calls their tool the Ken Burns effect.
Table of Contents
How to Zoom in iMovie Mac
Zooming in or out of a video clip in iMovie is a lot like changing the zoom on your iPhone. The camera isn’t moving, and the action isn’t moving, but you are zooming into one part of the scene.
The way you do get this motion in iMovie is through what Apple calls the Ken Burns effect (I’ll explain later where this name comes from) and can be done in four easy steps.
Step 1: Select the clip you want to apply the zoom effect to.
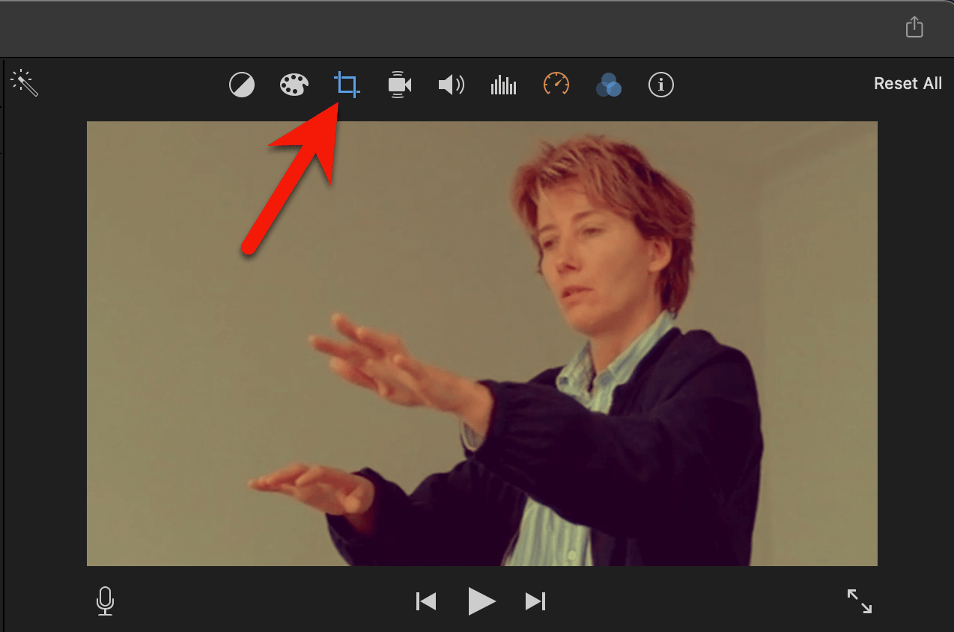
Step 2: Click on the cropping icon (where the red arrow is pointing in the screenshot below) at the top of the Viewer window, in the upper right corner of iMovie.
When you’ve done this, a new row of cropping tools appears between the image and the cropping icon you just clicked on, as can be seen in the screenshot in Step 3, below.
Step 3: Click on Ken Burns, where the red arrow is pointing in the screenshot below.
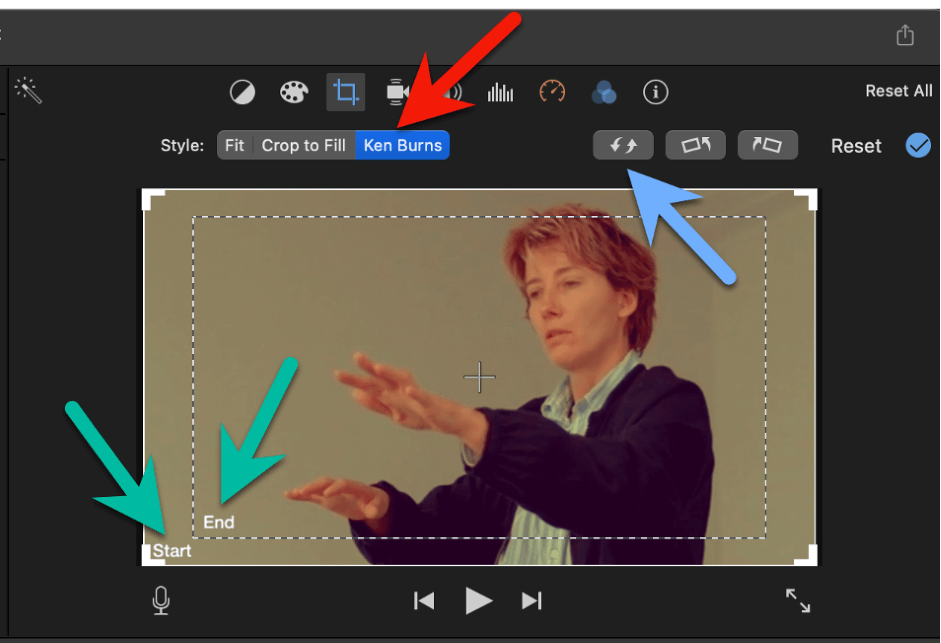
When you do this, the white boxes seen in the screenshot above appear on your image.
Step 4: Adjust the White Boxes
The box labeled Start (see the green arrows in the screenshot above) determines what will be seen in your movie when your clip starts. And, if it is not too obvious, the box labeled End will be what is seen in your movie when the clip ends.
For example, the way the boxes are placed by default (and shown in the screenshot above) will result in your movie clip starting with the entire image being shown, then slowly zooming in to a somewhat closer view of the Famous Actress.
But let’s say I wanted the clip to start with a closeup of her hands, and then move and slightly zoom in on her face. If I arrange the boxes like in the screenshot below, that is exactly what will happen:
Now, I have done a lot of moving and resizing of the boxes between the first screenshot that showed the default position of the white boxes and the one above, so let me backup and explain how you move and resize the boxes.
There are four things to keep in mind:
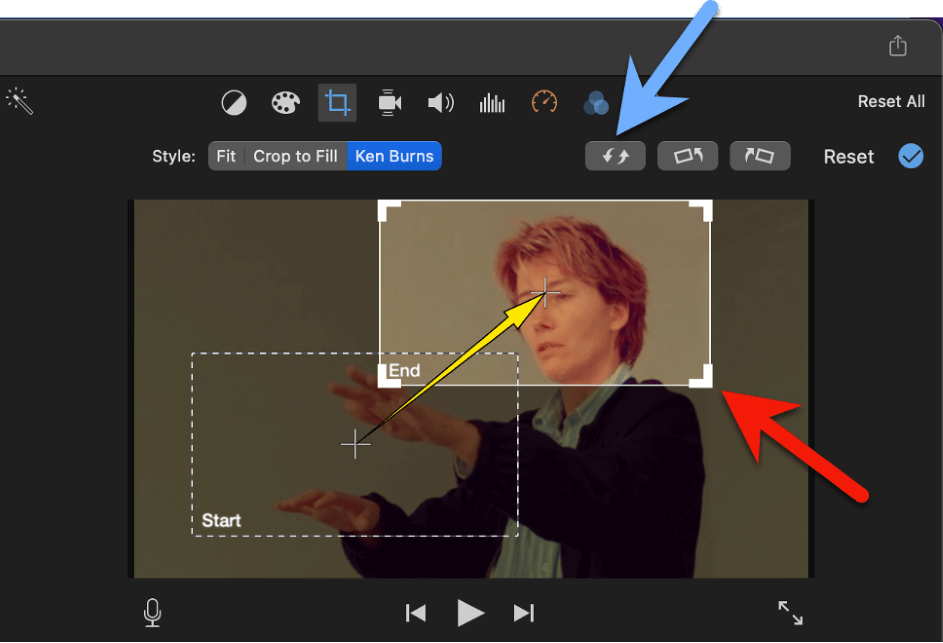
First, you can only adjust the box that is activated – and the activated box is the one with the large white corner handles, shown by the red arrow in the screenshot above.
Second, you can switch between having the start box and end box be the active box by pressing the squiggly arrow icon, highlighted by the blue arrow in the screenshot above.
Third, you can move an (activated) box by clicking anywhere inside it and moving your mouse or trackpad to where you want it to go.
Fourth, you can change the size of a box by grabbing one of its corner handles (again, where the red arrow is pointing in the screenshot above) and dragging it towards or away from the center of the box.
So, what I did in my example above was move the start box to focus on the actress’s hands and changed its size so that just her hands will fill the screen when my clip starts playing.
Then, I moved the end box to center on her face and shrunk its size so that the clip would end with just her head visible.
I’ll show you one more example below, which has more zooming and less panning.
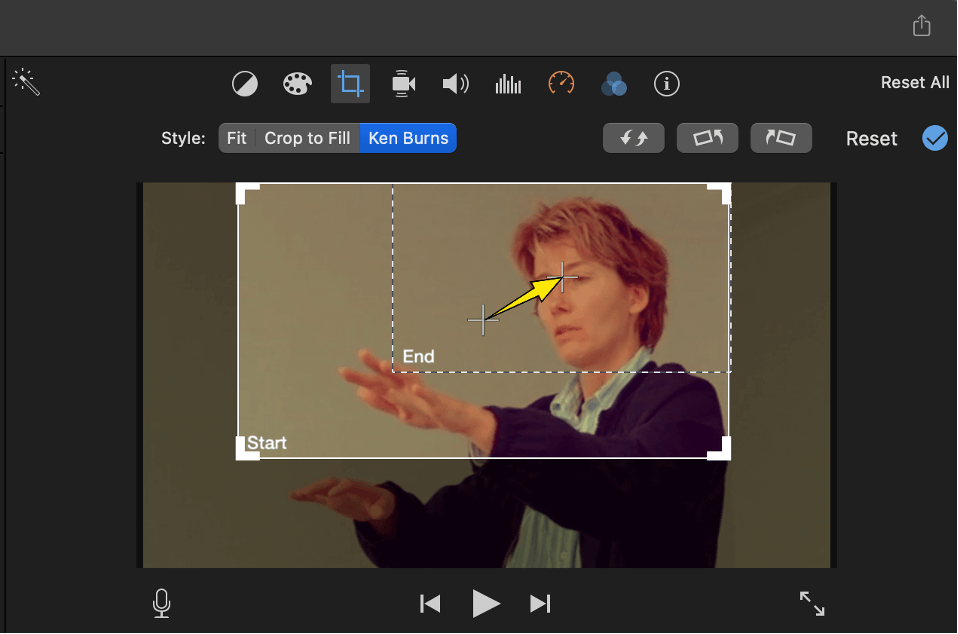
Given my arrangement of the boxes in the screenshot above, the clip will start with the Famous Actress’ head and left hand filling the screen, then as the clip plays it will zoom in to a closeup of her head, while also panning slightly up and to the right.
Astute readers may have noticed a yellow arrow in both screenshots, showing the path the clip will take from the center of the start box to the center of the end box. I did not add this arrow. iMovie helpfully adds it automatically as a quick indicator of what is going to happen in your clip given how you arranged your boxes.
Changing the Speed of Your Zoom, if Needed
There is no setting to control how fast your clip will zoom and/or pan from the start box to the end box. The speed is entirely dependent on how long your clip is. This is both simple and convenient, and highly frustrating when it isn’t exactly what you want.
If you find yourself in a situation where you need the length of the clip and the speed of the zoom to be independent, you are going to have to find a workaround.
For example, maybe you want to zoom in on the actress’s face and then let it linger there for a while.
One solution could be to split your clip where you want your zoom to end, and then slightly lower the speed of the second clip. This could buy you a second or two of the “lingering” you needed.
Editor’s note: You can read more about splitting clips and changing a clip’s speed in the linked articles.
So, Who Was Ken Burns and Why Does he Have His Own Effect?
Ken Burns was a documentary filmmaker, who became famous for his televised series The Civil War. He also went to school at Hampshire College, just down the street from where I grew up. (And, because of his fame, Hampshire College subsequently developed into a prominent film school).
Nevertheless, when making The Civil War, Ken Burns was reliant on using very old still photos because, well, there wasn’t a lot of filming going on in the 1800s.
So, to keep the story moving, he mastered – and thus popularized – the technique of panning the camera across a still photo and zooming into or out of the photo to direct the viewers’ attention.
That is, he was doing exactly what you have learned to do above.
And, for the record, iMovie is the only video editing program to have a Ken Burns effect, or at least call it that. Why? Because Steve Jobs personally reached out to Ken Burns to ask his permission to use his name to describe the effect he wanted to build in iMovie.
Final Zoom Thoughts
I hope I made it clear how to zoom in and out of a scene, how to pan across a clip, and why Apple calls their tool to do both the Ken Burns effect.
In fact, to test how successful I have been, here is a pop quiz: What college did Ken Burns go to and how close was it to where I grew up?
Please do let me know in the comments below how you did on the quiz and, regardless of whether you passed or not, please don’t hesitate to make any suggestions about how I could improve this article. We all want to learn. Thank you.