
Final Cut Pro makes it easy to add Green Screen clips – clips filmed against a green background – into your movies.
In this article, I will show you how you can overlay a video of Darth Vader dancing on top of a video of a wild buffalo marching down a road using a green screen. And the whole scene will be set to the Star Wars Imperial March theme song because what else would you use?
In all seriousness, using green screens to “composite” two different videos into one can open a world of possibilities for you.
With over a decade of professional filmmaking, I can assure you that having a grasp on the basics of how to do this can help you tackle a whole range of more complicated compositing tasks. And sometimes it impresses the client, which is always nice.
Table of Contents
How to Use a Green Screen
Step 1: Place your foreground clip in the Timeline, and place the green screen shot over it.
In my example, the “background” is the clip of the marching buffalo and the “foreground”, placed on top of the background, is Darth Vader. You can see in the screenshot below that the clip of Darth Vader was filmed against a green screen.
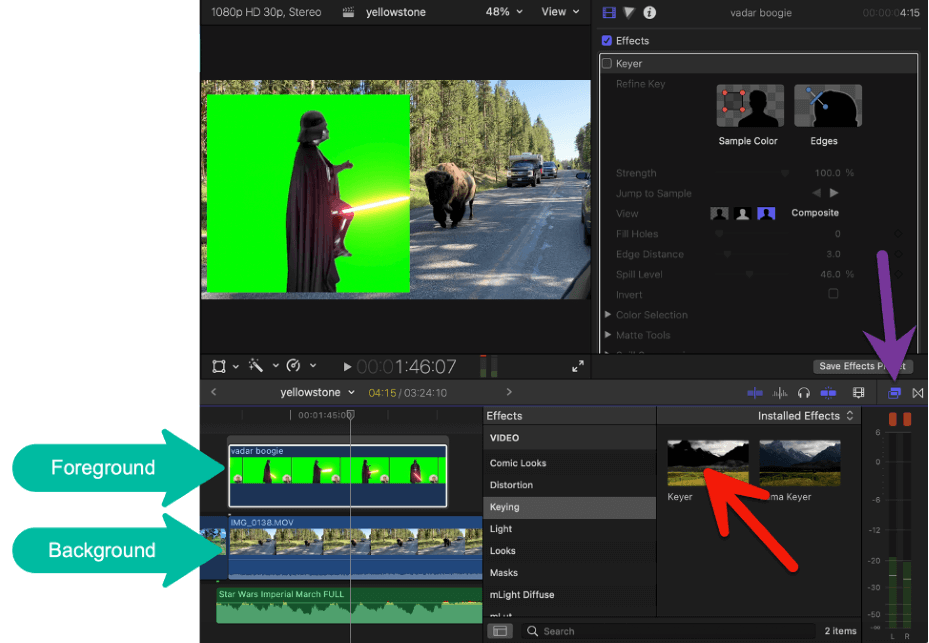
Step 2: Select the Keyer effect (shown by the red arrow in the screenshot above) from the Keying category in the Effects Browser (which is toggled on/off by pressing the icon identified by the purple arrow).
Then drag the Keyer effect over your green screen clip (Darth Vader).
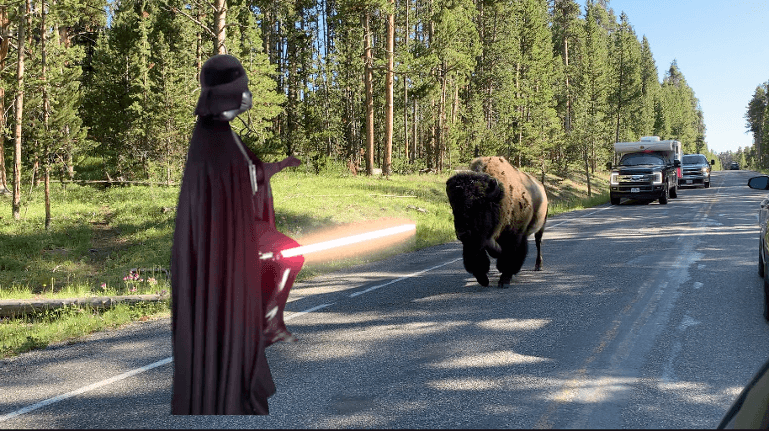
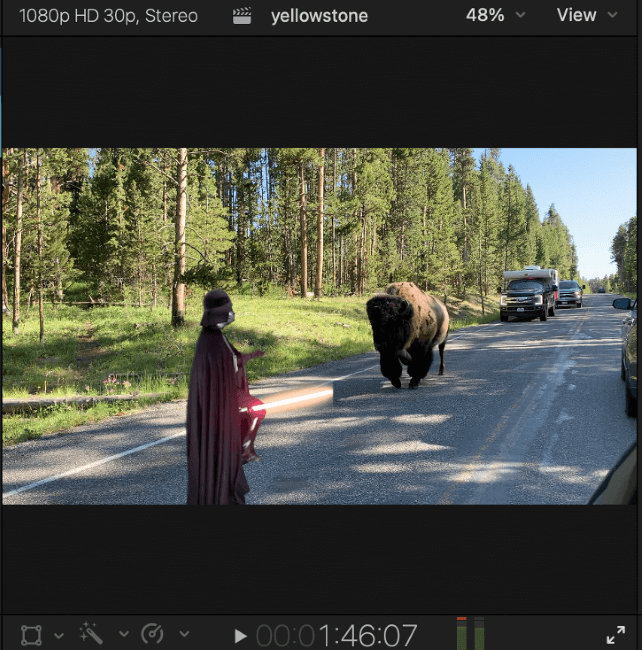
Congratulations. You’ve just applied a green screen! And a lot of the time, it will look like the image below, with all of the green removed and the foreground image looking pretty good.
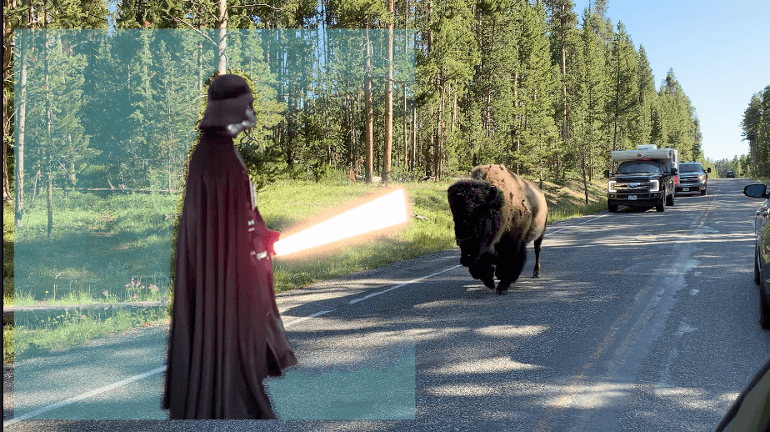
But the result can often look something like the picture below, with traces of the “green” screen still showing and a lot of noise around the edges of the foreground image.
Adjusting the Keyer Settings
When you drag the Keyer effect onto the foreground, Final Cut Pro knows what it is supposed to do – look for a dominant color (green) and remove it.
But it actually takes a lot of filming and lighting expertise to get a green screen to be exactly the same color in every pixel. So it is rare that Final Cut Pro can get it exactly right.
But the good news is that Final Cut Pro has a lot of settings that, with just a little effort, can help get it right.
With the foreground clip selected, go to the Inspector (it can be toggled on/off by pressing the icon my purple arrow is pointing to in the screenshot below)
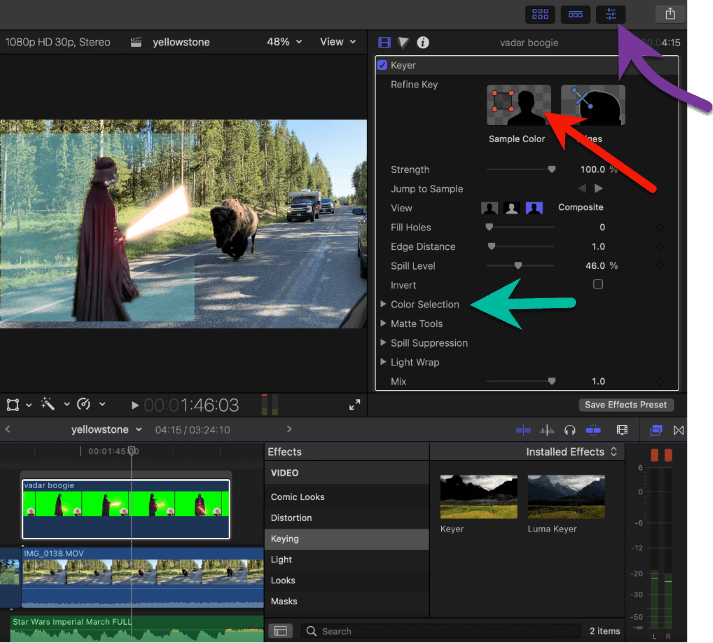
If there is still some green showing (like there is in the example above) it often is because there were some pixels in the “green” screen which were a slightly different shade of green, confusing Final Cut Pro. Indeed, in the picture above, the lingering color seems closer to blue than green.
To fix this, you can click the Sample Color image (where the red arrow points in the screenshot above), and your cursor will turn to a small square. Use this to draw a square in any area in your image that needs the lingering color removed, and let go.
With luck, one application of the Sample Color will do the trick. And usually, generous clicking around your screen will get rid of any lingering color(s).
But you might need to move the Playhead around in your clip to make sure that any movement in your foreground isn’t changing the light and creating additional colors which will need to be removed with more clicks of the Sample Color tool.
If you are still having trouble, the settings within Color Selection (see the green arrow) can help you home in on the exact colors you still need to remove.
Making Size Adjustments
With your green background removed, you will probably want to adjust the scale and position of your foreground (Darth Vader) so it looks right within the background (the marching buffalo)
The easiest way to do this is with the Transform controls, which can be activated by clicking on the Transform tool icon, shown by the purple arrow in the screenshot below.
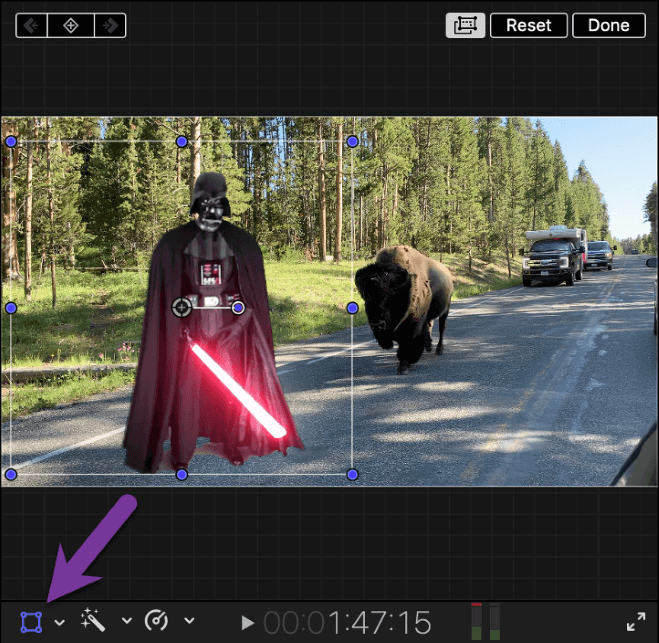
When activated, the Transform tool puts the blue handles (shown in the screenshot above) around your clip and the blue dot near the center.
Just clicking on your image will allow you to drag it anywhere on the screen, and the corner handles can be used to zoom in/out your video. Finally, the center blue dot can be used to rotate the image.
After a little fiddling around, I’m happy with the size, positioning, and rotation of my dancing Darth shown in the screenshot below:
Final Key Thoughts
I hope you have seen how easy it can be to add a video clip filmed against a green screen.
If the original shot was done well, compositing a new foreground (Darth Vader dancing) onto an existing clip (buffalo marching) can be as simple as dragging the Keyer Effect onto your greenscreen shot.
But if the result is a bit messy, applying the Sample Color tool here/there across your footage, and maybe tweaking some of the other settings, will usually clean up any residual messiness.
So, get out there, find or film some green screen and show us something new!
One more thing, for those who find a little background/history helpful, I am sometimes asked, “Why is it called the Keyer effect?”
Well, since you asked, Final Cut Pro’s Keyer effect is really a Chroma Keyer effect, where “Chroma” is a fancy way of saying “color”. And since this effect is all about removing a color (green), that part makes sense.
As for the “Keyer” part, well throughout video editing you hear a lot about “Keyframes”. For example, “Fred, set the audio keyframes” or “I guess we’ll just have to keyframe the effect”, and so on. And here the words are quite literal and originated in animation.
Remember, film is a series of still images, called frames. And when animating, the artists would start by drawing the really important (“key”) frames first, such as those that defined the start or end of some movement. (The frames in between were drawn later and (in an unusual lapse of creativity) were commonly known as the “in-betweens”.)
So, what a Chroma Keyer effect is doing is setting key frames where part of the video (its background) disappears, and the parameter which causes that transition is a chroma, or green color.
Happy editing and please don’t hesitate to let me know in the comments if you found this article helpful, see room for improvement, or just want to chat about Video Editing history. Thank you.