
Apple’s iCloud feature is a convenient way to access photos from any synced Apple device. To upload and sync photos from your Mac to your iCloud account, use the Photos app and adjust the settings to your preferences.
I’m Jon, an Apple expert, and owner of a 2019 MacBook Pro. I routinely upload photos to my iCloud from my Mac and made this guide to show you how.
This article explains the process of uploading images to your iCloud account from your Mac, so continue reading to learn more!
Table of Contents
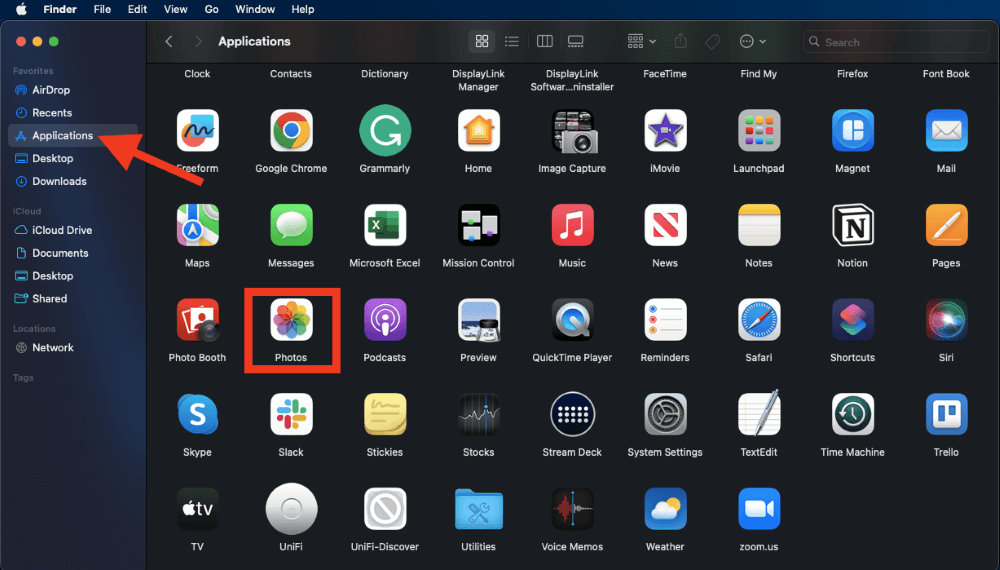
Step 1: Open The Photos App
To start the process, open the Photos app on your Mac.
You might have the Photos app in your Dock at the bottom of your screen. If so, click on it to open it.
If the Photos app (rainbow-colored icon) isn’t in your Dock, open the Finder window, select Applications from the left sidebar, and double-click on the Photos icon in the window.
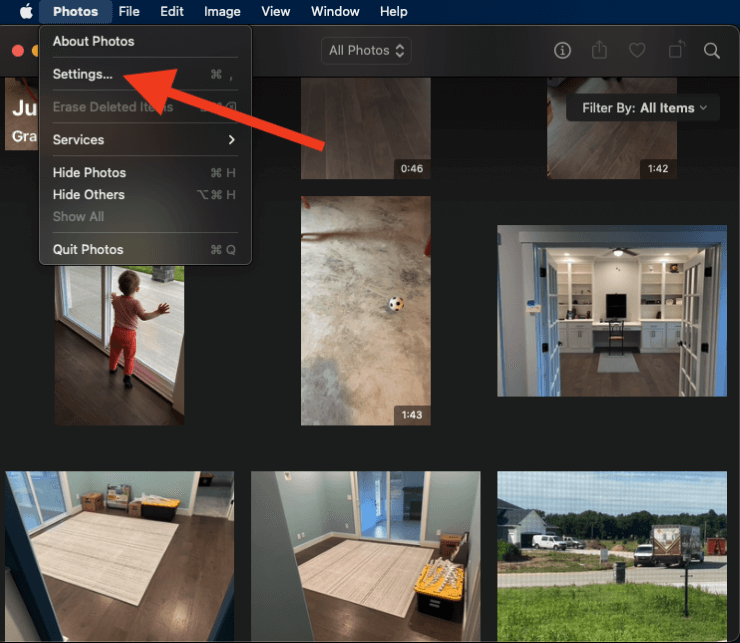
Step 2: Select Preferences
Once the app opens, click “Photos” in the top left corner of your screen. In the drop-down menu that appears, select “Settings.”
A new window will open, with three sections at the top: General, iCloud, and Shared Library.
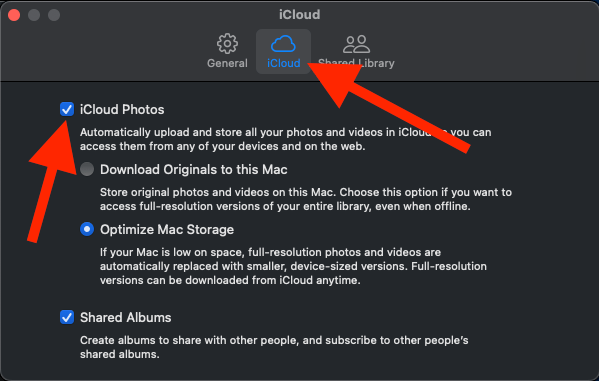
Click on iCloud to change your Mac’s iCloud settings. Check the box next to “iCloud Photos.” This will enable uploads on your device based on the settings you choose.
Step 3: Choose How to Store Your Photos
Once you open the iCloud settings window, you can adjust the settings to your liking. There are a few options to choose from on how you want to store your photos, including:
Download Originals to Mac
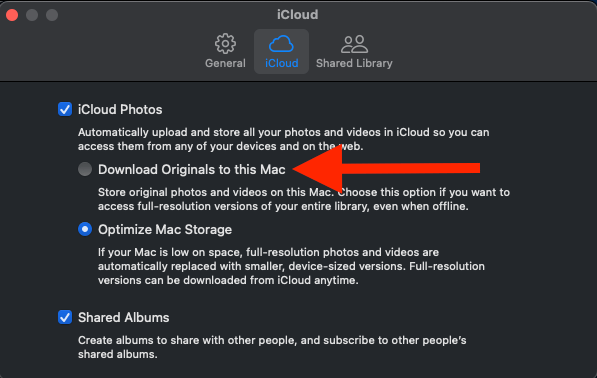
With this option, your Mac will keep a copy of original Photos and Videos on the device. On top of that, your Mac will upload these same files to iCloud for easy access across your devices.
If your Mac is tight on space, this option might not be a solid choice for you, as saving the photos to your Mac consumes a considerable amount of space (depending on how many images you have). That said, if you don’t have much space remaining in your iCloud account, you might want to save some to iCloud and others to your Mac.
Choose the option that works best for your needs.
Optimize Mac Storage
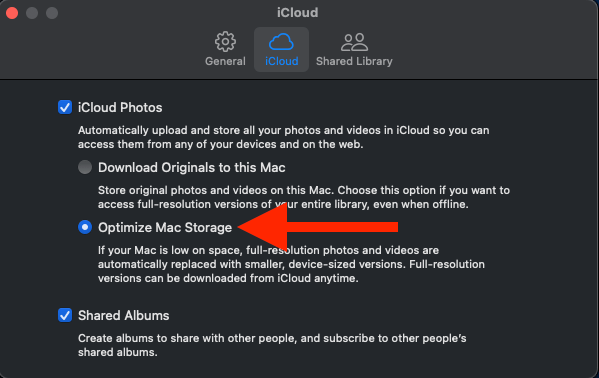
This option allows you to save space on your Mac by saving original photo files to your iCloud account. Although the image is still saved on your Mac, it’s compressed from its original full-resolution state, saving you space on your Mac.
You can easily access full-resolution photos uploaded to iCloud from your account, but only when you connect your Mac to the Internet.
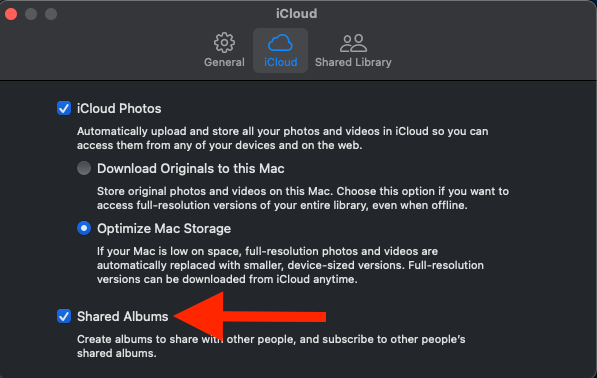
When you select this option, you can sync Shared Albums from your Mac or other Apple device to and from your iCloud account. This allows you to easily share photos with your family and friends and subscribe to other people’s shared albums to view their photos too.
Uploading Photos
Once you check the box next to “iCloud Photos” and choose the upload option you want, your Photos app will automatically start the process of uploading the applicable photos from your Mac to your iCloud Photos account.
For this process to work and successfully upload, you’ll need a strong WIFI connection, so ensure your Mac is connected.
FAQs
Here are the most common questions we get about uploading photos to iCloud from Macs.
How Long Does It Take to Upload Photos to iCloud?
The total time it takes for your Mac to upload photos to your iCloud account depends on how many images you’re uploading and your internet connection.
It can take a few minutes, or it might take multiple hours. Larger photo files and quantities will take longer to upload, regardless of your internet connection. In addition, slower internet connections will require more time to complete the upload process.
I recommend letting your Mac do this overnight.
Can I Access iCloud without an Apple Device?
If you have an iCloud account, you can easily access and manage your photos and videos without using an Apple device.
Simply open “iCloud.com” on any web browser from any device, then sign into your account with your Apple ID and password.
Why Are My Photos Not Uploading to iCloud?
A few common hiccups can cause issues with syncing photos to your iCloud account. If you’re having problems, check these three potential causes:
- Ensure you’re signed in to the correct Apple ID: If you have multiple Apple IDs, it’s easy to accidentally sign into the wrong account. So, double-check you’ve signed into the correct account.
- Double-check your internet connection: A slow internet connection (or none at all) will affect the upload process. So, ensure your Mac has a strong internet connection to complete the upload process.
- Make sure you have plenty of storage on iCloud: Each Apple ID comes with a specific amount of free storage. Once this storage runs out, you will encounter issues with uploading until you remove files from your account or upgrade to a larger storage plan. You can add more storage for a low monthly fee.
Conclusion
You can upload photos from your Mac to iCloud by toggling settings in the Photos app. Uploading photos from your Mac to your iCloud account is a great idea, as it ensures your images are safe in case anything happens to your Mac.
Although the entire upload process can take a while, the steps are quick and easy to follow. Simply select your setting preferences and let your Mac do the rest!
Do you sync your Mac’s photos to your iCloud? Let us know your questions in the comments below!