
DaVinci Resolve is a useful tool for creative editing, coloring, VFX, and SFX. Currently, it is one of the industry standards. Unlike most industry-standard software, updating DaVinci Resolve can be as easy as checking for an update and then simply downloading it!
My name is Nathan Menser. I am a writer, filmmaker, and stage actor. When I am not on stage, on set, or writing, I am editing videos. Video editing has been a passion of mine for six years now, and so I am confident when I talk about how easy it is to update DaVinci Resolve.
As our technological capabilities evolve, it’s crucial to keep up with the changes. Software updates are a necessary part of life as an editor. DaVinci Resolve definitely keeps up with the times, so in this article, I will show you how to update DaVinci Resolve, step by step.
Table of Contents
First Things First: Back up Your Project
Before you update the DaVinci software, make sure you back up all important files. Of course, DaVinci Resolve can autosave your projects as you go. I don’t like taking risks with my work.
To back up all of your data means something entirely different. With the latest version of DaVinci Resolve, the software developers have added new features to automatically backup important data at specific time intervals.
However, this feature is turned off by default. You must go in and manually switch on automatic backups for each project. This feature can be a lifesaver!
Step 1: Start up the program. Go to the horizontal menu bar in the top left corner of the screen and select “DaVinci Resolve.” This will open up a menu. Click Preferences and then Project Save and Load.
Step 2: From here, an additional panel will pop up. Select Live Save and Project Backups.
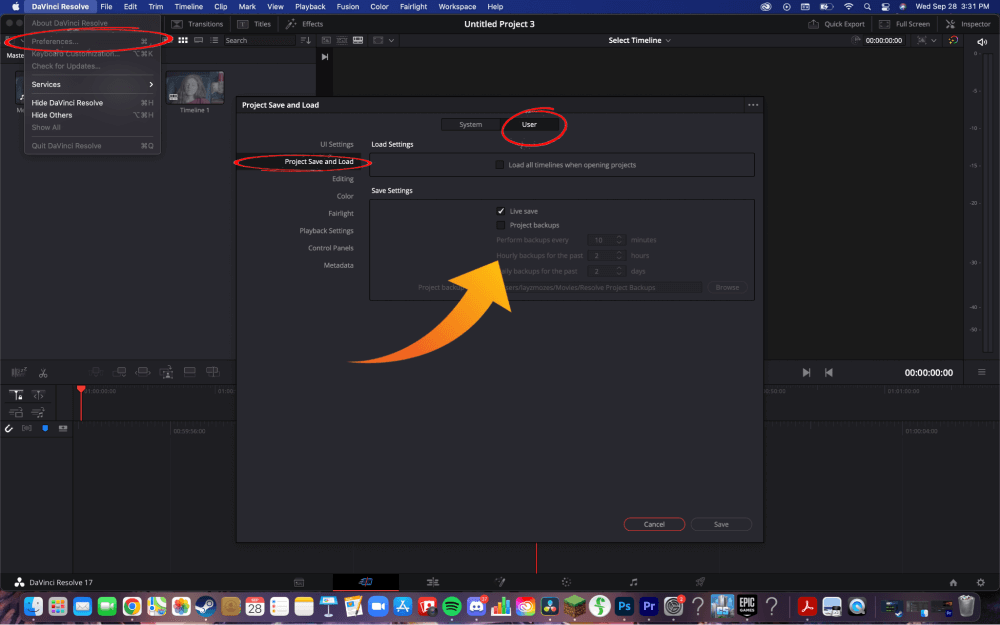
Step 3: You can instead select how often you want the project backed up. I recommend setting the intervals at ten minutes apart. This way if you were to lose power or if the software were to crash, you’d lose as little data as possible. Of course, backups will only be created while you are actively editing the project.
Step 4: You can also select the location you want the backup saved by selecting Project Backup Location and selecting which folder to save the data inside.
Updating DaVinci Resolve: Step-by-Step Guide
Now that you have backed up your project, you’re ready to update the DaVinci Resolve software.
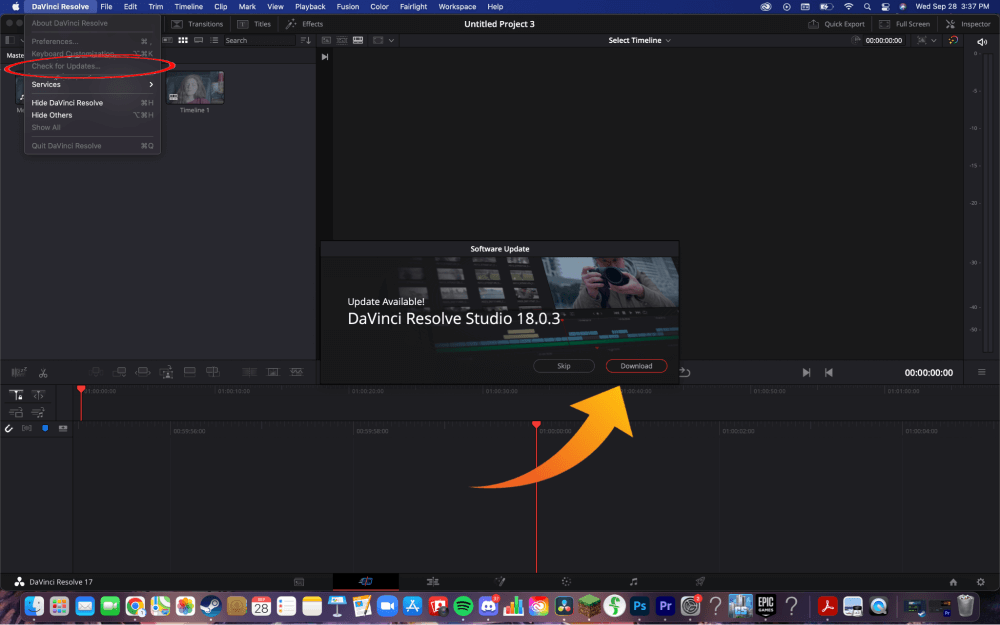
Step 1: From the main page, go to the horizontal bar at the top left of the screen. Select DaVinci Resolve to open the software menu. This will open up another menu. Click “Check for Updates.”
Step 2: If there are any updates available, the software will allow you to download them.
Step 3: After the download is complete, check to see if the installation starts automatically. If it doesn’t, you can manually begin the installation by going to the general file library on your computer. The update should be located in the downloads folder as a zip file. Once open, the software update will provide prompts for you to follow to complete the update setup.
Step 4: Once the software update is installed, DaVinci Resolve will give you the option to upgrade the database. Click Upgrade and give time for the database to update.
Final Words
Congratulations! By simply checking for the update, and clicking download, you are now the proud owner of the newest DaVinci Resolve version for absolutely free!
Remember to back up your database as there is a chance of your project files being corrupted because of the update.
Hopefully, this guide has helped you get the newest version of Resolve. Leave a comment below and let me know if you have any questions.