
The short answer is:
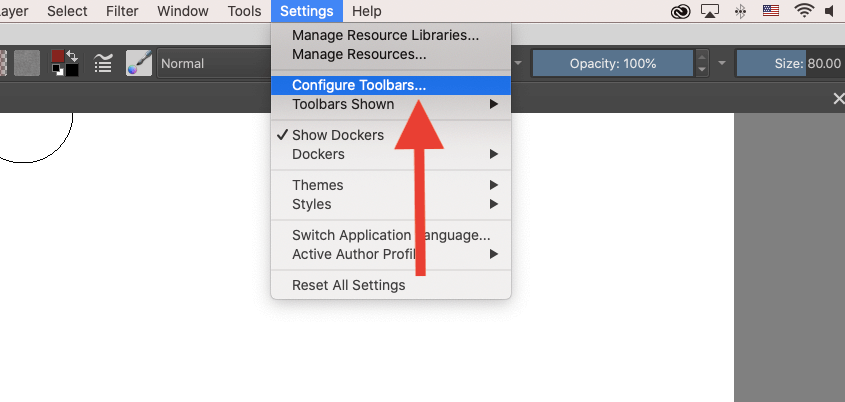
Click on “Settings” in the upper tab of your Krita program. Then select “Configure Toolbars”. In the pop-up window, scroll down to find the “Use Pen Pressure” option. Use the arrow to move it to the “Current Actions” box and then click on “Okay” to apply it.
I’m Carolyn and I’ve been using design apps like Krita to run my digital illustration business for three years. When I first started using Krita, I spent a lot of time getting to know my way around the app so I could make the most out of the full potential of this incredible application.
Because Krita is primarily a desktop application, it’s almost essential to connect a drawing tablet and stylus to your device if you plan on hand drawing any project. And the app doesn’t always automatically activate your pen pressure whether you’re using the mouse or a stylus.
In this article, I’m going to show you how to turn on the pen pressure in Krita and also how to adjust the pressure sensitivity.
Table of Contents
Key Takeaways
- The pen pressure feature of Krita needs to be manually activated.
- This function is essential if you plan on hand drawing anything in the app using your mouse pad or an external drawing tablet and stylus.
- If you still can’t view the Pen Pressure function on your workspace, you need to make sure to reconfigure your toolbar.
- Not all pen tablets and styluses are compatible with Krita so you need to check before investing in one.
How to Turn On Pen Pressure Sensitivity in Krita
This process involves a few steps but is relatively simple. Follow the step-by-step below to turn on your pen pressure in Krita:
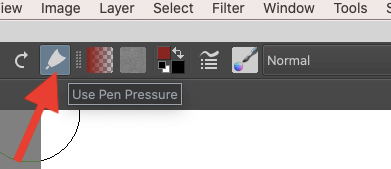
Step 1: In your Krita workspace, go to the top tab and click on Settings. In the drop-down menu, select the Configure Toolbars option.
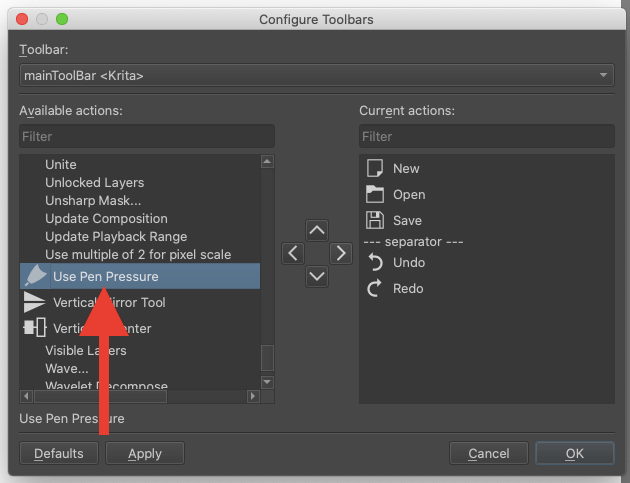
Step 2: In the Configure Toolbars window, scroll down until you find the Use Pen Pressure action in the list on the left-hand side of the window.
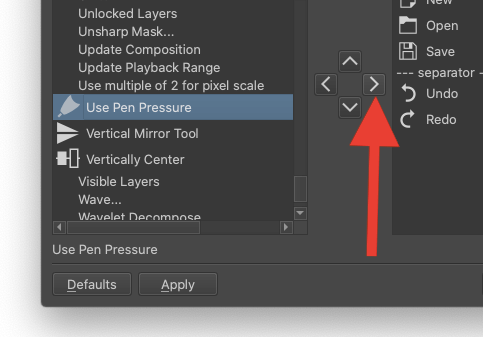
Once you have selected the Use Pen Pressure action and it is highlighted in blue, click on the right-hand arrow in the center of the window. This will move this action to the Current Actions box on the right-hand side.
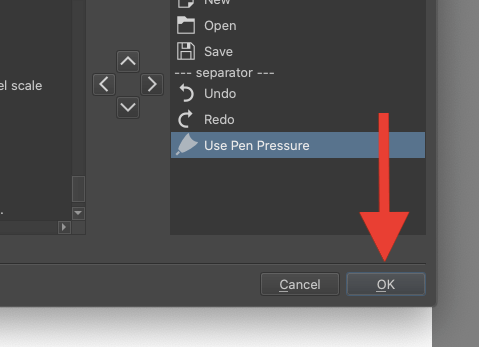
Once the Use Pen Pressure action is now in the right-hand box labeled Current Actions, you can click on Okay to confirm this change and close the toolbox window.
Pro Tip: Instead of scrolling in the Available Actions menu, you can search for the action you’re looking for in the search bar on top of the menu.
How to Make Pen Pressure Visible on Your Workspace in Krita
Once you have activated and turned on your Pen Pressure setting, it might not always be visible in your workspace tab automatically. Here’s how to show the Pen Pressure option in Krita.
In the top tab of your Krita workspace, click on the Settings option. In the drop-down menu, choose Toolbars Shown > File.
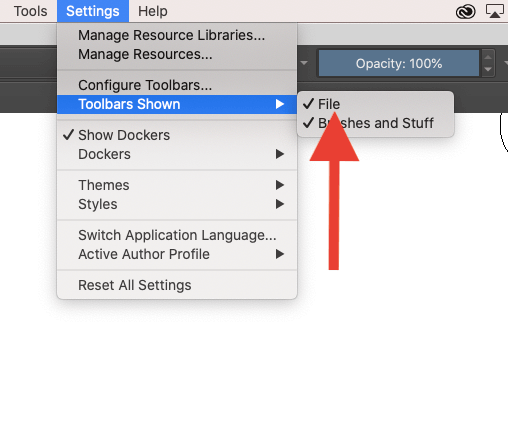
You will now see the Pen Pressure icon in the top left-hand corner of your workspace. This icon looks like the nib of a pen and will be highlighted in light blue when active. You can click on this icon to turn it off at any time.
How to Change the Pressure Sensitivity in Krita
Now that your Pen Pressure is active, you can manually adjust the sensitivity depending on your style type or specific drawing needs. If you are happy with the sensitivity already, you can leave this setting as it is. If you want to change it, here’s how:
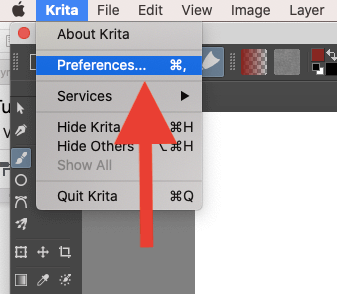
Step 1: In your Krita workspace, go to the top left toolbar and click on Krita. Scroll down and select the Preferences option.
Step 2: In the Configuration window, on the left-hand side menu, click Tablet settings.
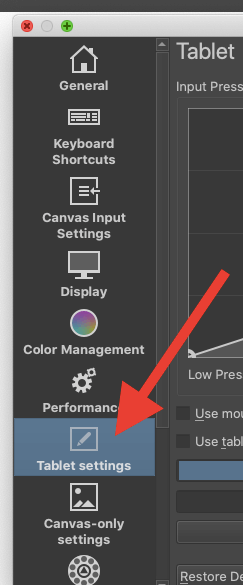
Step 3: In the Pressure Settings box, click on the middle note to adjust it to your desired pressure. To the left is low pressure and to the right is high pressure.
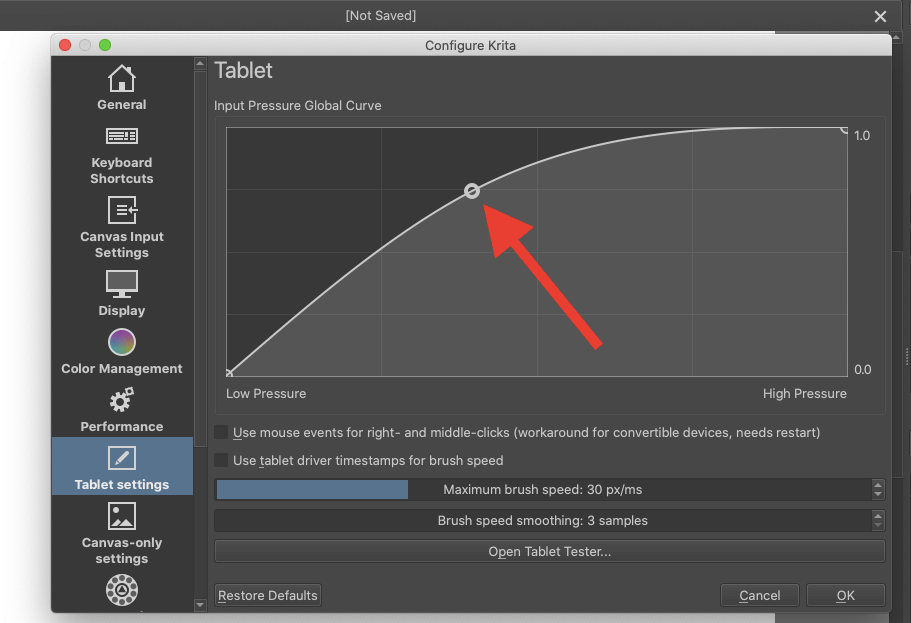
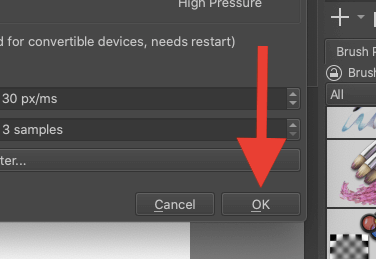
When you are happy with your adjustments, click on the OK button in the bottom right-hand corner of the window to confirm your changes and close the window.
Best Graphic Tablets for Krita
Below is a list of Krita-compatible pen tablets that you can purchase if you plan on using hand-drawn artwork on the app. I have selected a few of my favorite options and where to get them:
- Gaoman PD1560 Pen Tablet: This stylus and drawing pad combo is very pricey but works well with Krita and will give you some great results.
- Huion H610 Pro: This tablet and pen combo is at a more affordable price point and is supported by the Krita app.
- Wacom Intuos5: Another pricey option but Wacom is a very popular stylus brand that you can rely on.
Disclosure: The above links are affiliate links (if you purchase through our links, we earn an affiliate commission at no additional cost to you). As an Amazon Associate, we earn from qualifying purchases. See our disclaimer.
FAQs
Here are a couple more questions about turning on the pen pressure sensitivity in Krita.
What to do when Krita pen pressure is not working?
If pen pressure still isn’t working after turning it on using the method shown above, you should restart your app to ensure it updates your changes. Alternatively, it may be that your stylus is not compatible with the app.
How to turn off pressure sensitivity in Krita?
In the top left hand corner of your workspace where you see the pen icon highlighted in blue, click on this icon to turn off the pen pressure sensitivity in the app.
Conclusion
Most other design apps will generally have this setting defaulted to on. However, Krita is a much more advanced app that gives every minute bit of control over to its users so you need to know your way around the app to ensure it’s working best for you and your needs.
If you plan on creating hand drawings or illustrations in Krita, whether it’s on a mouse pad or a pen tablet, you should be aware of this process. Settings in the app may change with updates frequently so it’s good to be able to troubleshoot your own issues and fix them without wasting any time.
Do you adjust your pen pressure sensitivity in Krita? Leave your feedback in the comments section below.