
While Quicktime can be useful for recording your screen on Mac, it can often be confusing when it comes to ending your recording. Fortunately, there are 3 easy ways you can do it.
In my time as an Apple computer technician, I have been asked this question more times than I can remember. If you’re banging your head against the wall while trying to figure out how to end your Quicktime screen recording, don’t worry. We’re here to help!
Table of Contents
Key Takeaways
- Screen recording with Quicktime is easy, but ending your recording might be confusing.
- Click the stop button of QuickTime found on the menu bar of your Mac, and your recording will end.
- Alternatively, you can use the keyboard functions Command + Control + Esc.
- If you want a full-featured screen recording application to make things easier for you, Capto is a reliable 3rd-party app, packed with features.
Screen Recording with Quicktime on Mac
QuickTime is a versatile and user-friendly application that comes pre-installed on Macs. Besides being able to play video and audio files and edit them, QuickTime also offers a powerful screen recording feature that can be used for a variety of purposes beyond just creating tutorial videos.
But did you know that QuickTime’s screen recording feature can be used for more than just tutorials? It can also be used to record video calls, capture gameplay footage, create product demos, and even save live-streaming events.
With QuickTime’s intuitive tool bar, you can select exactly what you want to capture on your screen. Whether you want to record the entire screen, a specific section of it, or just a single window, QuickTime gives you the power to do so with ease.
To screen-record on your Mac, open Quicktime from your dock or applications folder.

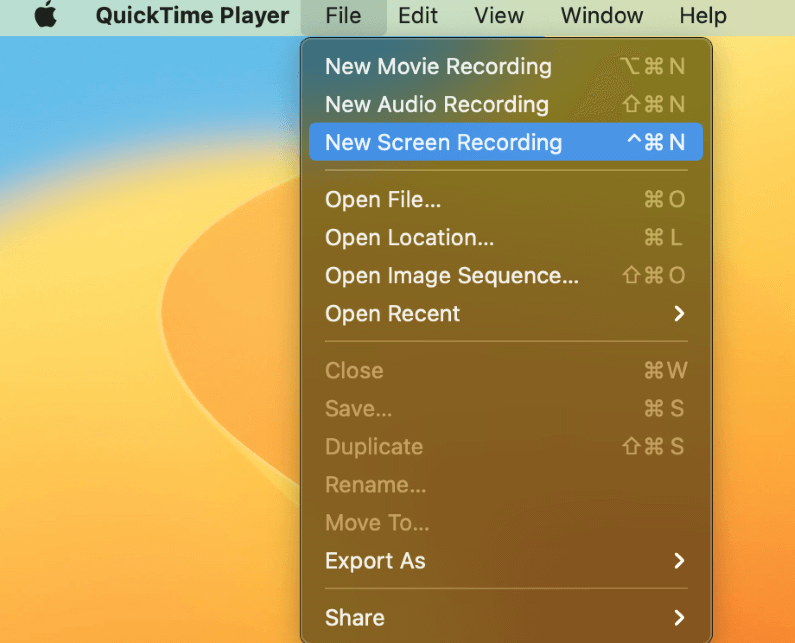
Next, select New Screen Recording from the File dropdown menu.
Once you’ve selected your desired area, simply hit the “Record” button located on the right side of the toolbar to start capturing your screen.
How to Stop Quicktime Screen Recording on Mac?
Now that you know how to screen record on a Mac, you can say it’s quite easy, right? However, ending it is a different story.
During the recording, the menu bar will be out of sight to prevent it from being seen in the video. You won’t be able to pull it back up on the screen by hovering where it was in the first place, nor will right-clicking QuickTime’s icon help.
Although it might seem quite a hassle that the toolbar does not pop up again, there is actually an easy way to stop the recording. You can do this by accessing your Mac’s menu bar located on the top portion screen.
Screen recording can be stopped by pressing the circular icon next to the Bluetooth and wifi icons. Tap that button quickly. Once you stop documenting your screen, the icon will disappear from the menu bar. Here’s the icon to give you an idea of what it looks like:

Clicking that stop button will automatically save your screen recording and place it in its default saving location. For example, if you set the location to the desktop, then you will find the video there, ready for you to watch or use.
In case you want to check out your video as soon as you end the recording, you can check the pop-up that appears at the bottom of the screen. It will look like this:

Click on it, and it will open in QuickTime for you to view.
Make sure to always click on the stop button on QuickTime after you’re done recording to avoid losing the video you worked hard on creating.
Using the Keyboard Shortcut to Stop Recording
The ease of access when using our devices is definitely a plus for any user. To do tasks more efficiently on your Mac, you probably used some keyboard shortcuts. It saves you more time as you can do certain actions without going through the process of clicking multiple things.
For example, copying a text on your Mac can be done by selecting the text, right-clicking on the highlighted text, and choosing “Copy” from there. The easier way to do this is by pressing the keys “Command” + “C” after selecting the text.
QuickTime will stop recording, save the video on your default saving location, then open the video on the QuickTime Player for viewing.

Do note that the keyboard shortcut to stop the QuickTime screen recording may not work if you have set up other shortcuts with similar keys on your Mac or if you have a game open that uses those keys as controls.
Screen Recording with a 3rd party App: Capto
While screen recording with Quicktime is simple enough, you can also choose from many 3rd-party apps. Many of these apps will have additional features to help you out. One of the most reliable screen recording apps in my experience is Capto.
This application offers an all-in-one suite of utilities for recording your screen. Whether you’re creating tutorials or a video series, or even recording a live stream, Capto is an excellent choice.
To get started, download and install the app. Upon launch, you will have to enable permissions to be able to record:
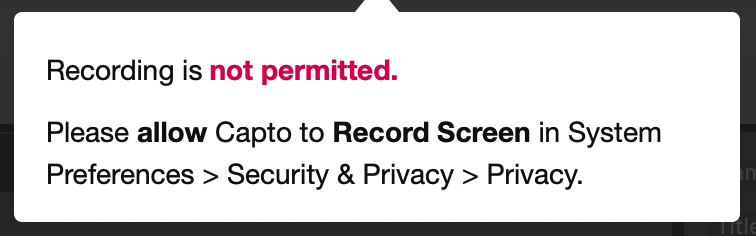
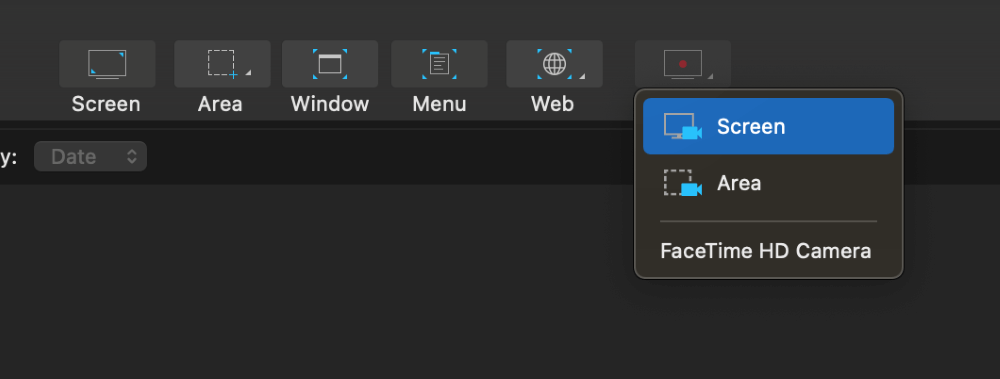
Once you allow Capto to record, you can start recording your screen. Locate the icons along the top of the window, and hit Screen.
It’s that simple! If you want a more powerful alternative to Quicktime, Capto is an excellent option.
Final Thoughts
Ending a screen recording on QuickTime is easy if you know how to do it. To give you a recap, the two ways to do that are by either clicking on the stop button in your Mac’s menu bar or using the keyboard shortcut Command + Control + Esc.
However, remember that these two methods will only work when you have already started screen recording with QuickTime. If you want a more feature-filled app, Capto makes a great choice for screen recording on your Mac.